The main criteria for choosing a hand tool are considered to be quality and convenience. How well it fits in your hand largely determines the flawlessness of the work done with its help. These requirements are most relevant for an axe, in which high labor productivity and safety depend on the material of the ax and its correct attachment.
Considering that the dynamic load on an ax is quite high, and working with it is associated with an increased risk of injury, especially with inept handling or lack of experience, you need to know how to make an ax handle correctly and be able to mount it.
Take care of your fingers
Oh, I almost forgot: the shovel also needs to be sharpened. It’s best to do this with a large flat file (on a machine, of course, it’s also possible, but it’s very inconvenient, and we’re practical summer residents, aren’t we?). So, rest the shovel on the edge of the table, as shown in fig. 3, place your foot on the handle and press it, then take the file in your hands - and go ahead, sharpen it to the desired sharpness. And rest assured: you will find this work a pleasure (especially since it will not take much time).
Well, that's it, I got excited. It’s not for nothing that I said that sharpening is an interesting topic. Once I picked it up, how can I not talk about knives? The main thing here is to understand what parts the blade consists of (Fig. 4). And it itself is the same back as an axe, which ensures the rigidity of the knife. Its cheeks determine the shape, and the chamfers on both sides form the cutting edge. To sharpen a knife, you also need an emery machine, which also needs to be prepared, and about this, see above. So, everything is put in order. It's time to get down to business.
Take the knife in your hands and see what condition it is in: curved - straighten it, with jagged edges - grind the cutting edge until a straight line is formed. If you look at the cutting edge from above, you can see a light stripe. This strip is dull and needs to be ground off.
To do this, take the knife in your right hand, the emery is turned on, and bring it as shown in Fig. 5 (item 1), and with a uniform movement from the handle to the spout, grind off the blunt edge. Turn it over (item 2 in Fig. 5) and sharpen the other edge with the same movement. Look at the knife blade from above: if there is no light stripe, then the knife is sharpened. All that remains is to remove the burr with a fine emery block.
Never check the quality of sharpening by running your finger along the blade! In order to check whether the knife is sharp, you need to take a sheet of paper (or newspaper) in your left hand and try to cut its edge. A sharp knife will do this without difficulty.
Further more
So, what other cutting tools do we have on the farm? A! Scissors! Sharpening them is both simple and difficult at the same time. Before you start sharpening, you need to determine the reason why they do not cut. There can be many of them.
Well, for example, scissors have too large a gap between the blades or, conversely, too small (as a result of which they “cut” each other, and the material being cut pushes them apart). What can you do here? Sometimes this can be eliminated by straightening and changing the degree of tightening (or, conversely, loosening) of the tightening screw. This is the easiest problem and will take a few minutes to fix. But with dull metal... On the dull blades of scissors, if you look from above, you can still see the same light stripe along the cutting edge. This is what needs to be ground off.
Never touch the inside of the blades with sandpaper because they are sharpened in production and have a specific clearance angle that ensures a free cut.
Only the upper part is ground until the light edge disappears. It is clearly visible when working. The sequence of actions is as follows. Open the scissors completely, bring them to the rotating circle from the side (Fig. 6) at an angle of 10-15°, lightly pressing with a smooth movement from the center of the scissors to the end of the blade, sharpen. You should get a smooth edge. Once you've sharpened one blade, move on to the second.
After sharpening, remove any burrs from the rear edges of the chamfer that formed during sharpening, otherwise they will greatly interfere with your work. If after sharpening the ends of the scissors do not meet, you need to grind off the growths on the rings so much that the ends of the scissors meet (Fig. 7). Now, having a little experience, we can talk about sharpening pruners.
And it is almost the most important tool in the garden. Before sharpening, it must first be disassembled (Fig. 8). There is no need to be afraid of this procedure - everything is very simple (Fig. 9). It is almost impossible to break anything there (however, if, as they say, there is a desire...).
We sharpen only one side of the pruning shears. If the cutting edge has jagged edges, cut them off so that the edge is smooth. Then we start sharpening. We apply the blade to the top point of the rotating sandpaper at a greater angle than when sharpening a knife, and sharpen from the center to the end of the blade in a smooth motion with rotation. There should be an even chamfer. Let's see if there is a light stripe.
If it is there, repeat the movement until it disappears completely. Tuck the burr into the inside of the blade. Assemble the pruning shears and adjust the free play. The spring should move the pruning shears freely. There shouldn't be much play. That, in fact, is all the wisdom. But you definitely need to master it. I wish all summer residents fruitful work!
how to properly place a cleaver on an ax handle.
| Handle for cleaver. How to place a cleaver on an ax handle. Village everyday life. |
| Click to view | The handle of my cleaver broke, I bought a new handle for the cleaver and decided to put the cleaver on the ax handle. Tree... |
| Tags: |
| Strengthening the cleaver's ax in 5 minutes! Fast and efficient |
| Click to view | Strengthening the ax of a cleaver in 5 minutes using improvised means. Several plastic bottles, pressed under... |
| Tags: |
| New cleaver and its modification. Firewood and a chainsaw, a vlog from the garage. |
| Click to view | Why didn’t I buy a normal cleaver before? Just a wonderful thing. We need to replace the chimney and we’ll get to work... |
| Tags: |
| I'm making a handle for a cleaver. |
| Click to view | I make a handle for a cleaver at home. |
| Tags: |
| how to properly attach an ax...it doesn’t fly off |
| Click to view | MEISEL, LIKE A CUT-OFF, places the ax on the correct side and wedges it into... |
| Tags: |
| Handle for cleaver with horseshoe |
| Click to view | Wooden handle for the cleaver, covered with tin. |
| Tags: |
| THE BEST WAY TO ATTACH AN AX. DEADLY! |
| Click to view | #best for mounting #axe with your own hands #with your own hands #axe In this video I will show you how to plant... |
| Tags: |
| How to properly plant a sledgehammer |
| Click to view | DO NOT JUDGE STRICTLY AND YOU WILL NOT BE JUDGED I am in contact. |
| Tags: |
| Attaching an ax is the old-fashioned method. |
| Click to view | Attaching an ax with a cleaver and a sledgehammer is the old-fashioned method. ========= ====== ============= ======= ===== … |
| Tags: |
| I FINALLY MADE MYSELF A HANDLE FOR THE CLEAVE |
| Click to view | Making Handles for a Cleaver with Your Own Hands. |
| Tags: |
| The ax WILL NOT FLY OFF anymore! RELIABLE and SIMPLE method of attachment! |
| Click to view | How To Replace An Ax Handle The best way to fit and wedge an ax on the ax handle “tightly”. |
| Tags: |
| Attaching axes to an ax handle on a cross (my experience) |
| Click to view | Attachment of axes to the ax handle on a cross - 3 wedges. You can plant on 5 wedges, if the ax is thick... |
| Tags: |
| Axe-handle. Warranty for drying for 10 years. Kharkiv. |
| Click to view | . |
| Tags: |
| Attaching an ax to an ax handle |
| Click to view | Video - Carpenter's tutorial Author Valery Samovich. An easy and high-quality method of attaching... |
| Tags: |
| The most correct Wood Chopping |
| Click to view | How to properly chop wood. We split firewood with an ax – a cleaver Fit. |
| Tags: |
| How to plant an axe. Soviet heavy ax and reinforced ax handle | Made in SSSR Ax |
| Click to view | The cutting edge is rounded to increase penetrating power. Heel on the butt and protective pad... |
| Tags: |
| How to firmly place an ax, sledgehammer or hammer on a wooden handle |
| Click to view | A simple and very fast way to attach an ax, sledgehammer or hammer to a wooden handle |
| Tags: |
| Cleaver ax. Not childishly confused. |
| Click to view | video from the second channel with my comments, this copy is not ... |
| Tags: |
| Making an ax handle Blanks Sampling a mold |
| Click to view | Ax handle: from felling a tree to cutting out the shape and mounting it. |
| Tags: |
| how to make a hammer that doesn't fall off |
| Click to view | eternal hammer. |
| Tags: |
| How to sharpen an ax? it's very simple!… |
| Click to view | In this video, I provide recommendations on how axes and knives are sharpened...namely, what principle... |
| Tags: |
| Cleaver ax for all times |
| Click to view | VKontakte group – Advertising and cooperation – . |
| Tags: |
| alteration of the cleaver |
| Click to view | Winter is in full swing and many people have worn out the axes on their splitting axes. In this review, Nikolay will tell you how to plant... |
| Tags: |
| How to plant a cleaver. |
| Click to view | In this video I repair a cleaver, weld the butt of the cleaver, make an ax handle, and scrape it. |
| Tags: |
| Repairing the cleaver, and MANUFACTURING HANDLES FOR IT |
| Click to view | The handle of the cleaver broke, I needed a new ax handle, I decided to make an ax handle and a handle for the cleaver with my own hands... |
| Tags: |
| DIY cleaver handle. How to make an ax handle. Life in the village. |
| Click to view | In this video I will show the internal structure of the Matrix 2700 splitter. I will also show a small modernization that... |
| Tags: |
| Matrix 2700 cleaver – what’s inside + modernization |
| Click to view | The ax handle of a cleaver most often breaks off due to a blow to a block. How to avoid chipping? |
| Tags: |
| Mount for the handle of a cleaver |
| Click to view | My method of repairing and maintaining axes is accessible to absolutely everyone. |
| Tags: |
| Protecting the ax handle near the cleaver |
| Click to view | Description missing |
| Tags: |
| JUST “I CAN’T STILL”)) A simple “adaptation” to the cleaver |
Start. Preparatory stage
Before starting work you must:
- Buy an ax handle. According to experienced carpenters, dried birch is ideal as a material for its manufacture. This tree is very popular because it has all the necessary properties. When choosing a handle, you need to consider the thickness of the product and its shape.
- It is recommended to check the ax handle for a comfortable grip. Ignoring this aspect will lead to the need to perform unnatural compensating power movements during chopping, and this, in turn, is fraught with rapid fatigue.
- Fit the acquired ax handle to the eye of the ax. The work consists of using a knife or other woodworking tool to trim the handle to the desired shape (straight or conical). Conical lugs are considered the best as they provide a very secure fit.
- Make a cut at the top of the handle. This work is performed at the end. A cut is a longitudinal groove that is made using a hacksaw for wood. You can make one (along the end) or several cuts (three lateral and one longitudinal). It depends on how the craftsman decides to mount the axe. According to professionals, the most effective is a longitudinal cut with four lateral cuts. An important nuance at this stage is the width and depth of the cut. The resulting groove must be hidden in the eye, otherwise, when wedging or using the ax, its handle may split. The width should correspond to the thickness of the wedges. But at the same time, they should not fit into the cuts either too easily (the sawing procedure loses its meaning) or too tightly, since this may lead to the splitting of the axe.
- Before placing the ax on the ax handle, you need to align the axis of the blade and the axis of the handle in one plane.
Read also: Connecting a double switch for two light bulbs photo
Placing an ax on an ax handle
At first, such a procedure seems simple. This false impression is formed due to the simple connection of elements - mounting and wedging. However, the procedure is quite labor-intensive and has a number of subtleties that in no case should be ignored. To make this job easier, a professional and experienced carpenter always follows strict step-by-step instructions.
Preparatory work with the tool
First of all, you need to get an ax handle. You can buy it at any specialized store or make it yourself. The ideal material is pre-dried birch. Carpenters with extensive experience prefer wood of this particular species. It has the necessary set of properties and that is why it is so popular
When choosing a handle, it is recommended to pay attention to its density and shape. An important criterion is grip comfort.
If you do not take this point into account at the initial stage, your hands will experience discomfort while working with an ax, which will quickly lead to severe fatigue.
Next, you will need to purchase a handle of suitable dimensions that will fit tightly into the metal hole. Using a woodworking device or a sharp knife, it is necessary to trim the handle so that it acquires the required shape (straight or ellipsoidal). The ellipsoidal hole in the ax is considered more reliable due to its fastening. Small cuts are then made on the top surface of the handle. Visually they resemble longitudinal grooves.
The most important nuance at this stage is the depth of the grooves. The cut grooves should be hidden in the hole of the axe. Otherwise, during the wedging process or during use, the handle may simply crack. It is necessary to strive to ensure that the width and thickness of the wedges are the same.
Creating wedges
The reliability of fasteners is largely due to high-quality wedging. The use of wedges made of metal and wood will help with this. As in the case of an axe, wedges can be purchased in a specialized department of the store or made at home. An important condition is compliance with the shape and size between the wedges and the material used in the manufacture of the axe. The best wooden wedge, according to professional carpenters, is made from dried birch, and the best metal wedge is made from hard tin, the so-called shovel.
Hammering
Perhaps the main difficulty faced by everyone who decides to mount an ax on a handle themselves is driving in steel or wooden wedges. In fact, this process is not as complicated as it might seem at first glance. This stage can only be started after the handle and wedges have been completely prepared. To begin with, the longitudinal wedges are hammered in using light blows with a hammer. It is not worth making strong blows due to the fact that the wood may be deformed. And this can subsequently lead to instability of further fastenings.
Once the wedges fit snugly into the grooves, use a hacksaw blade to carefully cut off the remainder. You can verify the successful completion of the work by the strength of the grip of the ax and the handle.
Wedging
There is an opinion that a wooden wedge must be made from the same type of wood as the handle. However, this is a misconception. The main condition when choosing a material is its strength. In turn, the direction of the wood fiber should also be taken into account, since it is recommended to maintain parallelism in the narrowing of the wedges. This will protect the weapon from possible damage.
Successful wedging can be considered complete filling of the groove space with wedges, and removing the ax from the ax handle is considered impossible.
Sometimes it is still not possible to avoid gaps in the ax hole. Then an ordinary piece of gauze, which has been previously treated with epoxy resin, will come to the rescue. This composition allows you to provide wood with protection from moisture and impart reinforcing properties. To remove any gaps that have arisen before mounting the ax, its upper part is wrapped several times with treated gauze. Thanks to epoxy resin, any gap, crack or gap is filled, forming a reliable and strong attachment of the ax to the handle.
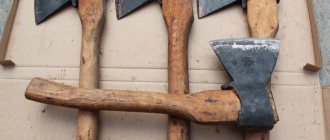
Types of axes
There are several types of axes, and each has its own purpose. Professionals distinguish this tool by the width of the butt, which can be wide, medium and narrow. At the same time, some use it for universal work, others for cutting wood, and some varieties are used for neat carpentry work.
Main types of axes:
- cleavers;
- for felling forests;
- construction;
- tourist.
Within each of these groups, there are various tool options designed for narrow-profile or other special work.
A striking example of this is a fire axe. Its design is no different from others, but opposite the blade it has a pointed pickaxe. With its help, you can hook heavy objects, secure yourself on the roof, or break door locks.
Handle differences
An ax handle is the name given to an ax handle. There are many varieties of them, made from different materials. Plastic and metal items are not in widespread demand, and their practicality can be confidently questioned. The most common wooden components of the tool are capable of dampening inertial vibrations during operation.
Classification of axes by handle:
- Lumberjack When using this tool, you need to hold it with both hands. Although this ax can be used quite successfully to chop wood, its main purpose is to cut down trees.
- Woodcutter. The ax is widely used in household farming. It is suitable for some types of carpentry, chopping wood and cutting small trees and branches.
- A carpenter . It is used primarily for processing logs and various wood products. They can be used to chop wood and cut down small bushes. The handle allows you to comfortably use the tool with one or two hands.
- Central Russian This ax is designed to be grasped with both hands, usually equipped with a powerful, sharp blade, and is used for butchering animal carcasses. It is noteworthy that the second name of this instrument is the taiga ax. On long-distance expeditions, it is very convenient to cut clearings with its help.
- Ermak . It is of medium size, and the small handle, held with one hand, implies a stronger load when working with the tool. It is convenient to carry with you. It is used primarily for household needs and chopping wood.
- Sturdy. The small size allows you to take it with you on hiking trips. With its help, you can build a hut, trim small tree trunks, chop firewood, or cut up a hunting trophy.
How sharpening an ax depends on its type
Surely, many of you have come across different types of axes. Most often this is:
- A tool called a carpenter's or all-purpose tool. Its blade can be either straight or rounded. Since this ax can be used by home craftsmen, carpenters, and joiners, its sharpening must correspond to the specific type of work being performed.
- A carpenter's ax most often has a straight blade and very precise sharpening, often done by measuring angles.
- A cleaver is a type of ax with a blade whose profile is wedge-shaped. This shape of the cleaver blade is explained by the purpose of the tool - to pierce the wood structure and then tear it apart.
But the cleaver is most often not called an axe, but rather a cleaver. And this is explained by the difference in purpose of these two instruments.
Having made this short excursion, I can now move on to the main thing - to the story of how an ordinary, universal ax is sharpened. That is, a tool sharpened without any special wisdom, without measuring any angles that are often mentioned.
Sharpening an ax for an ordinary home craftsman
In order to talk about the procedure for sharpening, an old hatchet was taken, well-worn, sharpened many times and clumsily. Why inept? Because if you look at the blade in profile, you will notice that its shape is wedge-shaped. That is, the kind that a cleaver usually possesses, not an axe. And the ax, as we indicated above, should cut wood, and not tear it.
Old masters sharpen axes by eye and without any measurements. They say that you only need to feel the ax blade thoroughly. Along its cutting part there should be no difference, angle, or noticeable transition from the thick to the thin part. Only under this condition will the ax cut the tree and not tear it.
On our axe, this angle is easily visible and noticeable to the touch. Therefore, sharpening the ax should begin with the removal of this corner.
Having carefully processed one of the sides of the ax, you can easily notice the difference between the old profile and the newly added profile. That is, exactly the profile that a real working ax should have.
If you turn the ax flat, you can see how the protruding corner was removed.
The second side is processed in the same way, where the protruding corner is also removed. When the ax blade is in the proper form, expressed in its smooth thinning towards the cutting part, you can proceed to sharpening the tool.
Sharpening, as well as profile correction, is better and faster done on an abrasive wheel.
As a result, the working edge of the tool takes on this form:
The final finishing is best done using a block.
To check how well the ax was sharpened, you can try chopping some unnecessary wood. In our case, an attempt was made to sharpen a wooden block. As it turned out, the ax cut wood perfectly and was completely suitable for work.
Ax care: practical recommendations
Four common forms of blade sharpening.
For a long service life of an ax, you need to ensure it is properly stored and maintained.
- Protect the tool from water. Like any other tool, it is afraid of water. That is, you need to store the ax in a dry, not necessarily warm, room.
- Sharpening. The force of impact applied to the ax and the quality of the work done depend on proper sharpening. Accordingly, you should sharpen well and try not to drive the blade onto stones. Also, do not stick it into the ground.
- Case. For careful carrying and protection from dullness, you should make your own or buy a leather case.
Rules for using an ax
There are few such rules, but they emerged from the practical use of the tool:
- The ax is used for its intended purpose. They cut branches, make wood chips, and work on wood. If you use it to chop metal or other hard material, the ax will quickly become dull and the edge of the blade will be damaged.
- You cannot use an ax with an old ax handle. It may break off upon impact and cause injury.
- The ax needs to be sharpened periodically.
- You should not use an ax with a dangling head. During operation, it can come off and injure a person standing nearby.
- If the ax handle has dried out but is still strong, soak it in water for at least 10-15 minutes before use. The swollen wood will hold the head well.
- For long-term storage, the head of the ax is greased with oil, it is removed from the sun, it is better to put it in a case.
How to choose an ax or what is the right ax handle.
The most ancient assistant
In Rus' they said, throw a guy on any island where there are no people or buildings with one handmade ax and in six months he will build a village there. It was a truly universal tool, necessary in any household: chop wood, build a hut, cut down a tree. But it is worth remembering that real large axes were used for all these acts.
Nowadays there is a fashion for axes-knives, but this is just a good PR move. Such a universal product, in fact, is neither an ax nor a knife; you can’t chop wood with it, you can’t open canned food. So the thing is beautiful and modern, but in an extreme situation it is useless.
Rules for choosing an ax or “how to choose an ax?”
If you are purchasing a handmade ax for a camping trip, it is worth deciding on the size of your group before thinking about the axe. One or two people can get by with a small hatchet, but for a large group and firewood you will need more. And two hatchets are worse at providing a group with firewood than one large one.
The ax blade must be forged, otherwise it will bend at the first blow. To check it, you can use a file; if there are marks on the flat part of the blade, what will happen when chopping?
It is better to choose a wooden handle and a lighter balance is better. Although you can have a metal handle in your car, you can use it when you need a lever.
Then everything depends on the goals. Those who prepare a shelter need to choose a classic product with a wooden handle. If the ax handle becomes unusable, you can always make a new one.
For camping conditions, you can choose axes with hollow handles; there is no need to carry extra weight on yourself if you can leave it at home. Sometimes it is difficult to choose a good ax handle; in such cases, you can purchase a separate head and make the ax handle yourself. The hole for the ax handle should be narrowed at the bottom; this is a kind of stop valve for the ax head.
How not to ruin an ax when sharpening
Sharpening a handmade ax is different from sharpening a knife, and it is not surprising that these objects have different purposes. To properly sharpen chopping objects, sharpening at three angles is used. An acute angle is made from the hole, then it is replaced by a medium one, and the edge is sharpened at an obtuse angle.
Correct ax handle
Even the best ax without an ax handle cannot be a full-fledged tool. When choosing a tree for an ax handle, you should take into account its lightness, hardness, elasticity and affordability. The best option for the correct ax in our country is birch; foreign manufacturers prefer beech, which is more common in their countries. It's a little heavy though.
Proper operation guarantees long service life
In order for an ax to serve for a long time, it must be taken care of; you cannot hit it on the butt with heavy objects: mallets, stones, or other axes. If the wedge falls out, you need to install a new one; this is a one-time use item.
A loose ax can be adjusted a little by placing it in water. The soaked wood will become thicker, and the ax will sit firmly again for some time. But this trick can be used a couple of times.
What should you never do if you have an ax in your hand?
You cannot direct the movement towards the chopper, and it is absolutely dangerous to hold the log with your hand. Before swinging a handmade axe, you should look around and behind your back. A wide scope can result in comedy, but it won’t be funny. And under no circumstances should you leave the ax lying on the grass.
Also check out our other articles and find out what the future of the Universe will be like in a few years.
Author: Katerina3007 4-06-2014
Category: News » People and Medicine » Things
Rating:
- 100
| The difficulties of flying to Mars |
| Read 3-06-2014 |
| Secrets of the Moon |
| Read 3-06-2014 |
| What awaits us in the future |
| Read 3-06-2014 |
Comments
How to do it?
And like this. Take in your hands a piece of an old emery wheel (preferably stronger in structure than the one you will “bring to life”), place it on the stand, and turn on the machine. The work ahead will be dusty, so be sure to wear goggles and a gauze bandage.
So, the device is turned on - carefully touch the rotating circle with the cutter. Touched
The emery began to wear off, sanding dust flew away - now, with a careful movement, move the cutter along the plane of the circle.
Make sure that the end is smooth and without runout. We achieved it. Turn off the machine, take off the bandage, glasses, shake off the sanding dust, rest, take a deep breath. You have done a great job. Now the fun is ahead.
Types of axes
Humanity has been using axes of various shapes and sizes for several tens of thousands of years. Today, store shelves are filled with hundreds of types of beautiful axes for repairs, industrial wood harvesting, and participation in medieval reconstructions.
If desired, you can chop wood and cut down trees with any ax. But only a specialized tool will help you complete the task quickly, using a minimum amount of energy. Before starting work, determine the type of ax you have.
Felling ax
A huge felling ax is the first item that comes to mind when thinking about lumberjacks. The length of its ax reaches 1 meter. The massive butt and wide blade increase the impact force. This tool will be useful for owners who prepare firewood with their own hands.
Cleaver
The cleaver is a classic ax for chopping wood. Without it, this activity turns into a long, exhausting routine. The heavy blade with a dull sharpening is ideal for cutting firewood for future use.
Army hatchet
An army hatchet is a small, versatile, easy to transport and maintain, a tool that is familiar to any military personnel. It can be used both for preparing branches for lighting a fire, and as a hammer for driving in pegs or bladed weapons during battle.
Carpenter's ax
A carpenter's ax is a universal tool for working with wood. Its lightness and sharpness make it an indispensable assistant in the countryside and garden. The weight of such an ax can vary from 0.8 to 1.2 kg, depending on the materials and dimensions. It should fit easily in the hand. The notch (notch above the blade) serves to lighten the blade and improve its cutting properties. Our step-by-step guide will show you how to make this type of ax at home.
Sharpening and hardening of an ax
Like any other tool, an ax needs periodic care and maintenance. Over time, when performing everyday work, the blade becomes dull and productivity decreases. In this case, it should be sharpened.
To perform this procedure efficiently, you need to know how to sharpen an ax correctly. The general principle is practically no different from sharpening ordinary knives using a sharpening machine, but you must adhere to the rule of forming a burr.
To avoid sharpening too often , the steel must be as strong as possible, and for this it must be hardened. At home, the procedure is performed using a gas burner and used motor oil. The blade is heated to red and immersed in processing, then completely cooled in water. The procedure is repeated several times.
Making an ax
You can make a high-quality ax handle with your own hands in different ways, and the choice of method will greatly depend on the skills of the master, available tools and material. Of course, the size of future axes will matter - the shorter the handle, the easier it is to cut it yourself from a solid block of wood.
Manufacturing methods
There are only 2 ways to make your own ax handle:
- Mechanical. This option is suitable for those who have a circular saw and grinding equipment at home.
- With your own hands using a plane or an ax.
Required Tools
To make your own ax handle, you need to have:
- hacksaw;
- axe;
- pencil or marker;
- hammer;
- rasp;
- sandpaper.
Some very experienced carpenters make a tool with just an axe!
Step by step process
An ax handle for an ax is made with your own hands according to the following algorithm:
A template of the future instrument is drawn directly on wood or on a sheet of paper. The design for the ax is chosen by the master himself.
Decorating and soaking the ax
At the very end, the product can be decorated with some kind of burnt symbols or bright ornaments. Some craftsmen decorate the handles with signature carvings. These actions are dictated by the personal preferences of the carpenters and are not mandatory. Since any wood is susceptible to dampness, mold and rot, it requires additional finishing treatment. Most often, these problems arise due to improper storage and operation of the tool. These processes can be prevented if immediately after production they are impregnated with linseed oil or drying oil. It is not recommended to use chemical paints or varnish, as they will interfere with the shock absorption force during intensive use of the ax. And the aggressive composition of the enamels will gradually corrode the wood. What to impregnate an ax handle with is a strictly individual choice, and here the master is guided by his experience.
Handle with your own hands
It is not always possible to use a factory-made ax handle. In this case, you can make an ax handle with your own hands according to the drawings. In this case, you need to start by choosing the type of wood. Birch is considered the best option for such a tool, but maple or ash can be used.
When making a handle, you need to immediately adjust it to the dimensions of the butt of the existing blade. The main criterion should be the ease of working with the future tool. Therefore, special attention should be focused on compliance with the dimensions indicated in the drawings.
On a block of suitable dimensions that does not have knots or cracks, a sketch of the handle is made. Then the excess parts are sawed off and cut off with a knife. The place for planting under the butt must be trimmed and the entire product sanded to perfect condition.
Originally posted 2018-03-28 15:13:22.
How to place an ax on an ax handle
The wooden ax handle, as the weakest part of the tool, always wears out faster than a metal ax. It begins to dangle, and this is not just an inconvenience in work, but also a danger. We'll tell you how to correctly change the ax handle and place an ax on it.
Most often, birch is used to make an ax handle, as the tree is quite hard, but at the same time affordable and easy to process. Beech and ash are also used. The workpiece should be brought to the size you need so that the ax fits comfortably in your hand.
Important! The wood for the ax must be well dried. If the workpiece is done manually in winter, then be sure to keep it warm for two to three days before attaching it.
Of course, most often you buy ready-made axes. The price can range from 20–80 rubles for the simplest polished blanks to 3,500 rubles for an ax with handmade carvings. Of course, simple but high-quality axes are suitable for preparing firewood and self-harvesting, in which case there is no need to pay for expensive options.
To attach the ax to the ax handle, you will need the blanks themselves, five wedges, a hacksaw for wood (some craftsmen use a hacksaw for metal to keep the width of the grooves for the wedges to a minimum), a marking pencil, a rubber or wooden mallet (mallet), a piece of gauze and epoxy resin .
Important! The wedges need to be made of harder wood than the ax handle. You can take larch, oak, beech (if the ax is made of birch)
One wedge will be wide, four will be narrow. To process them and adjust the ax handle to the ax, you will also need a grinder.
At the first stage, the contour of the ax head is outlined on the ax handle, and the lines for the cuts of the grooves are highlighted.
Important! The ax should fit as tightly as possible on the ax handle; it must protrude from the eye by at least one centimeter. The protruding piece of the ax after the blade will be larger in diameter, this will allow you to firmly fix the metal part of the tool and avoid the risk of it coming off during work.
The protruding piece of the ax after the blade will be larger in diameter, this will allow you to firmly fix the metal part of the tool and avoid the risk of it coming off during work.
Experts advise that before attaching the attachment, the eye of the ax should be slightly bored to a cone on the side of the ax handle. A file is used for this. This ensures that after wedging, the ax will definitely not slip.
The cuts in the ax handle should be 2/3 of the depth of the eye. Do not forget that one centimeter protruding above the eye should be added to this indicator. The cuts are made carefully with a hacksaw according to the applied markings. The direction of the fibers of the wedges is parallel to the narrowing, so that they do not break upon impact.
Before attaching the blade to the ax handle, you should apply two to four layers of gauze soaked in epoxy resin, which will perfectly fill all the unevenness. Protruding, excess pieces of gauze are cut off. The wedges are also lubricated with epoxy before being inserted into the cut grooves. It is advisable to pour the resin into the grooves themselves, about a quarter full. This is done after the ax is attached.
You can hammer in the wedges with a rubber or wooden hammer, and saw off the protruding parts. The main danger at this stage is to split the ax handle by driving the wedges too hard.
Epoxy resin has many useful properties. Firstly, it acts as a reliable glue. Secondly, it is resistant to water and therefore does not allow the ax handle to get wet. Thirdly, epoxy does not shrink, and after drying it forms a strong monolith that secures the ax to the ax handle.
Epoxy resin hardens in a warm place within a day, but it is safer to wait a week before using an ax.
We admit that putting an ax on an ax handle is somewhat more difficult than sharpening it. There are other methods besides what we have described, for example, with three wedges, with a cross. As for the basic requirements for the workpieces and the tool itself, follow GOST 1400–91 “Hatchets for construction axes.”
https://youtube.com/watch?v=-iIORmEEV-s
Preparatory stage
Before attaching the ax handle to the axe, its handle should be treated. It is made from a rough wooden block, mainly from birch. Due to the fact that the metal working parts come in different sizes, shafts are sold a little larger than they should be. This was done to ensure that the ax handle did not dangle and that it fit tightly into the ax. You will have to reduce the diameter of the shaft yourself. The handle is trimmed with a knife or other woodworking tool. Next, using a pencil, mark the contours of the eyes, as well as the places where the wedges will be located. Eyelets can be straight or conical.
Read also: Checking the washing machine motor
Then you need to measure the height of the shaft and mark on it the place to which the ax will be lowered. Afterwards, measure the depth of the cutouts on the handle into which the wedges will be inserted in the future. To make the shrinkage more reliable, these recesses must be smaller than the wedges themselves. Make cuts using a hacksaw for metal. After marking and cutting, the shaft itself is finished. At this stage, craftsmen use sandpaper. It doesn’t matter what grain size it will be. The fact is that rough work will be done with this tool, and then the section of wood will be covered with an ax. Due to this fact, the surface may remain rough. The main thing is not to remove too much.
Useful tips and tricks
Please note that the ax handle should be made so that its cross-section has a characteristic oval shape. Only by observing this condition will you be able to successfully hold it without straining your hand too much. In this case, blows with an ax will be more accurate and easier. It is recommended to make wood blanks for creating an ax handle in late autumn. It is during this period that the movement of sap is reduced to a minimum (almost stops), which means that the tree becomes, as it were, dehydrated.
Many inexperienced craftsmen neglect drying wood to build an axe. As a result, this ends up with the handle changing in size, and the metal part with the butt on it holds very poorly. It is permissible to use undried material only in special situations, when the handle needs to be built urgently, and this spare part is made as a temporary one.
When making a brand new ax handle yourself, you need to draw up a detailed drawing/template of the future tool. If you have a very convenient old ax in your arsenal, then you can remove all parameters from it. This will make it much easier and more convenient. Do not rush to turn the cutting edge of the tool. First you need to make sure the metal is sufficiently hard. If it turns out to be too soft, then it will need to be additionally hardened under the influence of high temperatures.
It is very important to use a ready-made ax (both homemade and store-bought) correctly. Experienced craftsmen strongly do not recommend trying to cut various metal parts with such a device.
Even if you plan to cut wood, it is better to make sure that there are no solid particles inside that could harm the tool.
It is strongly recommended not to throw the finished tool onto hard surfaces, especially from a great height. It is not recommended to leave the ax in the open air. Precipitation or aggressive sunlight can negatively affect the quality of the wooden part. Keep this tool in a dark and dry place. Only under this condition will the ax serve you for many years.
If the ax handle fits into the eye too easily, this may indicate that during the work the master made a serious mistake somewhere (most likely in the calculations). An incorrectly prepared template often leads to this problem. In such a situation, even one more installed wedge will not change anything
This is why it is so important to take your time to do all the calculations and make the template correctly
Do not forget to process the wooden ax handle at the end of all work. Please note that processing of this part must be carried out in several approaches. Each new protective layer should be applied only after the previous one has been completely absorbed. This is the only way to reliably protect wood from rotting and destruction. Stock up on enough wood to make an axe. You don’t need to make just one piece - it’s better to build several pieces. This is necessary because during the work some of them may not work out and be rejected. There should always be at least one more blank in stock.
To make an ax handle, you cannot use a wooden block that has a large number of knots. Because of them, noticeable cracks may form on the material. Over time, the branches begin to dry out, and the entire material loses its strength. Making an ax handle yourself is not at all difficult. If you doubt your abilities, are afraid of making a mistake and translating natural material, then it is better to refuse experiments. Buy a ready-made model or contact an experienced craftsman who will make a good tool for you.
To learn how to make an ax handle with your own hands, see the following video.
Wedges
According to generally accepted standards, wedges are inserted into an ax made of steel, but the use of wooden wedges is also allowed. They use hardwood deciduous trees. But compared to metal ones, they are significantly inferior in strength. The fact is that when working with a tool all year round, wooden parts gain moisture, and therefore their volume increases. Later, they dry out and the blade becomes very loose. Moreover, wooden wedges must be set on glue, which makes it difficult to re-tamp them in the future.
The wedging process is carried out crosswise. It is better to make a metal wedge for an ax from steel 5 mm thick. Its length should be 5 mm less than the prepared groove depth. Making them yourself is not difficult. To do this, a piece of steel is clamped in a vice, and using a grinder and a metal disc, the excess part is cut off. After which it is given a wedge shape.
To wedge the tool, you need to rest the handle on a hard surface and drive 3 wedges. An important clarification: with this method, pressure is created on the walls of the eye, and therefore the smelting of the metal part must be smelted correctly. That is, the blade is harder, and the rest is softer.
A correctly mounted blade should be no more than 1 cm below its wooden part.
Selection of an ax and its preliminary preparation
As practice shows, axes and lugs may differ slightly in size and shape. To avoid making a mistake, you can take an ax head with you to the store. But it’s more convenient to mark the outline of the upper part of the eyelet on paper, cut it out, and when trying it on, apply it to the upper end. The outlet, upper hole of the eyelet is larger in size than the lower one.
If you buy an ax handle:
- smaller size, it will not be possible to fit the head tightly;
- larger than necessary, it will take longer to adjust it.
By selecting an ax close to the required size, the master saves his time on fitting.
When choosing, you need to pay attention to the following points:
- the wood of the product is dense and dry;
- the surface should be smooth, without potholes or splinters;
- There is a bend and a slight expansion from below so that the hand does not slip during a chopping blow.
Even if the ax handle seems dry, it is recommended to keep it for an additional 2-3 days:
- in the summer in the sun;
- in winter on a hot radiator at home.
During drying, be sure to turn it over periodically.
Alignment of the ax handle and the ax blade
According to the accepted criteria for assessing the correct manufacture of an ax, the axis of its blade and the wooden part must be in the same plane. Their axis of symmetry per 10 cm of length should be 2 mm. In other words, with a length of 15 cm, the skew should not exceed 3 mm.
If the metal part is initially bent, balancing can be done even at an early stage in the manufacture of the handle. If the distortion is large, then it will not be possible to make a high-quality ax with your own hands.
Review of homemade ax models
In addition to restoring old axes, blades are made from other available materials. The type and purpose of such a tool is limited only by your imagination and skills. Springs, reinforcement, a circular saw blade, and stones can be used. A homemade ax may turn out to be better and more beautiful than one bought in a store.
Spring ax
The spring of a regular car is made from light, elastic, durable alloys. One 100x400 mm plate made from a spring is enough for a small decorative or throwing hatchet. To create a full-size blade, several springs must be welded into a small sheet of metal.
Draw the blade of your future ax and cut it out with a grinder. Keep in mind that the handle will wrap around it on both sides, much like a knife design. To make it, you can use a shovel handle or parts of old wooden furniture. Legs and slats will do.
Reinforcement cleaver
Unnecessary pieces of construction reinforcement can be turned into a convenient splitter for firewood. To begin, weld two identical squares from the reinforcement so that they are diagonally sized so that the logs can pass through them freely.
Then weld the letter “H” from the same reinforcement, and weld a blade with an obtuse sharpening angle onto the jumper. Connect the ends of the resulting structure with squares. The cleaver is ready.
Circular saw ax
A circular saw is an excellent material for a beautiful kitchen hatchet. Simply use a grinder to cut out a blade along with a handle from a circular saw blade, drill a couple of holes, and screw on the wooden trims.
Don't be afraid to experiment in your workshop. Skillful hands can breathe life into seemingly unnecessary, rusty garbage.
Which side should the ax be placed on the ax handle?
Features of mounting an ax depend on its shape. Standard Soviet-made products are characterized by a cone-shaped cutting part. This enhances its wedging properties and eliminates errors when placing it on the handle.
According to the rules, you need to put on the ax in such a way that the wedge and the end of the handle protrude 0.5 cm beyond the eye. This is possible if the ax is set with its narrow part towards the wedge, and its wide part towards the ax handle. With this mounting, the worker can, if necessary, push the loose chopping part back into place by knocking the ax on something hard. After this, you need to re-hammer the wedge, but deeper.
In carpentry, the reverse position of the ax is often used. It is necessary in those rare cases if the ax is used not as the main tool, but as an auxiliary tool to trim or trim something. The reverse attachment method is mainly used for sledgehammers and splitting axes. There are no wedges provided for them. The entire load goes to the extreme part of the handle, which holds the metal part of the ax.
Selection of an ax
Birch is used to create the ax handle. It is a relatively hard wood, but is very malleable to work with. In addition to birch, ash or beech can also be used.
It is necessary to work only with well-dried workpieces. If the workpiece is made in winter, then before work, it should be kept warm for a couple of days.
Often ready-made ax handles are used. You can buy the most ordinary ones, the price of which does not exceed 100 rubles, but there are also expensive ones up to 4,000 rubles with handmade carvings.
Preparing the ax
There is a small “old-fashioned” trick for attaching the piercing part to the ax handle. Before starting the process, it is necessary to remove all nicks from the iron part. To do this, the tool is clamped in a vice, with its piercing part, and using a simple file, all the notches are removed. The process is not complicated, but requires a careful approach.
As soon as all the nicks are removed from the inside, it is necessary to correct it from the outside using sandpaper.
The wooden handle must have the optimal length so that the ax is comfortable to work with and has sufficient amplitude to swing. This is necessary so that your hands do not get tired and you do not waste a lot of energy when working.
The process of fitting an ax consists of several stages:
- Once all the preliminary preparations have been completed, you can begin to fit the wooden ax to the iron part. Fitting and turning takes place on the same sanding machine.
- After adjustment, you need to place the iron part on a wooden handle, turn it upside down and hammer it with a hammer while holding the ax in weight. You can stuff it without additional items, simply by tapping the wooden part on the floor.