A turning tool is necessary for working on a lathe. A high-quality tool is very expensive, so one chisel costs from 3 thousand rubles, and the cost of some can reach 20 thousand rubles. Not everyone is ready to shell out that kind of money for turning chisels , given the fact that for work you need to have 3 or 4 cutters of different configurations.
In this article I will talk about the types of turning cutters , their purpose and methods of making them yourself from blade to handle.
I won’t drag it out and start talking about what kind of incisors there are and what they are needed for.
Meisel (oblique incisor)
A turning tool with a flat blade and a sharpened blade at an angle of 45-55 degrees. Meisel is necessary for almost all types of work: turning, trimming, finishing parts. The width of the lathe chisel can vary from 10 to 40 mm, the thickness within 4 – 6 mm, despite the fact that the wider the blade, the thicker it should be.
Reyer (semicircular chisel)
Semicircular turning tools are needed for rough roughing of the workpiece. A very useful cutter if you need to remove a large thickness. This type of chisel is very difficult to make on your own, because it is not easy to find a semicircular blank made of high-quality steel.
Flat cutter
The cutter is designed for turning smooth areas. The chisel blade is flat and comes in different widths depending on your needs. The thickness of the canvas is 4 – 6 mm.
Rounded cutter
It also has a flat blade of the same thickness of 4 – 6 mm and the width you need. Rounded turning tools are used for both rough roughing and finishing of concave areas of the product.
Parting lathe cutter
A cutting turning chisel (cutter) is needed for cutting products and processing cone-shaped recesses.
A significant advantage of purchased turning tools is that they are made of high-quality high-speed steel. It is the lack of high-quality material and tools for its processing that makes it difficult to make chisels at home.
I'll give you an example of how I made chisels myself. A turning chisel consists of a blade and a handle, which are naturally made separately. Let's start with making the canvas.
The main and probably the only tool I used when making a turning chisel was a grinder (angle grinder). But for work, I needed the following consumables:
- cutting wheel
- grinding wheel
- Velcro plate
- sandpaper of different grits (from 80 to 600)
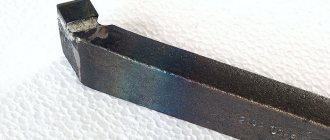
As a blank, I took an old file.
Why a file? It's simple: fairly strong steel, blade thickness 6 mm and width about 40 mm, the file has a shank, which will make attaching the handle much easier.
I will make a reservation: if the length of the file allows you to make 2 blades, then by cutting the source on the second half you can use a grinder to cut out the shank. By the way, the length of the blade without a shank should be 150-180 mm.
I’ll tell you using the example of making a meisel - an oblique turning tool . The procedure is as follows:
Take a file and use a grinder to cut it at an angle of 40 degrees. Then, using a grinding wheel, we roughly sharpen the blade. Before you start, make sure you have a container of cold water to cool the blade you are sharpening.
In order not to overheat the steel, cool the workpiece more often and do not sharpen for too long. After the rough grinding is completed, we begin sharpening the blade using sandpaper. In order to work using this method, you need to fix the grinder on the workbench.
As you sharpen the blade, change the abrasive wheels to smaller ones, not forgetting to cool the workpiece.
When sharpening is finished, you need to round the bottom edge of the turning chisel and the face - the wide sides. For this job, I preferred using sandpaper.
Oddly enough, sandpaper did a much better job than a sanding wheel. The rounded bottom edge is needed so that the chisel can move more easily along the tool rest.
Do not forget that we used a file as the starting material, which without smoothing will be very difficult to move along the tool rest.
The next step will be making a handle for a turning chisel .
It turns out to be a small vicious circle: we need turning tools to make turning tools . I had a couple of similar chisels of simply terrible quality. One is rounded from an old chisel, the other is a meisel from a piece of raw metal, which became dull almost from one blow on a branch.
It's just a sad sight, but, nevertheless, with their help I managed to turn out several handles. The materials I used were: larch, apple, cherry, pine, cedar.
Based on my experience, I will say that it is better not to use pine and cedar, because they make the handle very light, which makes the turning chisel very inconvenient.
The design of the handle was partially looked at on the Internet, and partially made for myself. The length turned out to be 280 mm. You can download the drawing of a handle for a turning chisel from the link and use it both for clarity and as a template. Do not forget that you will need a copper or brass ring approximately 20 mm wide so that the handle does not burst when inserting the blade.
So. When both the handle and the blade of the turning chisel are ready, all that remains is to connect them. We stuff the prepared ring onto the neck of the handle. We take a drill and a drill with a diameter slightly smaller than the diameter of the shank. Drill a hole exactly in the center with a depth equal to the length of the shank. If the hole is not made exactly in the center, then the handle and the blade will connect at an angle.
Making a wood turning tool from an old file
Turning belongs to the category of those that require the smallest number of tools. Indeed, having acquired several basic incisors, you can do a lot of work. Further expansion of the “park” of tools allows, mainly, to increase the convenience and speed of work. Of course, there are several highly specialized cutters, chucks, and rear centers, which, in their field of activity, are quite difficult to do without. But these works, sometimes quite exotic, and such products, such as turning things with a shifted center of rotation, are not of interest to everyone and look more like a fun experiment than an example of beauty. Well, or as a sort of demonstration of skill. The same goes for extra-large and extra-small products. Super thin and super long. All this touches the mind, but not the soul.
Craftsmen often make turning tools for woodworking on their own - partly because of the relative simplicity of the process, a third of which is occupied by close and familiar woodturning, partly because of the high cost of good finished tools. When designing such a tool, it is very important to acquire a suitable piece of hardware - shape, grade of steel. And here, old, worn-out files work quite well. For metal.
Everyone, from us to almost one-year-olds, was taken to the Tolkova to the point of bleeding, And in the basements and semi-basements, the children wanted to go under the tanks. They didn’t even get a bullet, Don’t worry about living in your craft. Neither dare, nor risk, but they took a risk - Make knives from files.
“Ballad of Childhood”, V.S. Vysotsky.
The file blade has good steel for our purposes, good factory hardening, you just need to choose older specimens as blanks. With the current ones, only the surface is hardened. Carefully avoiding overheating, having cut the workpiece into the desired shape, you need to sharpen it and provide it with a comfortable handle, that’s all. In this case, a whole layer of complex heat treatment work is omitted.
Thus, quite a few shapes of cutters and cutting inserts for special holders can be made from old files.
What you will need for work.
Tools
A set of metalworking and marking tools. An angle grinder, preferably a small one, is much more convenient for it to perform small and more or less precise work. Abrasive wheels for it are thick for “cleaning” and thin for cutting. Obviously, ear protection and goggles. An extension cord came in handy. Large bench vise. For pouring water over the workpiece, it is convenient to make a “sprinkler” from a soft plastic bottle by melting several small holes in the cork with a hot wire. Alcohol-based, water-resistant felt-tip pen for marking. Tool for sharpening - electric sharpener, abrasive wheel.
Materials
Actually, the file itself, of a suitable size and profile, a finished handle or materials for its manufacture - a block blank, a piece of a thin-walled tube of a suitable diameter. LMB, brush.
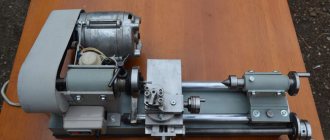
So, first of all, we decide on the shape of the cutter and select a suitable file-blank; as already mentioned, the older ones are now hardened differently during manufacturing. Below, we show the production of a fairly powerful cutter for end turning; however, in some places it is convenient to use it for regular turning, in the centers.
After selecting a file, it is better to sharpen its surface; I have also seen “lazy” cutters, with a notch - not very beautiful and not particularly pleasant to hold with your hands. And considering that when turning with a ready-made cutter, you will still have to hold on to the piece of iron with one (naked, gloved) hand all the time, it is better to go the extra mile. Grinding is best done with an angle grinder, turning it “away from you”, sort of like working with abrasive wheels on Velcro or with petals. In this case, it is convenient to secure the workpiece with a small clamp, periodically rearranging it. The disk is thick corundum, for cleaning. The main feature is to prevent overheating and tempering of the workpiece metal, otherwise all factory hardening will be a waste. An angle grinder is a resourceful tool and it’s as easy as shelling pears to burn through a piece of metal. Here you should prepare yourself in advance for a long fuss. Literally a few movements of the tool and watering, a few movements and watering. And so on until the desired condition. Overheating can be determined visually by the color of the tarnish - the first will be brownish. But this is already an accident. The processing time should be shorter the closer the tool is to the edge or thin parts of the workpiece. It won’t hurt to sometimes touch the piece of iron being processed with your finger to check whether our watering can cope with the excess heat; if you can’t hold your hand, let’s go have tea with chocolates - you deserve it. If the workpiece is not hot, it’s ok, you can still sharpen it.
Having ground off the teeth, we mark the cutter piece on a smooth surface. An alcohol marker works great. We take into account that the cutter is gradually shortened during periodic sharpening, but too long a piece of iron will force the turner’s hands to be in an awkward position when working, and the “weight distribution” of the cutter, especially a large one, will be unpleasant.
When sawing out a cutter, it is convenient to use a large vice. We replaced the disc with a thin cutting disc; discs with a thickness of 1 mm were used. When cutting, everything said about overheating and discoloration remains valid. We are closely monitoring this matter - the further we go, the more upsetting it will be to throw away an almost finished piece of hardware.
The iron is cut out where necessary, we round off the sharp edges and sharpen the flaws. Order. The most tedious part is done, all that remains is the handle and sharpening.
The handle of turning cutters is unique and, above all, quite long - for safety, and generally convenient. There are different forms of them, let's take a look at what Robert Sorby, a locomotive in the manufacture of cutting tools for woodworkers, makes.
Here he found a small plate with an assortment of handle sizes, you can choose the right one. The handle is turned from wood - beautifully from the wood of fruit trees, simply and cheaply from birch logs without knots. It is recommended to make the handles from maple - it is less “straining” on your hands, but here, you do not need to apply significant force to the instrument.
So, we decided on the dimensions, selected the wood, and turned it. Turning is simple, “in the centers”, without any special tricks.
Decorative rings, if desired, can be applied with iron wire. A simple tool is made - a small piece of wire, to the ends of which handles - short sticks - are attached. The wire is pulled by hand and pressed against the rotating part in the desired location. To prevent the wire from “scouring” the part, especially on “descents,” a small groove is made with a jamb knife. After some time, the wire at the point of friction heats up and burns the wood, while simultaneously “eating away” the groove. The decoration can be sanded, the charred mark remains in the groove.
After sanding, the handle was varnished. There are different opinions on this matter; choose a turner. I made a metal ring from a thin-walled steel tube - a handle from a broken mop with a lever for squeezing a sponge-rag. The steel is quite thin, but the ring here is rather decorative - I prefer to glue the piece of iron in rather than drive it in. Lokomotiv-Robert, he still hammers the iron, his rings are bronze. It's certainly more beautiful.
At the end of the handle, I drilled a deep hole with a long drill of a suitable diameter, then drilled it half the depth with a thicker drill, ensuring that the shank of the piece of iron fits into this hole with some effort. Prepare the required volume of epoxy glue. It is very convenient to use trays from “boxed” chocolates. One “seat” is cut off with scissors, and the glue components are mixed in it. Afterwards, the tray is thrown away without regret. Use a long stick to lubricate the walls of the hole and the shank of the piece of iron. We attach the handle, remove the excess glue that appears, or add it with a stick if the hole is not completely filled. The cutter with the glued piece of iron is installed vertically, preferably in a warm place - polymerization of the glue will occur faster, its strength increases. We don’t throw away the tray with the remaining glue and the stick for now - this is a control sample, it’s convenient to judge the “setting” of the glue without disturbing our cutter.
After the epoxy glue has completely hardened, all that remains is to sharpen the cutter. Here, too, options are possible, for example, different apex angles, cutting edge angles. The latter should not be made too sharp, otherwise the cutter will dig into the workpiece too much and will be difficult to control. The cutting edge will quickly become dull. The angle of the top, for universal use, is convenient to make less than 90 degrees.
It is better to do the initial formation of the cutting edge on an electric sharpener, not forgetting about cooling, and final finishing on a low-speed abrasive wheel. The icing on the cake is polishing the blade on a leather surface with GOI paste.
How to make cutters for a wood lathe with your own hands, their prices
The production of original wooden products on machines requires the availability of a variety of high-quality auxiliary tools. In most cases, wood lathe cutters are used for this. Thanks to them, it is possible to bring the workpiece to the required geometric parameters.
Manufacturers offer all kinds of sets, including products with cutting edges of various configurations. You can also make your own wood cutting tools with your own hands.
Wide selection of shapes and models
When processing wood blanks professionally, it is important to correctly select the appropriate tool for wood turning. A wide selection and large sets with diverse tips will allow you to cover a significant part of the work.
Varieties
Based on functionality, wood chisels are usually divided into the following groups:
- Rough peeling . The tool has a pair of working edges that meet at an acute angle. It is believed that this design is significantly safer than radius analogues.
Raiser for rough roughing
- Finish turning . Similar types of cutters for a wood lathe remove a small layer of chips and are not intended to give the workpiece a shape, but their purpose is to give external smoothness to the outer surface. Metal tips are available with left or right sharpening.
Finishing tool
- wood cutter They are used to work with non-standard surfaces.
Shaped can have almost any configuration
- Cut-off cutter . It is currently relevant for one operation in which it is necessary to separate some part from the workpiece.
Cutting width 10 mm
- Boring . With the help of such products, excess material that appears during the processing process is removed. A special ledge located in the cutting area helps in such an operation.
Boring tool to remove excess wood
- Round wood turning tools They are used for processing radius workpieces. The working part can be either radius or with small technological teeth.
Reyer for turning bowls
- Wood turning at the end is carried out using a conventional cutting file.
- As auxiliary equipment, special stops are used on cutters that limit the depth of cut.
In addition to the standard set, professionals use homemade wood lathe cutters in their work. This approach increases productivity and helps expand the range of finished products.
If you plan to engage in wood processing for a long time, then you cannot do without high-quality tools, which are made from tool-grade steel. It is able to withstand high production intensity, which homemade products are not always capable of.
Homemade wood turning tools
The greatest difficulty in the production of each type of chisel for a lathe is the selection of blanks for the cutting part. In addition to ensuring appropriate hardness, you have to think about the possibility of installing the metal part in the holder. It will allow you to fix the cutter in the desired position for comfortable processing.
Do-it-yourself sharpening of cutters
The quality of processing depends on how correctly the working tool is sharpened. To properly sharpen, you need to use an electric sharpening machine, which has a set of wheels of varying degrees of grain and a velvet bar necessary for straightening the blades.
Craftsmen choose sharpening angles personally based on their preferences, turning skills, wood hardness, quality of working tools and the final desired type of processed surfaces.
For beginner turners, the best option is sharpening angles for:
As you gain experience and improve your skill level, you can always reduce the sharpening angle to 20°-35°.
It is also recommended for craftsmen, in addition to different types of cutters, to have one type of cutters with the same size, but with different sharpening angles. This approach can significantly speed up and facilitate the work process, and will also increase the service life of the tools, since there will be no need to constantly resharpen the blades depending on the type of material being processed.
The obtuse type of angles is intended for sharpening hard wood or for initial (rough) processing.
The sharp type of corners of the cutters makes it possible to process surfaces better and speed up turning, but when using it you should be careful because there is a risk of chipping the workpiece and damaging the blade. This type of tool also needs to be sharpened and straightened more often than when using cutters with an obtuse angle.
Approximate sharpening angles on the blade are formed at the stages of making cutters with your own hands, and before heat treatment is carried out - hardening.
After their final preparation, the cutters are sharpened on an abrasive wheel, and the whole process is completed by hand finishing using a velvet block.
Chisels for a wood lathe: types and sizes
Creating wooden cylindrical products is impossible without a hand tool - a chisel for a lathe. It is from under its blade that the unnecessary amount of material is removed and the workpiece acquires an artistic decoration.
Turning chisels can be bought ready-made, but such kits are very expensive, especially high-quality ones. Cutters for wood processing are easy to make yourself, which will be discussed further.
What types of chisels are there?
For professional processing of a wooden workpiece on a lathe, various working tools are required, including a rich set of chisels. Based on their functional role, they can be divided into groups:
- For rough processing. They have 2 cutting edges located at an angle to each other.
- Meisel for finishing. This cutter is a blade with a flat plane and an angular sharpening on the left or right side. The angle of inclination of the cutting part may be different.
- The semicircular reyer chisel is used for working with non-standard products.
- The cut-off cutter is used to remove fragments of wood when forming a pattern.
- A boring tool for wood turning has a shoulder to help remove excess material released during the pointing process.
- Round chisel for processing round products. Its tip can be smooth or jagged.
- Cutting file for processing the end sections of the workpiece.
- The cutter stop is installed on the tool to adjust the turning depth.