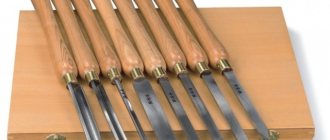
Band saw wood cutters
How to make a wood cutter with your own hands from a band saw? In fact, this is not so difficult, despite the fact that such cutters hold sharpening very well. To work you will need:
- Oak scraps for handles.
- Electric sharpener.
- Hacksaw.
- Belt sander.
- Sanding cloths of different grain sizes.
- The actual blade is from a band saw.
- A respirator to protect your respiratory system.
- Wood glue.
Homemade knives for wood carving
Hello to all lovers of homemade products, every specialist knows well that the tool plays a big role in the work, namely its reliability and build quality. Thinking about this topic, thoughts arise to make the ideal convenient tool with your own hands, in this case these are wood cutters, and cutting out patterns with their help is quite a fascinating activity, which cannot but rejoice. The main thing in creating cutters is to be more careful, since you will have to work with sharp objects, namely the cutting part. The author’s idea to make wood cutters with his own hands was accompanied by the fact that there was no such tool nearby, and there were no local stores either.
The properties that a good wood carving knife should have are as follows:
• High-quality steel, increasing the service life of knives and maintaining their sharpness for a long time. • Ergonomic (comfortable) handles. • Relative ease of manufacture. • Reliability.
To create this homemade product, you don’t need any hard-to-find materials, they shouldn’t be here, since it was planned in advance that all the details would be easily accessible to most carpenters and woodworking enthusiasts.
Required materials and tools:
* Band saw pieces made of durable steel, which from experience confirms their long-term sharpness retention.
* Remains of oak boards left over from previous work, since oak itself is durable, beautiful and technologically advanced material in its own way. Tools you will need:
* Electric sharpener. * Belt sander with a grit of about 40, as well as sanding paper (grit 80, and for finishing - 240, 800 and 1000). * Hacksaw. * Respiratory protection – respirator (gauze mask). * Wood glue.
Now all the parts with the necessary tools are ready, now let’s proceed to the step-by-step assembly.
Step one.
The first step is to make a blade. From pieces of saw blade about 8 cm long, the author turned metal blade blanks of the desired shape, and provided the blanks with shanks, their length is about 4.5-5 cm, these dimensions guarantee sufficient strength for fastening the blade in the handle.
A large chamfer on knives must be made even before the moment when the shank is not glued into the handle. The chamfer shape must be given on both sides, while maintaining a certain angle, and the grinding of the metal must occur symmetrically. It is known from materials science that during intensive grinding the metal heats up, which causes it to temper, and this leads to the fact that the metal becomes softer and loses the ability to maintain an edge. To prevent this from happening, the workpiece to be turned must be periodically cooled in water, thereby avoiding overheating. It is most convenient when a container with cold water is nearby and lowering the workpiece is not difficult. To finally shape the blade, as well as sharpen and polish it, you need to install the handle, which is what will happen next.
Step two.
After much work with metal, we move on to making the handle; oak bars are well suited for this, the dimensions of which were 12 by 22 mm in cross-section, and the length was slightly more than 120 mm. These bars were selected so that the surfaces to be glued were smooth. To simplify the work, we make a selection of a socket for the shank in one of the halves of the future handle.
First, the shank is processed using a grinder along the edges in order to get rid of burrs. Then, placing the shank on the prepared block, we outline it with a pencil. Using chisels, we select a socket to a depth that is equal to the thickness of the workpiece, periodically assembling the structure assembly dry to check the fit of the bars to each other. If the depth of the socket is insufficient, the handle will either not stick together or, if the connection is poor, it will simply crack during use. Also, a socket that is too deep will cause the blade to move from side to side, which leads to undesirable consequences, namely cracking of the handle or deformation of the shank. Therefore, be as precise as possible when selecting the socket for the shank.
After you have made sure during the dry control assembly that all the parts fit tightly, in this case the shank, and also that there are no gaps between the bars-halves of the handle, then you can start gluing. We apply carpenter's glue to the surface of the block and into the socket under the shank, since it is impossible to achieve accuracy in depth when manually selecting a socket, then just in case it is better to fill it with glue, after which dries the shank will be held in place due to its hardness, in case of inaccuracy. You also need to apply glue to the adjacent part of the handle, but in a smaller layer.
After gluing the workpiece, the back part is sawed off with a hacksaw to a size of 12 cm. Then we grind the ends of the handles with a belt sander, do not forget to use personal protective equipment - safety glasses and a respirator, since oak dust can cause allergies.
Sanding is started with 40 grit, and then in increasing order until the workpiece is smooth. Cover with nitro varnish.
Step four.
We are finishing the cutting part, we need a small chamfer, the sharpening angle of which for these knives is approximately 25-30°. To form a small chamfer, the author uses sandpaper of different grits, gradually increasing the grit, starting from 240, moving to 800, and then to 1000, finally everything is polished on a leather belt clamped on a block. If sharpening is successful, then the wood should be cut both along and across the grain without much effort, and the cut surface should be smooth and shiny, the so-called “butter” cut. Several knives were made using this manufacturing template; in general, they are quite reliable and easy to use, which is quite decent for a non-professional.
Blade making
If you plan to make wood cutters with your own hands, then you will need a piece of saw blade approximately 8 centimeters long. Of this, 4.5-5 centimeters should be left for the shank, which will be attached to the handle. Using an electric sharpener, the shape of the future knife is cut out of the canvas. The master determines the form himself depending on the requirements. Then you need to grind the shape using a belt sander, making a large chamfer with an angle of 10-15 degrees. This narrowing from the butt to the cutting edge is necessary so that the cutter can be worked with. A cutting edge with an angle of 25-30 degrees, which will participate in the cutting process, is created later.
This work must be done slowly, otherwise the metal will heat up, become soft and no longer hold an edge. You can sometimes cool the workpiece in water.
Wood Carving Hand Tools Review: A Must-Have Set
This type of decorative and applied art such as wood carving is finding more and more admirers these days. It is becoming a popular hobby not only among teenage children, but also attracts a fairly large number of adults. Like any work with wood, from making furniture to amateur builders and decorating residential premises, wood carving requires the use of special tools, which can be purchased in the form of ready-made kits, or you can make it yourself.
Considering the considerable cost of any original tool produced under the Tatyanka, Flexcut, Kogatana or Narex brands, the latter option is more preferable. It is unknown whether the hobby will be serious or whether it is a momentary whim, and a specialized cutting and engraving tool for wood carving is unlikely to find use in other branches of home creativity.
Required cutter kit
There is no universal toolkit with which you can create unique relief patterns on a wooden surface. Its full range is quite extensive, but taking the first steps, the carver can limit himself to the following items:
- one special blunt knife,
- straight and semicircular chisels with blades of various widths.
Over time, this minimum will expand, but to start work and master the skills, one knife and two chisels are enough - one with a straight blade and the other with a semicircular blade. In addition to this specialized toolkit, you will need a regular, commonly used tool:
- wood hacksaw with fine teeth,
- bit,
- set of needle files,
- sandpaper of varying degrees of abrasiveness.
Making a knife
When taking your first steps in wood carving, you can limit yourself to a simple knife made of high-quality steel, sharpening it in a special way. The only condition is that the knife blade must be rigid enough so that when making individual cuts it does not deform or bend.
The quality of steel is checked with a regular needle file, which should not leave marks on the sharpened blade or they should be barely noticeable. However, it is better to initially make a special knife-jamb, whose blade shape resembles the well-known shoe knife, but has a smaller blade width.
Most often, for the independent production of knives for wood carving, which have different widths and blade shapes, a machine-made hacksaw blade for metal with a width of 25.0...50.0 millimeters is used. Preliminary markings are made on the blade along the contour of which the blade blank is cut out.
So, in machine-made hacksaw blades, tool steel is used (usually P6M5 or P9M3), then to create a knife blade blank you will have to use a grinder with a metal cutting disc. The workpiece should be cut with a small allowance. When cutting metal, the edges of the part burn (the structure and hardness of the metal changes), so the final finishing is done on an emery machine.
For the final production and preliminary sharpening of the knife, the same emery wheel is used, and the final finishing is carried out on sanding blocks of varying abrasiveness. The side surfaces of the knife blade must be polished; a felt wheel and GOI polishing paste are used for this.
Similarly, this type of tool is made from metal circular saws. The advantages of using a circular saw are a greater number of standard blade thicknesses. Knives can be made in a variety of sizes and thicknesses. If at the initial stages of wood carving work this factor does not play much importance, then over time, when a cutting tool with a semicircular or shaped blade is required, the thickness of the workpiece will be of no small importance.
Making chisels
When making wood carver's chisels yourself, a drill of a suitable diameter and length is usually used as a blank. The process involves shaping the blade and giving it the desired shape. Sharpening the cutting edge is done in the same way as a conventional tool. The spiral drill winding does not need to be ground off, but only the sharp edges of the spiral can be dulled using sandpaper. To make chisels with a semicircular blade, you can use punches or a drill shank.
Making handles
In order to prevent your hand from getting tired and overstrained during woodcarving, the size and shape of the handle is important. Knife handles are made from two halves of hard wood, joined together with glue. A recess is cut out in the boards for the shank of the knife, after which the latter is placed in this recess, horses are applied to the joined planes and the halves are clamped in a vice or tightened with clamps.
After the glue has completely hardened, the handle blank, clamped in a vice, in which the knife blade is already securely fastened, is pre-processed with a file, giving it the most convenient (ergonomic, anatomical) shape. Final finishing is carried out using sandpaper or a belt sander. Depending on the needs of the carver, the surface of the handle is opened with varnish or left untreated.
As you can see, the process of making knives and chisels yourself is no more complicated than wood carving itself. To make the initial set (a knife and two chisels), you will need a grinder with a cutting wheel, an electric sander and a sander. Without power tools, making your own cutter kit will be simply impossible.
After watching the video, you will learn how to make your own wood cutting knife.
Making the handle
To make handles for objects such as machine tools, you need to give the wood a special shape with your own hands. For the handles, oak bars about 12 centimeters long and 12x22 millimeters in cross section are suitable.
Next you need to do the following:
- Sand the tail of the metal workpiece along the edges to remove burrs.
- Place the tail on the block and trace the shape with a pen.
- Use chisels to select wood to a depth identical to the thickness of the workpiece. Periodically, the workpiece must be tried on, placing a second block on top. The hole should not be too deep or too shallow - in the first case, the blade will wobble, and in the second, the handle will simply crack or not stick together.
- Once you are sure that all the parts fit together perfectly, you can glue them together. Glue must be applied to the socket and to the surface of the bar. You can apply less glue to the second part.
- Then connect the parts as accurately as possible and tighten them with clamps. You need to do this forcefully, but so as not to split the bars.
- Remove excess glue with a damp cloth and leave everything to dry for about 12 hours.
After this, the tightness of the structure must be checked - grab the handle with one hand, and try to loosen the blade with the other. If you hear characteristic creaks, the work will have to be redone. Don’t be lazy - if hand wood cutters are poorly made, the blade will quickly become loose and can ultimately lead to injury.
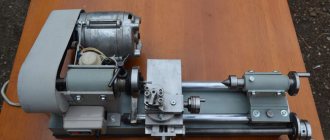
Chisels for a wood lathe: types and sizes
Creating wooden cylindrical products is impossible without a hand tool - a chisel for a lathe. It is from under its blade that the unnecessary amount of material is removed and the workpiece acquires an artistic decoration.
Turning chisels can be bought ready-made, but such kits are very expensive, especially high-quality ones. Cutters for wood processing are easy to make yourself, which will be discussed further.
What types of chisels are there?
For professional processing of a wooden workpiece on a lathe, various working tools are required, including a rich set of chisels. Based on their functional role, they can be divided into groups:
- For rough processing. They have 2 cutting edges located at an angle to each other.
- Meisel for finishing. This cutter is a blade with a flat plane and an angular sharpening on the left or right side. The angle of inclination of the cutting part may be different.
- The semicircular reyer chisel is used for working with non-standard products.
- The cut-off cutter is used to remove fragments of wood when forming a pattern.
- A boring tool for wood turning has a shoulder to help remove excess material released during the pointing process.
- Round chisel for processing round products. Its tip can be smooth or jagged.
- Cutting file for processing the end sections of the workpiece.
- The cutter stop is installed on the tool to adjust the turning depth.
Handle adjustment
The good thing about DIY wood cutters is that you can shape the handle yourself, as you see fit. Although some general rules must be followed:
- Leave the back round and wide, much wider than the one closer to the blade. Therefore, it is better to make handle blanks in advance in the form of an elongated truncated pyramid.
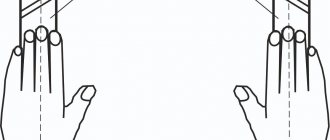
- Be sure to make a notch on the handle for your index finger.
The edges of the handle can be sharpened with a grinding machine. This must be done in a respirator and safety glasses so as not to damage the organs of vision and breathing. Roughly grind the handle and then sand it down by hand with fine sandpaper. Afterwards, if desired, paint the handle and be sure to varnish it.
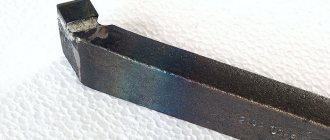
Creating a tool from a metal cutter
The cutter can also be made from a metal cutter - it is extremely durable and made of carbon steel, so your cutter will remain sharp for a long time and will not become dull very soon.
To make wood cutters with your own hands, you need to carry out the work in the following order:
- Apply the design of the cutter you want to obtain onto the cutter. The jamb knife is especially popular among carvers. The shank must be made longer than the blade.
- Using a metal cutter, cut the cutter exactly according to the design. This will give you a knife blank.
- Sand the blade by occasionally dipping it in cold water.
- Make a hardwood handle using two halves. Cut a recess in one half for the workpiece. Glue everything together with PVA glue and sand the handle.
As you can see, the answer to the question: “How to make a wood cutter with your own hands?” - quite simple and practically does not require any special skills from you.
How to make a wood carving tool. Making knives (cutters)
Part 2. Continuation “Tool for wood carving. Metal search.” And so, I collected everything I could find. The straight razors arrived safely, the needle file at the market, and I already had the blade For now, I decided to make myself several wood cutters of different sizes and at different angles. But there will only be knives, simple cutters. I can’t make semicircular and other complex shapes yet, and that’s why I’ll be looking for them on sale.
Knife for wood carving from a needle file.
The first and easiest thing I decided to do was make a knife (cutter) for small woodworking from a needle file. Having sharpened the file a little at the required angle, I sharpened it and got a very sharp cutter. Sharpening was done by hand.
It cuts great. Only, for some reason it turned out to be very fragile, and I already broke the nose of the knife twice
Knife for wood carving made of metal cloth for machine tools.
The most labor-intensive task is making a knife from canvas. a lot of time is spent processing metal. Very durable metal and strong.
I sawed the canvas with a grinder. Of course, I burned the edges of the metal and had to remove it using sandpaper.
My canvas was thick and I made it a little thinner (for a small incisor).
Large power knife. Now I’m thinking about making Bogorodsky.
Wood carving knife made from a straight razor.
The metal of straight razors is very strong, but fragile. making a knife out of a straight razor is not that difficult. The metal has already given the shape of the knife; it just needs to be adjusted a little.
Separate the handle from the blade.
I did not describe the process of creating a cutter in detail (the next post will have a detailed description of the creation of a cutter with a handle). I think everything is clear.
Here I made several cutters for wood carving. Now I will look at which forms are more acceptable. I didn’t particularly choose the sharpening angles and didn’t turn them up, I’ll be looking for the optimal one in the process. If you burn the metal (it turns purple), then it will no longer be suitable for the cutter. It will become soft. It needs to be completely sanded off. For myself, I came to the conclusion that it is better to sharpen it by hand more slowly and reliably than to try to quickly sharpen the knife on sandpaper (at high speeds) and burn the knife to the ground. I had one more metal. A two-sided saw is said to be used in meat processing plants for cutting bones, but it is very soft and turns into foil when sharpened.
If you have any questions, comments, suggestions, additions, I will be very grateful if you write in the comments.
Sharpening wood cutters by hand after manufacturing
After you make a blade blank, you will need to make a small chamfer - the direct cutting edge of the blade with a sharpening angle of about 25-30 degrees. A sharpening angle of 10-15 degrees will not be enough for you because the blade, when cutting even soft wood, will eventually chip and crumple.
A small chamfer can be formed with sandpaper or a block. You need to go from smaller to larger - first take a sandpaper with a grit value of about 240, and when the chamfer is formed, bring it with sandpapers to 800, and then 1000 grit. Afterwards, you can polish the blade on a leather belt with GOI paste.