Wood carving is an amazingly beautiful and very popular type of hand-made wood processing these days. The carved interior details captivate with their magnificent appearance and reflect rich national traditions.
Creative people who are simply itching to do something very interesting and useful should pay attention to wood carving. Girls and women may think that this is only a man's activity. And they will be wrong, because there are no fewer women woodcarvers than men.
Tatyana Boeva from Kamchatka
About wood carving for beginners
To decorate the internal and external space, various types of carvings and techniques for realizing the plan can be used. If you are interested in this type of needlework, then you must understand that you need to master the methods and techniques of wood processing, acquire the necessary tools and improve carving skills.
In the modern world of smartphones and tablets, a wooden stand decorated with wood carvings looks very original.
Skillfully executed carvings in the form of simple and ornate patterns and ornaments seem to enliven the world and endow it with sophistication, charm, emphasizing the taste of the owner of luxury items and the talent of the craftsman.
Panel
Cutting boards
Wooden icons
The works of the best carvers decorate the temples. Pay attention to the photo of the iconostasis of the upper Church of the Holy Image of the Savior, which is located in Moscow, in the Church of the Intercession of the Blessed Virgin Mary in Fili.
Modern masters with delicate taste create real masterpieces.
And thanks to finishing technologies and protection of the finished product from the destructive effects of mold and insects, these wood carvings have served people for hundreds of years.
Pay attention to the magnificent carved pieces of furniture:
Stylish doors:
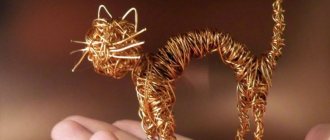
Delightful handmade figurines:
Very often, connoisseurs collect handmade carved items. Wonderful chess that is worthy of any collection.
Perhaps, over time, your wood carving masterpieces will be carefully preserved by collectors or decorate temples.
Types of wood carving
Of all the types of wood carving, openwork or through wood carving is very interesting, which is characterized by some transparency, in which only the image remains, without a background. An example is an applied carving - this is an ornament that is attached to a finished background after production by a craftsman.
Geometric wood is a type of carving in which a pattern is formed using a variety of simple geometric shapes (a rhombus is often used).
Oriental wood carving is distinguished by its whimsical forms. Egypt is the cradle of the oriental type of wood carving.
Relief wood carving. In this technique, the image is located above the background or at the same level with it. These are carved panels of various shapes with three-dimensional images.
Carving in the Baroque style is a flat-relief carving, but distinguished by an abundance of carved and molded decorations, various colors, curls, leaves, figures of people in unnatural poses, and fabulous fantastic animals.
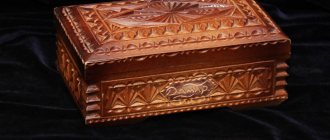
Kudrinskaya carving originated in the village of Kudrino. Well-known products in this type of carving are boxes, vases, dishes, ladles, and home decor items. The main element is a floral ornament: rosettes, curls and twigs.
Three-dimensional (sculptural) carving is excellent for making sculptures, animal and human figures, and toys. Bogorodskaya carving is a subtype of three-dimensional carving. This is the main industry of the village of Bogorodskoye in the Moscow region. The famous Bogorodsk toys are figurines of animals and people made of linden and alder.
Scandinavian carvings were most often used to decorate wooden Scandinavian churches. Wood carvers decorated the inside and outside of church buildings with images of Gods and various animals.
Contour carving is the simplest and most unique type of carving. On a flat background, the master cuts out grooves - grooves, forming a pattern. Carved landscapes - images of landscapes on wood.
All these types of carvings are quite conventional. Each master chooses the most suitable one, taking into account work experience, quality of wood and creative inspiration.
What can be decorated with carvings?
The simplest staircase is transformed, decorated with carved balusters. Balusters are curly posts in the form of columns, a stylish and noble decoration of the staircase. Wooden balusters look organically with a spiral wooden staircase.
Bas-relief. Another name is "low relief". This is a sculptural image on a plane. Most often these are figures of people and animals .
Types of knife blades
A classic jamb knife can have blades of different widths, blade angles and a conveniently shaped handle for a specific type of work. The blade of the knife can be made in the form of a triangle (the flag knife is very popular) or have another shape.
The knife can have different sharpening options, smooth or sharp cutting edge shapes. Understanding which blade is needed depends on the specific type of work, the design being performed and the experience of the craftsman.
As in the case of a blunt knife, the prerequisites for the quality of a knife with any blade shape are the sharpness of the blade and the comfort of the handle. The attachment of the knife blade to the handle must be perfect and reliable.
Choosing tools for wood carving
As in every business, wood carving has its own secrets and nuances, which allow one to reveal the beauty of wood in a wonderful ornament. It is necessary to select special tools for wood carving and stock up on the necessary blanks and sketches for wood carving, which will be embodied in the form of drawings, borders, lace or genre scenes.
Basic tools
Very high demands are placed on the quality of carving tools. Of course, skill plays an important role, but well-selected and sharpened tools will help bring your idea to life. Experienced carvers will tell about its quality at first glance at a tool, but beginners get lost in the store because of the huge selection.
The basic set for wood carving includes:
- several knives and chisels;
- needle files;
- hacksaws for metal;
- vice;
- sandpaper;
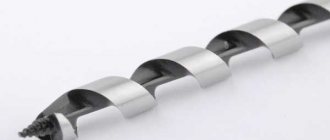
- drill with several types of drills;
- bars.
Knives should be made only from high quality steel. It is better to purchase them in specialized stores for creativity. Although at the initial stage, just sharply sharpened knives will do. An excellent start would be knives, Narex, Kogatana, etc.
It is not necessary to choose an expensive foreign-made instrument, because domestic instruments can be of the same good quality, but much cheaper
As your skill grows, you may need a set of tools, a milling machine, a drill, etc.
Chisels for carving
Sometimes, instead of a chisel, a sharpened screwdriver or file is used for wood carving.
A flat chisel is a long rod with a flat cutting edge at the end. Very often it is used for primary wood processing.
A semicircular chisel is one of the most important tools for work. They differ somewhat in the degree of roundness, that is, they are medium, round and sloping.
There is also a V -shaped version of chisels . It can be useful for geometric wood carving, which we will introduce you to below.
Beginners need only a small wood carving set of good quality to immediately get used to the correct movements and pressure.
In this video, the wonderful master A. Yuryev shared with us which tools to choose for carving.
How to protect yourself from injury when carving wood
Any tool of a master carver can be compared to a straight razor, therefore, when working with it, you must strictly follow safety precautions. The material must be positioned so that you can work freely with a knife or chisel, eliminating the possibility of the sharp edge hitting your hands.
The work place should be comfortable and clean. All unnecessary tools at the moment should be carefully folded, because they are very sharp and can cause injury.
Instrument care
You should periodically inspect your tools and wipe them with an oily cloth to prevent them from rusting. Store tools in individual compartments or wrapped in cloth to protect them and reduce sharpening time.
TOOL SHARPENING
Make sure your tools are always sharp and stop working from time to time to sharpen them. All the carvers I know have developed their own dressing system; everyone found their own procedure that was convenient for them personally. Some use whetstones with oil, others with water, and others use electrical devices.
The first step is to sharpen the blade using a fine-grained abrasive such as diamond chips or sandpaper. First, one side is processed until burrs appear on the metal, then the other. At the next stage of editing, the surface irregularities that arose initially are eliminated. Finally, you should polish the blade with a special compound to a mirror shine, reducing friction between the blade and the wood.
How can you tell if a blade is sharp enough? Take a piece of scrap wood and run a knife across the grain. If a smooth mark remains, then the blade is sharp. If the fibers stick out in different directions and the mark is rough, then you need to sharpen the blade more.
Materials for work
Each type of wood for carving has its pros and cons. Soft wood is easy to work with, but there can also be a lot of defects. These are aspen, linden, birch. This wood is best for beginners.
Oak, boxwood, mahogany are more expensive and complex wood. It is hard and durable, so it is difficult to carve from such wood. Very often there are troubles when working with such types of wood. Either the instrument or the craftsman may be harmed.
An experienced carver can easily work with a variety of woods, including juniper. Well, for beginners it is better to use inexpensive materials - spruce, pine, pear or birch.
Whatever tools are chosen for wood carving, safety precautions must be strictly observed!
TOOLS
All beginning carvers ask: “What tools do I need first?” First we will need a small number of tools. Instead of buying a full set of cutting supplies, purchase tools as you need them. Usually, when you buy a set, you don't save a penny, but there are always things left that you hardly need. Buy the best quality tools you can afford; good, sharp, high-carbon steel tools will last you a long time and save you money.
Geometric carving technology
Geometric wood carving is considered the simplest and is perfect for beginners. To create the intended design, you need to have a small set of wood carving tools and clearly follow the design. In geometric wood carving, symmetry and repetition are of utmost importance. This achieves a wonderful play of light and shadow.
Cutting boards using this technique and wooden panels look wonderful in the kitchen.
Geometric carving consists of sequential cutting out of simple geometric shapes: rectangles, triangles, squares, rhombuses. But the result is a wonderful ornament that looks different in different lighting.
The sequence of performing any wood carving is as follows:
- First, a wooden blank is made (board, deck, blank).
- Next is rough leveling of the surface of the workpiece, during which all defects and roughness are removed.
- Then a decorative relief is formed using special cutters.
- After the main carving is completed, the finishing process is grinding, impregnation, painting, varnishing.
You cannot work with a workpiece on your knees! The master must have a table to work on.
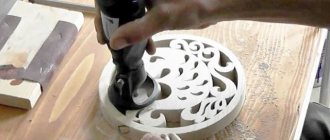
Master class “Geometric wood carving on a cutting board”
Tools . You will need 2 knives for wood carving: a triangular jamb knife and a feather knife, a ruler, a compass, a pencil.
A triangle jamb knife is necessary for cutting triangular shapes of various configurations, as well as for cutting long straight lines. A pen knife is used to cut long lines such as a petal or groove. Carving knives should be sharp and comfortable.
First stage. We make a sketch of the pattern on the board. It can be applied using a compass and ruler. Or you can print out carving patterns taken from the Internet and use carbon paper to transfer them to a prepared cutting board.
Second phase . Cut out the petals. We use a pen knife.
While working, the thumb is pressed firmly against the board, and the index finger lightly touches the wood. This will help regulate the depth of the knife into the surface and the angle of inclination. And your thumb will help you move the blade smoothly. First, we cut in one direction at an angle, then we turn the board over and cut on the other side.
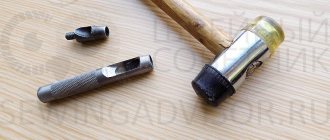
If the shavings curl like a rope, the knife is good and sharp. It must be periodically sharpened with a piece of leather with GOI paste.
Third stage . We cut out the triangles with a blunt knife. Using the heel, at an angle of 45 degrees, we cut the knife into the wood, not reaching the edges of the pattern on three sides. The slots should meet on all sides in the shape of a pyramid. The sliver falls out and forms a beautiful triangle.
Fourth stage. What we couldn’t cut, carefully clean it so that the edges are frequent and even. Using the same principle, we cut out grooves and triangles around the perimeter of the board.
Fifth stage . We sand everything with sandpaper and treat it with natural impregnation. All! The work is done. We decorate the kitchen with a useful and beautiful cutting board with wood carvings.
Original
Wood surface and sanding
Depending on the item being manufactured, one or another surface treatment is required. A shelf or rack for the kitchen, a table or bedside table for the bedroom requires a perfectly flat and smooth surface. A toy figurine, panel or box does not need sanding, but a drawing made with a chisel cannot be sanded at all.
Cutting wood with a knife and shaping the surface with a chisel does not require preliminary sanding, and once the work is completed, the surface simply cannot be sanded.
In the creative process of wood cutting, the idea often arises: not to cut out what you want, but to refine a natural solution. When a fancy piece of wood (a branch, a stump, a trunk) falls into the hands of a craftsman, the idea arises of adding to it rather than cutting it out.
Wood carving designs
To perform wood carving, photographs, drawings and sketches are simply necessary. A large pattern for wood carving is used for large-scale products: for the facades of houses, interior decoration with carvings of churches, windows.
For interior items and furniture, carvers use small patterns that are carefully worked out by the craftsman.
YOU WILL NEED IT
We offer you an archive of 80 wood carving designs. Choose, print, create.
Electrical tools
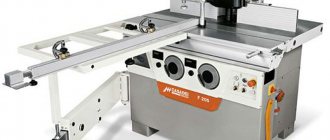
When you start making workpieces yourself, you will need a band saw. A huge selection of blades will allow you to make the most difficult cuts with ease, far surpassing anything that can be done with a bow saw. An openwork saw will help to process the inner surface, but not every tree can handle it. Belt and disc sanders are good for both finishing and removing bark. Many carvers use rotary tools with a wide range of heads to machine parts such as feathers. There are hand-held grinders and small high-speed cutters. There are also at least four types of electric chisels with a reciprocating motion, allowing arthritic people and people with tennis elbow to enjoy carving.
How to cut threads by hand
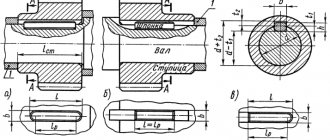
Threaded connections are widely used in various mechanisms and machines. Bolts, studs, screws, nuts are universal, interchangeable fasteners. However, there are times when it is necessary to cut threads by hand. A specialized tool will help you do this job efficiently.
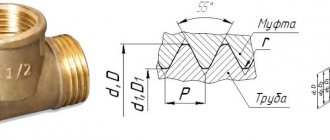
In mechanical engineering, there are three main systems of fastening threads: metric, inch and pipe.
Metric thread has become the most widespread. It has a triangular profile with an angle of 60˚. Its main parameters, diameter and pitch, are expressed in millimeters. Designation example: M16. This means that the thread is metric, has a diameter of 16 mm with a coarse pitch of 2.0 mm. If the step is small, then its value is indicated, for example, M16 * 1.5.
The diameters of inch and pipe threads are expressed in inches. The pitch is characterized by the number of threads per inch. The specified parameters are standardized, so it is always possible to select the necessary tool.
External thread cutting with a die
To cut external threads, you will need the following tools and materials: a die or pipe clamp, a die holder, a file, a vice, a caliper, and machine oil.
The most widespread are round dies (lerks). They are either solid or split. The diameters of solid round dies are standardized. This allows you to choose the appropriate option from a large range of sizes, for example, M10, M12, M14, M16.
A special feature of split dies is the ability to adjust the diameter of the thread being cut within 0.1…0.25 mm. However, they have reduced rigidity, which affects the accuracy of the resulting profile.
The die is installed in a die holder of a suitable size. After this, it is secured with screws. In the case of external pipe threads, die holders with a ratchet are often used. They provide convenience for working in hard-to-reach places, such as near a wall.
The thickness of the rod is chosen to be 0.1...0.25 mm less than the diameter of the external thread. For example, for M6 with a large pitch it is 5.80...5.90 mm; M8 – 7.80…7.90 mm; M10 – 9.75…9.85 mm. Measurements are taken using a caliper. The diameters of rods for cutting metric threads of average accuracy class 6g are presented in the table.
To ensure better insertion of the die, a chamfer is filed at the end of the rod. Its width should be 1 - 1.5 mm for M6 ... M18. The workpiece is lubricated with machine oil, which makes subsequent work easier and allows you to obtain a better surface.
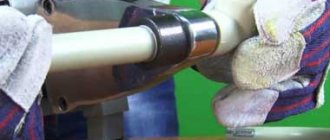
The die is placed on the end of the rod so that its plane is perpendicular to the axis of the bolt being cut. Next, with slight pressure, rotate the die holder clockwise (if the thread is left-handed, then counterclockwise). When the die cuts into the rod by one or two threads, it should be turned back half a turn for better removal of chips. After this, they again make 1-2 turns along the thread and 0.5 in the opposite direction. Using this scheme, the bolt is cut to the required length.