It is increasingly rare to hear the phrase “outdoor amenities” in the private sector. This is not surprising - after all, every person strives for comfort. However, it is out of the question if on a frosty night, waking up, you have to get dressed and run through the snow to a cabin located 15 meters from your home. So home craftsmen equip latrines directly in the house. But in order for them to function normally, it is necessary to properly install a sewage disposal system into a septic tank located on the street. Today we will look at how to install a sewer system in a private house with our own hands. We will also consider the diagram of its structure, and along the way we will find out the cost of such work when performed by specialists.
A properly executed sewer system is the key to comfortable living
How to correctly draw up a diagram of a sewerage system in a private house with your own hands
When starting to draw up a sewerage diagram for a private house, you need to decide on the number of drain points. It should be understood that if there are two floors in a residential building, the circuit of each is mounted, as planned, separately, with subsequent output to a common riser leading to the septic tank.
Having only one riser is unacceptable only in the case of installing a swimming pool or sauna - a separate drain will need to be installed for them.
Important! Its performance and ease of installation will depend on the completeness and correctness of the do-it-yourself sewerage diagram for a private house. The plan must indicate the length of all pipes - this will help to correctly calculate the amount of material.
High-quality insulation will be required here, otherwise the sewage system will not work in winter
Problems you may encounter during design
The main difficulty in drawing up a project may be the introduction of a sewer pipe into the house. To do this, you will have to break through the foundation or install special pumps. Their installation will also be necessary when installing a bathroom in the basement or basement. In this case, a special installation capable of grinding organic matter will not hurt. The sewage pump together with the blade assembly is called a multi-lift.
Expert opinion
Valery Drobakhin
VK design engineer (water supply and sewerage) ASP North-West LLC
Ask a specialist
“If the house is under construction, then regardless of whether a toilet is planned inside the house or not, it is worth installing a sewer pipe into the foundation. To begin with, you can simply turn it off. If you need to install sewerage, it will be very useful.”
When designing, the number of residents must be taken into account. This indicator will directly affect both the volume of the septic tank and the diameter of the sewer pipes that will be used when installing the system. Do not forget about the depth of soil freezing - the system must be in the ground below this mark.
It is better to lay out the main risers at the initial construction stage
What types of sewerage systems exist?
The main types can be called:
- Dry toilets. This format is not very common in private homes. It is more suitable for a summer residence where there is no need for a constantly functioning sewer system.
- A cesspool is the easiest to install and low-cost option. Its inconvenience is that it requires periodic pumping using special equipment, and this is not a cheap pleasure.
- A septic tank is the most common type of sewage system. Waste products are processed using living bacteria and microorganisms or by adding chemicals to the container that decompose organic waste.
The construction of a septic tank cannot be called cheap, but it allows you to do without pumping for a long time. The main task is to add the necessary substances in time. As for the sewerage system itself for a private house, it will be the same for both the cesspool and the septic tank.
You can make a septic tank for the sewer system yourself...
Do-it-yourself sewerage in a private house: diagram and its main components
When drawing up a project for laying a sewer system in a private house, you should mark on the diagram the location of plumbing fixtures, such as a sink or toilet. All pipes are also taken into account (their length and diameter are indicated in the plan), connections, corners and branches. Data is entered on the location of the riser and its outlet to the septic tank.
If you describe all the parameters in detail, you can install the entire system much faster and with better quality. The plan, after installing the sewer system, must be saved. It can help in case of blockages or other emergency situations.
When drawing up a sewerage diagram for a private one-story house (as well as buildings with several floors), it is important to think about the installation locations for cleaning systems - special branches with plugs that will help get rid of blockages. Do not forget about calculating the slope of the highway. If the slope is weak, the drainage will be ineffective, and if it is excessive, grease and dirt will settle on the walls, which will eventually lead to an emergency. Let's try to figure out how to correctly draw up a diagram of the sewer system.
...but a factory tank is preferable - you don’t have to worry about leaks
Collection and storage of wastewater
If there is no possibility of connecting to a central sewer system, several options for a local system for discharge, storage and treatment of wastewater are used:
- cesspool;
- septic tank
Traditional cesspools are not the best option from an environmental point of view. But they are the most economical way to organize an autonomous storage facility for household wastewater. When choosing this method, it is important to correctly organize the placement of the pit:
- The distance between the cesspool and the well should be more than 25 m.
- The well for drainage should be located further than 5 m from the house.
- With a sewerage capacity of 8 sq.m. meters the distance increases to 8 m.
- The distance from the cesspool to the border of the site must be at least 1.5 m.
- The cesspool is located downstream of the groundwater to prevent wastewater from entering the wells.
- The sewage well is located below the level of the house.
The material for building a cesspool is traditionally red brick. If access by special equipment is possible, a pit is constructed from ready-made concrete rings with a pre-concreted bottom. The structure is covered with a slab with an inspection hatch and a built-in pipe for ventilation.
A more progressive solution for organizing wastewater collection is a septic tank. It usually consists of two or three chambers. In the first chamber, the solid fraction settles and decomposition occurs with the help of bacteria. The filtered liquid is sent to the next tank for further purification. In the last chamber, the purified liquid seeps through the gravel base into the soil. The septic tank must be equipped with a ventilation pipe with an umbrella. The structure must be emptied of settled solid waste every 5–10 years. Such designs are purchased ready-made.
Schematic diagram of a wastewater treatment system
Drawing up a sewer system diagram
The first thing you need to do is draw a floor plan of all the premises of the building. It is more convenient if such a diagram is available - quite often during construction, just such diagrams are drawn up. In this case, it can be copied and sewer routes can be “laid” along it. Having indicated the installation points of plumbing fixtures, we begin measurements. Every millimeter can play a role here.
Important! When installing thinner pipes (for example, from a sink), if they are longer than necessary, there is a danger of them being bent. In this case, the water will stagnate, which will lead to a build-up of grease and dirt and clog.
If possible, it is better to place all plumbing fixtures in close proximity to the riser - this will allow sewerage to be carried out with the greatest efficiency. All tie-ins into the riser are indicated. A prerequisite is to connect the toilet flush directly to the main pipe, without additional connections. The drain of the bathtub and sink can be combined - this will save material and get rid of extra pipes and tie-ins into the main riser.
The layout of sewerage pipes in the basement must be of high quality and neat.
Design of the internal part of the system
The general structure of the internal part of the system has two main elements:
- the first is a riser, which provides a connection to the outside of the system and discharges wastewater from the house to the outside;
- the second is the horizontal part of the system (bed), which provides piping to all plumbing fixtures and devices.
It is possible to lay out sewer pipes separately, connecting each device to a riser, or to create one horizontal pipe with devices connected to it.
The second type of installation is used more often, since it is more compact and requires fewer materials and elements. The number of floors in the house is of great importance, since the number of horizontal sections changes and the length of the vertical riser increases. At the same time, the requirements for all sections and elements of the network are the same and do not depend on the number of floors and other features of the house configuration. Sewerage installation is carried out according to the same rules, only the total length of the pipelines and the load on the node for entering the external sewer branch into the house change.
Defining elements:
- highest point. Place of transition of the riser into the fan pipe;
- lowest point. The area where the riser is connected to the outer horizontal part of the sewer.
All the space between these points is occupied by the internal part of the sewer network. Typically, the high point is immediately above the riser connection area of the tee on the top floor. The lower one is located either in the basement or passes through the basement of the house. When installing a sewer system with your own hands, the entire working part of the pipes has to be laid over the ceilings with a passage through the floor.
This significantly distinguishes the installation method from the installation of sewerage in an apartment, where only the creation of a horizontal section is required, and the riser is common and does not require assembly. In addition, the apartment has a short pipe length, which allows you to remove blockages or carry out repair work without interfering with the design of the vertical part of the system. A nearby building has a sewer system in a one-story private house, but it also has its own, individual riser section. The basic principles and rules for constructing a private sewer network are set out in SNiP 02.04.01-85, which must be followed during design or installation.
You may also like: The height of the sewer outlet under the washbasin: types of plumbing fixtures and plumbing features
What diameter should the pipes be?
The diameter of the pipe is selected based on the number of residents and the planned intensity of use of the system. However, there are generally accepted norms. So the diameter of the main riser directly to the septic tank is usually 100-110 mm. The toilet flush has the same diameter. But from the sinks and the bathroom there are thinner pipes. Most often, a diameter of 50 mm is used for such purposes. This thickness will be quite sufficient.
All connections and taps must be made at an angle of 450. If the angle of the sewer pipe is even, it is this point that will periodically become clogged.
When installing a sewer system, it should be understood that the riser must go to the roof, from where air will enter. Let's consider what will happen if there is no air access and the upper part of the riser is plugged, using the example of a two-story house. Everyone knows that there is a hydraulic lock in the toilet that prevents odor from the system from entering the room. If there is no free access to air, we flush the water in the toilet on the first floor. Due to the vacuum, water is “pulled out” from the plumbing fixtures on the second floor. The hydraulic lock is open, all the smell from the sewer system rushes into the living quarters.
The same applies to sewer pipes inside a living space.
Internal wiring
In addition to arranging external sewerage, it is important to know how to properly lay pipes inside the house. There are many nuances:
- Water intake points should be located as compactly as possible for optimal organization of the sewer system.
- The toilet is connected to the riser separately from other appliances to prevent them from sucking up drainage from the toilet.
- Drains from sinks, sinks, showers and other plumbing equipment must be brought to a common riser higher than the drain from the toilet.
- The slope of the pipes should be 2–9°.
- Every four meters of the riser, revisions must be installed at a height of more than 1 m from the floor.
- If the sewer pipes are not hidden under the floor, then inspections must be installed before each turn.
- The riser is equipped with a ventilation pipe with its outlet above the roof level from 70 cm. This will protect the home from unpleasant odors.
- In unheated rooms, the pipeline must be insulated.
- Parts of the pipeline at the joints are coated with sealant.
- To organize drains from sinks and sinks, a pipe with a diameter of 50 mm is sufficient; for toilets, bathtubs and showers - 110 mm.
- The diameter of the riser must be at least 110 mm.
- The smaller the diameter of the pipe, the greater its slope should be.
Connection diagram of the riser with the external sewer pipe
It is advisable to soundproof sewer pipes (this will increase the level of comfort of the home) by arranging a plasterboard box and filling it with mineral wool.
How can you improve sewer efficiency?
The quality of operation of an autonomous sewer system can be improved both by installing additional equipment and purely by installation parameters. To do this, you just need to correctly distribute the slope of the highways. A slope of 3 cm/m is considered the most effective. But for greater efficiency of the sewer system, you can increase this parameter to 4-5 cm/m. This will be quite enough for the efficient operation of the system and not enough for the rapid formation of grease or dirt deposits on the inner walls of the pipes.
Modern means are very effective in combating deposits on the walls. But you shouldn’t expect a miracle from them if a serious blockage occurs. Advertising may claim that the product can easily cope with any of them, but this is not entirely true. In fact, such products are good for periodic prevention. If the pipe is already thoroughly clogged, then there is nothing better than a good old cable.
Many people insulate sewer pipes with mineral wool - a pretty good solution
Speaking about additional equipment, one cannot fail to note the benefits in preventing blockages of such equipment as a household waste disposer under the sink. It prevents large scraps and other debris from entering the sewer pipe. Everything that goes down the drain after grinding has the consistency of liquid porridge, which is not capable of clogging the main line.
Types of sewerage for a private home
Any drainage system consists of two parts: internal and external. The first is designed to collect water from various plumbing fixtures. The second most often also consists of two parts: domestic and storm sewer. The first removes excess water from the roofs of residential buildings and other buildings, platforms and paths. The second collects wastewater from a residential building. It consists of:
- pipeline;
- pumps;
- filters;
- wells and drainage pit;
- filter wells or septic tank.
gravity or forced circulation.
depends on the supply of electricity, Stormwater and sanitary systems are sometimes combined into one and are called a common sewer system. But most often, storm and melt water is discharged separately from household wastewater. Such external sewerage is called separate.
How to properly install a sewer system in a private house: stages of work
All work on arranging the sewer system of a private house is carried out in several stages. There is no need to perform them without interruption, which means you can carry out installation in your free time for a long time. However, according to professionals, such work rarely drags on - as soon as the arrangement begins, the home master tries to complete everything as quickly as possible. Let's look at the steps that need to be completed step by step. The algorithm of actions should be like this:
- We calculate the required volume of the septic tank;
- we install and equip the tank;
- we lay a line from the septic tank to the house;
- We carry out internal wiring of sewer pipes and connect them into a system;
- We connect plumbing equipment.
The fewer bends in the sewer line, the lower the likelihood of blockages.
By following this procedure and simple rules for carrying out work, you can be sure that the system will work flawlessly. Let's look at each step in more detail.
How to calculate the required volume of a septic tank for a private house
The calculation can be made empirically: to do this, you need to sum up the entire water consumption of the family living in the house. However, if the sewerage system is installed during the construction of a residential building, this method is unacceptable. Then you can take the average values recommended by SanPiN. However, it is much easier to use the specially designed calculator below:
The average data is shown in the table below:
| Number of residents | Average water consumption, m3/day | Required container volume, m3 |
| 3 | 0,6 | 1,5 |
| 4 | 0,8 | 1,9 |
| 5 | 1,0 | 2,4 |
| 6 | 1,2 | 2,9 |
| 7 | 1,4 | 3,4 |
| 8 | 1,6 | 3,9 |
| 9 | 1,8 | 4,4 |
| 10 | 2,0 | 4,8 |
Many may wonder why the volume of the septic tank is 3 times greater than the daily wastewater flow. The answer is quite simple. Almost all models of septic tanks installed in our country are designed for three-day processing of organic waste. The same applies to chemicals or live bacteria that are added there. It turns out that three days is exactly the period of time that is necessary for the complete processing of human waste products. Hence the tripled values.
The septic tank should be selected based on the number of residents
But calculating the volume of the septic tank is not enough; it needs to be installed correctly. We will now figure out how to do this.
Related article: Do-it-yourself septic tank for home and garden: without pumping for 10 years. From our materials you will learn the structure, operating principle, location requirements, secrets of independently installing cleaning facilities for a private home, as well as advice and recommendations from specialists.
Installation of the tank and equipment for it
More often, home craftsmen turn to specialists for help in installing a septic tank. However, there is nothing overly complicated in this work.
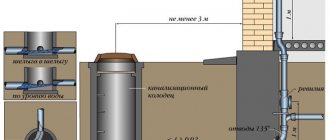
Having chosen a place in the yard and dug a pit, it is necessary to lay a reinforced concrete slab on its bottom, to which the container is secured using cables. If the groundwater level is high enough, then a drainage pipe is first dug into the bottom of the pit and led outside the site into the nearest drainage ditch. Installation of septic tank ventilation is also required. It works as follows. A pipe with a diameter of 50 mm is led from the ventilation hole, which runs underground at an angle of about 4-5 m. At the outlet, an elbow of 450 is installed and then the pipe rises to a height of 3-4 m. This allows for good traction and eliminates unpleasant odors in the courtyard.
In the place where sewage will be drained into the tank, a piece of pipe with a diameter of 100-110 mm is installed (the size depends on the model of the septic tank and the diameter of the planned riser). The septic tank itself is buried underground, outside, above the ground, only a small part of it remains (often just the neck) which is insulated.
The color of sewer pipes and outlets does not matter
Laying a sewer line from the septic tank to the house
To lay pipes, it is necessary to dig a trench at least 60 cm deep. In some regions of Russia, where the climate is colder, this parameter should be greater. In any case, the sewer line must be below the ground freezing level. It is best to fill the trench with river sand or sand and gravel mixture (SGM). After laying the main line, it is also backfilled. It turns out that the pipe is inside the sand cushion. Next, the ASG is compacted a little, and ordinary soil is poured on top.
Important! The pipe from the house to the septic tank must go downhill. The optimal spread is 4-5 cm/m. This will allow the sewage not to linger inside, but to go into the container with the greatest efficiency.
How to do the internal sewerage installation in a private house with your own hands
Sewerage installation in a private house is done in strict accordance with the project, which was already discussed in our article. To make it easier for the dear reader to understand this issue, we suggest looking at several photo examples with comments.
| Illustration | Action to be performed |
| First, we mark the places where the sewer pipes will pass. It is best to do this using a laser level to ensure the required slope of the highway. | |
| Now those places that will be in plain sight should be grooved to hide the sewer pipes in the grooves. But this can only be done if the thickness of the wall allows. | |
| Having cut through the wall along the marks, we knock out the excess concrete (or foam concrete) using a hammer drill with a spatula. | |
| Where the wall will not be grooved, we drill holes with the same hammer drill and install special clamps that will hold the pipe. | |
| We cut plastic pipes to size. This can be done either with a grinder or with a simple hacksaw. | |
| Having lubricated the internal rubber seal, insert the edge of the angle or pipe into the socket of another piece. The connection is quite tight and airtight. | |
| In the same way, we assemble the entire line up to the main riser, which goes to the septic tank | |
| The part that is not recessed into the groove is secured to previously prepared clamps. | |
| Do not forget that finishing work will continue. Special plugs on the pipes will prevent construction waste from getting inside. | |
| All that remains is to connect the line to the main riser. The rest of the branches of the sewer system of a private house are installed in a similar way. |
Having figured out how to properly install a sewer system in a private home, you can move on to installing plumbing fixtures. But first, a few tips on connecting plastic pipes to each other.
Connecting plastic sewer pipes: some nuances
The quality of sewerage installation in a private house depends on the correctness of the connections between the pipes. To do this, you need to purchase a special silicone-based lubricant. It should not be confused with silicone sealant - such compounds are not needed for such work.
If you look inside the bell, you can see a rubber O-ring there. It is quite enough to seal the system. However, it is easy to damage when connecting pipes to each other. Even if the O-ring moves a little, over time the connection will begin to leak, and no one wants that. To prevent this problem, silicone lubricant is used. After applying it, the pipes fit into one another without any problems, creating a reliable and tight connection.
Sewer pipe connections are quite tight
Article on the topic: Sewerage for a private home: how to correctly implement the project, the principle of operation, how to make calculations, selection of components, step-by-step photo instructions for performing installation work without errors, advice and recommendations from experts - read the material on our portal.
Connecting plumbing equipment
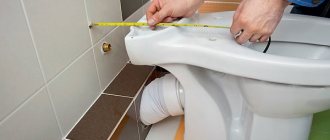
If it is clear how to install a sewer system in a private house and all previous work was done with your own hands, then the last stage should not cause any problems. Any plumbing fixtures, be it a sink or a toilet, contain detailed installation instructions in their documentation. However, some fittings will have to be purchased separately.
Sinks often come without a siphon and connecting hoses. The toilet may not include cistern fittings, and there will certainly not be a flexible corrugated pipe designed to connect the toilet to the sewer riser.
Having purchased the necessary parts, the home technician will easily make all the connections, guided by the technical documentation. But what to do if there is absolutely no time or desire to do such work, and a sewer system in the house is necessary. In this case, you can seek help from specialists.
If the volume of water is small, you can combine several sewer branches into one
Sewer installation procedure
The drainage system of a private house consists of internal and external sewerage and a collection well. In cottages with more than two floors with their own bathrooms, the sewer network is additionally equipped with a drain pipe.
Water supply and sewerage systems are usually designed and installed simultaneously, since the same plumbing and household equipment are connected to them.
The procedure for laying the sewer network:
- Prepare a pipeline project taking into account all the devices connected to it, a slope of 2-3 cm per linear meter, and calculate the amount of building materials required.
- Purchase pipes, connecting elements and fittings.
- Cut the pipes into lengths in accordance with the project.
- Carry out internal wiring and bring the sewer pipe outside.
- Install the drain pipe.
- Lay external drainage.
- Build a collection well and connect a pipeline to it.
Professional sewerage installation in a private house on a turnkey basis: the price of specialist work
The cost of such work is quite high, but for many there is simply no other choice due to various life reasons. Let's try to understand the price tags for such services on the Russian market.
| Name of service | Cost, rub. |
| Installation of connection point to the sewerage system | 1,500 per piece |
| Installation of internal/external sewerage pipes (open) | |
| diameter up to 50 | 200 per m.p. |
| diameter from 50 to 110 | 400 per m.p. |
| Installation of internal sewerage pipes in a pipe (brick, plaster) | |
| diameter up to 50 | 400 per m.p. |
| diameter from 50 to 110 | 650 per m.p. |
| Installation of internal sewerage pipes in a pipe (concrete) | |
| diameter up to 50 | 600 per m.p. |
| diameter from 50 to 110 | 900 per m.p. |
| diameter more than 110 | individually |
| Installation of a sewer riser | 600 per m.p. |
| Ladder installation | 1000 per piece |
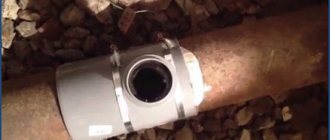
| Installation of a sewer check valve | 1000 per piece |
| Installation of sololift sewage pumping unit | 4000 per piece |
| Installation of a drainage pump | 2,000 per piece. |
| Installation of a drainage pump | 2,000 per piece. |
Having calculated the total amount, it becomes clear that doing all the work by hand means saving a tidy sum, which can be spent on luxury plumbing or something more necessary for repairs.
Advice! The main thing is to ensure the correct slope for the sewer pipe. Only in this case will it function effectively.
External sewerage
The appearance of the internal sewage system is no different from that installed in the apartment. But the amount of work involved in its installation will vary significantly.
Less time and effort will have to be spent on its creation if the home has an old sewer system . In this case, the main work will be related to the dismantling of old pipes. You can use old sewer pipes. However, it may turn out that you will have to redo the entire system. In this case, you will have to spend a lot of time and effort on creating a new autonomous sewer system in the house. The floor will need to be raised.
And if it turns out that the depth of the sewer is insufficient, then it will have to be deepened. To do this, you will have to dig a hole under the foundation, and then measure the distance from the bottom edge of the foundation to the top. It must be at least 1 m. In this case, the wastewater transported along the laid collector pipe will not freeze even in severe winter.
It is necessary to dig a trench from the outside of the house directly to the well . It should be deeper than in the house. This is necessary to ensure a constant slope for the pipe. In this case, the water will flow freely into the well.
At the exit from the house, the trench should have a depth of at least 1 meter, and every 10 meters the depth of the trench should decrease by half a meter.
The principle of sewer wiring
Regardless of the number of floors in a private house, the layout of the sewer system in it is built around the main vertical riser. Horizontal drains and outlets from plumbing fixtures are already connected to it. From below, the outlet to the street is connected to this central pipe to the septic tank or village drainage network. And on top of it there is a fan ventilation outlet to the roof.
If the house is one-story, and the only plumbing fixtures in it are a toilet and a sink with a bathtub, then you can refuse the riser. However, a vertical pipe for ventilation will still have to be made, otherwise all the odors from the sewer will somehow end up in the cottage. Even siphons will not save you in this situation. Pressure drops when draining water will cause the water seals to fail, resulting in sewer stench from the pipes into the kitchen and bathroom.
Pipes for sewer distribution in the house
To install sewerage in a private house yourself, you will need:
- pipes with a diameter of 50 (for bends) and 110 mm (for the riser);
- tees and elbows;
- plugs;
- inspection hatches;
- siphons for sinks, bathtubs and shower cabins;
- fastening elements (clamps).
It is recommended to take plastic pipes for sewerage in a cottage, made of PVC or polypropylene. The former are cheaper, and the latter are more resistant to household chemicals and high temperatures. You can also take cast iron analogues for a country house. They are more durable, but more difficult to work with. If plastic is cut with a regular hacksaw, then for cast iron you will need a grinder or a gas autogen. Plus, for the pressure system you will need a sewer pump (installation with a small storage tank in the basement).
Scheme of natural sewerage of a private house
Wiring diagrams
The installation of sewer pipes in a private house is carried out according to one of two schemes:
- Natural (by gravity).
- Forced, pressure (with pump).
It is best and most correct to give preference to the first, with gravity flow of wastewater. The forced installation option should be used only as a last resort, when it is impossible to ensure natural drainage of wastewater from the building. Such a system is energy dependent; if there is a power outage, the sewage system will stop working. The internal storage tank of the pumping unit can absorb a certain amount of sewage, but it is limited.
Forced sewerage scheme
Installation procedure
The sewage system in the house is assembled from the bottom up. First, an outlet is made in the basement (output through the foundation of the cottage) to connect the street and indoor parts of the drainage system. Then the riser rises upward, installing a tee or cross on each floor above the floor to connect horizontal outlets.
It is recommended to turn the riser to the outlet on the street not with one elbow with a right angle, but with two at 45 or three at 30 degrees. This way the bend will be smooth, which will reduce the risk of a blockage forming in this area.
Features of installing sewer pipe connections in a private house
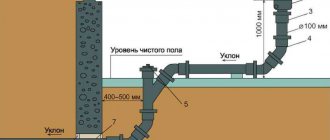
The opening in the foundation is made 400x400 mm or more in size. There should be a free space of about 150 mm from the pipe to the edge of this hole. It is necessary so that when the cottage settles and the soil swells in winter, the outlet does not become deformed or destroyed. The remaining gap is sealed with clay and tow.
Installation of risers
Installation of the riser consists of sequential installation of individual parts on top of each other. Their connection and fixation with each other is carried out due to the presence of a socket at the end of these elements. From the floor on the first floor, a tee is first installed on the branches. Then there is a pipe about a meter high. Then a revision is installed. And then another pipe is installed to pass the floor to the next floor. There is a tee again and everything repeats.
Installation of drainage system
There should be about 1–1.5 m from the floor level to the inspection hatch. If the pipeline is made of plastic products, then the riser must be attached to the wall using clamps on dowels. Moreover, there should be a gap of 15–20 cm from the wall surface to the pipe. And the clamps should be placed under the sockets and with a distance of 4–5 meters from each other in height.
The passage through the ceiling and the space above it, after installing the pipe, is filled with cement mortar with a thickness of 2–3 cm from the pipe and a height of 8–10 cm above the floor. This concrete edging is made to protect the riser, provide sound insulation and prevent the spread of fire in the event of a fire.
Installation of a drain pipe using adapters
Installation of bends
The bends are installed at a slope from the plumbing fixtures of 25–35 mm per linear meter. If the slope is made smaller, the wastewater will stagnate in the sewer pipeline. And with less, the drains will flow too quickly, as a result of which heavy particles and grease will begin to settle inside, gradually forming a blockage.
The length of the horizontal line should not exceed 10 m. If it is laid in an open way, then the pipeline can still be increased by a couple of meters. However, this is unacceptable for sewer pipes closed with a screed. And in any case, for every 8 m of the horizontal section, it is necessary to provide an inspection for cleaning. The sloped outlet is fixed with clamps to the wall in increments of 1–1.5 m. If you increase this distance, the plastic line will sag.
Features of the sewerage installation scheme in the house
Features of sewerage arrangement in one and two-story houses
In a one-story cottage, sewerage installation is usually carried out with one riser in the bathroom and two horizontal outlets in the bathroom and kitchen. But if the house is large and has two or three floors, then the sewer system layout will be more complex. Here it is often necessary to install a pair of separate risers. But in general, the principles of organizing the collection of household wastewater from plumbing fixtures are the same - the slope of the pipes and the supply of wastewater to one point for exit from the building.
Sewage scheme in a one-story house
In order for the sewer system to work properly for many years, during its design and installation you should:
- connect branches to the riser not with straight crosses, but with elements with branch pipes at an angle of 30–40 degrees;
- to fix branch lines at a slope, use clamps with a pitch of no more than 1.5 meters;
- the places where vertical risers pass through the floors must be sealed with cement mortar;
- remove burrs from the ends of plastic pipes after cutting them with a hacksaw into parts of the required length;
- use siphons to form water seals;
- divert the fan outlet away from windows and balconies.
According to SNiPs, in a private house, sewer pipes can be installed in open and hidden ways (in shafts or boxes made of non-combustible materials). The first option allows you to constantly monitor the condition of pipelines and, if necessary, simplifies their repair, while the second is more aesthetically pleasing.
Features of sewerage installation in a two-story house
Another point and a common mistake is the conclusion from the desire to save a fan pipe into a regular ventilation shaft. The sewer air outlet and ventilation in the house cannot be combined, otherwise odors from the sewer system will end up not on the street, but inside the building.