DIY plumbing repair
Author: jk.335500Dec 19, 2019Dec 19, 2019
Sewage equipment provides water supply and removal of used liquid from the water supply system. If the drainage device fails, the siphon in the bathroom is replaced. Recommendations from the experts will help you carry out repairs without calling a plumbing team.
- 1 Design and principle of operation
- 2 Types and features of siphons
- 3 How to assemble a bath drain device
- 4 Required materials and tools
- 5 Installation of a new drain 5.1 Installation of a simple overflow system
- 5.2 Installation of a semi-automatic siphon
- 5.3 Installation of an automatic siphon
Design and principle of operation
Sewage equipment, consisting of 2 mains, is responsible for the continuous circulation of water. Through one pipe the liquid is supplied to the point of consumption, through the other it is drained and removed from the system.
A siphon is a special design that regulates the level of inflow and outflow of water.
The second function of the drainage device is to prevent the spread of unpleasant odors emanating from the sewer system by forming a special seal. It is created by liquid retained in the system after passing siphon bends. The operating principle is based on this.
In addition, the drainage device performs a filtration function. Dirt and mechanical impurities contained in the water supply line settle at the bottom.
Structurally, the siphon is made from a small flask-shaped container filled with water. Pipes are connected to the device on both sides. When the permissible level is filled or exceeded, an overflow occurs and excess liquid goes into the sewer.
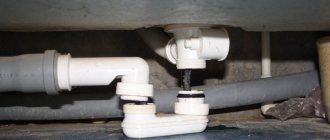
Preparing for replacement
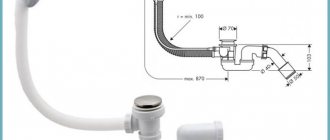
Scheme of a siphon with drain.
Before buying a new siphon, be sure to measure the diameter of the spout of your existing plumbing product. It is desirable that the new siphon has the same fit.
If you cannot find a suitable product, you will have to buy a transition cuff. You can also buy a special siphon with a stepped spout end; it fits all 3 sizes. You will need to trim off the excess and buy the lower seal separately.
Immediately buy a sealing collar along with the siphon. Check its strength and elasticity, see how it will sit on the spout. Avoid purchasing a siphon that has large burrs on the spout trim. They will interfere with seating the cuff. Such a defect indicates low quality of the raw materials.
The entire preparatory stage boils down to dismantling the installed product and mandatory cleaning of the sewer pipe.
When cleaning, you don’t have to try too hard: the cuff is designed to be secured in a rough socket.
Some difficulties may arise if a Soviet-made cast iron product embedded in a pipe with cement mortar is being replaced. Then you will need to arm yourself with a chisel and a small hammer. Only with their help will it be possible to get rid of old cast iron and clean the pipe from cement residues. At the same time, it is important to ensure that no cement fragments remain in the pipe, because in the future they will constantly lead to the formation of blockages. You can remove debris using pliers or tweezers.
Types and features of siphons
Depending on the material, plumbing siphons come in 2 types:
- plastic;
- metal.
The advantages of polymer drainage devices include:
- ease of installation;
- low cost;
- resistance to mold growth;
- resistance to corrosion.
Disadvantages of plastic siphons:
- Limited service life. Often, a metal cable is used to deal with a clog in the sink; if handled carelessly, it can destroy the fragile polymer material.
- Insufficient tightness. To solve the problem of loose fitting of the nuts during assembly, the fastening structures are supplemented with rubber seals.
- Increased likelihood of leaks caused by manufacturing defects. Small irregularities on the surface during operation lead to the appearance of cracks.
Copper, brass, cast iron, and stainless steel are used for the production of metal siphons. The reliability and durability of cast iron drains explain the high cost. The chrome plating adds an aesthetically pleasing appearance. The disadvantage is the complicated installation technology.
Based on design features, drainage devices are divided into 3 types:
- Tubular. Manufactured from a curved hose with an S- or U-shape configuration.
- Bottled. They are made in the form of a flask, which is filled with water during operation. To carry wastewater into the sump, a pipe of smaller diameter is connected to the tank. Having reached a given level, the liquid overflows and flows into the sewer. Siphons do not dry out during interruptions in water supply.
- Combined. The design consists of a corrugated hose connected to a flask. The systems are installed in bathrooms of multi-storey buildings.
According to the principle of operation, drainage devices are:
- Universal. Standard siphons are characterized by the absence of unnecessary elements. A plug is used to regulate the water level. A simplified installation technology is provided.
- Semi-automatic. They differ from the previous version by the presence of a special mechanism that remotely controls the drainage. The fragility of the semi-automatic device requires extreme caution during installation and gentle operation.
- Automatic. The systems lack most standard parts. Regulating the sewer connection area is the task of the built-in mechanism. According to the control principle, they are divided into 2 categories: with a manual lever and “click-clack”.
It is recommended to install a universal siphon. Drain repair is simple and can be done with your own hands.
Installing a siphon under a bathroom sink - installation and selection of materials
Draining the sink in the bathroom - what could be easier, it would seem? An elementary design with a minimum of details, a simple installation that an apartment owner, even with average skills, can do on his own.
But is it really that simple? After all, it is often not only about practicality; functionality and aesthetic components are also taken into account. Yes, don’t be surprised, it’s aesthetic.
In addition, there are several design options depending on the complexity of the design and the choice is a matter of purely personal taste and the proposed circumstances. But first things first.
Design and material of manufacture
When choosing a siphon for a bathroom sink, you should take into account the location of the room itself. When it comes to a residential building or apartment, the most optimal are products with a water seal.
If you intend to use it in your dacha exclusively during the warm season, you should think about a dry-type valve to prevent water from freezing and, accordingly, destruction of the drain. Both options have the same goal - to block the unpleasant “odor from the sewer.”
Sink siphon
Let's look at the designs of both types in a little more detail.
There are three types of parts with a water seal:
- capacitive (also called bottle);
- S-shaped (corrugation or pipe of this configuration);
- elbowed (that is, the pipe under the sink is bent in the form of an elbow followed by a straight section).
Depending on the type of drainage, there are systems with natural drainage, with a built-in check valve, and also with a manual valve.
Let us note that the last option is, let’s say, “not for everyone.” It is designed on the principle of a crane-axlebox and each time rotating it back and forth is a very dubious “pleasure”. And the cost of such a unit is quite high.
A check valve is also not the most optimal option, since the more complex the design, the more often it fails. Consequently, the system will have to be disassembled periodically to replace damaged parts.
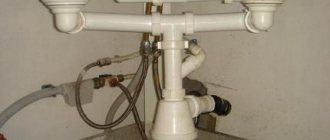
How to assemble a bath drain device
Assembly methods vary according to the type of structure. In a pipe device, the parts are connected one by one. To properly assemble the bottle system, measure the distance between the floor surface and the bathtub.
Next steps:
- First, a flask is built. By sealing the fixation with a rubber gasket, the bottom is attached to the cylinder. Fixing nuts with a seal are screwed onto both ends of the drain pipe. One side is inserted into the top hole of the container, the second is connected to the neck. The joints are sealed with silicone compound.
- The overflow hose is fixed to the corresponding outlet of the flask. The required length is formed by stretching the corrugation. The telescopic design allows you to adjust the size of the prefabricated pipe by extending individual elements of the part. After creating a given configuration at a fixed bend point, the outlet is connected with a nut to the overflow pipe.
A prerequisite is that the hole in the bathroom matches the diameter of the hose. The factory package of the bottle siphon includes a gasket. The seal is placed between the surfaces when securing the overflow.
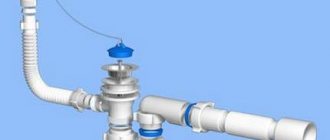
Siphon selection
Convenient bath siphon
Having considered the installation process, you can begin to give advice on choosing this device. At the same time, you need to understand that you can replace the siphon in the bathroom with your own hands in accordance with the instructions, but no one writes anything about purchasing it. So, when purchasing, pay attention to the material from which the siphon is made. If you purchase a device made of plastic, then its surface should be uniform, smooth, and without flaws. Do not purchase a siphon made of nickel-plated metal or steel. It will quickly rust, and after a few years it will completely fail. If you take a metal one, then only one made of stainless steel or brass.
Also, when purchasing, try to choose the simplest design possible. It will cost less and is much easier to install. But do not purchase siphons at greatly reduced prices. As a rule, they are made of PVC, and it tends to disintegrate when exposed to high temperatures (hot water with various chemicals significantly speeds up this process). It is better to give preference to siphons that are in the middle and high price range. This device will definitely serve you for several decades.
In almost all configurations there is a lack of pipes, and they have to be purchased separately. Experts recommend choosing corrugated pipes, as they are flexible, reliable and inexpensive. Also, when using them, you don’t have to think too much about the exact distances between centers. More problems may arise when using a rigid pipe. Here everything needs to be measured exactly down to the millimeter, which can cause a lot of trouble.
Another recommendation from experts is the correct selection of sealant. It is worth paying attention to the basis. If it is acidic, then it will not suit us. It is better to take a more expensive one, but one that does not contain acid.
Required materials and tools
To change the drain device, you will need a minimum set of tools consisting of a screwdriver, pliers and a wrench.
Before starting work, the completeness of the factory delivery of the sanitary siphon is checked, including:
- frame;
- drain pipe;
- decorative grille masking the drain;
- cuffs made of rubber and polymers;
- fastening hardware (bolts and nuts);
- elastic gaskets for sealing joints.
If one or more items are missing, the missing parts must be purchased separately.
In addition, high-quality installation work is impossible without additional materials:
- tow or rags;
- sealing composition based on silicone or rubber;
- FUM tapes.
When dismantling, you will need a container to drain the water. A large bucket or basin will do.
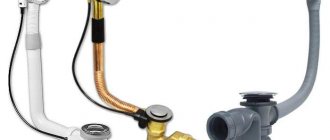
Equipment
Changing the siphon with your own hands is a fairly simple task that does not require calling a specialist to your home. When purchasing a siphon, you must first check its configuration. If any parts are missing, the product must be replaced. So, the siphon package includes 11 items:
- outlet pipe. You should carefully check the threaded insert, since it must be made of metal;
- rubber gasket included with the pipe;
- nuts - they should be supplied in the amount of 2 pieces and have a plastic base;
- rubber cuff in the form of a cone;
Siphon equipment - installation cuff framed by a soft plastic skirt;
- clamping screw, material – stainless steel. It is very important that the screw is made of stainless steel, since other material will become unusable;
- drain plate made of stainless steel;
- drain gasket, and it should be made of either silicone plastic or oil-heat-resistant rubber. There is no need to take a polyethylene gasket;
- product body;
- when purchasing a bottle siphon, the kit should include a stopper and a ring-shaped gasket;
- rubber plug.
Installation of a new drain
At the preparatory stage, you need to remove the old siphon. Access to the device opens after removing the decorative grille. You will need to unscrew the screw that secures the masking. With prolonged use, the threaded threads wear out. In difficult cases, a grinder will help to disassemble the structure.
You should take into account the large amount of dirt that comes out of the siphon after removing the plug. Before you begin, you should consider ways to protect your bathroom flooring.
The method of installing the drain piping depends on the design features of the plumbing fixture.
Installing a simple overflow system
Procedure:
- Plumbers advise starting installation from the bottom of the siphon. Having coated one of the 2 gaskets included in the factory package with silicone sealant, it is placed on top. The structure is brought to the drain hole on the outside of the bathtub.
- Having put on the second seal, the upper section of the trim is screwed into the lower one. Use pliers to tighten the fastener.
- Fix the overflow socket. The neck with the gasket on is inserted from the outside into the overflow hole. Another seal is secured and clamped with a special cap-nut.
- The drain pipe is connected to the sewer. The siphon parts are connected with a flexible hose.
The final stage of installation is system diagnostics. The bathtub is filled with water above the overflow hole. The absence of leaks indicates that the work was done correctly.
Installation of a semi-automatic siphon
When installing a semi-automatic machine, follow the instructions:
- Having pushed the pipe all the way through, connect the collector pipe to the central overflow. A rubber seal is used to seal the joints.
- Having secured the double gasket to the drain, install the filter device on the overflow hole.
- Flat metal covers are connected to an adjusting cable, which moves during operation, and are carefully secured to the drain. Bolted fastenings secure the structure to the overflow.
The central joint is sealed with a butterfly seal. Standard thin rubber gaskets are applied to the side connections.
Installation of an automatic siphon
The installation technology differs from previous options due to the large number of additional parts.
The work is performed in the following order:
- The harness is assembled. The elements of the factory-delivered kit are connected in the order specified in the manufacturer's manual.
- In the click-clack system, the automation mechanism is located between the siphon and the drain. Therefore, installation is carried out according to a scheme similar to the installation of a simple overflow device.
- In machines with a rotary hand lever, the handle is first fixed, securing it to the outlet of the bathroom. An adjustment cable is attached to the base of the handle, connecting it to a corrugated hose. At the next stage, a control mechanism is installed that controls the opening and closing of the plug in a given mode. The automation is securely fixed to the drain and connected to the cable.
- The final step is the installation of a tubular or bottle-type siphon body that forms a water seal. Assembly is carried out at the preparatory stage, and at the end the assembled structure is fixed in the drain-overflow system.
To prevent leaks during operation of the siphon, ensure reliable tightness of the connections. Reduces the likelihood of leaks in the drain system by additionally treating the joints with a silicone compound.
Similar articles
How to replace glass in a shower yourself
How to change bathroom pipes with your own hands
Causes of leakage in shower cabin elements
How to choose a new siphon
When choosing a siphon model, it is worth considering several factors. These are:
- The price determines the quality of the material, the manufacture of the siphon and its durability.
- Appearance. A siphon installed in an open place should look aesthetically pleasing and fit into the design of the room.
- The diameter of the sink drain neck must match the size of the seat on the inlet pipe.
- It is desirable to have an overflow system.
- Availability of additional outlets for connecting a washing machine and dishwasher.
- The dimensions of the siphon depend on the horizontal and vertical distance from the sink neck to the sewer pipe.
- When the sink neck and sewer pipe are located in different planes, a siphon with a corrugated drain pipe is purchased.
- The diameter of the drain pipe must be the same or smaller in diameter than the sewer pipe. A pipe of smaller diameter is mounted with an adapter.
It is important! There should be no chips, cracks on the siphon, or burrs on the threads. Sealing gaskets must be elastic, solid, and without damage.
What is a bathroom siphon
The drainage system designed for the bathroom is very similar to other water drainage systems. However, the design has some differences, for example, the presence of several outlets for water at once.
One of them is intended for overflow, and the second for draining. There are also special drainage systems in which filling and draining are controlled automatically or manually.
The operating principle of each such device is not complicated; when the water is drained, it does not completely go into the sewer pipes, but remains in the “elbow”, thus forming a water seal.
This helps prevent gases from entering the room. Some types of drains additionally have a mechanism that allows you to lower or raise the plug, thereby controlling the flow or filling.
Typically, a cable and a switch handle are used for control. Just turn the handle and the cable will tighten or loosen. This system allows you to draw in or flush water without putting your hands into the bathtub.
Checking the reliability of connections and preventing leaks
The siphon installed on the bathtub must be checked. To do this, draw a bath of water, then you need to inspect the siphon and make sure that water is not leaking from it. If the floor under the siphon is dry, then the lower part is connected to the sewer correctly. Then the plug is removed from the bath. It is also important here to make sure that there are no leaks anywhere during draining. If everything is dry, then the bathroom siphon is connected correctly, and now you can safely use it.
If a leak is detected somewhere, the problem area must be disassembled and the causes of the malfunction eliminated. Problems can occur due to carelessly installed gaskets, nuts that are not tightened tightly enough, or leaky connections. After eliminating the problems, the entire structure is checked again.
Conducting hydrotests
- Pour water into the bathtub to check how well you were able to replace the siphon under the bathtub.
- Check all connections: they should not leak. If necessary, tighten the fasteners more tightly. And also check to see if there are any leaks between the bathtub and the overflow. For more information on how to get rid of a leaking water seal, read the article on our website “The siphon is leaking under the bathroom: what to do?”
- Bend over and check the drain from the outside. Sometimes water may leak in this area. If this is the case, then go over it again with silicone sealant.
Checking the functionality of the drain
So, now you know how to replace the siphon under the bathtub. And if you follow everything strictly according to the instructions above, then you will not only do everything correctly, but also quite quickly. Good luck in assembling and installing the bathroom siphon!
Interesting on the topic:
- How to install an acrylic bathtub
- Installation of a metal bath
- Corners and screens made of plastic for baths
- Installation of a steel bath
- Installation of a cast iron bathtub - stages of work
Types of drain devices
The simplest and most well-known design today is a plug that is pulled out of the bathtub drain hole using a chain. Leading manufacturers of luxury plumbing offer various options for automating this process.
- In particular, a simple device has been developed that is attached to the overflow fitting. Water is discharged from the bathtub by turning the flag placed at the top.
- In other designs similar in purpose, the drain is controlled by turning a lever or pressing a special button.
- In modern homes, the function of automatic water supply and drainage is assigned to computer control systems such as “Smart Home”. In this embodiment, remote control is implemented via mobile communication lines.
The functionality of simple and complex devices for draining water from the bathroom includes control of the water level, eliminating overflow and flooding of residential premises.
Breaking down a cast iron bathtub for removal in parts ↑
If you need to dismantle an old bathtub and install a new one, then the easiest and fastest way to get rid of outdated plumbing fixtures is to simply break them apart with a sledgehammer. Cast iron is a strong metal, but it cannot withstand a series of strong blows from a heavy hammer and will definitely crack. After this, it will not be difficult for even one person to remove small pieces from the apartment.
The only significant drawback of this method is the extreme noise produced during the breaking process. To reduce the need for knocking, you can use a grinder. The procedure will be as follows:
- As in the previous case, disconnect the plumbing from the communications, cut or otherwise dismantle the drain pipe.
- Free the bathtub from cement mortar around the perimeter. If there is a decorative screen, then it is broken with a chisel and hammer.
- Move the bowl a little away from the edge of the wall. Using a grinder, make cuts on the curved edges in the middle on both sides. It is these edges that give the bowl the necessary rigidity, so you need to saw them completely.
Next, all that remains is to hit the bottom with a sledgehammer a couple of times, after which the bathtub will “fold” exactly in the middle. The only thing that should not be forgotten throughout the entire demolition of sanitary equipment is eye protection. Use special masks or goggles, otherwise chipped pieces of enamel or shavings can cause injury.
Breaking down a cast iron bathtub
Video: How to break a cast iron bathtub ↑
The work of dismantling communications, demolishing and removing an old bathtub is not extremely difficult, although its labor intensity for one person is quite significant. The greatest difficulty is caused by dismantling a cast iron drain, the stuck nut of which is almost impossible to unscrew without the help of, for example, a hammer drill. Breaking will also require significant physical effort, so it is better to do the work with an assistant or immediately seek help from a specialist.
What it is?
A trap is a plumbing device that is used to connect a bathtub or shower drain to the sewer system. This device performs three main functions: it ensures fast, unhindered drainage of water, tightness and absence of sewage odor in the room.
All this is possible thanks to the special design of the siphon in the form of a curved pipe, in which a water seal is created that does not allow unpleasant odors into the room. Before installing a siphon on a bathtub, you need to choose a new suitable model. There are the following main types of devices:
- Metal. Metal models are most often made of cast iron or copper. They are more expensive, their assembly and installation are more difficult for an untrained craftsman due to their bulky size and rigid shape. Cast iron siphons were used in Soviet-era bathtubs, so everyone is familiar with their reliability and durability firsthand.
Metal siphon - Plastic. Modern models are usually made of plastic with the addition of metal parts. They are lighter, more compact, flexible and inexpensive. Thanks to these qualities, assembling a bath siphon has become much easier and more convenient.
Plastic siphon
Please note that the assortment of plumbing stores now includes more technologically advanced and functional models equipped with automation. Such devices have an automatic drain plug, which is very convenient to use. However, these devices are more expensive and more capricious, so they often break down.