In 1884, the UNITAS sanitary product received first prize at the International Exhibition in London. Since then, it is difficult to imagine an apartment, house or public place without this device.
Anyone can install it themselves if they wish. To install a toilet in a private country house, you need to understand how the product and sewage system work, and fully follow the work instructions.
Features of toilets for summer cottages
There are two options for choosing a toilet for a summer resident:
- standard ceramic with siphon;
- plastic for summer cottages.
Toilet bowls for a summer residence should be:
- frost-resistant;
- lungs;
- inexpensive;
- with direct sump without siphon;
- easy to install and operate.
The main requirement is to work without using water. Ceramic toilets can be installed in dachas with central water supply and sewerage. The toilet must be heated. To prevent the water in the system from freezing.
Required Tools
Self-installation of the unit does not require a lot of time or money for preparation, however, it is important to purchase the necessary consumables:
- flexible corrugated cuff (or plastic drain pipe) for connection to the sewerage system
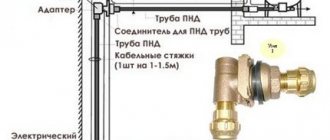
- bendable hose for connecting the tank and water pipe
Tools and accessories
Directly for installation and fastening you will need:
- Industrial hammer drill (another possible option is an impact drill)
- Drill (for making holes)
- Screwdriver Set
- Adjustable and open-end wrenches
- Spear drill bit for tile work
- Yardstick
- Construction level (preferably water level)
- Hammer and chisel
- Marker or pencil
- Metallized tape
- FUM tape
- Sealant (preferably silicone)
- Cement mortar
Preparing for installation
In order to properly install the toilet, you need to prepare a horizontal base. The floor can be wood or concrete. In both cases, it is necessary to provide for bolting the housing to the base.
Choosing a place for the toilet
The location for the toilet is selected in accordance with sanitary and architectural standards, this distance is:
- from the well at least 25 meters:
- at least 5 meters from the house.
In addition, it is necessary to take into account the slopes of the site. The toilet should be at the lowest point of the site.
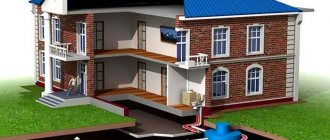
Design elements
Structurally, the toilet consists of a cesspool and a house. The house can be made of wood, brick, foam blocks, cinder blocks. Pay attention to the overlap of the cesspool. Wooden beams must be at least 100*100 mm, plank flooring 50 mm thick. Wall and ceiling cladding can be made from 22 mm thick boards.
Required Tools
To make a wooden toilet structure you need to have the following tools:
- hand circular saw;
- jigsaw;
- screwdriver;
- square;
- level;
- roulette;
- electric drill;
- felt-tip pen or pencil.
If you can’t buy ready-made lumber, you need to have an electric planer.
Planning
Before installing a toilet in a private home, a number of preliminary steps are performed. And the first on this list is the floor plan. You cannot install a toilet in a private room without a plan. The diagram will require:
- precise measurements between location points;
- plumbing dimensions;
- type of equipment being installed.
According to plumbing standards, the distance between the wall and the device should not be less than 20 - 25 cm. The free space between the plumbing fixtures and another object is 65 cm.
How to install: step-by-step instructions
Each toilet bowl has holes in the bottom flush for mounting it. Let's look at three mounting methods.
On a wooden floor
Before attaching to wood sheathing, you must select a location for installation. Trace the installation location with a pencil and mark the holes for mounting screws with dots on the floor. Pre-drill holes 1/3 the diameter of the screw. Lubricate the screws with paraffin or oil and screw them in.
On tiles
If there are ceramic tiles on the floor, the body can be glued to it with epoxy resin. The prepared epoxy adhesive is applied to the base of the toilet and installed on the floor. Excess glue is immediately wiped off with a wet rag.
On a wooden base in a cement screed
To do this, cut out a wooden backing from 10 mm plywood or a thick board along the contour of the base of the toilet body. The board is secured to the base with bolts, and then nails or screws are driven into it from the outside. After this, the toilet is installed on a cement screed. Nails and screws with their heads will hold the body.
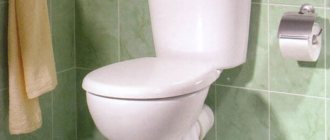
Bowl installation
The first step is to mark the installation: place the bowl on the floor and mark its attachment points. Drill the required number of mounting holes in the marked areas. Then make similar holes in the floor surface and carefully hammer the dowels into them. Next, mount the bowl: insert the bolts through the sealing gaskets into the pre-made holes, tighten the fasteners and close them on top with special plugs.
Advice. Do not tighten the bolts to the stop end - you risk deforming either the toilet bowl itself or the connecting parts: tighten them until the device is firmly attached to the floor. In addition, perform final fixation of the device only after precise adjustment of its position.
We advise you to study - How to make a bunk bed with your own hands. step by step process for making a simple wooden bunk bed. detailed drawings
If the floor surface is uneven, but you do not have the opportunity to lay a new finish, level the position of the bowl in this way: place it not on the bare floor, but on special plastic spacers.
Installation of a toilet bowl
Connection to sewerage
In remote villages there are not many options for sewerage installations. Sewerage can be:
- gravity;
- pressure
The simplest sewage system is a cesspool. But despite its simplicity, it must be isolated from groundwater. The cesspool is located in a place where a sewage disposal truck can drive up.
Features of the dacha sewage system
The drainage system at the dacha can only be of periodic operation. After filling the cesspool, it must be cleaned. If possible. Then install a large plastic container or several septic tanks with drainage into the ground. Deep biological treatment units have proven themselves to be the best. These are miniature treatment plants that use a multi-stage method of wastewater treatment. The only drawback of these systems is the high price.
Gravity type sewer
The simplest type of waste disposal at a dacha is gravity-flow sanitary sewerage. This method of drainage removal is inexpensive and can perform its functions for many years. But this requires strict adherence to slopes. The disadvantage of this method is that the cesspool or septic tank must be located close to the house.
Pressure type of sewerage
Pressure sewerage is used in cases of supplying wastewater over long distances.
It requires the use of electricity, automatic control and will not work if it is turned off. To install a pressure sewer system, you need to buy a fecal pressure pump with a grinder.
Connection options
Options for connecting a toilet in a country house depend on the method of removing drains and connecting sewer pipes, as well as the location of the cesspool. They come with a connection to a water supply or a pressure tank and sewerage system.
With vertical outlet
A toilet with a vertical outlet without a cistern is the simplest and most inexpensive. It is installed directly in the toilet above the cesspool. When connecting to a water supply system, it is necessary to ensure the supply of water and removal of feces through sewer pipes with a consistent slope. If your dacha has the opportunity to connect to a sewer system, it can be installed directly above the sewer pipe.
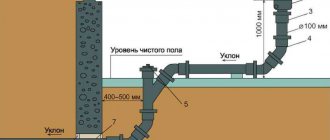
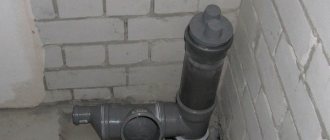
With horizontal outlet
First of all, the toilet must be heated or located directly in the house. It can be connected in two ways:
- using corrugation;
- using plastic factory outlets.
In the first case, the corrugation can be connected directly to the sewer pipe in the floor or wall. The corrugation stretches and bends within acceptable limits. In the second case, plastic bends and pieces of sewer pipes are used. This requires special rubber or silicone seals.
To prevent the corrugation from starting to leak water over time, it is necessary to insert a piece of sewer pipe into the socket, and then install the corrugation. In this case, the connection will work long and reliably.
With oblique release
A slanted outlet toilet is installed in a home where the socket of the sewer pipe exits the floor at an angle. It is necessary to install a cuff with an eccentric in the socket and then connect the toilet.
- To ensure tightness, coat all connections with silicone sealant;
- if the eccentric collar is not enough, use plastic bends.
Without corrugation
A connection without corrugation is preferable; it does not clog or crack. But such a connection is only possible if the distance between the toilet and the socket is small and it coincides along the axes of the outlet and sewer pipes. A slight eccentricity is allowed. In order for the connection to work reliably, rigid eccentric cuffs and plastic bends are used.
The main differences between installing a toilet in a house and installing it in an apartment
The methods of equipping a toilet in a house and apartment are practically no different from each other. The difference lies in the use of waste pipes when connecting the toilet to the drain manifold. Fan pipes protect the apartment from the penetration of unpleasant odors from the common sewer riser. When installing plumbing in a country house, the use of such pipes is not necessary.
Final stage
After installing the toilet and connecting it to the water supply and sewerage systems, tests must be carried out.
To do this, the tank is filled several times and the water is released. Check all connections with a blotter. If there is a leak, fix it with silicone sealant, after drying the connection with a hairdryer. Based on the above, it is quite possible for a summer resident to independently install a toilet of any design. The main thing is to know exactly what this will require and the correct course of work.
Choice
Solving the question of how to install a toilet in a private house is impossible without relying on parameters common to all models. The main selection criterion is the method of fastening and the type of drain. When replacing equipment, preference is given to a product with a similar type of drain and mounting method. The entire segment is divided into 6 types:
- For dachas - a bowl without a tank and fastenings, fixed with ordinary bolts. (A necessary accessory if a drainage pit is built in a private house).
- Compact floor-standing toilet - consists of two interchangeable elements. Fixed with special fasteners included in the kit.
- Monoblock floor – one-piece design. Disadvantage: if one element breaks, a complete replacement is required.
- Attached - with a tank recessed into the wall.
- Suspended - wall installation with complex installation of a holding frame frame and a flushing mechanism.