One of the most difficult and critical stages in the construction of drainage systems is the removal of the sewer pipe from the house. It is necessary not only to position the pipe correctly, but also to solve several problems along the way.
It is necessary to ensure the specified slope, insulate the pipeline, and maintain the working qualities of the foundation. The procedure is seemingly simple, but the quality of operation of the entire sewer line largely depends on it. Let's take a closer look at it.
Things to consider
Before installing a sewer system, you need to analyze a couple of main points.
- What is the planned number of people to live in the house?
- Will this be a periodic or permanent presence?
- At what distance from the house are reservoirs, wells and wells?
- How deep is the foundation?
- What is the depth of soil freezing?
- What type of treatment facilities will be used?
- Is the entire internal system of the house combined into one non-specialized riser?
- What pipe material is planned for use?
Thanks to the answers to these questions, it will be possible to choose the best type of septic tank, find out its capacity and location, assess the scale of work on dredging the soil, and choose the best tool.
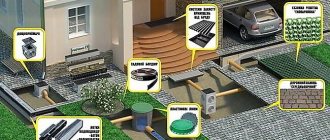
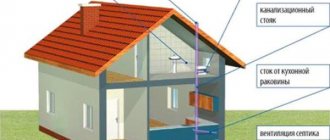
Design stages
Sewage outlet diagram
The design of a sewerage system in a private house is created even before the construction of the pipeline begins. It should take into account the following points:
- is it possible to connect the sewerage system to the central communication complex;
- will live in the house permanently or temporarily;
- how many residents and potential guests are planned;
- How far are the rooms with sewer drains from each other?
If connection to a central system is not intended, choose what type of treatment facility will be installed: cesspool, septic tank, biotreatment station.
When building a new house, the sewer pipe from the house to the septic tank is designed simultaneously with the building plan. This allows all catchment points to be installed closer to each other, which facilitates the construction of a simple and efficient network with a single drain pipe.
For a large private cottage, you can make an exception and install a system of two risers, but the exits must be located at a distance of at least half a meter.
Choosing a drain location
The minimum distance to which treatment facilities must be removed is 5 m. This is necessary so that the rising smell does not enter the house. The best option would be a value of 10 m. This does not mean that the distance cannot be made larger, just in another case, if the slope is maintained, the trench will need to be made much deeper.
- The distance from sources of clean water should be thirty meters.
- The container should not be on the border of the site.
- If groundwater is located close to each other, care must be taken to ensure that the container is well sealed.
- For greater convenience in servicing with a vacuum cleaner, it is better to locate the septic tank closer to the roadway.
- At a time when the presence of filtration fields is planned, it is also necessary to allocate sufficient territory for them.
- Well, if the territory has a natural slope. This greatly facilitates the laying of communications.
Drainage from the house
To remove sewerage from a house, you need to evaluate several factors that may subsequently affect the complexity of the process. First, you need to assess the depth of the foundation of the house; if it is up to 50 cm, then you need to dig under the foundation. But this will be advisable if the distance to the treatment plant is relatively close (up to five meters), since the further the septic tank is located, the deeper the trench will need to be dug in order to ensure the required drainage angle. The work will only consist of digging a trench from the house to the treatment plant.
If the house is large and the depth of the foundation is more than 50 cm, then it will be necessary to make a hole in it, and the diameter of this hole must be greater than the expected diameter of the sewer pipe in order to place the sleeve at the point where the sewerage passes through the foundation.
The diameter of the waste pipe is selected taking into account the tasks that the sewerage system must solve in your home. If the task of amenities is limited to only a shower and a pair of washbasins, then its diameter may not exceed 5 cm. If the house is equipped with a toilet, then it is advisable to double the diameter.
Equipment for work
The foundation hole must be made at an angle to the outer edge. Foundations up to 40 cm wide can be punched manually. If the foundation is thick and accompanied by reinforcement, then it is necessary to use special installations based on an electric motor and a drilling rig, with nozzles used depending on the design. In the case of reinforced concrete, diamond tips are used, as well as pobedit-based materials. In this case, the holes are relatively smooth and do not require additional modification.
Tools that can be used to make a hole in the foundation:
- perforator;
- jackhammer.
For related work, you may also need a grinder with diamond coating on the disc if you have to cut off the fittings that come across during drilling.
If there is no specialized equipment, one of the methods for making a hole in the foundation is to make several control holes with a drill, about 1 centimeter wide. Then you need to work with a jackhammer. If you don't have a jackhammer, you can use a sledgehammer.
Hole in concrete using a hammer drill
Selection of local sewerage
The easiest to make will be a simple cesspool. It is possible with both a filter and a sealed bottom. Everything will depend on exactly what level the groundwater rises to. It is manufactured:
- from cement rings;
- the method of lining the recessed walls using bricks;
- pouring concrete.
In other cases, perhaps a huge plastic container. Its disadvantage is the need for constant cleaning, which can cost a lot of money.
The next option is perhaps a homemade septic tank. Its essence is contained in the presence of several settling chambers. The wastewater, slowly moving through it, is cleaned and discharged into the ground or reservoir. Under such conditions, it will be necessary to prepare a couple of separate pits and line them according to the principle from the previous version. In order for the structure to be cleaned, much less cleaning is required.
The best way out of the situation is considered to be the installation of mini-sewage treatment plants. Despite the fact that they are much more expensive than previous options, with them you can forget about waste disposal. And the purified water can be used to water the plants in the garden.
Advice! The starting point for selecting the volume can be a figure of 0.15 m3, which is the minimum indicator of water consumed per day per person, i.e. for 4 people per day approximately 0.5 m3 will be consumed and discharged.
Laying pipes underground
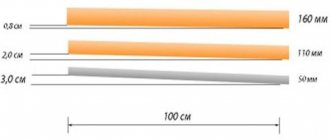
PVC pipes are also used for installation of external sewerage. To ensure free flow of water, they are laid obliquely. Each subsequent pipe deepens 3-5 cm below.
ATTENTION! For each meter of sewer pipe, a slope of 1-2 cm must be provided. If the slope is greater, the noise in the pipe will increase; with a decrease in the slope, the movement of water in the system slows down.
Laying a sewer system in trenches is labor-intensive work. You can dig them manually or rent special equipment. The depth of the laying depends on how the soil freezes in a given area (for central Russia, a depth of 1.7 - 2 m is sufficient). The pipes are laid in the trench with the sockets down, inserted one into the other. It is advisable to install wells at the bends of pipes laid underground.
Transition area
This segment of communications is one of the most critical. It supplies the connection between the internal and external sewerage circuits. Its production must be approached with special attention, because... This is where, if the pipe slope is not properly executed, blockages appear much more often. There are a couple of ways to implement it:
- During the laying of the foundation. This option is the simplest, and very effective, because it allows withdrawal without additional dismantling work. In order to do this, you need to analyze in advance the steps given above. At the end, which will be directed to the location of the VOC, an iron sleeve is inserted below the level of the future filling. Its diameter must be more than 200 mm, the wall thickness must be from 3 mm. Instead of metal, it is possible to use an asbestos pipe. The length of the pipe must be calculated so that its sides extend beyond the foundation thickness line by 15–20 cm. To ensure that the holes are not blocked during the pouring of the foundation, it is possible to close the ends or stuff rags inside. It is possible to provide a larger diameter of the pipe in order to also use it for introducing water pipes. If the foundation lies deep enough, then a problem may arise with creating a sewer slope. To avoid this, the sleeve can be placed directly into the thickness of the foundation. All that is required later is to dig a trench to the depth of our workpiece.
- Under the foundation. This method is very similar to the previous one, but it is prepared after the completion of the main work or in those cases, at a time when sewerage is being laid in a dilapidated house, where it was not provided for under any circumstances. All work boils down to the fact that you need to choose the place of transition to the premises. The floor covering is removed, and the screed is knocked down using a hammer drill or jackhammer. Then the soil is deepened below the foundation level. The same recess is made on the outside. A cartridge case is placed in the resulting trench, as in the first case. Then it is possible to carry out the main installation normally. Dredging the soil from the outside can be done not manually, but with the help of a drill. Along with this, you need to correctly calculate the angle in order to arrive exactly at the laid workpiece.
- Through the foundation. The choice of this method may be necessary in the case when the foundation is at great depth. A hole is dug from the outside of the building to a depth of 50–70 cm. Its dimensions should be such that a person with a tool can comfortably fit there. The hole can be made using a special drilling station. It is fixed directly to the wall and drilling is carried out using a crown. Immediately select the diameter that is needed. This option is not available in all cases, so it is possible to use another method. For this, you will need a wonderful hammer drill and a concrete drill, which will be longer than the width of the foundation. Using chalk, draw a circle with a diameter larger than the diameter of the sewer pipe. Holes are drilled along the drawn line, one to one. Then a chisel is installed in the tool and the released layer is carefully removed. When performing such work, you need to be careful and avoid unnecessary strong impacts, which could lead to cracks in the structure.
- Through the basement. It is not uncommon that there is a basement or cellar under the house. Under such conditions, withdrawal can be carried out through it. This will require the same tools as in the previous case. The sequence of work will be as follows: part of the floor is removed from the premises, a small area of the screed is knocked down using a hammer drill or jackhammer. Using a drilling rig or hammer drill, a hole is drilled into the basement slightly larger than the diameter of the sewer pipe. From the basement side, through the foundation, you need to make a window through which the outlet will be carried out. At the same time, it must be at such a level that it is possible to set an angle of 45? at the junction of the pipes. If this is not done, it will be impossible to maintain the required slope.
- Through the wall. This method is the most undesirable, but it may be necessary when the foundation is made of granite blocks, which will be difficult to drill, and there is no possibility of digging under it. The hole is made using the same method as outlined in the previous two options. The most important part of this whole process will be the installation of a special box near the exposed pipe. It can be made from brick or foam block. It is fundamentally important that its top point is 20–30 cm higher than the pipe. Upon completion of the construction and installation work, mineral wool is laid inside, which will serve as insulation. If this is not done, then in winter the water will freeze and the sewage system will be non-functional.
Advice! In the case when the pipe is discharged through the foundation or under it, but this level is higher than the level of soil freezing, then the size of the laid sleeve must be 2 times larger so that it is normally possible to lay insulation in it near the sewer.
Pipes for local sewerage
Laying a plastic sewer pipe to a well
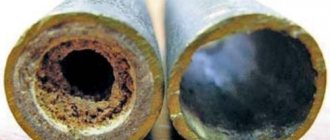
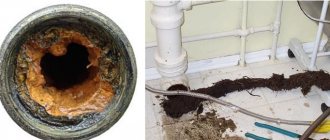
Previously, exclusively metal pipes were used for sewer construction. However, due to the metal's susceptibility to corrosion, it is increasingly being replaced by plastic.
An additional argument in favor of plastic pipes is that there is no need to resort to the services of a welder or involve construction equipment for installation, because plastic and metal pipes of the same diameter differ significantly in weight.
When choosing types of pipes for organizing local sewerage for a country house, you should remember that there are varieties for internal and external sewerage.
- Internal sewerage devices include all plumbing items and pipelines located inside the house.
- External sewerage includes pipelines located on the street, as well as storage tanks and wastewater treatment facilities.
Pipes intended for outdoor use are produced in brown-orange, and those designed for indoor use are produced in light gray.
Advice! Carefully read the information included in the accompanying documents for the pipes. As a rule, manufacturers try to describe in detail the scope of application of each type of pipe. And don’t forget to ask to see the quality certificate to make sure that you are purchasing a real product and not a fake.
Laying external channels
The difficult stage of withdrawal has been completed; now it is necessary to correctly install the pipe into the septic tank:
- The first step is to clear the area. The top layer of turf is removed along the entire length of the future trench.
- Correct measurements of the length of the pipe from the transition point to the wastewater collection point are made.
- Now it is necessary to calculate to what depth the trench will need to be made. To do this, it is fundamentally important not to forget that the slope of the pipe should be 1–2 cm per meter. If the starting point of transition from the internal sewerage to the external one is at a depth of 50 cm, and the distance to the septic tank is 10 m, then the entry point into the drainage pit should be at the level of 60–70 cm. In the case when the landscape goes under slope, you need to calculate the difference and subtract it from the final result. This can be done quite simply. A line is projected using a laser level. From it, measurements are taken to the surface near the house, and near the septic tank. For example, if the slope is 20 cm, then a recess of only 40–50 cm will be required near the septic tank.
- The trench is constantly dug 20 cm deeper than planned (the width in most cases is 40 cm). This is done to add sand to this thickness. The sand is well compacted and spilled with water. Then he will most likely sit down, based on this it will be necessary to supplement this level.
- It is better to assemble the structure on the surface, this way it is possible to ensure the best joining, and it is simply more ergonomic.
- The pipe is being laid. A fill of sand is also made around it and compacted well. But do this only on the sides, because pressing from above can easily damage it.
- The entrance to the septic tank is sealed using a rubber cuff.
- It is necessary that the installation site is not an area with intense traffic. If this is the case, then it will be necessary to lay corrugated sewer pipes or additional sleeves, which will compensate for the pressure.
Advice! In certain cases, external installation is permitted. In this case, you will need to take care of good thermal insulation of the pipe by wrapping it in a couple of layers of mineral wool and securing everything with thick foil. If you are not sure whether the pipe in the ground is really below the freezing point of the soil, then it is also possible to insulate it or lay a heating cable along it.
For external installation, take a special pipe that is designed for this purpose. In conditions of enormous load, it is possible to use corrugated. In addition, take care of the ventilation of the septic tank by installing fan ventilation.
Carrying out road cleaning
In a situation where autonomous sewer systems are located at a distance of more than 15 meters from the house, then, according to SNiP, the equipment of various inspection wells or cleanings is required. Such special inspection wells should be installed every 15 meters of the pipe, or even every 10 meters if we are talking about straight, level sections.
Special inspection wells for an entire network of sewer pipes with a diameter of 100 mm or more are usually installed in sections of the pipeline where there are turns in the circuit or changes in slopes, as well as connections of branches or pipes of different diameters. This will increase the level of reliability of the entire system, as well as simplify monitoring the operation of the system and the use of sewerage.