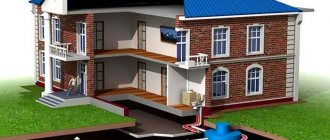
Today, a comfortable stay in a country house or dacha, not to mention the private sector of cities and towns, is unthinkable without providing appropriate public amenities, among which the organization of sewage drainage plays an important role. It is a system of elements and pipelines connected to a centralized network, or an autonomous discharge system equipped with special settling filters. We will tell you about the advantages and features of each type, their design, methods and rules for installing external sewage systems.
Installation of external sewerage
- 1 Design and preparatory work
- 2 Equipment selection
- 3 Installation of external sewerage to the general network
- 4 Features of installation of autonomous external sewerage
- 5 How to avoid mistakes?
- 6 Cost of work
Design and preparatory work
The first stage of any home improvement work is an analysis of conditions and needs, and the development of a work project. In the case of installing an external sewer system, the first and most important issue is to determine the degree of autonomy of the system based on a number of factors, the main one of which is economic. The theoretical costs of building a line to the nearest sewer network are compared with the costs of creating an autonomous system with a septic tank, filtering and distribution system.
In the second case, it is also important to take into account the long-term costs and difficulties associated with maintaining and repairing equipment, as well as periodically pumping out the contents of the septic tank.
The second stage is planning, drawing up working sketches, determining the need for materials, and clarifying the cost of work. At this time, the location of pipelines and structural elements is developed, possible difficulties and ways to solve them are analyzed. The result should be a finished project, which should preferably be agreed upon with a specialist.
General diagram of the sewer system
Each house is individual in its own way, so communications are designed for each household separately. Using other people's projects may lead to malfunction and breakdowns.
The first place in planning is drawing up a general scheme. As you know, the sewage system consists of an internal and external part.
The first includes: plumbing located in the house and internal piping. The external system includes a pipeline connected to a centralized system or an autonomous treatment station, and the treatment facility itself.
Equipment selection
One of the most critical operations in the process of performing preparatory work is the choice of material and technical characteristics of the pipeline. If previously the undisputed leadership in the market belonged to cast iron pipes, in recent years they have partially lost their position to plastic (PVC) products. Debates about the best material continue to rage, as each provides specific benefits to the user. The advantages of cast iron pipes include:
- high mechanical strength;
- durability and reliability, especially when applying protective coatings;
- good sound insulation and thermal insulation;
- ease of creating high-throughput systems.
Here are the main advantages of plastic pipes compared to cast iron:
- lower price (in most cases);
- resistance to corrosion and chemicals;
- low weight, which facilitates transportation and installation;
- no need for complex plumbing and welding work.
Therefore, when choosing a material for each specific pipeline, it is necessary to take into account such operational characteristics as permanent and temporary loads on the pipeline from the external environment and flow intensity. In addition to choosing pipes, you need to decide on the configuration and type of additional elements. In any case, you will need adapters, turns, and fastening mechanisms.
Particular attention will have to be paid to the choice of equipment for an autonomous external sewerage system. You will have to select reliable filtering and drainage mechanisms (for example, a special well) that eliminate the possibility of groundwater clogging.
The most important element of the structure will be the septic tank. It is necessary to select its volume in accordance with the intensity of sewer discharges, on average - based on 1 cubic meter of capacity of one resident.
The installation location of the septic tank must not only correspond to the route of the main line, but also ensure the convenience of connecting the sewage system, since the contents of the septic tank should be pumped out at least once every two years. In this case, the permissible distance from the external walls of the house is at least 9 meters, and the minimum depth is 1.5 meters. In areas where deep soil freezing is possible, the depth indicator is further adjusted.
Details
Pipe material
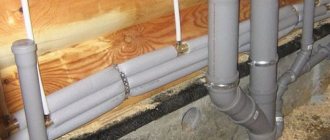
They build a sewer system outside the building using special pipe products that can be used in difficult conditions. Pipes can be made of the following material:
1.made of cast iron.
2. made of concrete.
3. made of polyethylene.
4. made of polypropylene.
5.PVC.
For many decades, pipes made of cast iron and concrete have been used. The products are of high quality, but they are heavy and difficult to install. Workers began to switch to lighter materials. Modern requirements for materials do not recommend the use of pipes on which corrosion and silt deposits form.
Pipes made of plastic material do not have such shortcomings. The products are lightweight, installation is simple, and there is no need to use equipment to lift rolled pipes. The construction time of the pipeline was reduced, and the connections from these elements became more durable. The material has special elasticity and resists mechanical stress. The pipes do not require maintenance for many years, have smooth internal walls, and do not form corrosion.
The main disadvantage of this material is considered to be the high level of linear expansion coefficient when heated. This nuance should be taken into account during installation. At low temperatures, some types of materials, including polyvinyl chloride, become inelastic and quickly break. Pipes made of polyethylene material are not used for laying above-ground pipelines, because the material is subject to the negative influence of sunlight and becomes brittle.
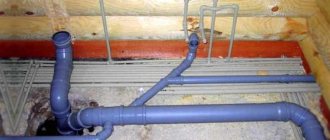
Attention! For outdoor pipelines, orange-colored pipes are used.
Special rolled pipes for external types of pipelines are durable; sealing rubber is used to connect parts. Such pipelines operate without maintenance for a long time. Vinyl pipes and parts are considered the leaders among different types. They combine the optimal ratio of quality and price, and serve for a long time without breakdowns.
Installation of external sewerage to the general network
This is a simple method of installing an external sewage system for a building, which, after drawing up and approving the project, includes only three stages.
The first is the acquisition and delivery of materials and elements, final work with the internal sewerage system, that is, combining its lines and leading them outside.
The second stage is the most difficult and includes land work. First, the area is marked. Every 1.5-3 meters, as well as at all points of change in the trajectory of the highway, install the first row of stakes, connecting them with a nylon thread.
Then, at a distance twice the diameter of the main pipes, a second row is installed. The compliance of the markings with the plan is monitored, after which trenches are directly dug. The depth can vary quite widely, but most likely you will have to dig a lot - the pipe should go to the very bottom of the sewer well.
An important condition for high-quality execution of earthworks is maintaining a slope that will allow the movement of liquid by gravity, but not by a concentrated flow. The minimum permissible slope is 8 mm per meter, the recommended one is from 1.5 to 3 cm. Often, regulatory documentation also gives a slope value of 1 degree.
You can control the slope of the trench using a board laid on its bottom with a level set on it, as well as an ordinary ruler, but this should be done after laying and wet compaction of the sand cushion for the pipes.
The third stage is the actual installation of the external sewage system. It includes cutting and forming pipes, combining them into a single system, and laying them in trenches. Upon completion of installation, the slope of the main line is checked again, and a connection is made to the internal sewerage system and the main sewer network.
The pipeline is tested - for this purpose, an intense flow of water is released through it, and the sand cushion along the entire length of the trenches is periodically checked for leaks. If they are not there, the installation is considered complete, the pipes are covered with 10-15 cm of pitch to absorb stress, the trenches are covered with earth, and the profile is leveled. Otherwise, areas of leaks are marked and sealed after the liquid has dried, after which re-inspection is carried out.
Scheme of external sewerage in a private house
In past decades, the simplest option for the location of an external sewerage system involved laying drainage pipes from the house to a regular cesspool (this is still used today). According to modern hygiene standards and environmental regulations, wastewater must be treated before being discharged into the environment. Therefore, modern external sewerage includes a combination of treatment facilities and pipelines.
Before starting work, you need to develop an action plan:
- Determine the location of the sewer system, taking into account the design of the house.
- Draw a diagram indicating the pipes and the number of fittings.
- Make notes on the diagram about the footage and components of the project.
- Indicate calculations on the diagram itself, which will help in the subsequent purchase of the necessary building materials.
If a person understands at least a little about the rules of construction and installation for a one-story house, as well as SNiP, it will not be difficult for him to construct a diagram. Complex projects are best left to professionals.
When drawing up an external sewerage diagram, you must adhere to the following rules:
- It is advisable to place the kitchen and sanitary unit of a one-story house next to each other, close to the drainage outlet.
- A two-story house requires a toilet on each floor, so wet rooms should be located one above the other, and the outlet pipes should be connected to a common riser.
- It is necessary to consult with specialists on how to properly position and install septic tanks or a pumping station.
- Take into account the climate, temperature and soil in your place of residence.
- Consider how the septic tank will be cleaned - with the help of a vacuum cleaner or yourself.
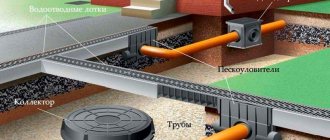
- Indicate the location of pipes, collectors, wells or pumps in external sewers.
When drawing up a diagram, you need to know that wastewater should always flow at the bottom, which means that the outlet pipes from the house should be located at an angle so that the waste flows down, and the cesspool (or septic tank) receives it at the lowest point.
The soil, the possibility of freezing, and the height of groundwater passage are also taken into account. These factors influence the calculation of pipe depth and the choice of treatment facilities.
IMPORTANT! When installing external sewerage, pipes are always installed followed by sewerage installation.
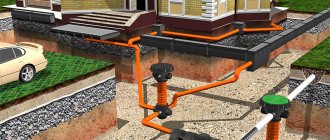
Features of installation of autonomous external sewerage
It is obvious that autonomous sewerage is more complex in design and requires compliance with specific requirements due to the presence of additional elements in the design.
The first thing to do is to mark the area in accordance with the technology described above, but additionally mark the exact installation locations of the septic tank and filter well with drainage system, or drainage pit. An important rule, without which an autonomous external sewerage system will hardly be able to function properly, will be the direction of installation - unlike a centralized sewerage system, the line does not lead from the house, but to the house.
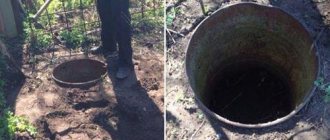
Let's begin our consideration of the technology for installing external sewage systems of an autonomous type with drainage pits, as a simpler, albeit outdated, method of waste disposal. In accordance with the marked perimeter of the pit, excavation work is carried out, which is an extremely labor-intensive process. The use of special equipment can simplify it. When digging a hole by hand, it is important to constantly control the shape of its walls with a level - it must be strictly vertical, without “collapsing” outward. After completion of the excavation work, the bottom and walls of the pit are laid out with bricks, leaving drainage holes and a window for the entrance of the sewer pipe.
Then they dig trenches and lay pipes according to the method described above, with the exception of one nuance - laying pipes of autonomous systems can be carried out much higher, even in a frozen soil layer, since wastewater moves through the system periodically, and not constantly, and is characterized by a relatively high temperature.
In conclusion, I would like to remind you that the use of drainage pits not only creates a lot of inconvenience, but can also be illegal if it is determined that the discharges pose a danger to groundwater. A much safer and more promising way to install an external sewer system is to equip it with a special device - a septic tank. Let's consider the technology for organizing such a system.
First, excavation work is carried out in the places where the septic tank is installed and the well is constructed, and two trenches are dug. The first, relatively shallow, connects the house and the septic tank pit, the second, of greater depth, connects the pit and the well.
At the next stage, the bottom of the pit is insulated, for example, with penoplex. This is necessary to prevent freezing of stagnant liquid in the device, as well as for the normal flow of bacterial life processes, which are a necessary condition for the safe decomposition of waste. After insulating the pit and carrying out all related work, the actual installation of the septic tank is carried out. In this case, it will be most convenient to use the services of a manipulator car. The neck of the septic tank must be at ground level.
They begin to build the well. There are two acceptable methods here - laying the walls with bricks or installing concrete rings. The second is simpler, but requires the use of special equipment, as well as preliminary chiselling of holes in the rings for the location of elements of the drainage system. Brickwork allows these openings to be provided during the construction of the walls.
When the construction of the well is completed, they begin to install drainage pipes, the lines of which are more convenient to provide at the stage of excavation work.
Drainage pipes ensure the distribution of purified water in the ground and can be located linearly in a horizontal plane, or diverge in different directions - orderly or chaotically. It is worth noting that recently, ready-made, industrially manufactured plastic drainage wells have become increasingly widespread.
The next stage is laying the main pipes. There is nothing new here - a compacted sand cushion, installation with cutting and connections, and at each stage - control of the compliance of the actual slope with the standard one.
We remind you that the direction of installation is from the septic tank to the house and from the well to the septic tank. Particular attention is paid to the joints of pipes and elements.
Thus, the entry point of the main pipe into the septic tank must be made movable in order to prevent the destruction of the pipe during the almost inevitable subsidence of the septic tank over time, but at the same time ensure its tightness. All technological openings should be covered with a layer of polyurethane foam or other similar substance.
It is important to take timely care to install an air valve, which will help reduce pressure in the system and ensure its normal functioning.
Next, a comprehensive tightness control is carried out at the highest possible flow intensity, identified faults are eliminated, the trenches are backfilled using the sand-earth method, and the upper profile is leveled.
The soil is added to the septic tank until it is completely compacted. Now the installation of the system can be considered complete. All that remains is to carry out timely and high-quality maintenance of the elements, and first of all, pumping out the contents of the septic tank.
Sewerage for a summer residence - varieties
There are several main options for installing sewer systems in dachas, the main ones:
Cesspool. This is one of the simplest and most effective ways to independently install a country sewer system. It is based on the principle of waste separation. Gray waste after washing dishes, cleaning premises, cooking, washing is sent to a cesspool located a short distance from the house. Usually it does not have a bottom and is designed to absorb runoff into deep soil layers.
To dispose of human waste, an outdoor toilet is built. It is advisable to make the pit in it airtight, but many owners neglect this requirement if they are rarely on the site or the toilet is located at a significant distance from water intake sources. Thus, a second open underground reservoir for collecting fecal waste is obtained on the site.
Some owners install a flush toilet in their home, sending liquefied organic waste into the cesspool and in this way causing quite significant harm to the environment. Typically, this technology is used when transporting waste beyond the boundaries of a site in sparsely populated rural areas. In this case, gray waste is often sent into the pit along with organic matter.
Rice. 4 Examples of arrangement of cesspools
Storage capacity. This option is effective in cases where the site has a small area, there are shallow water sources for water intake, and the owners are rarely at the dacha. In this case, all types of waste are collected in a storage tank, and a sewer truck is used to remove them.
Septic tanks. Modern septic tanks made of polymers are widely used in autonomous sewer systems of country houses; their operation is also rational in dachas. Due to the infrequent presence of owners in the house, small-volume tanks are used, after which a drainage well (infiltrator) is placed to dispose of treated wastewater.
Rice. 5 Sewage system in a country house with a storage tank - diagram
Combined method. Many owners of private households collect all wastewater into one tank. This solution has one significant drawback, namely the inhibition and death of colonies of anaerobic bacteria that process organic matter. Bacteria cannot tolerate chemical reagents (acids and alkalis) contained in washing powders and household chemicals for washing dishes, cleaning premises, and cleaning plumbing fixtures.
As a result, the processing and decomposition of organic matter by bacteria slows down, the quality of wastewater treatment decreases, and too dirty water enters the final filtration system. Due to disruption of the biological process of water treatment, it is necessary to call sewage disposal equipment much more often.
Therefore, a good, but rarely used option is the separation of wastewater into gray wastewater after the use of water for domestic needs and organic human waste. To dispose of the former, a drain pit is used, and organic matter is sent to a septic tank, where it is effectively processed by bacteria, which can be replenished if necessary.
Rice. 6 The principle of operation of a septic tank
Related article:
How to eliminate the smell in the sewer in a private house - affordable methods. Often the sewage system in a dacha gives off an unpleasant odor; in a separate article we will analyze the possible causes of the smell, errors in installing the system, as well as how to eliminate the smell in accessible and inexpensive ways. Read it, it may be interesting when arranging a sewer system in a dacha.
How to avoid mistakes?
The following tips will help you install an external sewage system quickly and efficiently, as well as avoid some basic mistakes:
- Show the preliminary draft to experienced professionals, listen to their comments and make the necessary changes.
- Do not skimp on materials - this price difference is not comparable with the cost of repairs that may be necessary if the elements contain technological defects.
- Although this is not a requirement, consider insulating the pipes with polystyrene foam or polyethylene foam (mineral wool should not be used). This additional reinsurance will protect sewer pipes from particularly harsh weather and climatic conditions.
- Follow the folk wisdom “measure twice, cut once” - carefully and efficiently cut and adjust sections of the pipeline, strictly observe the required slope angles, and do not forget about checking the tightness.
- Ask the seller about the composition and quality of protective coatings on the internal surface of the septic tank. It is considered optimal to apply two layers of bitumen on top of the primer layer. If cast iron pipes are used, it is better to opt for products with durable anti-corrosion coatings.
- Pay special attention to the quality of drainage pipes. If they are clogged or have low capacity, water may stagnate in the well, which can lead to a number of unpleasant consequences.
But the main thing is to follow safety rules, especially when using dangerous tools or being near working special equipment.
Requirements of regulatory documents ↑
Before you begin installing an external sewer system yourself, you need to prepare its design. There are certain requirements for the laying of pipes and the location of the septic tank.
When developing a project you will have to take into account:
- relief of the local area;
- distance to drinking wells and reservoirs;
- general climatic conditions;
- number of people living in the cottage (average daily volume of wastewater);
- soil characteristics (composition, groundwater level, freezing depth);
- technical conditions for connecting to a centralized system or the need to organize access for sewage disposal equipment for pumping out sewage.
All these requirements are specified in the codes of practice “Sewerage. External networks..." (SP 32.13330.2012) and "Single-apartment residential houses..." (SP 55.13330.2011), which replaced the SNiPs of the same name.
When installing an autonomous cleaning system, you will not have to collect a bunch of permits and then pay for utilities. But you will constantly need to monitor the condition of your septic tank and, if necessary, call the sewers.
Important! The entire sewerage system of a private house is built on the principle of gravity flow of wastewater. Installation of horizontal sections of sewer pipes outside the cottage should be carried out with a slope towards the treatment system.
Optimal slope for street sewer pipes
A slight slope of the pipeline ensures gravity flow of sewage. Do not tilt it too much, this can lead to blockages of solid fractions at the entrance to the sump. The optimal slope largely depends on the diameter of the pipe:
- D500 mm – slope 30 mm/linear meter.
- D1000–1100 mm – slope 20 mm/linear meter.
- D1600 mm – slope 8 mm/linear meter.
Errors made during the design and installation of external sewer networks will lead not only to constantly forming blockages, but also to the poisoning of drinking water sources with fecal waste. Therefore, it is so important to follow SNiPs at all stages of sewerage creation.
Soil preparation
The list of preparatory work related to the soil when installing all sewerage elements comes down to correctly cutting a trench for laying pipes and preparing the base for a septic tank.
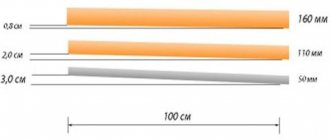
When preparing a trench, it is important that the slope of the pipe is the same throughout the entire section. For pipes of different diameters, the following slope is provided:
- Pipe 160 mm – slope 0.8 cm per 1 meter;
- Pipe 110 mm – slope 2 cm per 1 meter;
- Pipe 50 mm - 3 cm per 1 meter.
The trench section for sewer pipes should have as few turns and bends as possible, especially if they are less than 90 degrees. The bottom of the trench must have the same slope all the way from the foundation of the building - the highest point of entry of wastewater into the sewerage system and until the pipe adjoins the septic tank - the lowest point of the pipeline. When the trench is torn off, the bottom of the trench is leveled and the soil is compacted, especially where there is a possibility of its weakening. Additionally, a 15-25 cm gravel cushion is poured in sandy and bulk soils; this element will provide greater reliability and strength of the base for the pipes.
When installing a septic tank, soil preparation is carried out:
- Under the base of plastic containers;
- For reinforced concrete and brick structures;
- Under a septic tank with a natural drainage tank.
For plastic and reinforced concrete structures, the base can have a regular gravel-sand cushion 15-25 cm high or a monolithic concrete base up to 20 cm thick. For a container in which natural filtration of wastewater is ensured, the base in the form of a concrete monolithic slab is poured onto an area of 1/3 of the pit, and on the rest of the area the foundation for brickwork is simply being prepared. Inside the perimeter of the foundation, a filter bed of sand, gravel, and crushed stone of medium and coarse fractions is filled. Such a cushion will allow for more efficient drainage of wastewater into the ground.
External sewerage 110 mm - or how to choose pipes for external sewerage
External sewerage 110 mm is a fairly common request among those who plan to equip a wastewater treatment system - this is the diameter of the pipes that is most common for creating drainage lines in private homes. In addition, you can find proposals for external sewerage 160 mm, as well as other sizes, which is due to the peculiarities of designing engineering systems. Briefly, different diameters are needed in the following situations:
- Up to 100 mm – pipes used for laying internal sewerage.
- 110 mm is the most popular size of external sewer pipe in country houses using autonomous wastewater treatment systems.
- 160 mm - rarely used in individual construction of sewer systems, however, if the house is located within the city and it is possible to connect to a centralized sewer system, these pipes can be used in accordance with the given specifications.
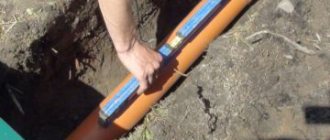
In addition to the diameters of the pipes, the material from which they are made is also important. Note that today the most profitable in terms of both cost and durability is polyvinyl chloride. It is from this material that pipes are made for internal sewerage (usually gray) and for external mains (usually orange).
PVC pipes usually have convenient sockets for creating tight connections, in addition, they are easy to cut, they can be welded and, in general, they are easy to install and convenient to use. Perhaps the only drawback of such pipes is thermal conductivity, I would like it to be lower, but until such pipes are invented, it is advisable to insulate the main line from PVC pipes (and experts recommend insulating even its pipe located below the theoretical level of soil freezing - just in case).
Note that it is almost impossible to continue the external sewer line from one solid pipe, which means you will have to think about the tightness of the connection areas and minimal movement of the pipes under the influence of soil. To reduce the risk of depressurization during soil movement, it is recommended to equip a sand cushion at the bottom of the trench in which the main line is laid, as well as carry out initial backfilling with sand, and after backfilling the trench with soil, compact it along the edges (on the side of the pipe; with pressure from above on the pipe, it may not withstand load and crack).
Connecting pipes to a wastewater tank
When installing a connection between a pipe and a plastic container, standard rubber seals and plastic adapter couplings are used. The connection is made to an installed and fixed container; the pipe must enter the inside of the container at a distance of 15-20 cm.
When laying pipelines to reinforced concrete structures, the pipe must be located no lower than 0.6-0.7 meters from the top of the tank. Just like with plastic septic tanks, the pipe must go inside the tank, and the distance should be 25-30 cm. The entry point of the pipe is carefully processed and sealed with a solution or a special silicone sealant.
For brick septic tanks, pipes are installed in the same way as for reinforced concrete ones, however, all work must be completed before the clay mortar is poured into the lock around the septic tank.
Thus, the construction of an external sewer system for a private house currently does not pose a big problem and does not require special education to carry out minimal engineering calculations.
Calculation of pipe laying depth
The starting point for calculating the depth of laying pipes for external sewerage is the depth of natural soil freezing for a given region. This indicator is most often indicated in construction reference books in sections related to the construction of foundations and the laying of various pipelines.
The average depth of soil freezing in most regions is considered to be 1.2-1.45 meters. This is exactly the depth the cold can reach. For laying external sewerage, this indicator is taken as the top point of the sewer pipeline. Usually, in practice, another 10-15 cm is added to this indicator when cutting a trench. This is enough to guarantee that the wastewater will not freeze when it enters the pipe.
The slope is calculated depending on the diameter of the pipe and the volume of sewage. The optimal slope for smooth sewer pipes of different diameters from 160 to 220 mm is considered to be 1-2 cm per 1 meter. This is slightly more than the calculated standard, but with a pipe length of 10 meters, the difference between the entry point and the discharge point at the septic tank will be a maximum of 20 cm. Thus, the depth of laying the pipes will be 1.5-1.75 meters.