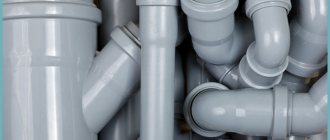
To ensure uninterrupted operation of the sewer system, it is necessary to choose high-quality drain fittings. Outdated cast iron products have been replaced by modern drains and drainage systems made of plastic, which are lighter in weight and easier to install, therefore they are a worthy alternative to metal products. Today we will tell you how to install a drain in the bathroom according to all the rules.
The principle of a siphon is the basis for drainage of any design. The small volume of water located in the knee acts as a kind of lock that prevents sewer gases from entering the house. A classic bathroom drain consists of 4 main parts.
Installing a drain in the bathroom in accordance with the recommendations of the installation instructions will help to avoid mistakes typical for a novice plumber, which are manifested by a slow outflow of water from the bathtub, leakage or the appearance of an unpleasant odor.
Selecting a drain pipe
In the bathroom, the drain pipe consists of several parts, but it is the siphon that needs to be replaced, which is available for sale in a small assortment.
Materials for arrangement can be purchased at any specialized or hardware store.
If we do not consider the technological side and design features, then it happens:
- Ordinary, equipped with a stopper;
- Automatic drain and overflow.
A distinctive feature is how exactly the cap opening system works, since in an automatic device the lever on the overflow operates independently. You won’t need to bend down to get the plug and pull it out with your hands, since you can press the lever or wait until the system turns on itself.
If we consider a group of simple siphons, they differ only in the pipes and the method of sealing the connections, which are divided into gaskets: conical, straight.
Materials used for the manufacture of siphons
For the manufacture of siphons the following are used:
- plastic. Plastic devices are durable and low cost. It is optimal to install such equipment on a bathtub with a protective screen, since the appearance of the device is not aesthetic;
- metal: brass, bronze, chrome steel and so on. Metal siphons are suitable for acrylic bathtubs, especially those installed in the center of the bathroom. The devices, having an elegant and neat appearance, can serve as additional elements of room decor;
Siphon made of copper and brass
- cast iron. Siphons made of cast iron are intended exclusively for bathtubs made of the same material. Currently, they are practically not used, as they are large in weight and size, and also require high installation accuracy.
Device made of cast iron
If the siphon is not visible to users, then it is enough to install a plastic device.
Preventing a clogged drain in the bathroom.
As you can see, the procedure for cleaning the drain hole in the bathroom from hair is simple. But it takes time. Therefore, it is easier to avoid such situations.
- We install small mesh in the drain hole, which will trap not only hair or wool, but also small debris.
- Periodically pour chemicals into the drain hole to clean sewer pipes.
- Once a quarter we clean the siphon under the bathtub.
And then you won’t have to worry about how to clear the bathroom drain from clogged hair.
- October 19, 2017
- 729
- 0
(0)
This note is about one of the elements of the roofing system that the customer will most likely never see unless the builder himself or technical supervision shows him, namely the drain hole in the gutter. The one through which water from the gutter enters the outlet of the gutter (funnel) and then into the pipe.
Sometimes it is done like this:
So.
Strike the grinder four times and the hole is ready in the gutter. Of course, it can only have a rectangular shape, and the edge will be uneven - with splinters and burrs. It is difficult to make such a hole large, because the design features of the tool impose restrictions. Scale flies from the grinder to the sides, and after a short time “saffron caps” of rust may appear on the drain. Obviously, this method of constructing a drain hole in the gutter is a sacrifice of quality for the sake of speed and simplicity and a forced tribute to the low qualifications of the worker. If you don’t know how to use anything other than an angle grinder, where to go?
Sometimes they do this:
This hole appears to have been made by repeatedly drilling the gutter around the perimeter, after which a circle of metal was broken out or “bitten out” with the noses of scissors, and the resulting notches were slightly bent down with a hammer. One can guess why the drain is so small. Drilling hole after hole is painstaking work. If you increase the diameter, the number of holes will increase in proportion.
And sometimes they do it like this:
Here - let's try to figure out the technology - the metal was drilled once. And not at the edge (so as not to damage the straight line of the edge), but in a place that will later be completely removed. They drilled only to “bite” the scissors. Then, using small metal scissors, we went to the perimeter of the hole and cut along the perimeter. Then we used a small mallet to process the edge, making a reverse bend. There may be other variations on this theme, but in general, this is probably the case.
Question for builders - what is better? Or - to rephrase - how would you like the gutters to be done on your house?
With your permission, I don’t believe that the most common answer is “I don’t care, as long as there is a hole for water to drain.” Because in general, every builder (and not only builders) understands that the drain hole should be no smaller in diameter than the pipe (or slightly larger), round in shape, with smooth edges - so as not to collect debris on burrs and jagged edges. By the way, all builders also know that it is impossible to cut galvanized steel with a polymer coating with a grinder (not just metal tiles, but any kind).
This means that the correct option is in the last photo.
The technology for making a neat drain hole is not difficult to master. If you know how to hold a mallet and scissors in your hands, you can do it well the first time, I’ve tested it on myself. But then you can safely show the drain to the client and/or technical supervision, without raising questions or comments, but, on the contrary, receiving compliments, gratitude and recommendations through word of mouth.
And we are proud to realize that another step has been taken on the path to a high level of roofing craftsmanship.
Doesn't work well: what to do?
Over time, many users encounter poor performance of the siphon and the entire drainage system as a whole. The causes of such problems may lie in improper installation of all components of the structure or in clogged pipes.
Mechanical blockages
Mechanical blockage of pipes can be caused by sand and pebbles from shoes, animal hair, human hair and many other similar little things getting into their interior. All these components certainly lead to serious blockage of both the pipes and the siphon itself. Because of this, the water from the bathtub usually drains very poorly and slowly.
This problem can only be resolved by thoroughly cleaning the pipes. However, in order to avoid such events, it is worth installing a special fine mesh on the drain hole, which will prevent foreign particles from entering the pipes and siphon.
Operational
Such blockages usually result from simple improper use of the bathtub. In this case, clogging of the pipes and siphon may occur due to dirt and particles that should remain on the protective mesh, but, unfortunately, not everyone uses it. In addition, a combination of grease and cold water often leads to operational blockages.
Technogenic
Water may not drain well due to an inexperienced technician who made many mistakes while renovating the bathroom in your home. Or maybe the fact is that the installation or replacement of plumbing in the room was not carried out according to technology. For example, you could have chosen the wrong level for installing objects or made the wrong drainage slope as it should be.
To get rid of these problems, you need to either dismantle the plumbing (if it is installed incorrectly) or remove blockages that have accumulated in the pipes.
- Thoroughly clean the siphon and drain - these are the main and vulnerable places where garbage collects first. To do this, you need to remove the siphon and unscrew the protective mesh behind it. Please note that this must be done with both the bathtub and the sink in the room.
- Now shake out all the removed parts into the toilet.
- Then thoroughly rinse the siphon, completely free of contaminants, and with it all tubes, bowls, gaskets and protective mesh.
- Wash all parts with a brush and a high-quality cleaning agent that has a degreasing effect.
- Do the same with the mesh located on the sewer openings - these are the central areas where blockages accumulate.
- Clean the corrugations that lead directly to the sewer.
You can also clean pipes and corrugations mechanically. While the external elements of the drain are drying, mechanical devices should be used to clean the system. For this purpose, a cable with a handle is most often used. It should be screwed into the depth of the sewer, trying to lower it as low as possible. After this, you need to remove the cable and repeat the work done. It is advisable to do this several times to be sure of the ideal frequency of the pipes.
Next, you should move on to chemical sewer cleaning. To do this, it is necessary to pour chemical compounds into the sewer that are designed directly to break down fats and soften plaque. There are quite a lot of such funds. Some of the most popular are products such as “Mole”, “Tone”, “Tiret” and others. It is recommended to leave these products on for 15-20 minutes. Some wait a little longer than 40-50 minutes. After the required amount of time, you should turn on the water in the bath for 10-15 minutes to remove all aggressive chemicals.
How to clean a drain hole
There are a lot of reasons why a blockage may appear in the drain hole. It can become clogged not only with hair, but also with small debris, pellets from clothes, and the hair of four-legged pets. When all this accumulates in the drain, a lump is formed, which is the reason why the water does not drain. Moreover, this lump becomes larger and larger, and a bad smell begins to appear. Well, let's get started. To clean the drain hole, you should try the following methods:
Try clearing the blockage under the cap covering the drain hole. Even if it seems to you that the cap is clean, check it anyway. It is very likely that you will find hair there in huge quantities. Drains that have a cross plug are most susceptible to such blockages. If you have a bathroom that has a plug installed, you will need to lift the plug before cleaning. The guide plate is unscrewed, and only then can you remove the plug.
If the hair clog is deeper than you expected, then you can use:
wire hook. Take the wire hanger, untwist it and bend it into a hook. Place the hook in the drain hole and pull out the clog
Important: you need to pull out, not push, the rubbish. Otherwise, you will definitely have to call a plumber. plunger
Probably the most common method. But it will only help if the blockage is small. The plunger should be the size of the drain hole. It’s easy to clear a drain hole with a plunger, so if your drain is often clogged, it will become an indispensable assistant for you. How to make a drain hole with a plunger? Take the plug and close the drain. Lubricate the plunger with Vaseline and press it to the drain hole. Make about 10 sharp back-and-forth movements. If the water is still standing, add hot water. Fill the bathtub with enough water to cover half of the plunger. Subsequent steps are the same as described above: we try to “break through” the blockage.
cable. A cable can help with serious sewer blockages. A cable is a twisted wire with a handle at the end (it can be wooden or plastic). The advantage of this device is that it can cope with a blockage that is located at a depth of up to 9 meters. How to use the cable? Take the handle and insert the cable into the drain, hold and twist the cable with one hand, and push it deeper into the drain hole with the other. Nowadays you can find cables on the market that have interlocking hooks that help get rid of hair in the drain hole. If you feel that the cable is stuck in something, “stuck”, know that this is the place where the blockage is located. Now you need to repeat the back and forth movements several times and then you can clean the drain hole. Then you can pull out the cable.
with tape. To make a hole in the drain, you can use any adhesive tape. Cut a strip of approximately 50 cm. Place the tape in the drain hole and move it along the inner walls. Almost all the hair will remain on the tape. When you remove the tape with hair, be sure to wash away any remaining clog. chemicals. To combat blockages, you can use household chemicals. Ask the store clerk to tell you which product is better.
Criteria for selecting systems
When choosing a drain-overflow system, you should focus not only on the appearance of the structure, but also on other more important criteria, which include the following points:
- Manufacturer of the product. To be sure of the reliability of the device, it is recommended to choose products from trusted manufacturers. To do this, it is best to consult in advance the reviews of users who have already installed one or another option and have been using it for more than one year.
- System cost. For small budget options, the best option would be plastic equipment with a mechanical drain design. Automatic and semi-automatic systems are suitable for bathrooms designed in a certain style, as well as for those users who prefer comfortable operating conditions.
- Determination of the quality of the manufacturing material:
— high-quality plastic (polypropylene) must have dense walls;
— for products made of non-ferrous metal, the surface must be smooth without scratches or dents;
— for systems made of ferrous metal, it is necessary to pay attention to the integrity of the structure, as well as to ensure that there are no dents on the surface of the products.
- Compliance with the parameters of the bath, as well as compatibility of the siphon connections and the diameter of the sewer pipe. If the cross-sections of the pipes differ, you can use special plastic or elastic adapters.
- Completeness of the delivery set. The kit with the main parts must contain connecting rings and sealing gaskets of the appropriate sizes and configurations
When purchasing a system, be sure to carefully check the completeness of the package. It happens that some important little things are suddenly missing during assembly.
- Additional system functions. For example, siphons may have several pipes for connecting to it, in addition to a bathtub, and other plumbing accessories. For example, if a sink or washing machine is installed next to the bathtub, you can connect one of these devices to the free pipe of the bathtub siphon. However, the branch does not have to be activated; if not necessary, it is closed with a sealed plug.
- Preference should be given to systems in which external parts in contact with water are made of stainless steel. This gives the required strength, oxidation resistance, and neat appearance.
Main types of drain devices
There are several types of drain systems. One of the most common options is a design in which the drain is secured with a large locking nut. This method of fastening can be found even in the bathrooms of houses built more than two decades ago.
Classification by device principle
Drain siphon systems used when connecting sinks come in three types: flask-shaped, elbow and combined.
They differ according to the type of construction:
- Bottle-shaped or flask-shaped. The main structural elements are two cylinders immersed in each other. A tee is installed inside the flask of the device, distributing the liquid and forming a hydraulic barrier.
- Pipe. The main element of the double-turn design is the “S” or “U”-shaped bend of the pipe, which forms a hydraulic barrier.
- Mixed type devices. In addition to the structural elements of the bottle structure, supplemented by two partitions, they are equipped with a corrugated hose.
In bottle-type devices, the waste, entering the siphon, moves down through an internal pipe of smaller diameter. Having reached the bottom, the wastewater rises through the cavity between the inner and outer cylinders and is discharged into the sewer pipe.
Bottle siphons are advantageous in that even with rare use of the plumbing fixture, the water seal in the sewer system does not dry out for quite a long time. This effect is achieved due to the fact that the outlet from the siphon is located approximately in the middle of the flask.
Many owners prefer bottle siphons for the reason that, if necessary, they can always connect several drains. To do this, the structure only needs to be equipped with an additional element.
Siphons of mixed type have proven themselves to work well. The corrugated siphon, used when arranging a mixed-type drain structure, is a modified version of a conventional curved tube.
Unlike analogues of bottle and pipe versions, among the combined options there are no models with bells, and therefore they cannot be connected to overflow systems and household appliances.
Division by material of manufacture
There are two types of sink drains available for sale, depending on the material of manufacture: those made of polymers and those made of metal alloys.
Polymer products are famous for their low price and ease of installation. Structures equipped with a corrugated pipe can be conveniently adjusted in length.
But the service life of PVC structures is relatively short. And the sealing properties of the assembled structures leave much to be desired. Therefore, all joining elements must be equipped with rubber gaskets during assembly.
In terms of reliability and durability, metal elements of drain systems are more beneficial. The models made of non-ferrous metals: brass and bronze are most in demand in everyday use. The harness made from such materials often has a chrome coating, due to which it acquires a rather presentable appearance.
To prevent the accumulation of dirt deposits on the inner surface of the walls during the manufacturing process, manufacturers coat metal products with a protective film of chromium.
Installation of metal structures does not present any particular difficulties. A hitch can only arise at the stage if you need to shorten the outlet pipe.
Siphons for non-standard equipment
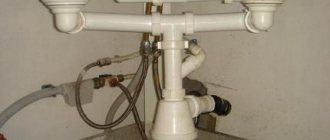
For non-standard models of double “pair” sinks, siphons equipped with two outlets are used. Such siphon devices are connected to the drains of both sinks, and a little lower along the flow of waste water they are combined into a common flask.
Drain systems of such designs will not be difficult to hide in a niche, covered with a decorative screen. But it is worth remembering that if the bend of the outlet pipe is too short, there is a high risk of an unpleasant sewer “aroma” appearing.
Features of automatic siphons
Thanks to technological progress, an improved siphon for a modern bathtub has appeared on the sanitary equipment market, working like an automatic machine. Automation provides a large selection of operating modes and additional functions. With a single turn of the knob or pressing a button, water is drawn to the desired temperature.
In this case, it is possible to maintain a certain water temperature for a certain period of time. The automatic siphon is made of brass and copper alloys, which are coated with a layer of chrome to attract external shine and chic, and also repel dirt and provide reliable protection of materials. The system is equipped with a “click-clack” valve, which greatly facilitates control due to the absence of any additional levers and handles.
Along with undeniable advantages, such drains during operation require uninterrupted electrical power and regular maintenance. In addition, automatic siphons have a fairly high cost and are also characterized by frequent breakdowns. Moreover, even the failure of a small spring requires replacement of the entire structure.
Thus, in order to choose the most optimal siphon for a bath, it is better to study in detail the statistics and nuances of the operation of certain models, look at reviews about the manufacturer and design. When choosing a particular model, great attention should be paid to reliability and durability, since drains perform invisible work, exposed to hot, cold water, and various detergents.
Replacing a bathroom drain with your own hands
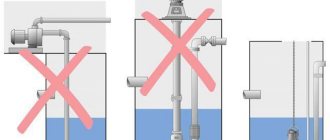
Experts do not recommend installing the siphon below the recommended level, since the height of the corrugation directly affects the rate of water drainage. If everything is more or less clear with the installation, then how is such part of the plumbing as the drain arranged?
You don't need any special skills to replace a bathroom drain.
Drain neck. It is installed in a cavity in the bottom of the bathtub and consists of 2 parts. The lower one is a pipe that has an extension and a built-in nut. The top one is a chrome plated cup. The bathtub must be placed between these elements, which are connected to each other using a long metal screw. To ensure tightness, a special sealing gasket is used. The overflow neck has the same structure as the drain, however, it does not have a direct drainage of water, since it is installed on the side in case the bath is too full, to prevent flooding of the room. A siphon, which can be of various configurations, and it looks like a removable curved pipe that is constantly filled with water. It is called a water seal, which prevents the penetration of odor from the pipe into the room
It is important to note that the volume of the water seal is especially important. If the ventilation in the sewer drain does not work correctly, then it is quite possible that air will be sucked in from the siphon cavity, and accordingly, the room will be filled with a stench
This can be eliminated if you take siphons with a deep water seal. A corrugated hose for connection, which must be used to drain water from the overflow into the siphon cavity. The pressure on this part of the drain is low, and therefore the hose can simply be put on a special pipe without using crimps. If the system is complex, then it must contain a crimp nut and a gasket. The pipe, which is responsible for connecting the siphon and sewerage. It comes in corrugated and rigid types. It is designed simply and is not difficult to set up. The first is considered more convenient to connect, and the second is reliable. The main advantage of the corrugation is that you can adjust the length yourself without replacing this element.
The assembly is actually simple, but when purchasing a siphon and all drain components, you need to check the complete set so as not to encounter missing elements, which, naturally, will not allow you to complete the process without violating the technology.
Types of siphons according to the method of water discharge
There are the following types of siphons according to the method of water discharge:
- manual;
- semi-automatic;
- automatic.
Automatic siphons are complex devices, but they make it easier to control the water level in the bathtub
Manual. The design of such devices is considered the simplest. These devices are equipped with a drain hole that is manually adjustable (opens and closes).
Semi-automatic. Semi-automatic devices at the manufacturing stage are equipped with a special plug with an additional cable. This plug is adjusted using a handle located outside the bathtub. As a rule, such a handle has two positions: directly draining water from the bathtub or placing a load on the overflow hole.
Automatic (click-clack devices). Such devices are the most complex in terms of execution. The automatic bathtub is able to independently regulate the water level in the bathtub bowl. In order to drain the water, in this case you just need to press the drain lid.
Important! Experts do not recommend installing automatic models yourself. This is due to the fact that their installation requires special knowledge and high precision, otherwise such a system will be ineffective.
How to connect a bathtub to the sewer
The scheme for installing a drain in a bathroom is clear, but even if it is carried out accurately, some problems may arise if there is no work experience. The essence of the difficulty is that some have technical thinking, others have economic thinking, and some simply mechanically perform the indicated actions.
It is worth noting that there is no particular difference between the assembly of two types of siphons. It is enough to carry out a few manipulations to carry out the replacement:
To replace the old siphon, you need to remove the old one, thoroughly clean the area where the connection to the bathtub is made, replace the gasket and connect. To connect, you need to take the bottom overflow, put a gasket into it and place it from the bottom to the drain hole. With the other hand, the upper gasket is applied in parallel and the screw is inserted, followed by implantation. Then, while supporting the lower part of the overflow neck with one hand, the other tightens the screw using a screwdriver
It is important not to overdo it so that the body of the plastic neck does not burst. If there is a small leak, the screw is tightened a little more. The overflow neck is installed in the same way.
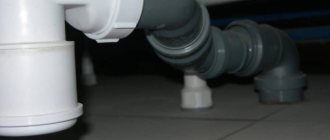
The pipe is designed to remove excess water and is not placed vertically, pointing down, but moves slightly to the side, which makes it easier to connect it to the neck cavity. Then you need to connect the drain and overflow using a corrugated hose. It is strictly forbidden to shorten it sharply, as it will simply be bent.
Plastic pipes are well suited for bathroom drains.
According to technology, it bends smoothly. If the joint is sealed using a nut, then you need to remember that the gasket is installed with a thin tip to the cavity of the drain and overflow neck. First, the corrugation is put on, then the nuts, and only then the gaskets.
How to assemble a manual siphon
Despite the difference in the designs of these elements, all siphons are assembled according to a similar scheme.
Design of a manual bath siphon
Step-by-step instructions on how to assemble a bath siphon:
- The kit includes the sump itself, tubes of different diameters, and sealing elements. The sump is taken first; the largest flat gasket (most often blue) is placed on its lower part. When installing it, distortions or other distortions are not allowed;
Connection pipe for sewerage - The overflow and sump pipes are connected to each other. If a plastic siphon is being assembled, then FUM tape is not needed - a gasket is sufficient, but to connect brass or steel to a thread it is additionally sealed;
- On the top and side of such a siphon there are two holes of different diameters. One is designed to connect the side drain, and the other to connect the system to the sewer outlet. In accordance with the dimensions of these holes, a conical gasket (wide) and a union nut are selected;
- The first to take is the pipe that will be connected to the central drain. A union nut is put on it. Then the sealing gasket is put on. Pay attention to its design. One end of the gasket is blunt and the other is sharp. The sharp end of the seal is put on the pipe; the blunt end will subsequently “sit” on the sump. The gasket is inserted to the maximum position, but be careful not to tear it;
Flat siphon design - The pipe is inserted into the corresponding hole in the siphon, then the union nut is tightened. The pipe that will lead to the sewer is connected in the same way;
- If everything is done correctly, then what remains is a wide gasket under the sink and a thin rubber ring to seal the pipe, nuts for connecting the sewer, and a sink drain filter. A wide gasket is installed on the upper pipe. Afterwards the outlet is connected to the sink;
Step-by-step pressing of gaskets - Connection to the sink is made using a bolted connection. Here it is also recommended not to use FUM tape (if the siphon is plastic). To connect all parts of the structure, you need to install a sealing ring on the upper section of the drain, followed by a metal mesh filter. The siphon pipe is attached to the bottom, the entire structure is screwed in place;
- The outlet is connected to the sewer using silicone sealant (to connect two plastic elements) or a special adapter (to connect metal and plastic pipes). In the first case, the end parts of the siphon and the sewer pipe are lubricated with silicone and connected to each other. In the second, the ends of the adapter are lubricated.
After installation is completed, you need to wait until the sealant has completely dried (on average, from 4 to 6 hours), only then can the system be used.
Video: assembling a bath siphon
Corrugated models do not require complex assembly work - often, they are simply connected to the waste disposal system. At the same time, flat ones are more complex in design. The main problem is the large number of pipes of different diameters.
Tips for correctly assembling the siphon:
- All metal threads must be sealed with FUM tape;
- Not a single gasket or ring should be left “idle.” If after completing the assembly you still have extra parts, this means that a seal is missing somewhere and there will be a leak;
Filter gasket - When connecting pipes, only one gasket can be used. Some home craftsmen install two gaskets at pipe connections or during repairs to prevent leaks. This contributes to the violation of the tightness of the system;
- When tightening the union nuts you need to be very careful (especially if you are working with plastic). The connection cannot be “stretched”, but with strong impact there is a possibility of damaging the fastening element;
- The same goes for installing gaskets. They need to be tightened onto the pipes to the maximum, but if you overtighten the seals, they will tear;
- Sealing elements must be replaced regularly. Drain gaskets - once every 6 months (on average), thin seals between pipes - once every 3 months. These timing may vary, but timely warning of rubber wear will help avoid flooding and leakage.
Purpose and design of the drain
The sink drain is a curved structure, the main elements of which are a siphon and a drain pipe.
The outer element of the drain hole is a metal grill, which protects the pipe from hair and small debris.
Located just below the drain hole, the siphon performs two key functions:
- Protects the drain pipe from clogging with waste entering through the hole in the sink.
- Prevents the spread of unpleasant odors coming from the sewer pipe.
The main secret of the siphon is its bend.
Thanks to this design solution, the water does not completely leave the pipe, forming a kind of water seal, which prevents the spread of sewer “odors” in the room.
The device includes the following items:
- frame;
- exhaust pipe;
- rubber and plastic cuffs;
- decorative overlay for the hole;
- rubber stoppers;
- nuts and screws.
If the system is clogged, this siphon can be easily removed and cleaned mechanically, chemically or using the pressure of a directed jet stream. To prevent such situations, manufacturers recommend purchasing sink drains equipped with an overflow.
The design of the system differs in that it is equipped with an additional tube made of bendable corrugation or hard plastic. It connects the hole in the top side of the sink rim to the part of the drainage system that is located in front of the siphon.
This zigzag tube is fixed in the desired position using a plastic clamp.
Required materials and tools
To change the drain device, you will need a minimum set of tools consisting of a screwdriver, pliers and a wrench.
Before starting work, the completeness of the factory delivery of the sanitary siphon is checked, including:
- frame;
- drain pipe;
- decorative grille masking the drain;
- cuffs made of rubber and polymers;
- fastening hardware (bolts and nuts);
- elastic gaskets for sealing joints.
If one or more items are missing, the missing parts must be purchased separately.
In addition, high-quality installation work is impossible without additional materials:
- tow or rags;
- sealing composition based on silicone or rubber;
- FUM tapes.
When dismantling, you will need a container to drain the water. A large bucket or basin will do.
Purpose and design features
A sink drain in a bathroom or kitchen with an overflow is a curved structure, the key purpose of which is to redirect excess water into the drain, thereby preventing the sink bowl from overflowing.
The design of the bathtub drainage system is almost identical to the design intended for the sink.
Structurally, the overflow drain for a sink or sink consists of the following elements:
- siphon with water seal - is a “U”-shaped element that performs a dual task: it prevents the flow of foul odor from the sewer and protects the drain pipe located below from clogging.
- drain pipe - made of corrugated or rigid plastic pipe and designed to redirect wastewater into the sewer system.
The main secret of the functionality of the siphon is in its design. Due to the bending, the water does not completely leave the pipe. The formed water seal acts as a barrier to the penetration of sewer “ambre” into the drain hole.
Such designs are convenient because if they become clogged, they can be easily removed and cleaned mechanically or chemically.
Do you want to install a more durable device that is less prone to clogging? In this case, it is better to purchase a design in the form of an overflow drain for the sink. It differs from traditional models in that it is equipped with an additional tube.
This device connects a hole made in the upper side of the side of the bowl with the elements of the drainage system located in front of the siphon. Thanks to this, the overflow drains liquid from the sink, thereby preventing the bowl from overflowing.
From the outside, the drain hole is covered by a grill. It performs a protective function, trapping small debris and hair, thereby protecting the system from clogging.
Drain installation
Siphon installation
Having assembled the drain, you need to install it in the bathtub.
- First of all, you need to check if there are any pieces of the old gasket or any adhering debris left. The landing area must be clean and smooth (both inside and outside the bath). If this is not the case, then installation cannot be performed until the problem is resolved.
- The lower part of the siphon has a wide neck with a lower part from the inside - this is a seat for the gasket (shown by the blue arrow). If the length of the arms allows, then further installation can be performed without an assistant. The siphon with the gasket placed on it is brought under the lower hole of the bathtub and held in this position.
- From inside the bathtub, check that the bottom gasket has not moved to the side.
- A gasket is placed on the drain hole (the green arrow points to it), the top cover with the grill is installed and screwed on. In modern models, fixation is carried out with a copper screw; in older models, the lid is threaded and screwed directly into the siphon.
Clamp the siphon
- In the same way, the overflow hole is tied and connected to the siphon using a flexible hose with pre-installed nuts and cone washers.
- The next step is to connect to the sewer. As a rule, there are no problems when connecting to PVC sewer pipes, but in order to connect to a cast iron pipe, you will have to purchase a rubber coupling of the appropriate size.
- Having crimped all connections, you need to check if there are any leaks. This is done simply - water is drawn into the bathtub, and you need to look under the bathtub. Then you need to close the plug and check if drops of water appear from below when the bath fills up a little. The final step will be to check the tightness of the overflow installation. To do this, you need to draw water until it flows into the siphon through the overflow.
Is it dry under the bathtub? Then the installation of the siphon is completed successfully.
Plastic parts are not very durable, so you don’t need to put much effort into fixing them. If you find a leak, disassemble the connection and, lubricating the gasket with plumbing silicone, reassemble.
Trusted manufacturers of plumbing fixtures
A considerable number of companies from different countries of the world present their products on the Russian market. A wide range of products allows you to choose the most suitable option for the drain-overflow system in all respects. It is recommended to give preference to those manufacturers whose products are certified in accordance with international quality standards.
Such companies include, for example, the following:
Illustration/Brief information about the manufacturing company
| Geberit is a Swiss manufacturer presenting a wide range of plumbing fixtures, including drain-overflow systems, in the mid-price segment. Geberit produces equipment in a wide range of models, so you can choose the appropriate option for your specific application. This company produces products from plastic, chrome steel, brass and copper. | |
| Alcaplast is a Czech brand. The company is among the top largest manufacturers of plumbing plastic products in Europe. The products of this manufacturer are distinguished by their reliability, simplicity of design, interesting design, and quiet operation. | |
| Kaiser is a German company that produces bathtub trims made of bronze and chrome-plated steel. It is recommended to choose equipment from this manufacturer for bathtubs with deep bowls, for which it is difficult to find a siphon with non-standard sizes, since the company presents models in a wide range of sizes. | |
| Viega is a German company that has gained its reputation thanks to the quality and reliability of its products. It produces flush-overflow systems made of plastic, stainless steel, bronze and brass. Viega designers have developed interesting design options for visible parts of the structure. The market offers a wide range of devices in shape and color. Affordable cost and ease of installation make the products of this company very popular among consumers. The drain-overflow systems of this manufacturer are characterized by a long period of trouble-free operation. | |
| Hansgrohe is a German manufacturer that produces drain-overflow systems of various designs made of plastic, steel, as well as combined options. The products are reliable and easy to use. Visible design details can have different design solutions, so from the Hansgrohe assortment you can choose a model to suit any bathroom design. | |
| WasserKraft is another German manufacturer that offers a variety of fittings for bathtubs and sinks. The company produces systems from black and light plastic, steel, bronze and combined materials. At the same time, the company's designers and engineers have developed variants of models with very unusual shapes. Products, especially those made from chrome-plated steel, are distinguished not only by their aesthetic appearance, but also by their high reliability and long service life. | |
| Jacob Delafon is a French manufacturing company that produces plastic products and combined options. This manufacturer is quite popular in Russia, as the systems have proven themselves to be highly reliable and easy to install and operate. | |
| Triton is a domestic manufacturer that produces drain-overflow devices from plastic of different colors, as well as combined design options. The products have an affordable price, but at the same time they are distinguished by very high quality and reliability. You can take it! |