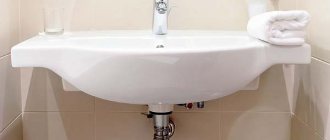
The bathroom is usually supplied complete with legs or a frame on which this sanitary product is mounted. When making hot tubs, manufacturers are guided by the fact that the distance from the floor to its side should be about 60-65 cm.
However, sometimes situations arise when the standard height of the bathtub is inconvenient for use or water does not drain well from it. In this case, there is only one way out - to lift it. In this article we will tell you how to raise a bathtub above the floor using the 3 most popular methods, as well as the advantages of each of them.
Why do you need to raise the bathtub?
In general, the standard height of a bathtub above the floor, according to building rules and regulations, should be 60-65 cm. This standard was calculated in accordance with the average height of a person and has been tested for more than one generation.
If the font is installed at this height, then it is convenient and safe to use. However, situations arise when the bathtub has to be raised above the floor. Most often, this procedure is performed to solve the following problems:
- Water does not drain well. According to the quality standards adopted in our country, the font bowl must have a natural slope towards the drain hole so that the water flows into it by gravity and does not stagnate at the bottom of the bowl. Therefore, the bathtub must be installed strictly parallel to the floor. In some cases, due to a manufacturing defect or an unsuccessful form, water does not flow into the drain. Then you need to raise the legs of the bathtub to give it an artificial slope.
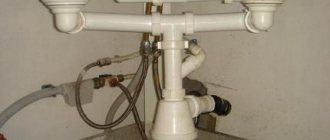
- Additional equipment needs to be installed . Usually there is only 15 cm between the floor and the bottom of the bowl. This space is enough for a compact flat siphon, but not enough for installing any other additional equipment. If you need to install a waste grinder or pump for hydromassage equipment, you will have to raise the bathtub by at least 10-15 cm.
- Inconvenient to use the bathroom . If the apartment is inhabited by people whose height is much higher than average, then using a standard-height font may be inconvenient. The greatest inconvenience is washing in the bathtub, as you have to bend low.
Remember that the standard installation height of the bathtub is calculated and recorded in SNiPs and GOSTs, as it is suitable for most people. However, if there is a need to raise the floor font, this can be done by lengthening the legs, constructing a podium from foam blocks or bricks, or using a frame.
Standard issues
All standards take into account the physiological parameters of a person, which are determined by height, gender, and age. Accordingly, the existing differences do not allow us to set a single value that is equally convenient for all occasions. Therefore, there are three main standards that allow you to more or less accurately match the target audience.
First of all, it is important to remember that all distances are indicated from the finished floor, therefore, without knowing this parameter, it is useless to make any calculations. In total, there are three average categories, in which the average height of a person corresponding to a specific age is taken as the standard.
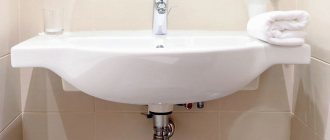
- Older age. The height of the sink edge is 800 mm.
- Average age. From the top edge of the sink to the clean floor 700 mm.
- Younger age. Sink at a height of 600 mm.
It is not always necessary to strictly adhere to these values, but you should not deviate too much from them. In a private home, of course, there is more freedom, but when installing sinks in kindergartens, hospitals, schools and similar facilities, the specified parameter should be maintained as strictly as possible.
In any case, even when installing a sink in your own house or apartment, you should not go beyond 750 - 850 mm from the clean floor to the top edge of the appliance. Practice shows that even a slight deviation creates noticeable discomfort.
Difficulty lifting the bathtub off the floor
Before raising the bathtub, so that the drain works well, you need to calculate everything well. Flaws in installation can lead to discomfort during washing due to instability of the font, deformation of the walls or bottom of the bowl, and chipping of the enamel.
When choosing a method for raising the bathtub above the floor level, the following nuances should be taken into account:
- Heavy weight. Naturally, the weight of the font depends on the material from which it is made, as well as the size of the model. The heaviest are cast iron bathtubs, and the lightest are acrylic. However, when using a font, the weight of the water, as well as the weight of the person bathing, is added to the direct weight of the bowl itself. Under such conditions, the total weight of a plumbing fixture can reach 500 kg, which places a very large load on the legs.
- Small support area . Typically, 4-6 legs are used to install a bathtub; the total surface area hardly exceeds 10 square cm. If we take into account that the weight of the font, water and the person in it reaches 500 kg, then the load on each square centimeter of the supports reaches 50 kg. Due to such a load, the supports may simply deform, unable to cope with the weight of the plumbing product.
- Mechanical strength and wall rigidity . When choosing a method for raising the bottom of the bathtub above the floor level, you need to take into account that different materials have different rigidity. If cast iron models are so thick-walled and resistant to deformation that they can be installed on only 4 legs, then acrylic models have less rigidity, so when lifting them, you need to build a structure that evenly distributes the weight of the bowl between the supports.
Note! When choosing the method by which you will lift the bathtub, you need to take into account the 3 most important factors: the material from which the bathtub is made, the height to which the lift will be carried out, and the weight of the model.
Wiring diagrams
Methods of fastening the sink depend on its design. And if a sink with a pedestal cabinet (tulip) or a bowl built into a bedside table does not leave much room for creativity, then you have to tinker with a simple remote design or some modern developments.
It is always worth considering the fact that a typical faience sink and its analogues weigh a lot, so the fastening must be reliable and durable. Moreover, many people have a persistent habit of sometimes leaning on the edge of the sink, which significantly increases the load on the suspension system.
You also always need to take into account the location of water outlets, sewer drains and the installation of household appliances (for example, a washing machine). All this should not block or interfere with each other. In rare cases, adjustments are made for design features (for example, a stucco border runs along the perimeter of the bathroom at the height of a standard sink installation).
Usually the fasteners are included in the delivery and the sink. In rare cases it has to be purchased separately. It is important to remember that not all decorative elements of the sink (for example, a pedestal cabinet) are designed for heavy loads and more often work as ordinary decor, masking the drain siphon or water supply connection points.
Do not neglect the rubber/silicone shock-absorbing pads installed at the points of contact between the mounting bolts and the sink. Plumbing sanitary ware is a durable and reliable material, but quite fragile.
Subtleties of installation on drywall:
The usual installation algorithm is as follows:
- Determining the optimal height of the sink. Marking its position using a building level.
- Sink installation.
- Mixer installation.
- Connecting a sewer siphon.
Sink on a pedestal
The pedestal determines the installation height of the sink (in addition to masking the siphon), so it all ultimately comes down to choosing the installation location, aligning the device vertically and horizontally, determining the optimal locations for fasteners, marking the mounting holes and installation itself.
Moidodyr
Typically, the bedside table under the sink also serves as a load-bearing base. Therefore, such a sink is the easiest to install. True, you should make sure in advance that the sewerage and water supply connections do not interfere with the installation of the cabinet. It is also worth remembering that some models have legs that allow you to adjust the installation height within a small range, which is extremely convenient. The installation of a suspended sink is somewhat more complicated and in general terms repeats the installation of a conventional remote sink. The only difference is the mounting system used - special brackets will be required.
Questions about installing water sockets:
Water lilies
When installing small-sized remote sinks designed to install washing machines underneath, you should ensure that after installation there are no problems with either placing the washing machine or connecting it to water and drainage. Drainage is never done at floor level. The optimal height is 600 mm from the floor level. This should also be taken into account when installing siphons. It is possible for the water lily sink to extend beyond the dimensions of the washing machine, but the opposite situation should be avoided - it is very inconvenient to use the sink. There should be a gap between the sink and the machine, taking into account the vibration of the device and possible dismantling.
You can watch a video on how to install a sink here:
Frame mounting
If you lift an acrylic bathtub on legs, it may become deformed or even burst under load. To evenly distribute the load and increase the area of support, thin-walled fonts are installed on the frame.
The frame can be made from stainless steel metal corners. It can be prefabricated or welded, and the second option is characterized by increased strength.
The frame is ready
Before working on installing the frame, you need to make sure that you have everything you need:
- Stainless steel corners, the cross-section of which is sufficient to support the weight of the bathtub.
- Grinder with a metal disc.
- Welding machine.
- Self-tapping screws and anchors for attaching the frame to the walls and floor.
- A hammer drill for making mounting holes in the wall and floor.
- Screwdriver.
- Putty for treating seams to protect against corrosion.
Frame made of metal corners
Please note that when we raise the bathtub above the floor using a frame, it is quite difficult to give it a slope. Therefore, this method is suitable in cases where the bottom of the container has a natural slope towards the drain hole, and water flows well.
Types of blockages
There are several types of blockages:
- Operational problems arise due to deposits on the walls of sewer pipes. Appears with prolonged use of water supply. It is easier to remove such contaminants using chemicals. Since it is impossible to eliminate the cause of the blockage, regular prevention is required.
- Man-made ones appear due to violations during the installation of the sewer system. Accidents may be the cause. You won’t be able to eliminate the reason why the water in the sink or bathtub doesn’t drain well on your own. You will need specialist help.
- Most often, the water in the bathroom does not drain due to violation of the rules for using the bathtub or sink. If hair, foreign objects, or various debris get into the pipe, a mechanical blockage forms. You can get rid of it using a plunger or a cable.
Without a siphon it will “siphon”
Yes, no matter how trivial it may sound, one of the functions of a siphon is to “lock in” dubious sewer odors. And if this tool does not work, there will be a heavy spirit in the bathroom. The second function of the siphon is to provide a sealed drain and protect the sewer from clogging. So a lot depends on this simple device.
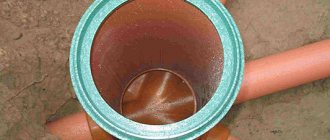
A device for draining wastewater into a sewer consists of a drain and overflow valve, pipes connecting them to each other and to the sewer PHOTO: obustroeno.com
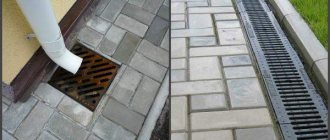
What level of sewer slope can be maintained?
Dwelling in more detail in this construction magazine article on the level of slope of sewer pipes, it should be noted that errors in this lead to the greatest number of problems. Firstly, with a small slope of the pipes, the drains cannot move independently to the riser under the influence of gravity, so the pipes become clogged from time to time.
Secondly, as a result, sewer pipes may leak, especially if they are poorly sealed at the joints. Thirdly, an unpleasant odor may appear in the room due to the fact that wastewater is constantly in the pipes. This is why it is so important to maintain the correct slope of sewer pipes. With all of the above, you should know that too large a sewer angle is also not very good, due to constant noise when flushing the toilet or sink.
The correct level of sewer slope should be at least 3 cm per 1 m for a 110 pipe, and at least 2 cm for a pipe 50 mm in diameter. The maximum slope level for pipes should not exceed 15 cm per 1 m. Otherwise, there will be a lot of noise when draining the sewer.
Rate this article and share the link:
Types of bath siphons according to the opening principle
Each bath has its own siphon. This is not surprising, because fonts come in different shapes and designs. Drain systems are made of metal or plastic, and the siphons themselves must be “adjusted” to the drain holes and the height of the bowls. For ease of connection to drains, these systems are equipped with flexible pipes.
Drains can operate in semi-automatic or automatic mode. Semi-automatic systems involve connecting the drain and overflow valve using a cable. To open the drain in this case, you can simply turn the overflow valve.
Externally, such a device looks very good, and it’s convenient to use, since you don’t have to feel the drain cover in the water PHOTO: sanusel.ru
But semi-automatic systems also have their drawbacks. The main one is the high probability of the cable jamming after several months of operation. But this usually happens with inexpensive siphon models.
Automatic options have a more complex design with a pin that is combined with the bathtub plug and controls it when turned.
Many hot tub manufacturers initially include automatic siphons that match the overall design of the product PHOTO: mcalpine.ru
Installation of sanitary ware below the sewer level
When installing sewerage systems in a private house, it happens that the level of the basement floor is located below the level of the sewerage system. And at the same time, it is vital to install bathrooms, sinks, washing or dishwashers, and so on in the basement.
Then what should we do in this case? How to implement this so that during operation the basement does not flood with wastewater?
There is a way, and not even just one. In this short article I will try to lift the veil of secrecy about the possibility of installing and connecting a sanitary system below the sewer level.
Often we cannot influence the level of sewerage entering our home. For example, if you are connected to a central sewer system, then it has its own level and you cannot make it lower.
It may also be that when installing an autonomous sewer system, you have to dig deep and expensively to install a septic tank or treatment plant. And therefore, such elements of an autonomous sewage system are installed shallowly and the sewer system is introduced above the basement level.
Therefore, to connect sanitaryware below the sewer level there are 3 proven methods. Let's look at them in order.
- We use a grinder pump
The simplest solution would be to connect your sanitaryware, toilet or any other equipment to a grinder pump for sewerage.
This pump is installed behind the toilet. At the same time, it does not spoil the appearance. It looks neat and aesthetically pleasing.
The truth needs to be connected to electricity. This is the main drawback. And if your electricity is often cut off, then take care of an autonomous power supply to the shredder pump.
There are pump models designed for one toilet and sink. There are more powerful pumps and are designed to connect full bathrooms.
While operating the shredder pump, do not throw garbage or household products into it. As well as personal hygiene products.
There was a case when a house worker flushed nut shells down a toilet connected to a grinder pump. At the same time, the pump jammed. It had to be disassembled and all the shells taken out. Be careful yourself and warn friends, guests and all people who may use a toilet connected to a macerator pump.
- Installation of the container
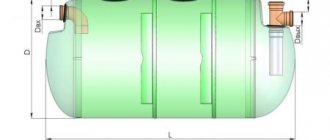
The next method for connecting sanitaryware to a sewer system above the level is to install a tank to receive wastewater.
A wastewater pump is installed in this container. There are two types of such pumps. The first pumps are used simply for dirty water without large impurities and inclusions.
Such waste comes from all sanitary faience, except toilets. Such a pump simply pumps dirty water and, using a pipe with a diameter of approximately 32-40 mm, is connected to the sewer system above the level.
- Using a pump with a cutting rotor
This type of pump is equipped with a cutting rotor and is designed for grinding and pumping sewage from those systems where toilets or other large inclusions are present.
Such pumps are turned on in two main ways. The most common way to turn it on and off is with a pump with its own float switch. That is, a float switch is mounted and connected to the pump, and when the level of wastewater in the tank rises, the pump turns on and the sewage is pumped out.
When the level drops, the pump turns off. And this goes on all the time. The frequency of switching on depends on the volume of the receiving tank, the power of the pump and the amount of sewage.
Household pumps are usually equipped with such a float switch.
More powerful industrial pumps or pumps with a cutting rotor are connected to a special control unit, which has the ability to install electrodes in the container to monitor the level and turn the pump on and off.
This unit also has the ability to connect an alarm for exceeding the level in the tank if for some reason the pump does not turn on.
Using this method of connecting a wastewater pump, you can protect yourself from overflowing the container.
You can get more detailed information on how to drain wastewater into a sewer below the level in the course on self-installation of water supply and sewerage in your home.
You can also share your methods of removing wastewater into the sewer above the level in the comments to this video.
If you liked the information, please don’t be lazy and share it on social networks.