How to choose Shower drains and trays
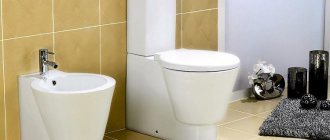
An important part of a modern shower cabin is a system that ensures that used dirty water is drained into the sewer system. For this purpose, ladders are used - drain elements that are mounted in the floor or walls of the booths. More often the ladder is installed in the floor. This is done so that the upper surface of its grate is flush with the floor tiles.
The shower drain is a gutter-type drain system. It is embedded in the floor screed, ensuring free drainage of dirty water from the shower stall into the sewer system. A properly installed system, in addition to draining water, also collects debris, preventing it from clogging the drain channels, and protects the bathroom from unpleasant odors from the sewer.
For bathrooms, drains of different models are used, which differ significantly in appearance. However, they all work on a similar principle, therefore they consist of the same components.
The ladder structure consists of the following elements:
- siphon or dry seal;
- funnel-shaped receiving body;
- outlet pipe;
- mesh protective filter;
- decorative overlay;
- pipelines and couplings.
Shower cabins with drains take up minimal space, are easy to clean and durable. The drain ladder protects the bathroom from emergency flooding.
Purpose and design of drainage equipment
A drainage system using a ladder is used in industrial food factories, chemical laboratories, swimming pools, kindergartens, dormitories, hospitals, and laundries. Installing a shower with such a drain is much cheaper than purchasing a stationary shower stall. In addition, the cabin dimensions are selected individually, taking into account needs and available space.
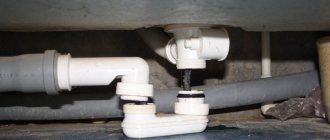
Plumbing drain for sewerage
The sewer drain consists of several parts:
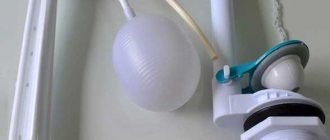
- water inlet funnel is an outer casing of equipment designed for draining and discharging water. The flange of the device provides a hermetically sealed fastening of the floor waterproofing membrane;
- a siphon with a removable grille is built into the body and serves to protect the sewer system from large debris. The siphon water seal prevents the penetration of unpleasant odors from the sewer into the room. Some drain models are equipped with a dry or mechanical shutter;
- At the bottom of the housing there is an outlet with a coupling. It ensures connection of the device to the sewer pipe.
The equipment also has sealing and clamping elements. The tightness of the device is of great importance for the operation of the drain system. Therefore, before purchasing a ladder, it is recommended to assemble the device and evaluate the tightness of the parts. At the same time, pipes of the appropriate diameter and couplings are purchased.
Types of drains
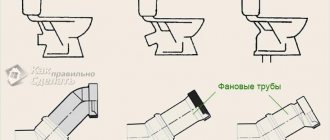
The drains for draining water are cast according to the type of installation. There are three types:
- Spot. Usually the receiving hole is small, the grille is square, less often rectangular. Can be installed anywhere.
- Linear. The shape of the receiving chamber is rectangular, long and narrow. It is installed mainly along the walls, retreating some distance from them.
- Wall ladder. The drain hole is also long and narrow, but this design is different in that it is mounted not only in the floor, but also in the wall. The installation is walled into the wall, there are sewer pipes behind the wall, and the drain hole itself is located exactly next to the wall.
Most often, to make a floor with a drain, point drains are used, much less often - linear ones. The installation of wall drains is generally quite a rare occurrence, since installation is possible only at the stage of major repairs, not only of the floor, but also of the walls. In addition, such devices are much more expensive.
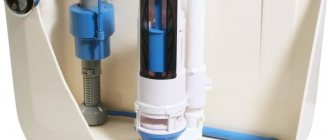
Valve types
In addition to different design solutions, the water drain to the floor (point or linear) has different types of valves. A seal is a device that prevents sewer odors from entering a room.
The simplest seal is a water seal. In these devices, there is a bend in the outlet pipe in which water remains. It blocks odors. The disadvantage of such a system is the possibility of drying out. This happens if the water has not been drained for a long time. Drying out can also be caused by incorrect installation (the slope is chosen incorrectly) or the presence of floor heating - a warm floor in the bathroom “dries out” the water in the water seal.
Dry gates for ladders are more reliable in this regard. There are several types:
- Membrane. A movable spring-loaded membrane is installed, which falls down under the pressure of water, and in its absence, blocks the drain hole, blocking access to gases from the sewer into the room.
- The membrane is made of a material that has “molecular memory”. The principle of operation is similar to the membrane one, but the reliability is higher - the springs can break, but the material, which simply strives to return to its original state, is more durable.
- Float This system has a float. When there is water, it rises up, and when the water has subsided, it falls down and blocks the entrance to the sewer.
- Pendulum. The drain into the sewer is blocked by the device, which, under the influence of gravity, tends to take a position above the drain.
Dry drains are made mainly of plastic, gratings are made of stainless steel or also plastic. There are models with a built-in check valve. It prevents water from rising when the drainage pit overflows. When installing a floor with a drain in an unheated bathhouse, look for models that can be used in cold weather (there are some).
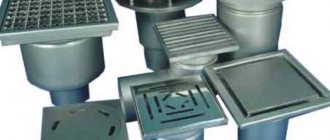
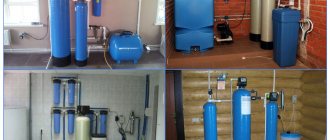
Types of materials for equipment production
In accordance with the material from which the drain parts are made, the following types of products are distinguished:
- cast iron has the largest capacity, but is heavy and difficult to install. Can be used in difficult conditions. Used in factories, swimming pools, public toilets;
- plastic ones are resistant to aggressive influences, weigh little, have low cost, are durable, and do not require special operating conditions. Polymer products are widely used when installing a do-it-yourself drainage system for various sanitary facilities;
- Stainless steel drains are used in premises where it is necessary to ensure compliance with high sanitary requirements: hospitals, kindergartens, catering establishments. The metal body is easy to clean from dirt, and the products are easy to install.
Plastic ladder
Stainless steel drain
Cast iron horizontal drain
To install a drain system for a shower stall with your own hands in an apartment or house, it is recommended to use plastic or steel products.
Materials
Drains are made of steel or special plastic. Less commonly, models are made from sanitary cast iron. Plastic models are cheaper than steel and cast iron, so they are most widespread. They are easy to clean and are not afraid of corrosion. Plastic sewer drains are simple, easy to maintain and can withstand heavy loads. They are durable and resistant to aggressive environments.
Steel ladders are recommended for installation in premises that are subject to increased requirements. These drains are made entirely of high-strength stainless steel.
Cast iron drains have increased wear resistance and throughput. They are used in the most difficult conditions. Cast iron drains can be installed not only in shower stalls, but also in toilets, swimming pools, and laboratory rooms.
Shower drains can have the following shape:
- round;
- rectangular;
- square;
- triangular;
- oval;
- extended tray.
The most popular are rectangular and square models. They are easiest to fit into the lining of the floor covering used in the shower stall.
Review of prices for different equipment models
The table provides a reference overview of prices for domestically produced models based on the results of monitoring offers from online construction stores.
| Type of equipment | Material | Average price, rubles |
| Horizontal with water seal | stainless steel | 2900 |
| plastic | 2200 | |
| Vertical with water seal | stainless steel | 4900 |
| plastic | 3700 |
Types of drains
The drains for draining water are cast according to the type of installation. There are three types:
- Spot. Usually the receiving hole is small, the grille is square, less often rectangular. Can be installed anywhere.
- Linear. The shape of the receiving chamber is rectangular, long and narrow. It is installed mainly along the walls, retreating some distance from them.
- Wall ladder. The drain hole is also long and narrow, but this design is different in that it is mounted not only in the floor, but also in the wall. The installation is walled into the wall, there are sewer pipes behind the wall, and the drain hole itself is located exactly next to the wall.
Most often, to make a floor with a drain, point drains are used, much less often - linear ones. The installation of wall drains is generally quite a rare occurrence, since installation is possible only at the stage of major repairs, not only of the floor, but also of the walls. In addition, such devices are much more expensive.
Valve types
In addition to different design solutions, the water drain to the floor (point or linear) has different types of valves. A seal is a device that prevents sewer odors from entering a room.
The simplest seal is a water seal. In these devices, there is a bend in the outlet pipe in which water remains. It blocks odors. The disadvantage of such a system is the possibility of drying out. This happens if the water has not been drained for a long time. Drying out can also be caused by incorrect installation (the slope is chosen incorrectly) or the presence of floor heating - a warm floor in the bathroom “dries out” the water in the water seal.
Dry gates for ladders are more reliable in this regard. There are several types:
- Membrane. A movable spring-loaded membrane is installed, which falls down under the pressure of water, and in its absence, blocks the drain hole, blocking access to gases from the sewer into the room.
- The membrane is made of a material that has “molecular memory”. The principle of operation is similar to the membrane one, but the reliability is higher - the springs can break, but the material, which simply strives to return to its original state, is more durable.
- Float This system has a float. When there is water, it rises up, and when the water has subsided, it falls down and blocks the entrance to the sewer.
- Pendulum. The drain into the sewer is blocked by the device, which, under the influence of gravity, tends to take a position above the drain.
Dry drains are made mainly of plastic, gratings are made of stainless steel or also plastic. There are models with a built-in check valve. It prevents water from rising when the drainage pit overflows. When installing a floor with a drain in an unheated bathhouse, look for models that can be used in cold weather (there are some).
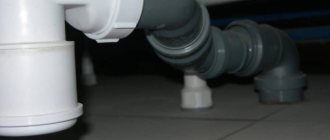
Design Features
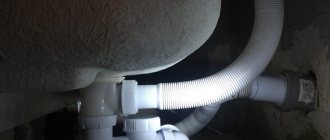
According to their design features, the most popular are horizontal drains, in which wastewater is discharged to the side. They are easy to install with your own hands, even in multi-story buildings. The vertical device requires complex installation, but has a higher throughput. Horizontal equipment must have a sleeve cross-sectional size corresponding to the diameter of the sewer pipeline of 5 cm; for vertical devices, the cross-sectional diameter is 11 cm.
The height of the sewer drain is selected taking into account the height of the shower stall floor, in the range of 7.5-18 cm. It is necessary to correctly calculate the height of the device so that after its installation the upper part does not protrude above the floor surface.
Types of shower drains in the floor under tiles
The sewer drain can have different throughput and diameter of the drain hole. For an apartment, it is recommended to install equipment with a throughput capacity of at least 1.2 l/sec. The removable grill can be square, round or rectangular. It is easier to lay tiles around square and rectangular drain holes and fewer cut pieces will be required. This must be taken into account when choosing a ladder.
Types of sewer drains
Example of a corner shower drain
Ladder with dry seal
Sewer drain installation technology
The very first and most important condition for installing any drain is the slope of the floor covering. It must be made in such a way that wastewater can flow gradually and easily into the drain. Usually the drain is installed in place of the shower stall , so many floor finishing is done with tiles. Rules for installing a sewer drain that must be followed:
- The drain grating must be flush with the top floor covering.
- Floor finishing begins directly from the ladder; tiles must be laid from it to the walls.
- All seams between tiles should be no more than 2 mm.
- Their grout is only moisture resistant.
Installation of the ladder has its own sequence :
- The marking is always done first of all, where the drain will be installed and how the sewer system runs.
- The slope of the outlet pipe must be at least 1 mm per 1 m.
- When installing a drain funnel in an apartment, the screed is removed.
- The drain must be attached to the sewer pipe.
- You need to adjust its height; the future floor covering is always taken into account.
- It is important to check whether the pipe slope is sufficient.
- All connections and joints with the pipe must be carefully sealed.
- Waterproofing is being laid.
- Thermal insulation must be placed around the drain.
- The extension is poured, but during the work it is necessary to control the slope of the pipe.
- After all work, the surface of the raw concrete is leveled.
- The tiles are being laid.
This option for installing a drain allows you to maintain the height of the floor in the bathroom at the same level as other rooms, so the work is quite labor-intensive. You can take another, simpler route; you need to build a deck from a wooden or iron frame , the main thing is that it is durable. Next, the outlet from the drain to the sewer pipe is installed; it is also important to maintain the slope.
The elevation is done by constructing a screed; it is necessary to install the formwork, lay down waterproofing material and reinforcing mesh. The ladder is installed so that its level is slightly higher than the formwork, that is, on a par with the facing material. Next, concrete is poured; you always need to control the slope of the pipe. After it hardens, the formwork is disassembled and finishing work is carried out.
Installing a drain yourself is not an easy task, but anyone can cope with it. It is important to strictly follow the rules for installing a sewer drain and the sequence of work.
Installation of a drain system
The design of the shower drain system is associated with raising the floor level in the bathroom. To ensure the movement of wastewater towards the drain, the floor surface is made inclined by 15 cm or more. Floor installation will include the following steps:
- laying a layer of polystyrene foam 4-5 cm thick. It will provide noise and heat insulation;
- making a rough screed from a concrete mixture 4-5 cm thick;
- flooring of a sealed membrane made of floating waterproofing;
- making a screed from a concrete mixture to create a slope in the direction of the drain hole;
- laying ceramic tiles on an adhesive solution.
If you plan to cladding the walls, then for better waterproofing it is done after laying the tiles on the floor.
Installation diagram of a linear shower drain
As a result, the plumbing fixtures are built into the floor. The level of the grating should be lower than the level of laying the tiles. If the drainage system is installed in a room located above the basement, then the drainpipe is laid into the basement to the sewer pipe through the ceiling. For bathrooms that are located above living areas, installation is more difficult. The drainpipe must be laid in the floor. However, not all interfloor ceilings will be able to withstand the additional load.
Installed shower drain in section
Preparing for work
Before installing the plumbing drain, you need to calculate the thickness of all layers of the floor. The height of the equipment will determine the lowest point of the sloped floor surface. The recommended difference in floor level is 1-2 cm per 1 m of surface. If you perform installation with a smaller slope, the water will not have time to drain, and stagnation will form.
When choosing a place where you will install a plumbing drain yourself, you need to take into account the size of the floor tiles. The distance of the grate from the shower walls should be a multiple of the dimensions of the tiles, taking into account the tile joints. Floor tiles are laid from the center to the walls. This installation will minimize the amount of cut tiles; there will be only whole tiles in the center of the floor.
Thermal insulation and rough screed
To begin installing the drain system, connect the drain to the sewer with your own hands, adjust the height of the device and the level of inclination of the drain pipe. It is important to ensure reliable sealing of the joints with silicone sealant.
Then, polystyrene foam boards with a density of 35 kg/m2 are installed around the equipment on a concrete base. Expanded polystyrene provides noise and heat insulation. In addition, the insulator will prevent the occurrence of deformation processes in the screed during the interaction of low base temperatures and high temperatures of heated water. For a warm concrete base, the insulation layer does not need to be installed.
If the design of the ladder does not provide mechanisms for adjusting its height, use available materials
A cement-sand mixture screed is poured on top of the polystyrene foam. The thickness of the screed varies according to the height of the drainage equipment. The solution is carefully distributed around the outside of the equipment and the flange. The screed is leveled flush with the flange. As a result of pouring the rough screed, a durable surface is obtained that will well distribute the resulting mechanical loads.
Floor waterproofing
As a waterproofing material, you can choose the floating insulating material “isoplast”. The canvas is reinforced with fiberglass, elastic and can withstand mechanical loads well. Installation of adjacent panels is carried out overlapping. The joints are heated with a burner to soften them, then sealed hermetically. The isoplast pressed into the flange will act as a reliable seal.
When laying the material near the shower walls, an overlap is made on the wall to the level of the second screed. The edges of the canvases are heated and firmly glued. As a result of laying isoplast, a reliable waterproof membrane is obtained.
A siphon with a grille is installed inside the device body. A tight connection is ensured by an O-ring. When assembled, only one part of the plumbing equipment remains removable - the grate.
Waterproofing the drain is one of the most important requirements for its installation.
Installation features
Installation is carried out either before laying the tiles (if the structure is poured into the screed) or after installing the covering (for shower cabins with a tray). The installation procedure is described in detail in the instructions for the device. The process is not difficult and is accessible to everyone. The main condition will be tightness and no leaks around the perimeter of the drain hole. In addition, it is necessary to ensure the specified slope of the surface towards the outlet, as well as the desired height of the grate. All necessary values can be found in the instructions supplied with the device.
Design features of valves
To prevent the reverse flow of water and the appearance of unpleasant odors from the sewer system, all types of drains are equipped with a shutter, which can be:
- Hydraulic.
- Dry type.
The principle of operation of the water seal is to create a water plug, which is located in the siphon in front of the drainage pipe. The only drawback of this design is the possibility of drying out in the absence of water for a long time. The “dry gate” design consists of one or more dampers that block the drainage system under its own weight.
The domestic market offers the consumer three types of “dry” drains for draining water:
- Membrane. The valve opens at the pressure created by the flow of water. The membrane blocks the passage under its own weight.
- Float Water fills the chamber, the float rises to the top of the tank, opening the duct. When the water supply stops, the float lowers under its own weight, blocking the drainage system.
- Pendulum. The design consists of “curtains” that move apart when a certain pressure is created, and close under their own weight.
There are also combined sewer drains with two types of valves: hydraulic and dry. Installing a universal drain ladder in a bathhouse provides a guarantee against the penetration of unpleasant odors from the sewerage system under any operating conditions.
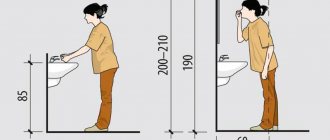
How to raise the bathroom floor to install a drain
The smallest floor-mounted drain ladder has a height of 6-7 cm. At the same time, in order for water to flow normally into it, it is necessary to ensure a slope towards the drain hole of at least 1 cm per meter. This means that when making a floor with a drain, the height of the floor towards the walls is increased. The zero point in this case is the upper part of the installed ladder. How accurately the floor rises depends on the size of the shower stall or the entire bathtub, if you plan to collect water from the entire area of the bathroom.
Floor drain layout diagram
There are several ways to raise your bathroom or shower floor. When choosing a method, it is necessary to take into account the load-bearing capacity of the floor, otherwise you can cause damage to the entire structure.
Screed of different types
The most obvious way to make a floor drain slope in the floor is to pour a screed. But the option is not always the best. Firstly, an ordinary cement-sand mixture has a lot of weight, and secondly, it “matures” for a long time. But there are several good options.
- DSP. Conventional cement-sand screed. The option is understandable, but very heavy - 15-16 kg per 1 sq. meter with a layer thickness of 1 cm. Not every ceiling can withstand such a load. You need to be especially careful in old houses.
- First pour a layer of expanded clay, pour a cement-sand mixture on top (thickness at least 3 cm). Not a bad option, but you have to consider the load-bearing capacity of the floor - whether it will hold up or not.
- Make an insulated floating screed. Plates of extruded polystyrene foam are laid down (not polystyrene foam, it will crumple under the weight of the screed), and DSP is poured on top (the minimum thickness is also at least 3 cm). A good option - the floor will not be so cold, and the total mass is relatively small. This option easily integrates a floor heating system. More rational - electric, with water, there is a lot of hassle during installation.
- Polystyrene concrete or other types of lightweight concrete. The option is very good; at the same time, the problem of “cold floors” is also solved - since these materials have good thermal insulation properties. Here it will be necessary to look for a compromise solution - between the mass of the screed and the strength characteristics.
The most common way to create a floor with a drain is using a screed. It’s just that the screed can be different, especially since the thickness of the “pie” is usually significant - rarely less than 12 cm - which makes it possible to make it a combination. This allows you to provide the required reliability, but reduce weight. Most often, the floor with a drain is insulated. But the maximum thickness of the insulation and screed is 10 cm, which is clearly not enough to install most drains. The remaining centimeters are “gained” by laying a rough screed, but it makes sense to make it from lightweight concrete to reduce the load on the floor.
On the logs
In order not to overload the floors, you can make a podium in the shower or bathtub on joists. The option is controversial, since high humidity and wood do not go well together, but sometimes this is the only option. When choosing such a floor drain device, you must use well-dried wood. Before use, it is treated with protective compounds (according to the instructions, but at least twice). It is advisable to choose from those impregnations that are intended for outdoor use or for direct contact with the ground - they have a higher degree of protection. After the composition has dried, you can begin to work.
- Make it full of wooden joists. The logs are installed in an “envelope” with the center at the location of the drain. In general terms, the technology is as follows: holes are drilled in the floor screed for installing studs (M14-M16), the installation step is about 30 cm. Logs are attached to the studs (40*60 mm or 45*90 cm - depending on the size of the podium being built). The logs are laid (can be trimmed) taking into account the creation of the required slope. On them - moisture-resistant plywood 12 mm or thicker, then gypsum fiber board, waterproofing, and tiles on it.
- Make a flat wooden floor on joists, and lay the tiles on a slope using different thicknesses of glue. This option is good for small areas - if you drain only in a small shower stall.
The advantages of these methods are minimal weight, the disadvantages are the complexity of execution, since attention to detail and high quality waterproofing are required. As you can see, the floor with a drain in a bathtub or shower can be done in different ways
Choose the option that best suits your conditions
As you can see, a floor with a drain in a bathtub or shower can be done in different ways. Choose the option that best suits your conditions.