The installation of a flow filter for water purification in an apartment is carried out by the service department of the Rusfilter company in Moscow and the Moscow region represented by professional mechanical engineers with more than 4 years of experience in this service sector.
All work is carried out quickly and with a guarantee by experienced specialists; in the future, you can sign an agreement for one-time or regular maintenance of the installed equipment. Installing a filter under the sink at a favorable price will help you get rid of problems with contaminated, excessively hard and unpleasantly smelling chlorine water.
Basic operating principles
If you need clean drinking water not only in the kitchen, you can install a filter structure on the inlet pipe for the entire room. But if you just want good water for drinking and cooking, the recommended location for the purifier is under the kitchen sink. This saves space and provides easy access to replace cartridges.
Most often, installation is carried out into the existing liquid supply system, but sometimes a separate tap is made. To do this, you have to modify the sink - create an additional hole. It is also necessary to install a tee to divert part of the flow. Today, in most cases, flexible hoses are used, which makes work easier.
Upon completion of installation, it is recommended to flush the system by draining about 8-10 liters of liquid. Filling the compartments will take from 1 to several minutes. Then you can use the device in the required mode.
Operating principles of a water purifier
The main difference between the under-sink system is that clean water (drinking) is supplied to only one place - to a specially designated tap. While there are general filtration installations that are installed at the point of connection of the water supply to the apartment/house. They are more expensive and difficult to install, but they protect all water intake points from contamination, including extending the life of household and sanitary equipment.
Returning to the principle of operation of under-sink filters, everything is simple here. Water comes from the main water supply or well and passes through pipes to the kitchen (or to another place where the equipment is installed). Here a branch is made from the cold water pipe to the purifier. The liquid sequentially passes through the cartridges, accumulates in a storage tank, and then exits through a specially designated tap. Sometimes the system is combined with a conventional mixer, but this is rarely done, because, as a rule, the selection of filtered drinking resources is not very large.
Features of the design of filters for washing
Despite the fairly simple design and principle of operation, filters of this type contain a large number of components and elements. Therefore, installing a water filter yourself should be in accordance with the complete set of the product.
The composition of the filter part is determined by the user's choice. The number of cartridges and, accordingly, purification stages is from 2 to 6, and their type is selected in accordance with the quality of the source water. Since the cost of the filter directly depends on the number of stages, in some cases it is advisable to strengthen one direction of cleaning, saving on the other.
For example, if there is sand and other types of mechanical impurities in a liquid whose composition meets quality requirements, you can do without an iron removal cartridge by installing an additional sorption filter instead.
The under-sink filter may include:
- carbon cartridges for mechanical cleaning,
- deferrization,
- mechanical filters for solid suspensions,
- softeners for removing hardness salts,
- reverse osmosis membranes,
- mineralizers that optimize the composition of the liquid,
- UV lamps for disinfection.
In addition to cleaning modules, the design is equipped with:
- bracket-console for mounting on the wall,
- a device for connecting to a cold water supply pipeline (adapter or tee) with a valve installed at the insertion point and regulating the water supply,
- gaskets for connections,
- faucet installed on the sink.
For ease of use, the kit may include a storage tank that ensures water supply, despite the decrease in pressure when passing through filters and especially through a reverse osmosis membrane.
Flow filter system
The flow filter externally consists of several flasks connected to each other, in which special cartridges are installed. Their number varies from 2 to 4.
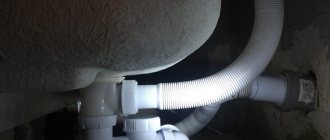
It is connected to water supply communications via a flexible connection. There is a small tap at the sink itself, through which clean water is supplied.
The produced filters require several stages of cleaning, for which appropriate cartridges are used. For rough mechanical cleaning, a cartridge made of foam propylene is sufficient, which traps foreign particles in the water.
For medium cleaning, a cartridge with sintered activated carbon is used to remove:
- organics;
- chlorine;
- smells.
The third version of the cartridge is also made of polypropylene, only with better penetrating ability - 1 micron, compared to 5 microns of the rough version. It is capable of removing chlorine and dissolved iron from water.
Reference. Flow filters are the most common.
Reverse osmosis systems
The design of such a system is similar to flow-through sorption filters, but has several additional components. Here, several filter modules are mounted on a common console, of which there can be from one to four, and in premium models with a high degree of purification even five. Each of the modules, which is a plastic container with filter cartridges inside, is designed to do its job. The main feature of such systems is the presence of a module with a reverse osmosis membrane, passing through which the water undergoes ultrafine purification.
Here are the main types of cartridges used in such systems:
- filters (usually made of polypropylene) that cope with a variety of mechanical impurities in water.
- filters containing carbon sorbent are able to cope with organic matter, hydrocarbons, heavy metal salts, and the taste and smell of chlorine.
- filters that remove excess iron from water are called iron removers; inside there is an active substance that reacts with iron dissolved in water.
After undergoing preliminary cleaning using the above cartridges, the water flows to the module with a reverse osmosis membrane. It is on this membrane, which allows only water molecules to pass through, that the principle of the reverse osmosis system is based. To pass through the membrane in the water supply system there must be a pressure of about 3 - 3.5 bar. Therefore, an electric injection pump is often included in the delivery package. Some models use an ultraviolet lamp to disinfect water and destroy harmful microorganisms.
Water purified by this method is similar to distilled water. To replenish minerals, a number of reverse osmosis systems have a special mineralizer. Since water passes through the membrane slowly, reverse osmosis systems are equipped with a storage tank - usually up to ten liters in volume. This turns out to be very convenient when a large amount of water is needed at once, but there is no time to wait for it to clear.
To summarize, we note that it is reverse osmosis systems that provide the cleanest water. Exactly the same as what is sold in bottled form in stores. Only the cost per liter will be many times lower. So the savings are obvious - many zealous owners realized this long ago, having acquired similar systems and enjoying the purest, clear, like a tear, water.
Reverse osmosis system with installation under the sink.
General information about water filters
Recommendations for installing the filter
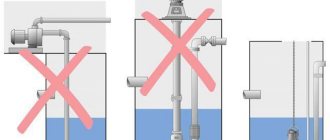
It is not advisable to install a filter at the beginning of the water supply system. For washing, showering, washing dishes, etc. Standard cleaning is sufficient. If you purify all the water you consume, the filters will quickly become clogged and fail.- This filtration system consists of several elements; therefore, installation depends on the installation model and the number of units.
- The purification system can consist of two to 6 stages. Their quantity is determined by the nature of the impurities and the quality of the liquid. Knowing which impurities are more abundant in water, you can save money by focusing on the required purification and weakening other areas.
- For example, there is a lot of iron in water and practically no mechanical impurities. It is reasonable to increase iron removal and exclude the sorption filter from the system.
- To determine the quality of water, it should be analyzed. One study is enough from the central water supply; for a country house, two water intakes should be made, the first is better in the summer, and the second in the spring, when the groundwater level rises.
Types of cleaning
A kitchen filtration unit may include:
- Mechanical cleaning
- Filters for removing ferrous and ferric iron
- Filtration of iron salts
- Reverse osmosis
- Mineralizer
- Ultraviolet
- Mechanical cleaning of suspended solids
In addition to various filters, the system contains:
- Wall Mounting Mounts
- Parts for connecting the filter to pipes (fittings, ball valves)
- Gaskets
- Sink faucet
For your information! Filtration systems are available equipped with a storage tank, which guarantees the constant availability of purified liquid.
Selecting a cleaner
To correctly select a home “health guard,” you need to decide on the basic parameters.
- Initial water quality. If it has only mechanical impurities, then a jug filter or a faucet attachment is sufficient. If the water is hard, has impurities, or contains many chemical elements, it is advisable to use a flow-through stationary filter. The ideal option would be to combine a stationary device with a faucet attachment.
- Expected economic effect. Assess the ratio between the price of the purifier and its performance over a certain period of time. Then estimate the service life in liters for which the cartridge is designed. If you have a large family and water consumption is significant, it is better to choose a flow-through option with a high cleaning speed.
- Possibility of embedding. If you often travel or rent a room, it is more convenient to use a pitcher filter; such products are easy to transport. If you have a permanent place of residence, you can simply integrate the device into the system and not think about the quality of the liquid consumed.
Subtleties of self-installation
If the reader does not have basic knowledge of plumbing and the necessary tools, it is recommended to call specialists to connect the entire system. The main problem is the constant pressure of running water. If all elements and joints are not properly secured and insulated, a leak may occur.
You can install the entire filtration system yourself in just a couple of hours. It all depends on what type of purified liquid outlet is used. If the sink requires an additional hole for a second tap, the task is simplified. If it is not there, you will have to do it yourself using an electric drill.
It is necessary to purchase an additional tap for distributing water supply from the water supply system. There must be a separate outlet for the kitchen faucet and filters.
Installation site requirements
First you need to prepare the space under the sink. To do this, mark the sink and the place where the outlet for filtered water will be located. All the lower space needs to be freed. This is necessary because you will need to connect to the water supply system going to the kitchen.
You need to take a basin in advance and place it at the place where the pipes are to be dismantled. For convenient and safe installation of the filter connection system, it is necessary to turn off the water in the apartment or house. For fixation you will need rubber or silicone gaskets and mounting thread for pipes.
In the system, even after turning off the water, liquid will remain until it is drained. To avoid strong pressure during opening, before starting installation, it is recommended to open cold water taps in the entire apartment and wait until the liquid runs out in the system. However, even after this, there will be a small amount of water in the pipe. Therefore, it is important to place a basin or bucket under the pipe fixation points to avoid leaks.
Direct installation of filters
It is better to start preliminary installation by choosing the location of the crane. It is important that all elements are securely fixed. If the drain is on the countertop, installation problems should not arise. It is enough to select a drill bit for an electric drill that matches the diameter of the tap hose and make a hole in the right place.
This method can also be used for metal sinks. If stone or ceramic models are used, this method should be abandoned. The drill may leave cracks and chips. The location where the faucet is fixed is hidden under the external decor. It is attached with a self-tapping screw or mounting adhesive.
Having installed a drainage system, you should ensure the flow of water into the filters. To do this, you will need to remove everything from under the sink and first mark the place where you need to install the cleaning device. It is best to mount it on the inside or side wall of the sink.
Next, you need to make a water intake system. To do this you will need a connection node. Usually it comes complete with the purchased device. It must be placed on a water pipe. The upper part is connected to drain water to the main tap. The side outlet is used to allow liquid to enter the filter compartment.
Preparation for use
Before starting, there is a system for checking the flow and purification of fluid. After connecting the water to the filters, you need to run the water through all the cleaning elements for 5-10 minutes. From the moment the device starts, it is important that the water begins to circulate correctly. Filters, after a long period of stagnation in the box, may have their own sediment. It is this that must be washed off when running.
At the end, the drain hose is correctly connected to the additional tap and flowed again for 5 minutes. After this action, the pressure in the entire water supply is checked.
It is important to ensure that after connection there are no leaks in the entire network.
Which is the best water filter to buy?
You don’t need to go far in search of good water filtration systems; there are many good Russian-made units on sale at affordable prices. Dozens of popular manufacturers operate in this market, but the most famous are the following:
- Geyser - the history of the brand began in 1999 with a group of enthusiasts and developed into a large company that became one of the leaders in the plumbing and plumbing equipment market. It offers both individual flasks and complex multi-stage cleaning systems with 2 and 3 modules, with storage tanks. Its units are capable of coping with the heaviest contaminants.
- Aquaphor is one of the leaders in the water purification filter market, which began operating in 1992. Its products are supplied to 20 countries around the world and are developed to meet strict quality and safety standards. The manufacturer controls the process at all stages, from development to sale. The company uses modern technologies to ensure high quality water.
- Barrier – the company’s mission is to provide the population with high-quality, tasty and safe running water from the tap, which will not negatively affect the functioning of the liver, kidneys, and bladder. Its products are easy to use, easy to install and readily available on the market. The manufacturer produces not only systems, but also separate removable cassettes for replacing outdated components, which makes their operation easier.
- Atoll - filters of this brand provide 100% deep cleaning, effectively eliminating even the smallest particles and softening water. In the assortment, special attention is paid to multi-level filtration systems, which simply leaves no chance for harmful substances. The company's cartridges use materials that meet the strictest safety standards. There are both budget models and premium units.
You can purchase goods not only in online stores, but also on the official websites of companies. Some companies even offer free home delivery and installation of under-sink filter systems.
Where to install the cleaning system?
The following requirements are put forward for the installation location:
- There should be enough space under the sink for the filters so that they can be placed there freely, without deformation;
- The flasks are left freely accessible, as they will need to be replaced over time;
- Also leave access to plumbing elements, which is necessary for system maintenance and repair work.
Attention. The under-sink filter can be installed in both vertical and horizontal positions. The main thing is that there is enough free space for all dimensional elements.
The best flow-through drinking filters for washing
| New water Expert M312 5,947 A neat and convenient filter from the Expert series, which not only does its job perfectly, but also takes up very little space under the sink. Complex water purification from contaminants includes 4 stages and is carried out using four special cartridges.
Main advantages:
Minuses:
| 9.8 / 10 Rating |
| "Barrier EXPERT Ferrum" 3,790 Another water filter in our rating is best suited for country houses where the concentration of iron dissolved in the liquid is high. It is also effective where there is a significant excess in the organoleptic properties of water and chlorine. The filter system is easy to install and operate. Three stages of purification remove both rust and unpleasant odors from the water. Relative disadvantages include insufficient protection against scale, but this filter system is not intended for this; it has other tasks. If you're looking for the best high iron water converter, you've found it. Main advantages:
Minuses:
| 9.7 / 10 Rating |
| OMOIKIRI Pure Drop 1.0 6,988 OMOIKIRI Pure Drop 1.0 is a universal flow-through water purification system for removing common types of contaminants. The complex filter is absolutely easy to use, easily installed under the sink and does not take up much space. It consists of 3 replaceable modules, the planned replacement of which does not require the use of additional tools and is a matter of 1 minute. A high degree of purification is ensured due to several factors:
The filter supports high filtration speed – up to 3 l/min. Resource – up to 10,000 l (depending on water quality). Main advantages:
Minuses:
| 9.7 / 10 Rating |
How the composition and hardness of water changes after filtration
Raw tap water contains the following elements:
- chlorine;
- fluorine;
- metals;
- sand;
- pathogenic bacteria.
After going through several purification systems, the water can be safely drunk straight from the tap. In this case, no additional boiling is required.
The taste of the liquid also improves. This becomes especially noticeable when preparing tea, coffee or soups, where it plays an important role. For convenience, you can install the system not only for cold, but also for hot water.
The best under-sink systems with reverse osmosis
| Atoll A-550 MAX 16,700 An absolutely irreplaceable unit. 99.9% of all harmful impurities contained in water are removed. In this case, the liquid is not “emasculated”, but is enriched with oxygen during the purification process. A reverse osmosis system is one of the most environmentally friendly ways to remove contaminants from water today. The clean water tank holds 12 liters, which is enough to supply a large family or office with up to 20 employees. The main advantage of purified water, in addition to its usefulness, is the absence of scale in kettles. A separate tap for drinking water is optionally available. Main advantages:
Minuses:
|
|
| New water Expert Osmos MO530 11,970 Compact, lightweight and effective reverse osmosis system with a mineralizer and a highly selective membrane with increased productivity TOREY (Japan). Designed for universal water purification from chlorine and its compounds, mechanical impurities, petroleum products, fertilizers and their breakdown products, pesticides, herbicides, iron, heavy metals, radioactive elements, all kinds of viruses and bacteria. Improves the taste of water and neutralizes odors. The water passing through the filter is softened, which eliminates the problem of scale formation. The system is completely silent and works reliably at low pressure in the water supply. The set includes 4 cartridges (including a membrane), a transparent storage tank, a separate Premium ceramic ball valve for clean water and everything necessary for easy installation under the sink. An additional feature of Expert Osmos MO530 is its stylish and impeccable design. Main advantages:
Minuses:
| 9.9 / 10 Rating |
| "Geyser Prestige-2" 4,990 A slow filter, which, however, produces very high-quality water. Its salt balance is restored to normal, odors of bleach and other impurities are eliminated. The reverse osmosis system allows you to soften and deferrize the liquid passed through a special membrane. With this unit you will forget about scale for a long time. The set includes a separate faucet for filtered water. Despite some difficulties in installation, the system works very well and, as a rule, completely satisfies users. Main advantages:
Minuses:
|
|
We crash into a water pipe
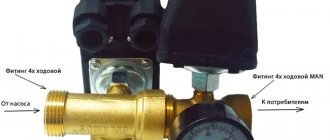
Water must be supplied to the filter unit through a tap into the water supply system. To do this, the kit must have a special tee. Before tapping, shut off the cold water riser and drain the remainder from the pipes.
Now remove the hose that connects the faucet to the water pipe. You need to install tees on the cold water pipe. To prevent the threaded connection from leaking, use sealant or FUM tape. A flexible hose leading to a cold water tap is connected to one branch of the tee. A ball valve is attached to the second branch to regulate the flow of water.
Reverse osmosis system connection diagram
How to properly install a filter under a sink
- It is recommended to install the filter not to the main faucet, but next to it, making another hole in the sink.
- It is necessary to make a branch from the water supply network. To do this, turn off the valve that will stop the water supply and drain the remaining water in the blocked area. Then bifurcate the supply network using an adapter and connect the outlet to the filter. Thus, we get two input disconnected parts and a tap for the filter.
- If for some reason the filter system was not assembled in production or in a store, then you must first assemble it strictly following the instructions.
- Two hoses, inlet and outlet, are connected to the already assembled device.
- Attach the faucet to the sink.
- Connect the device to the water supply and tap using the connected hoses.
- Seal and seal all threaded connections using FUM tape.
You can watch the installation process more clearly with specialist comments in the video:
Choosing a place for the filter
When choosing a location for installation, it is important to consider several nuances. It is very important that the filter does not block access to the plumbing. In case of force majeure, you need to get quick access to shut-off valves. And the water filter should not become a hindrance.
Also be aware of the location for filter maintenance access. Cartridges need to be replaced periodically. And this requires space.
Inspecting the equipment
Typically, a filter installed under a sink is equipped with all the necessary fasteners. But sometimes something may be missing. The standard package includes:
- flasks with cartridges;
- bracket-console;
- connecting tubes;
Water filter kit
- tee for tapping into the water supply;
- ball valve for flow control;
- faucet for outlet to the sink.
More complex filter systems may include additional accessories.
Installation of an additional tap
Immediately before assembling the filtration system, you need to install the faucet on the sink. It is necessary to remove the liquid that has undergone purification. Many household filtration systems have this faucet as standard. It can be installed on a sink or any other convenient place.
To install an additional faucet, drill a hole in the places where you plan to place it. The choice of drill and drilling mode depends on the material in which you want to make a hole.
- If the faucet is installed on a stainless steel sink, then careless drilling may cause the metal to become deformed. It is best to drill stainless steel first with a thin drill, and then with a drill of the required diameter.
- If you need to install an additional tap in a granite sink, you can drill a hole in it using a Pobedit drill. To prevent such a drill from shrinking, periodically cool it with water.
Connecting a filtered water tap
A tap is inserted into the hole and secured with a fastening nut. It is screwed onto a tube at the bottom of the tap inserted into the hole.
We crash into a water pipe
Water must be supplied to the filter unit through a tap into the water supply system. To do this, the kit must include a special tee. Before inserting, close the riser with cold water and drain the remainder from the pipes.
Now remove the hose that connects the faucet to the water pipe. You need to install tees on the cold water pipe. To prevent the threaded connection from leaking, use sealant or FUM tape. A flexible hose leading to a cold water tap is connected to one branch of the tee. A ball valve is attached to the second branch to regulate the flow of water.
Reverse osmosis system connection diagram
Filter assembly and installation
The most important step in installing a filter yourself is assembling it into a single whole. To begin, connect the plastic hoses included in the kit to its inlet and outlet. Typically, the places where the hoses are inserted are closed with transport plugs. They must first be removed.
Installing the filter will be easier if you purchase a model equipped with special quick-release clamps. To attach a plastic hose, simply insert it into such a clamp using a little physical effort.
Filter cartridge system
The hose that is connected to the filter outlet must be connected to an additional tap installed a few minutes earlier. The hose connected to the inlet of the filter is mounted to a ball valve mounted on the tee.
Attention! The hoses must be securely fastened at the connections!
Checking joints and system operation
After the filter has been installed, check it in action. To do this, run water through the water pipes - you closed them before installation. After filling the system with cold water, check all joints for leaks. Inspect the tee for leaks. Then check that the hoses and taps are securely attached. If no leaks are detected, then the filter is installed correctly. You can run water into it: to do this, turn the handle of the ball valve.
Attention! Open the tap with clean water. It should drain within 5 minutes. This will remove process dust from the filter. There is no need to be afraid of muddy water. After a few minutes it should become transparent and clean.
Filtration of tap water is a very important condition for improving the quality of life in the modern world. Unfortunately, today the water supplied to residential buildings is not of high quality: it may contain harmful chlorine, heavy metals and even pathogens. Modern water filters can clean up to 95% of contaminants. The main thing is to change clogged cartridges on time.
Installing filters
The easiest way to answer the question “how to install a water filter under a sink” is to list the necessary operations and the features of their implementation one by one. By following these instructions step by step, installing a filter for water purification will not be difficult.
- Experts recommend installing a filter tap not instead of the standard one, but next to it. To do this, you will need to drill an additional hole taking into account the required diameter.
- For a branch device supplying water to the filter from a common pipeline, it is necessary to first shut off the water supply with the valve and drain the remaining liquid from the corresponding area. After this, in accordance with the diagram attached to the product, the existing cold water supply network is disconnected (in most cases this is done at the connection point of the flexible hose). Using a tee or adapter, connect the outlet to the filter. Thus, the disconnected parts will enter the two inlets of the tee, and the filter outlet will enter the third.
- If the product was not sold assembled, installing a water filter under the sink includes assembly work. A visual diagram and all the necessary components are included in the kit.
Installation diagram of a standard multi-stage filter - Plastic hoses for water inlet and outlet are connected to the assembled model. To do this, remove the plugs and retaining half-rings at the connection points.
- The tap on the sink is secured with nuts and washers.
- The hose intended for connection to the tap is placed on the piston.
- Using the installed hoses, connect the cleaning structure to the water supply and the faucet installed on the sink. The connection to the tap requires special attention. The piston inserted into the pipe is placed against the wall and pressed so that the distance between the edges of the piston and the pipe does not exceed 2 mm. The other end of the hose is threaded through the fastening nut, which in turn is screwed tightly.
- If the design provides for a drainage outlet, it must be inserted into the sewer pipe by drilling a hole in it and using the drainage clamp from the filter kit for fastening.
Installation of a reverse osmosis water filter - All threaded connections are sealed and sealed using FUM tape or flax and sealant.
Reverse osmosis installation
The installation process is similar to the previous option. You need to start work by turning off the water.
Installation procedure:
- It is recommended to begin installation work by connecting a tap for purified water. For this task, the package contains everything you need: clamps, nuts.
- To install a thin faucet, you will need an additional hole. It is done with a tool such as a drill, paired with a diamond-coated drill. Hole diameter – 13 mm.
- On an enamel or porcelain surface, the top layer is cleaned down to the metal base.
- Using a 7 mm drill, a hole is made in the metal base. Work should be done carefully. Then the same procedure is repeated, only a 13 mm drill is installed. Now the tap is installed with the nut tightened.
- The filter is equipped with a connection to the water supply. It includes a tap with an outlet to the tube and a special tee. The instructions indicate in what order they are connected.
- The insert is installed. Each connection is pre-wrapped with fum tape.
- The supply line is disconnected from the tap through which cold water flows.
- We attach and secure the insert. You need to screw it in carefully without damaging the tubes.
- When installing the filter, a clamp must be installed on the waste pipe, preferably above the siphon.
- We install the storage tank, after which we wrap its threads with Teflon tape. Next, a plastic tap is attached to it.
Useful video that describes the process of installing a reverse osmosis filter:
This completes the installation. Now let's figure out how to check the functionality of the systems.
Faucet installation
First of all, you need to inspect the sink for ready-made holes for installing a faucet. In some models they may be closed with plugs. If they are not there, you will have to drill a hole of the required diameter in the sink or countertop. Stainless steel sinks must be handled as carefully as possible, since the tool can leave uneven edges. If your kitchen has a granite sink, you should choose a pobedit drill bit. Working with wooden countertops does not require such manipulations.
Once a hole of the appropriate size has been made in the sink or countertop, you can begin installing the faucet for the filter. The part is installed in the resulting hole and then secured from below with a nut. After securing the tap, you need to make sure that all sealing gaskets are in place.
The end of the hose marked in blue is connected to the tap. For installation on a sink, fasteners are used that come with the filter itself. First, a crimp ring is put on the hose, then a plastic ring, after which the pipe is inserted. Then you need to tighten the crimp nut well using a wrench.
Features of operation and maintenance
In order for water to be effectively purified by the selected filter, it is important to follow certain rules when using it.
- Make sure there are no kinks in the hoses.
- Replace cartridges in a timely manner (the resource can be indicated in liters or indicating the maximum allowable operating time).
- When replacing cartridges, wash the flasks with soapy water and clean water.
- Install carbon cartridges with the membrane removed, followed by washing.
- Ion exchange cartridges must be regenerated in accordance with the instructions.
Even with good washing of the installed filter, a slight turbidity of the water may appear at the initial stage of operation. This does not last long, and after the water becomes clear, you can taste it. A slight bitter taste should not be considered a sign of incorrect operation of the filter device. This taste can be caused by the material of the cartridge for removing hardness salts (desalting blocks). Usually, water also tastes bitter for a very short time - it is enough to drain it a little so that clear, clean, tasteless and odorless water comes out of the tap, optimally suitable for use in cooking and drinking.
First start
First, let's briefly go through all the main installation steps to make sure the steps were performed correctly.
Key stages:
- A tee is connected, which is an input node;
- There is a tap for purified water on the countertop, which is connected to a plastic hose connected to the filter;
- Each tightly tightened flask contains a cartridge, in accordance with the instructions;
- The eyeliner is carried out without kinks.
Now let's try to launch it. Initially, the water in this area was cut off.
We open the supply and manually check all connections for leaks . We open the blue tap that supplies untreated water to the filter and test the connections.
Next, open the tap on the sink and let the water run for 5-7 minutes. After this time, we taste the water.
Important. If a flow filter was installed, the water will seem bitter - this is normal and is explained by the chemical replacement process. After some time the taste will go away.
General requirements for mounted systems
The selected treatment equipment must first of all meet a number of basic operational requirements.
- When assembling water treatment systems, only food-grade materials are used, which retain their absolute inertness (ecological purity) within the operating temperature range. In addition, this property must be maintained throughout the entire period of use of the product.
- The operating pressure of the installation is calculated based on the parameters of the water supply network. If there is a shortage of it, an additional booster pump may be required. Such a need sometimes arises on the upper floors of high-rise buildings or in the private sector.
- Excessive pressure is also dangerous. Therefore, all components of the after-treatment system are made from durable, certified materials. For example, the permissible operating or maximum pressure is indicated on the housings of the filter units, which should be considered with a reserve in case of water hammer, which may cause cracks and, as a result, leaks over time. It is best to install a water filter made of glass-filled (reinforced) polymer (polypropylene or polyamide) or stainless steel under the sink.
- The size of the installation components is selected so that they allow installation in a cramped washing space, and also guarantee convenient routine or repair maintenance.
- Shut-off valves made of high-quality brass alloys with ceramic inserts are welcome, since their service life is significantly higher than that of their plastic counterparts.