Ventilation units in forges have the task of combating smoke, dust, harmful gases (carbon monoxide and sulfur dioxide) and excess heat entering the room. In improved forges with furnaces for heating products, this task is greatly facilitated, but forges with open forges are widespread and ventilation is especially important in them. The forge ventilation device consists of the following parts: 1) a device for blowing to the forges - a fan, an air duct, a nozzle (the blowing tip of the air duct), 2) a suction device - a receiving umbrella (a cap over the forge), an exhaust pipe and a draft stimulator (deflector or fan) , 3) supply unit. To blow the furnaces, high-pressure fans described above are used, and air is taken both from outside and from inside the room. Air ducts from the blower fan to the furnaces are usually supplied in underground ducts, and since the air in them moves at high speed and the diameter of the pipes is relatively small, sometimes smoke pipes (heating pipes) are used for the blower air duct, which can be sealed under the floor without a device for them channels. At the hearth itself, a valve or valve with a long handle is placed on the air duct, which is brought to the front side of the hearth for convenient use. The blowing nozzle has one or more holes for air outlet; sometimes the air duct tip is cast iron with a slag collector at the bottom and a cleaning hole with a cover with a counterweight. The umbrella over the forge is arranged in such a way that the edge of the umbrella is at the same distance from the blow nozzle at which the umbrella is raised above the forge; The device of the forge is shown1 in Fig. 257, which shows a typical forge design with basic dimensions. The furnace cover should be as complete as possible; therefore, the non-working sides of it are closed tightly, and on the working sides of the umbrella there are folding aprons, which should be opened only when necessary.
The umbrella should move smoothly to the exhaust pipe, which is made straight; in a typical forge, the pipe diameter is 500 mm, the height is 4 - 5 m and at the top there is a “Shanar-Etoile” deflector. At a height of 0.5 - 1.0 m above the umbrella, a throttle valve is installed in the pipe, which can be fixed in any position. To better capture smoke, the umbrella is equipped with additional devices: 1) double activated umbrella (Fig. 258, a); in this case, the smoke escaping from under the first umbrella is picked up by a draft that forms in the gap between the walls of the umbrella; 2) double pipe (Fig. 258, b); in addition to the exhaust pipe, a second pipe about 1 m long is made, which can go down on blocks; lifting height 0.5 - 0.7 m; sometimes a bell is made at the bottom; the drain pipe is equipped with a counterweight, an iron box in the form of a ring around the pipe, into which sand is poured for the load.
When the exhaust pipe passes through the ceiling, fire prevention measures must be taken. The pipe should not touch the wooden parts of the building anywhere and have reliable insulation, for example, in the form of winding with asbestos cardboard, placing cases filled with sand, etc. The draft stimulator in forges is predominantly the “Shanar-Etoile” deflector; in the case of using a fan, the hood is usually arranged in one of two ways: 1) direct suction of smoke by a fan, which passes the smoke through itself and is in this case called a smoke exhauster; chimneys from the furnace to the fan can go both up and down into the underground channel (Fig. 259);
2) the use of ejection, i.e. creating thrust with a strong stream of air, dragging the surrounding air along with it; in this case, the fan operates as a blower. The tapering air duct (nozzle) is discharged into the exhaust pipe (Fig. 260). Ejection is turned on during ignition, and then it can be turned off, since it does not provide any particular advantages when natural draft is established; sometimes for ejection they use a blower fan, from which an air duct is branched into the exhaust pipe; After igniting the forge, the fan switches to blast.
Exhaust devices in forges work normally only if there is sufficient supply ventilation from a central installation or local units installed in the forge itself. The supply air is heated in winter and its volume is regulated depending on the number of simultaneously operating forges.
Purpose of the fan for the forge
You can understand the role of the fan by studying the principle of the forge structure. It can be installed permanently or have a mobile design.
A classic stationary forge consists of a work table, in the center of which there is a recess (socket) intended for burning fuel.
Indoors, the forge must have a pipe with an exhaust hood to remove smoke.
A special feature of the forge is that the metal workpiece is placed in direct contact with the fuel.
This ensures that the workpieces are heated to a plastic state, in which the metal can be easily forged. The temperature in the working area of the forge should be at least 1000–1300 o C. It is achieved through fuel combustion. To maintain the combustion process in this area there must be good air exchange, which is provided by a fan. The air stream from it is directed into the forge socket through the nozzle.
The fan must provide a certain air pressure.
Important! The efficiency of the blowing and combustion process, which affects the temperature in the working area, depends on the fan power.
The combustion process is also affected by the type of fuel used. Fuel from coke, charcoal and gas is used as fuel. Liquid fuels made from petroleum products, such as gasoline or kerosene, are rarely used.
Working wheel
First we will make the impeller. The wheel itself consists of blades that are fastened together, and in the middle of the wheel there should be a hub for mounting the engine. A circle made of any material (wood, plastic, etc.) can be used as a wheel. The blades can be cut from stainless steel of the required diameter and attached to the circle in any convenient way. To simplify the manufacturing process, you may need a drawing with dimensions. Here is an approximate version of the drawing:
This is what a homemade fan looks like, although the number of blades and size may be different.
The impeller is ready, now let's move on to the housing. The fan will have the shape of a snail, so the blower is often called a snail for the forge.
Industrial fans design
Industrially manufactured furnaces are mainly equipped with centrifugal (radial) fans for air blowing. They are simple to design and provide uniform blowing.
A fan for a forge of this type often has a casing that is made in the shape of a snail. Its internal structure and principle of operation are shown in the figure, where a) is the appearance, b) is the structure and arrangement of internal parts.
The principle of operation of the “snail” is as follows:
- Inside the casing (3) of the fan housing, a rotation wheel (1) equipped with blades (2) is located on the axis.
- The shape of the blades and the direction of rotation of the wheel create the movement of air flow into the pipe (4) in the direction of the combustion zone.
- The direction of air flow is provided from the hole located in the central part of the volute body to its final turn, which has a narrowing. Due to this, the air pressure increases.
An example of an industrial product is a fan of the common brand VT1-2, produced under the Blacksmith brand.
It is designed for blowing both stationary and portable forges with a completely open top. The diameter for connecting the pipe of such a device is 50.8 mm, power is supplied from a 220 V network, power consumption is 150 W, the impeller rotates at a speed of 3000/3600 rpm.
The maximum pressure (pressure) of the air stream in the supply hole is 490 Pa. The fan has dimensions of 225x180x225 mm and weight of 2.65 kg.
The fan housing is made by casting and is highly durable. The device operates almost silently and is easily connected to the forge.
Parts and tools
To create it you will need the following parts:
- Electrical engine.
- Impeller (you can take it from a centrifugal fan or make it yourself).
- 2 plastic buckets.
- PVC pipe.
Tools you will need:
- Screwdriver or screwdriver.
- Drill.
- Knife or hacksaw for cutting holes.
Fan drive for forge
The rotation of the fan wheel with blades is carried out using a drive:
- electrically;
- by manual force;
- a combination of methods.
When using an electric drive, rotation is carried out using an electric motor that converts electrical energy into mechanical rotational energy.
The manual method involves simply rotating the handle of a glider-type gearbox.
This option is usually a backup and is used when there is a power outage and the installed electric motor cannot be used.
The figure shows the drives: a) - manually, b) - using an electric motor.
1—belt on pulley;
2 and 3 - transmission gears;
4 — rotation handle;
Setting up a forge: particularly important points
First you need to decide what products you are going to create, because what your future workshop will look like will depend on their size. If there is no need to make fairly large “masterpieces,” then you can build a forge by spending quite modest funds.
- The premises are the first important point to stop at, because there are strict restrictions, and fire safety rules require compliance with them. The fact is that the blacksmith's workshop should be remote from both residential and commercial buildings. The required room area is at least 16 m2, and the door must open exclusively outward.
- The floor of the forge requires special attention, because flammable materials are strictly contraindicated here. If in ancient times in such workshops the role of floor covering was played by thoroughly compacted earth, now the best option will be concrete or something similar.
- Providing ventilation and soundproofing are also important. If it is simply impossible to work without the first one being forced, then the second one will make you a common enemy - both household members and neighbors.
If the necessary premises are not yet available, you can set up a forge either in the garage, or even in the open air, but in this case you will have to build a fire-resistant floor, a rain shelter and create when everyone around you has gone on business. When the question about the premises has found an appropriate answer, you can move on to a new “headache” - taking care of tools and equipment.
A “naked” forge - without a forge - is the height of indecency
To put it pompously, we can say that the forge is the heart of the forge, only there “the steel submits obediently,” turning almost into plasticine. The device is simple: coal burns in the furnace of such a furnace, and a metal billet is placed there, which is heated to the required temperature. The smallest forge can even be built from a tin can. And he will allow you to make forged things as successfully as his respectable “colleague” in the craft. True, their sizes will be appropriate.
The main task assigned to the operation of this equipment is to provide a fairly high temperature for heating the steel. The best option would be a solid fuel fireplace that uses coal. He also has a competitor - the Kuznetsk gas forge.
Dream come true: building a forge
This working tool consists of a table, hearth, tuyere and umbrella.
The table is a reliable foundation
If you decide to make a solid stationary forge, then you need to start by building a table on which the hearth is located. Usually its height is 700-800 mm, but it depends more on the height of the master. The dimensions of such a tabletop are determined only by the dimensions of those products that will be forged: the working surface can be either a meter by one and a half, or 1.5x2 m. The tabletop can be made of reinforced concrete, brick or steel sheet 4 mm thick. The body is constructed from logs, brick or stone. Clay, sand or crushed stone is poured inside this “box”.
The anvil is the forge's faithful partner
Therefore, it should be located close to him. The best is its two-horned variety. The horizontal platform is called the “face”, so it must be protected from any flaws - only a perfectly polished surface guarantees the quality of the work.
On one side of the anvil there is a cone-shaped horn; here the rings are welded and rolled out. Not far from the base of the cone there is a round hole (15 mm), with the help of which the products are given a round shape. On the opposite side, where the “chin” of our face is located, closed rectangular parts are bent. There is also a hole here, but it is square, its dimensions are 30x30 mm.
At the bottom of the anvil there are 4 paws, which are intended for attaching it to the base. This is done with staples. This instrument also requires a special chair made of oak or birch, its diameter should be about 600 mm. In order to make something like a foundation for an anvil, the block of wood needs to be deepened into the ground by 50 mm, even deeper is better. This will avoid vibration of the tool.
Frame
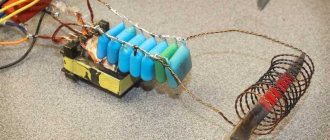
This is what the snail-shaped blower looks like in the diagram. To make it, at the bottom of the bucket, in the center, we make a hole, which should be slightly larger than the diameter of the motor shaft. Then you need to make fastenings, as in the photo or any other fastenings that will securely fix the engine so that it does not rotate and does not touch the impeller.
After this, you need to cut the bucket so that it is wider than the impeller. Next, we cut off the lid, the same diameter as the bucket, and in it we make a circle in the center, which will be slightly smaller than the diameter inside the impeller.
Blacksmith chair vise: neighbors with an anvil
It is impossible to do without a vice in a forge, because workpieces have to be clamped in them. They must be adjacent to the anvil, so a wooden base for them is dug near it. This must be done so that the working plane of the anvil is at the same level as the jaws of the vice. If it is not possible to purchase a chair tool, you can temporarily replace it with ordinary ones, but you must “get it right” that ordinary cast iron is not able to withstand such hard work.
Step-by-step instructions for making a homemade blower for the forge
The forge is the main tool in the forge, but in order to create the required fuel temperature in it, you will need to blow the forge. There are many models of fans on sale, but they are very expensive, so we will consider the option of how to make a blower for the forge with your own hands. This option is more economical and requires a minimum of time.
The rest of the blacksmith's assistants
Without a suitable tool, any blacksmith cannot be called such. Mandatory equipment includes:
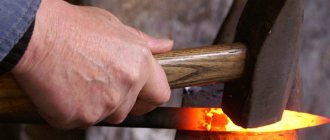
- The war hammer can weigh up to 12 kg, so it requires both hands to operate it. The head is suitable for basic work, while the rear takes part in accelerating the steel along the axis.
- The sledgehammer is a heavyweight, its weight reaches 16 kg. Used when greater strength is needed.
- Handbrake. This is a small hammer (from 500 g to 2 kg) for basic work. Rowan is used for the handle, as this wood is able to neutralize the recoil from an impact.
- Pliers are a fascinating tool in every sense. Only with its help can you pull future products out of the forge and hold them during forging.
It is better to ask about how to make a forge at home on special forums, where they will answer you in detail and professionally. Or you can go the other way - watch the video and take action. The choice is yours.
We make a forge with our own hands
Making a forge with your own hands is not the most difficult task. At the same time, you will have the opportunity to create metal masterpieces at home. Of course, making a forge with your own hands only makes sense if you are going to work with metal and forge certain products.
Photo of a forge
Forged elements are actively used in industry and everyday life. These can be either huge complex structures or simple small crafts.
To be able to forge metal, you must have a forge and a device that will heat the metal to the required temperature of 1000-1300 degrees. How to achieve this at home? That's right, you need to build a forge with your own hands.
The forge device is designed specifically for heating metal workpieces to high temperatures.
The forges have the same operating principle, but the devices differ only in the type of fuel used. This affects the type of construction.
Modern blacksmiths who prefer to work at home use coke as fuel. This is due to the fact that coke provides a high temperature at low consumption and produces a minimum of waste.
The nuances of self-production
How can you make a homemade blacksmith's forge? To do this, you will need drawings of a heating device model that suits you and the room where the equipment will be located.
Forges differ in the types of heating chambers.
- Closed heating chambers. They are the most efficient because they minimize fuel consumption while providing excellent heating of workpieces. But the blanks themselves are limited in size, since they depend on the dimensions of the chamber.
- Open heating chambers. This design provides that fuel is poured onto the grate, and air is supplied from below. The metal blank is placed on the fuel. Although fuel consumption is slightly higher, larger workpieces can be used.
How to make a blacksmith's forge in order to be able to forge iron at home? Let's consider each stage of construction of the structure.
Photo of a handmade forge
- Table. The table is the basis of a homemade forge. The drawings show that building this element is quite simple. Typically the table height is up to 80 centimeters, and 5 millimeter thick metal is used for the lid. The working surface can have different sizes. It all depends on what kind of metal workpieces you are going to work with. Another option for building a table is to use angle iron to create a frame. Bricks and a grate are laid inside it. The grill should be positioned in the center.
- The grid is mounted in a hole made in the table. Then the fire brick is closed on all sides. Select the height of the table directly to your height so that the structure is at waist level.
- Blowing For the forge to work effectively, it requires high-quality air supply. Due to oxygen, the temperature rises and the metal begins to melt. Traditional forge designs used a foot-driven blower. But now everyone has the opportunity to use electricity, so the optimal solution is an electric fan or an old vacuum cleaner. The vacuum cleaner supplies air with the required force. If you have a speed controller, you will get a chic homemade horn.
- Now all the structural elements are assembled into a single system - a homemade metalworking forge.
- Pour the required amount of fuel onto the grate. First use wood chips and medium wood, after which comes the turn of coke. Turn on the blower and place your workpiece over the fuel. A small amount of coke may be added on top of the iron. If there is no coke or there are large reserves of wood waste, you can use them.