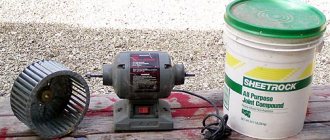
The idea is not mine, stolen from some fishing forum. I'm tired of drilling one and a half meters of ice with my hands, with myself and my wife. The heroic silushka is enough for 6-8 holes, but the fish don’t bite everywhere. The idea was there a long time ago, with both a screwdriver and a chainsaw. But you still need to look for a screwdriver for Tornado-M, and the price is not encouraging. The chainsaw is too noisy, it infuriates you when someone is drilling nearby. And the electric booster is silent, with a worm reduction gear and a composite shaft.
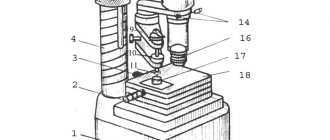
The steering column pipe was removed from the amplifier, in which a shaft with an electromagnetic steering lock was installed. The blocker shaft fit into the pipe 20 (80 cm long) with tension and was stuck by welding.
To prevent the shafts from coming apart when the drill was pulled out, a hole was drilled and a fixing bolt was inserted.
A small piece of 15 pipe was inserted into the 20 pipe and welded. It is slightly inappropriate in diameter for insertion into the drill auger. so it was sanded a little.
I haven’t made the start button yet, I needed to make sure the design was working. It should be easily released when biting the drill in the ice, so as not to get wrapped around it as in the well-known video)) That is. work on the principle of mikrik. At the same time, the operating current of such a drill is about 15A (measurements not mine). The corresponding switch has already been developed (in the brain). The wire was torn from an extension cord in the garage, it was just at hand, 10 meters. Terminated with crocodile clips to connect to the battery. A piece of 20 mm pipe was welded to some kind of mount on top of the electric amplifier as a handle.
When fishing in winter, one of the most important devices is an ice screw. But today we will talk about a rather rare species: a ring ice drill or, as it is also called, a “ring ice drill,” which is not popular among fishermen. It’s completely in vain, since it has a number of advantages over auger ice screws.
When fishing in winter, one of the most important devices is an ice screw. Today in stores there is a huge selection of different ice drills, both manual and electric ice drills, with two and three blades, with right and left threads. But today we will talk about a rather rare species: a ring ice drill or, as it is also called, a “ring ice drill,” which is not popular among fishermen. It’s completely in vain, since it has a number of advantages over auger ice screws.
We have already discussed which ice screw is better to choose in this article. Now let’s take a closer look at a rare type of ice auger - the ring auger.
Conditions for proper operation of the ring ice auger:
Due to the fact that the rod in the ring ice drill is shifted from the center by the radius of the ring, the stop handle should be located on an imaginary line passing through the center of the ring.
If this condition is not met, then the rod on which the ring is attached breaks the ice glass ahead of time and complicates the process of drilling the hole.
The continuation line of the cutting edge of the knife should pass through the center of the ring.
Advantages
- One of the advantages of a ring ice drill is that it drills a glass in the ice along the diameter of the ring. Less energy is wasted when drilling due to the fact that there is no need to destroy this ice cylinder, while when drilling with auger ice screws you put additional effort into destroying this glass.
- After drilling a hole, you do not need to make up and down movements to pump water (to clear the hole of ice), here you just need to lift the ring a little and pull the ice cylinder out of the hole.
- The edges of the hole are smooth. Because of this, the fishing line does not cling to the edges of the hole, reducing the likelihood of the fishing line breaking.
- The cutting edge away from the ice is sharpened, and the cutting plane always remains straight. While in classic ice screws it’s the other way around. The convenience is that if you change the sharpening angle of the knife when sharpening, there is nothing to worry about, since the cutting angle will not change.
Homemade motorcycle ice drills
In addition to the ring ice drill, you can also make other simple devices at home using available materials and tools. Here are some successful examples:
- Ice auger-shovel. It is a brace with a pin, in the lower part of which there is a tip made in the shape of a spatula or spoon. With the help of such a drill, you can easily drill a hole, the depth of which is no more than 30 centimeters.
- Auger ice screw. It consists of a rod in the form of a pipe, as well as a special screw belt welded to the rod. The “blades” are made from ordinary metal rings, which are then bent at a certain angle.
- Electric ice axe. It is made from a ring ice ax and a screwdriver. The two instruments are connected using a special adapter. It is important that the engine power is at least 18 Volts, otherwise the ice auger will not last long.
- Motorized ice drill. This device is made from a chainsaw or trimmer (a device for cutting grass). It is very difficult to create a tool, but even if you do it, be prepared to catch unkind glances from other fishermen, since it will make a lot of noise.
You can make an electric ice auger with your own hands from a ring ice ax and a screwdriver.
Making an ice auger for winter fishing is not such a difficult task as it might initially seem. The most important thing is to create the correct drawings, as well as prepare suitable materials in advance. A home-made device for making holes will not only cost less, but will also cause envy among other fishermen.
Drilling a hole
If you start drilling a hole like an ice auger, then you are unlikely to be able to do it or it will require a lot of effort. In order to drill a hole with a ring ice drill, its ring is placed at an angle to the ice surface and the rod to which the ring is attached is lightly pressed with your foot. Several revolutions are made so that the ring can stick into the ice, and then the bar is leveled, making the axis of rotation perpendicular to the ice.
When catching large fish, it is often necessary to drill a hole in order to get the fish out from under the ice. You all know how difficult and sometimes almost impossible it is to drill overlapping holes with a conventional auger ice drill. There will be no problems when drilling intersecting holes with a ring drill; moreover, you won’t even put in more effort than when drilling one hole.
A ring ice auger is much quieter than auger augers, so it doesn’t scare away fish as much
DIY ring ice screw (drawings)
Ring
The ring is made from a piece of pipe of the required diameter, cut with an ordinary grinder. The width of the ring must be no less than the diameter of the rod. The optimal ring height should be in the range of 17-20 mm, and the diameter should be 190 mm. Almost all the fish pass through a hole of this diameter, but if you are lucky enough to catch a trophy specimen, you can always drill a couple more holes with an overlap and lift the trophy onto the ice.
The cutting surface of the knife should be located at an angle of 42-48 degrees to the ice surface. Initially, the angle is made 45 degrees, and then by placing plates under one or another bolt, the angle changes.
The distance from the bottom surface of the ring to the cutting edge is 10-15 mm.
Rotator rod
The rotor is made of 16mm steel pipe, the dimensions of which are shown in the figure.
At the junction of the ring and the pipe, it is best to install a metal rod onto which the pipe is placed and then welded to the ring. This is necessary to enhance the rigidity of the structure.
Handmade homemade ice auger
A few decades ago, purchasing a functional ice auger was a real success for an ice fishing enthusiast.
Most often, domestic samples categorically refused to drill into ice, sliding along a smooth surface. And no matter how the angler pressed the tool to the ice, drilling several holes required spending a lot of calories. And the next day my whole body ached from fatigue.
Foreign ice screws were inaccessible and unknown to Soviet fishermen. So the need forced me to make a working tool with my own hands.
It is clear that without the help of metalworking enterprises it is very problematic to make a real ice drill.
I will try to briefly describe the entire technological chain that he overcame:
- The easiest step was finding a tube of suitable diameter for the tool. He bent a handle (rotor) from one piece of tube, and the second piece was intended for the lower part of the structure (auger).
- It was much more difficult to make the base for the knives. Here we had to first sketch the design of the Barnaul product, and then bring the idea to life with the skillful hands of a milling machine, turner and mechanic. After this, the base was inserted inside the pipe and welded along the contour.
- There was a lot of fuss with making the curved spiral parts of the auger. A colleague decided to make them short, so he welded the individual parts to the pipe, as well as to each other. After this, the welds had to be smoothed with a grinding machine.
- To connect the two parts of the ice drill, homemade brackets and a long bolt with a wing nut were used.
- Many problems have arisen with ice drill knives. At that time, regular trapezoidal models, as well as their varieties with a step, were in fashion. Work began with the selection of metal, which, after hardening, could give a hardness of 55-60 units. Then the milling operator made the dimensions of the knives, the mechanic drilled the holes, the thermist did the hardening, and the grinder completed the sharpening.
- The final stage of the work was carried out by the amateur fisherman himself. He painted the product and assembled all the parts.
Homemade ice ax
DIY tree house for children. step-by-step instructions on how to make an unusual house in the country. drawings, diagrams, photos, videos
You can make a drill for winter fishing yourself if you have the necessary skills and tools. We will describe how to do this using the screw version.
Making a handle (rotate) includes the following steps:
- The appearance of the future part is drawn on the ground.
- The selected pipe is bent accordingly using a blowtorch.
- A bracket is welded to the bottom, which will be responsible for connecting to the auger.
- At the top and in the middle of the handles, pre-purchased handles from the repair kit are attached to the factory products.
- After this, the brace is sanded and painted.
It is unlikely that you will be able to make a base for knives at home. It is better to order it from workshops. But everyone can do all the other procedures at home. The manufacture of a screw includes the following processes:
- A threaded pin is welded to the top of the pipe to connect to the handle or brace.
- A seat for knives is welded to the bottom.
- Circles for the auger of the required diameter are cut from a metal sheet.
- On one side, the prepared circles are cut to the center and bent to the characteristic shape of a screw, using a blowtorch.
- One by one, the blades are welded to the pipe. They must be connected by a weld.
- The lower part is sanded and painted.
After this, all parts are connected and the device is considered ready.
You shouldn't break through the ice with a drill. When struck, knives change their angle and become dull. In order not to destroy the structure of the metal, you should not heat the knives with open fire. It will be better if the equipment stands in a warm room and the water drains itself, after which it is worth wiping the device dry. If the paint has peeled off, then it is worth painting over the metal so that it does not begin to oxidize and corrosion does not form.
DIY ice drill from a screwdriver
Modifying a well-functioning manual ice auger looks much simpler and more effective. Recently, powerful cordless screwdrivers have appeared that have excellent torque. Savvy fishermen immediately figured out how to use this device for winter fishing.
To create a model with an electric drive you will need:
The main work of the fisherman will concern the manufacture of the adapter. You can either purchase it in a store or order it from a familiar turner and milling machine.
The adapter has two parts made from one piece of iron. A cylindrical part is made from one edge, which will connect to the ice auger auger. The cylinder is drilled through so that the adapter can be secured to the auger pipe with a bolt.
The other part (shank) is made in the form of a hexagon or tetrahedron. This side of the adapter will be clamped in the screwdriver chuck.
If the thickness of the ice in your region in winter exceeds the length of the auger, then it is necessary to make an insert between the adapter and the auger from a pipe of the same diameter.
The following requirements are put forward for the screwdriver:
- voltage 18-36 V;
- torque from 40 to 80 Nm;
- Battery capacity is more than 2.5 Ah.
At air temperatures below -10°C, it is better to disconnect the battery from the device and hide it in your jacket pocket.
How to create an ice screw for winter fishing with your own hands?
The auger is a steel tube with a wound strip along its specific spiral. It is difficult to make such a detail at home, but it seems possible. It is almost impossible to make an auger, like the rest of the ice auger, at home. Only an educated turner at a local enterprise can do this.
Creating a homemade ice auger serves the fisherman not only as proof that I can do anything, but also a decent cost savings. After all, most fishermen go winter fishing more than three times a season. Therefore, purchasing an expensive professional ice drill is not profitable.
That’s why many winter fishing enthusiasts are racking their brains about what to make. But don’t forget that an ice screw is not a spinner. The best way out of the situation is to purchase an inexpensive ice drill of a Russian brand, and then improve it.
Ice drill tonar is the brainchild of one of the largest domestic factories for the production of high-quality ice drills. The company has many positive reviews and is popular not only in Russia, but also in neighboring countries.
Homemade gasoline ice auger
Particularly skilled fishermen have found a second use for chainsaws. In the summer, they use the tool for its intended purpose, preparing firewood for the fire, and in the winter, using a special adapter, they mount the ice drill auger to the saw. This improvement allows you to quickly make holes even in a thick layer of ice.
To create a homemade ice drill, any chainsaw is suitable. It is convenient to work with old Soviet models, which need to be held with both hands. The main thing is that the tool starts well in cold weather. When using modern Chinese saws or branded products (Stihl or Husqvarna), you will have to invent an adapter with a handle.
The main problem when connecting a high-speed chainsaw and an ice drill auger is the reduction in speed due to the installation of a reduction gearbox. On one side, the gearbox must be attached to the base of the saw, and on the other, the auger enters it and is securely fixed there. Here it is better to copy the adapter from an already tested model, and then order its production at a metalworking plant. Every saw will need some minor but important work.
Fishermen continue to amaze others with their developments. And if earlier the manufacture of a simple tool for drilling holes was a necessary measure, today craftsmen have reached a new level.
Using electric and gasoline-powered devices, they made motorized ice augers. The value of such products lies not only in the rapid formation of holes in the ice. These same devices can, after minor manipulations, perform their direct duties of sawing firewood or tightening screws.
Other modifications of ice screws
By the way, modifying a ready-made ice drill will be much easier, especially since an automated drill will be much more productive than a manual one. This becomes especially important in severe frost or with very thick ice, when drilling becomes a very labor-intensive process. To a large extent, the auto-drill is in demand among fans of ice fishing, so for them, making an ice drill with their own hands is often a fundamental topic.
Things of bygone days: how to make a ring ice screw with your own hands
Household appliances to help the fisherman
As soon as powerful screwdrivers appeared on sale, savvy fishermen immediately found use for them. By connecting the auger part of the drill with this electric drive, the Kulibins immediately received an excellent automated mechanism for drilling, which we talked about in the article “Selecting a screwdriver for an ice drill.”
The main problem when the question arises: how to make homemade electric ice augers is making an adapter. By the way, for imported products you can buy them ready-made in the store. If you have a Russian product, you will have to finish it by hand.
In principle, making an ice screw by connecting it to an electric drive is not particularly difficult. So, for the adapter you can use a hex wrench of a suitable diameter by sawing off its short part. One end of it is clamped into a screwdriver, and a hole is drilled in the other part. This end is inserted into the liner pipe and tightened with a bolt.
Tips for a fisherman: Which screwdriver is best for an ice auger reviews - How to best use
Do-it-yourself ice drill for winter fishing using a chainsaw
Any gasoline saw is suitable for making a gas drill. Preference is given to Soviet models that are easy to use. The main requirement for engines is that they start easily in any weather. If a Chinese analogue is available, you will have to be tricky with the adapter and handle.
In this case, when making ice screws for fishing with your own hands, you will have to solve the problem of joining a chainsaw, which has a decent speed, and the auger shank. This problem can only be solved by installing a gearbox. On one side it is fixed at the base of the saw, on the other, an auger is inserted into it.
And finally, we will answer a frequently asked question: ice screw repair of handles that tend to fail at the most inopportune time. Of course, you can make them yourself, but repair kits are quite easy to purchase in a store. Thus, the Barnaul company produces excellent spare parts for almost any model. The kit includes not only both plastic handles, but also caps and clamps necessary for quick replacement.
The sludge from the holes made by an ice auger of this design will also have to be scooped out using a scoop.
It’s scary to even begin to describe this complex process. Without metalworking, turning, welding and milling abilities and skills, it is simply unrealistic to make an ice screw with your own hands. For craftsmen, this is probably not very difficult, so let’s get started.
To describe the manufacturing process, we have selected several models:
- spatula;
- annular;
- frame;
- screw
They have one thing in common - the upper part with handles, or the brace. Therefore, first we will try to make it.
Even this is a rather complicated process for an uninitiated person, judge for yourself:
The rotator is ready, the most difficult task remains - manufacturing the lower part of the mechanism.
Spatula
This homemade ice screw is easier than others to make. A cutting part cut from a steel plate is simply welded onto the lower pipe. It is slightly bent in the form of a spatula, one edge of which is sharpened with sandpaper.
Although such a drill can make a hole in ice, and it is cheap and easy to manufacture, it still has plenty of disadvantages:
- gets dull quickly;
- the absence of an auger forces you to frequently scoop out the sludge;
- slowly cuts ice;
- difficult to rotate.
Annular
At the base of such a drill there is a ring with knives and an attached frame. At the top, the frame is connected to the pipe, and the pipe to the brace. The steel strip is twisted into a spiral and point-fixed to the frame. It turns out to be a completely workable model.
Frame
This DIY ice screw is also easy to make. Let us describe this process in detail:
The sludge from the holes made by an ice auger of this design will also have to be scooped out using a scoop.
Screw
This drill for winter fishing cannot be completely made at home. If someone thinks that the whole problem is with the auger, then this is not so. The main part of such a mechanism is the base for the knives. It can only be made by specialists in workshops.
Let's skip the process of creating this part and describe the rest of the process:
- We weld a part to the top of the pipe to connect it to the brace.
- We also attach a seat for knives at the bottom for welding.
- We cut circles from sheet metal.
- We cut them to the center from one edge and bend them in the form of an auger blade.
- Having bent a sufficient number of blanks, we weld them to the pipe.
- We sand and paint the resulting product.
- We connect both parts of the ice screw into one.
- We screw the knives.
Due to the fact that the motor from the trimmer has a small torque, this means that you will need to use transmission mechanisms and reduce the rotation speed of the motor itself. Several gears placed in one housing should be used as transmission mechanisms. In order to lower engine speed, you will need to install a small gear on the input shaft. In this case, the secondary shaft is equipped with a large gear.