Sharpening metal cutters for a lathe is a necessary procedure for efficient and uninterrupted operation of the equipment. The fact is that turning cutting machines are actively used; they are used to process products and cut threads. It is clear that frequent use causes the units to become dull, which leads to samples of poorer quality. In order for a metal lathe to perform operations correctly and continue to be actively used throughout its service life, it is necessary to periodically sharpen it. Of course, this procedure is invariant, depending not only on the type of machine and the units used, but also on the goals and objectives of use.
Design of turning tools
Sharpening turning tools cannot be done correctly if you do not understand the design features of such a tool. The main elements of its design are the holder rod, with which the cutter is fixed on the machine, as well as the working head: it is its cutting part that needs to be sharpened regularly.
Let's take a closer look at the working head of a turning cutter. It is formed by two types of surfaces: front and rear. The front one is very easy to distinguish: it is through it that chips are removed. The rear sides are those sides of the cutters to which the workpiece is facing during processing. They can be main or auxiliary, depending on their location.
» data-lazy-type=»iframe» src=»data:image/gif;base64,R0lGODlhAQABAIAAAAAAAP///yH5BAEAAAAALAAAAAABAAEAAAIBRAA7″>
The most important element of any cutter (including for a metal lathe) - its cutting edge - is formed at the intersection of the rear main and front surfaces. The design of any cutter also includes an auxiliary edge, formed by the intersection of its rear surfaces: the main and auxiliary. The top of the tool, which is mentioned in the specialized literature, is the intersection of its cutting and auxiliary edges.
The main characteristics of turning cutters for metal, which determine their functionality, are sharpening angles, divided into main and auxiliary. In order to determine the values of the main ones, they are measured in the plane that is formed when the cutting edge is projected onto the main plane.
In general, two planes are used to determine the angles of a cutting tool:
- the main one, superimposed on the supporting side of the turning cutter, located in its lower part (in relation to the direction of feed of the machine, such a plane is parallel);
- cutting plane located tangentially relative to the surface of the workpiece (this plane intersects with the main cutting edge of the tool).
Elements and planes of a turning tool
In the design of the working part of a turning cutter, there are several types of angles:
- points - located between the front surface of the incisor and the back main one;
- rear main ones - located between the rear main surface and the cutting plane;
- front main - located between the front side of the tool and the plane perpendicular to the cutting plane.
It is quite simple to check the correctness of their definition: their sum is always 90 degrees.
In addition to the above, the design of the working head of a turning cutter is characterized by several more angles between:
- the direction of feed and the projection that the main cutting edge makes;
- processing plane and the front surface of the cutter;
- projections that lay down the main and auxiliary cutting edges.
This is interesting: Features of hardening of various types of steel - methods, temperature, other nuances
Rules for sharpening turning tools
To properly sharpen wood cutters on a lathe, you need to process not only the tool, but also the cutting part, which has the shape of a thin plate. To carry out this process in large-scale production, a special device is used, on which the work is performed by a specially trained person.
To sharpen a chisel on a wood lathe with your own hands, you will need to know a certain technique for performing the procedure. This process can be carried out using a grinding wheel or avaul super-sharp sharpening. An abrasive wheel for incisors is the most cost-effective way to perform the procedure.
Note! This turning method makes it possible to give the workpiece the desired geometric shape most efficiently.
The highest quality turning sharpening of metal chisels is carried out using a special lathe, which is designed specifically for such types of work. If you don’t have such a tool for sharpening metal turning tools, then you can use a sharpening wheel and a universal sharpening machine for tools. When choosing a circle, you should also be careful, since the material from which it is made plays an important role in this process. For example, in order to sharpen carbide cutters, you will need a carborundum boring wheel. To process a wood cutter, devices that are made of high-speed or carbon metal are more suitable.
Note! Processing of workpieces on a lathe can be carried out with or without cooling. The first option is more preferable, since during cooling it is not necessary to ensure that the tool does not cool down too quickly after sharpening. This measure will protect you from cracking the cutting surface.
You can also use a special stone to sharpen a wood cutter on a lathe, which will give the workpiece the required shape. At the last stages of the procedure, to eliminate minor defects and irregularities, sandpaper is used to sharpen medium-density wood cutters. They are convenient for processing corners and removing chips.
An important role in the process of processing wood blanks is played by the choice of the type of turning tool for the machine. The most popular wood turning chisels for home work are Reyer and Meisel. Meisel is designed for finishing finishing; it is a flat turning surface with a blade on the right or left side. Reyer, in turn, has a semicircular shape and is designed for working with non-standard parts.
Sharpening rules
Narrow rayer and cutter for turning bowls
These cutters are sold in a variety of sharpening options. In some cases, this sharpening works well, but more often you have to completely resharpen the cutter. Side sharpening of such cutters with an elongated cutting edge and less likelihood of cutting into the part is becoming increasingly popular. (With a side sharpening, the bevel extends further from the tip along the edges of the blade, as opposed to a straight sharpening, like a rough edger.) Due to the large number of movements that are not easy to describe clearly, this sharpening requires a lot of practice, and not everyone can do it by hand. Luckily, the Wolverine Jig's versatile attachment holder allows you to do this even without experience.
To sharpen a narrow rake or bowl cutter, clamp the tool in the universal holder with the tip protruding 45mm. Insert the holder leg into the cutout of the retractable tool rest and touch the tip of the cutter to the abrasive disc. Change the position of the tool rest and the angle of the holder leg to sharpen the chamfers (Fig. 4 and 5). Without turning on the sharpener, touch the blade with the bevel of the cutter and practice moving the tool from side to side, trying to achieve smoothness and continuity, which will help to obtain a quality result. Then turn on the machine and, lightly touching the rotating disk with the chamfer of the cutter, rock the tool.
So that the chamfer on both sides of the groove passes at a distance of 13-18 mm from the tip of the cutter for turning bowls, as shown in Fig. 6, the tool should be turned further than usual. Look at the chamfer from the side. The profile of the cutting edge should be smooth and slightly convex. With a concave profile, protruding corners are formed at the edges of the groove, increasing the likelihood of cutting into the part. Correct the concave profile by grinding off more metal from the corners and heel.
Sharpening process
sharpening a cutter on a grinding wheel
The main flank surface is sharpened first, then the secondary flank surface, the front surface and then the end radius. At the end of the work, the sharpening angles are checked against the template.
To ensure an even and smooth edge, the tool must be constantly moved along the grinding surface. With this type of work, the wheel lasts longer and wears out evenly.
The tool can be processed dry or with constant water cooling. The water flow must be sufficient and continuous. If the tool is sharpened dry, there is no need to periodically water it or dip it in a container of water. This causes cracking of the surface and destruction of the working edge.
Manual finishing is carried out:
- fine-grained whetstone using technical oil, kerosene or - tools made of various types of steel;
- circle made of copper using boron carbide paste and technical oil.
Only the cutting surfaces of the tool are adjusted with an edge width of up to 3 millimeters. It is more efficient to finish the cutters on a machine with a cast iron touchstone. The procedure is simple and does not require much time, but significantly extends the service life and productivity of the instrument. It is important to maintain the required angles!
Videos about sharpening different types of cutters:
To come in
Already registered? Sign in here.
There are currently 0 users on the page
There are no users viewing this page.
- Price: $33.98 for a set of three and 10 plates
- Go to the store
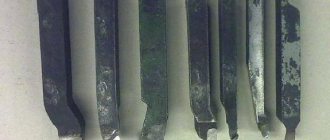
First, I’ll tell you a little about the hero of the review. Thread cutter for internal threads with replaceable blades.
I used to use quick cutters. It’s frankly inconvenient to sharpen and after a couple of sharpenings you can make a new one.
The cutter arrived in the amount of three pieces and with a dozen replacement blades.
Why do I need three identical incisors? One for a lathe, the second for a milling machine (there are plans to attach a CNC to it and cut threads), but the third cutter is really superfluous. I’ll give it to one of my friends who has a homemade one with a lathe. Any machine operator will be happy with such a gift. I judge by myself.
Marking of cutter holder SNR0010K11. 11IR A60 record. Cutter length 125 mm, diameter 10 mm.
Each cutter comes complete with a screwdriver with a torx shank.
The quality of the cutter is excellent, the smooth holder is made of steel, reminiscent of the feel of St45. However, this applies to almost all modern Chinese incisors. Their industry has been making high-quality and reliable tools for a long time. Well, at least in the field of metalworking. Over the past 6 years, I have not encountered any obvious defects or any flaws. Maybe I was lucky, but rather this is the norm.
As can be seen from the geometry of the cutter itself, its main purpose is cutting internal threads or fine internal boring.
Let's return to the oil can.
Our starting materials will be: a brush from the nearest store for 6 rubles, a bottle, and a small aluminum blank
We trim the workpiece, bore a hole for the screw ring, cut off
We grind out the body of the tassel. At the end of the spout we make an internal cone. This will allow us to collect excess oil after use.
We grind to the size of the external thread, do not forget about the groove for the exit of the thread cutter
And finally the time has come for the hero of today’s review to act. We cut the internal thread in the ring that we cut off earlier. The cutter showed its best side. The thread is smooth, shiny, without burrs or roughness.
Boring a hole in the bottle cap
Next is the most important operation. We insert the bristles into the body of our brush and fill it with glue. There is a wire inside the bristles.
After the glue dries, we pull out the wire and in its place an oil access channel is formed
A responsible operation - we trim the villi)))
Putting all the details together
Add oil and test. Hurray, everything works, the experimental screwdriver is covered with a layer of oil)))
Here's what we got
And as usual, a video with the process of making an oil brush
Summary. An excellent cutter, well made, and also performed remarkably well in its work. Saves time on sharpening or making high-speed steel thread cutters. I really liked it.
The product was provided for writing a review by the store. The review was published in accordance with clause 18 of the Site Rules.
Where can I get 3D models of thread cutters?
Models of these cutters can, of course, be built in SolidWorks. But it’s much easier and faster to download them from the manufacturer’s website. Suitable for these cutters.
We go to the website of this tool manufacturer and in the search column enter the designation of the first cutter “ 266RFG-2525-16 ”. Open the page with these tools on the website and click on the line “Download” .
Thread turning tool page on the Sandvik coromant website
After downloading, open this cutter in SolidWorks.
Thread turning cutter 266RFG-2525-16 in SolidWorks.
In the same way, download and add to SolidWorks a thread cutter with a replaceable insert for internal threads 266RKF-20-16.
Thread cutter for internal threads in SolidWorks 266RKF-20-16
You can download 3D models of these cutters for solidwork using the link at the end of the article.
Next, we will watch a video animation of processing a part with these cutters.
Purpose of the cutter, design, types
To obtain parts from a metal ingot when turning on lathe equipment, a special tool is used. They are made of steel, and the hardness of the material is higher than that of the workpiece being processed. The holder rod and the working head, the main structural elements of a metal cutter, are used to secure the tool on the lathe.
The function of the second component is to cut off a layer of the metal surface during processing. The holder rod or the body of the cutter has a square or rectangular cross-section. The main cutting edge of the working head is shaped (wedge) or straight in cross-section. Metal cutting parts require regular sharpening during operation. In modern conditions there is a sufficient choice of incisors.
Turning tools for metal processing with replaceable inserts
When choosing gear, you should take into account such an indicator as angles. The classification of species is as follows:
- checkpoints;
- cutting;
- pruning;
- boring;
- shaped;
- grooved:
- chamfered;
- persistent;
Pass-through, this type of device processes cylindrical blanks. A cutting tool is used for cutting rods. Trimming is performed at a given angle. A cutting-type device is also used to cut grooves for various purposes in them. Scoring, this type of device is used for trimming blanks and reducing ledges. Boring, this tool is used to machine holes of the required diameter in workpieces or parts on a lathe.
Grooving - the purpose of such a device is to form internal and external grooves on a cylindrical surface, maintaining the required angles. Sometimes a cutting-type function is required when it is necessary to remove part of the metal from the workpiece. Thread-cutting machines use this device to cut threads on lathes. Shaped - the purpose of this cutter is to form protrusions and grooves on the blank being processed, thereby obtaining angles with the required parameters.
Chamfering - with this device, after sharpening, internal and external chamfers are made on the product. The persistent one is used for turning metal parts with small ledges. To reduce vibration when working on a lathe, you need to check its position. Thrust is used for non-rigid parts.
Types of cutters are also divided according to the direction of processing of turning equipment into left and right, according to the material from which they are made, according to the method of attaching the cutting part to the holder and other parameters.
This is interesting: Lapping and finishing - precise fitting of critical parts
What you need to know about metal cutters to sharpen them correctly
It is impossible to properly sharpen a metal cutter if you do not know the design features of these tools.
Design of turning tools for metal
A metal cutter consists of a holder and a working part. The first serves to securely fix the tool. The second one is involved in the cutting process and gradually wears out. It is she who needs to be sharpened.
The working part of a metal cutter has front and rear surfaces. The first is where chips are removed. The rear surfaces face the workpiece. They can be main and auxiliary.
Image No. 1: design of a metal turning tool
The surfaces form cutting edges. The main one is formed by the intersection of the front and main rear planes. The secondary edge is formed at the intersection of the front and secondary rear surfaces.
Angles of metal cutters and their influence on the cutting process
As a result of sharpening metal cutters, it is important to obtain a tool with the correct geometry.
Image No. 2: geometry and basic angles of a metal cutter
Geometry is determined by angles, which are classified into three groups.
Principal angles
These are the main rake and back angles, as well as the point and cutting angles.
- Main rake angle (γ). It is formed by a plane perpendicular to the cutting plane and tangent to the front surface of the cutter. The value can be positive, negative, or zero.
- The sharpening angle (β) is between the auxiliary and main cutting edges. Measured in the main cutting plane.
- The cutting angle (δ) is formed by the cutting plane and the rake surface of the tool.
- The main clearance angle (α) is between the cutting plane and the main clearance surface. Measured in the main cutting plane.
Let's talk about the influence of principal angles on the cutting process.
The greatest importance in metalworking is the value of the main rake angle of the equipment. Thanks to metal cutters, which have large rake angles, it is easier to cut tools into workpieces. In addition, the degree of deformation of the removed layers of material is reduced, chip flow is facilitated, power consumption and cutting force are reduced.
As the main rake angle increases, the point angle decreases. This weakens the cutting wedge of the tool and reduces its strength. Cutters wear out faster due to accelerated crumbling of cutting edges and difficult heat dissipation. Therefore, when manufacturing and sharpening metal cutters, the front angles are made different.
When processing brittle metals and hard alloys, the strength of the tools is especially important. In this case, the rake angles are given reduced and even negative values. When processing soft metals, cutters with large rake angles are used.
The geometry is also influenced by the materials from which the tools are made. When sharpening carbide and metal-ceramic cutters, the rake angles are reduced. Models made of tool steels have larger rake angles.
The main clearance angle serves to reduce friction between the cutting surface and the flank surface of the metal cutter. At small values, the wear rate on the flank surface decreases. As the main relief angle increases, the strength of the tool decreases.
Auxiliary angles
Auxiliary rake and back angles are measured in the auxiliary cutting plane.
- Auxiliary rake angle (γ1). Formed during the manufacture of the cutter. Does not affect the cutting process.
- Auxiliary clearance angle (α1). Located between a plane passing perpendicular to the main plane through the auxiliary cutting edge. Serves to reduce friction between the workpiece and the back surface of the cutter.
Leading angles and inclination angle of the main cutting edge
Plan angles
measured in the main plane.
- Leading angle (φ).
It is located between the direction of longitudinal feed and the projection of the main cutting edge onto the main plane.
The strength of the tool, the processing power and the cleanliness of the resulting surface depend on the magnitude of the main angle in the plan. At a low value, the width increases and the thickness of the cut layer decreases. The cutter sharpened in this way is subjected to small thermodynamic loads. Increases wear resistance.
When the main angle in the plan decreases, the quality of processing decreases due to vibrations. The tool wears out faster. Typically the angle φ = 45°. This value is suitable for cutting most materials. When working with insufficiently rigid parts, tools with large leading angles (60, 75 and 90°) are used.
- Auxiliary plan angle (φ1).
This angle is formed by the direction of the longitudinal feed and the projection of the auxiliary cutting edge onto the main plane.
The size of the auxiliary entering angle affects the frictional force between the auxiliary flank surface and the workpiece. As the value decreases, the strength of the tool increases.
- Plane vertex angle (ξ).
It is located between the projections of the auxiliary and main cutting edges onto the main plane.
Angle of inclination of the main cutting edge (λ).
Measured in a plane that passes through the main cutting edge perpendicular to the main plane. The magnitude of this angle determines the direction of chip flow.
When is it necessary to sharpen turning tools for metal?
The need to sharpen metal cutters is judged by the degree of wear. There is a table of acceptable values.
Image No. 3: table with permissible wear values for metal turning tools
If the specified parameters are exceeded, the tool is sharpened, fine-tuned and polished.
In what cases is it necessary?
During operation, chips rub against the working surface of the tool. Due to the increase in temperature during operation, the part wears out. If sharpening is not carried out, the full service life of the part and all equipment is significantly reduced.
The documentation indicates acceptable cutter wear parameters. If these parameters are exceeded, the tool cannot be used. It must be sharpened along the front and back surfaces.
The permissible amount of wear differs depending on operating conditions and ranges from 0.3-2 mm.
In what cases is sharpening required?
Sharpening of turning tools is carried out when an old tool wears out (even the hardest alloys tend to wear out), or during the production of a new one. A new or damaged device is given the desired angle and a certain shape. When the wear of the cutter reaches the maximum permissible value, the cutter must be re-sharpened to ensure further normal turning of parts. Working with an outdated cutter often impairs processing accuracy and reduces labor productivity.
What parts do cutters for turning units consist of?
The cutters of any mechanism include two parts. The first is a rod, it is necessary to fix the object in a special holder. The second is the head itself, which is driven into rotation. The rake surface is where the part is chipped and processed. The back surface is usually called the reverse side of the process. It is to the back bar that the product that is currently being processed is addressed.
With the help of the main edge - the grinding surface - sharpening of tools and workpieces occurs. The element is located at the intersection of the front and back. If the main rake surface intersects with the secondary one and a cutter is installed in place, an additional edge is created. With its help, a slightly different processing of mechanism parts is carried out. The apex denotes precisely the suppression of the latter.
The angles of the mechanism are the most important characteristics that allow us to distinguish the main and auxiliary components of the lathe assembly. The main ones produce movement along the plane, the projection of the main one onto the main axis. Please note that the axes:
- the main one is superimposed on the lower part of the mechanism - parallel feed stroke of the equipment;
- cutting is an intersection with the main one, at a certain angle to the processing surface.
Depending on the intersection of the axes, the resulting angles are distinguished. If they are located between the front incisor and the main one, then this is the sharpening angle. Spruce between the processing surface and the rear main, then the rear main. By analogy with the last example given, the front main ones are formed, located between the feed and the cutting projection, the processing area and the front, the auxiliary and main projections.
The sum of the angles of the point, rear main and front main never exceeds 90 degrees.
Types and angles of sharpening
In order to determine the angle of a cutting tool or sharpening a chisel on a machine, 2 planes are used:
- The main one - it is superimposed on the side of the cutter support and is located in its lower part;
- The cutting surface is located tangentially relative to the plane of the workpiece being sharpened.
There are several types of angles in the working surface of the workpiece:
- Point angle - located between the back and front base.
- The main clearance angle is located between the cutting surface and the clearance plane.
- Main front - located at the intersection of the perpendicular to the cutting surface and the front side of the tool.
Angles are measured using a table goniometer. It is placed in the center, at the place where the edge and the plane touch. The value is determined using a special ruler.
sharpening angles
Conducting fine-tuning
After sharpening the tools, they are polished with boron carbide on a cast iron disk rotating at a speed of 1-2 m/s. The disk should rotate in the direction from the tool support to the working edge.
When finishing is carried out, the blades and surfaces of the tool are sequentially ground in. In addition, irregularities are removed and the incisors are brought to a shine.
Why carry out fine-tuning? The fact is that during turning, the tool wears out and becomes dull due to friction of the plate against the chips and the workpiece. The smoother the plate, the weaker the friction, the slower the wear of the tool.
Finishing is carried out with abrasive pastes consisting of boron carbide. Wet the finishing disc with kerosene. Apply paste on it (in a zigzag pattern), bring the tool to the disk. When using kerosene, you can use GOI paste. If you are using a modern paste, it is not necessary to wet the disc with kerosene.
The tool table should be positioned so that the cutting blades are slightly lower or in line with the middle of the disk. The disc should rotate towards the cutting plate.
When the tool is pressed and finishing is performed, the paste particles are crushed. When they pass through the edges, no chips or abrasions appear on the cutter. The paste grains ensure the elimination of irregularities from the incisal surface.
In order to study the finishing procedure in more detail, you can watch the training video. Remember that high-quality finishing will ensure long-term operation of the cutter without re-sharpening.
Classification of turning tools for metal
Features of sharpening
When sharpening wood turning tools, you need to ensure that the cutting edge is located in the center of the lathe. The clamping of the holder to the plate must be ensured by rotation of the circle. When carrying out processing, it is advisable to use a coolant.
To sharpen a single sharpening tool for wood, you need to apply light pressure during the procedure and regular movement in the direction of the intersection of the circle to ensure a level base. After completing the work, the geometry of the product can be checked using special instruments or templates.
How to choose a sharpening method depending on the type of cutter?
The main part consists of their cutting part for metal or wood - structural similarity. There is a mount. But controlled removal of part of a part is possible in various ways, the type of tooling depends on this.
The type of cutter is determined by the number of surfaces (there can be two or more). Surface characteristics are determined by the width of the blade and its shape; there are also variations depending on the possibility of adjustment (the direction is chosen arbitrarily). The edge is an integral design feature.
The choice of the type of cutter, that is, a specific model with technical characteristics, depends on the type of work to be done. For example, for the simplest processing of the external shape of a wooden part, one option will be needed, but for a standardized scheme for making metal carvings, a completely different one will be needed. Not only the type of cutter changes, but also the method of sharpening it.
Flat straight
Depending on whether metal or wood is used, the features of creating flat straight incisors change. The main purpose is surface treatment. But these variations are used to create small, simple holes, recesses and grooves in products. Flat straight cutters have the following characteristics:
- the ability to quickly create rectangular holes;
- blade width variations - from 4 to 40 millimeters;
- sharpening angle variations - from 25 to 40 degrees.
Turning cutters. Basics of the metal cutting process
Conditions for high productivity of mechanical cutting tools
The action of cutting tools used on metal machines, in particular turning tools, depends on three main conditions: 1) on the stability of the workpiece, i.e. on the strength of its material and the method of fixing it on the machine; 2) on the strength of the tool, in other words, on its size and method of fastening; 3) on the shape of the cutting part of the tool.
Proper stability and strength of the machine is also, of course, necessary.
The person working on the machine usually has to sharpen and install the cutters required for the job himself, and therefore he must be well acquainted with the requirements for them.
Turning cutters
Forged turning tools
- The scoring cutter (on the right in the figure) is used for end (frontal) turning. Has side and front clearance. The cutting edge is sharpened at such an angle that the cutter does not touch the rear center of the machine when approaching the center of the surface being ground. The cutter has only a transverse slope. There is no longitudinal slope.
- The sharp-nosed incisor (right in the figure) is now rarely used, as it has been replaced by “normal” Taylor incisors.
- Curved, sharp-nosed incisor (left in the picture). The ends of most types of incisors often bend to the right or left. For some jobs, eg when processing shoulders, this is convenient.
- Normal through cutter. This type of cutter was developed by Taylor as a result of many years of experience, which showed that this form of cutter is the most advantageous for turning. The average longitudinal slope is 8°, the average transverse slope is 14°. In what follows, for brevity, this incisor is called “normal.”
- Cut-off cutter. Discussed in detail in §§ 147 and 148.
- Round-nosed incisor. The cutting edge is rounded to an arbitrary radius, which distinguishes it from a normal cutter. Used for cutting semicircular grooves, fillets (fillets), shoulders, etc.
- Brass cutter. It is sharpened like a type 6 cutter, the tip of which is rounded to a small radius. It has neither longitudinal nor transverse slope, in order to avoid cutting the cutter into soft brass.
- Wide finishing cutter. Very useful for aligning front centers and turning short tapers. It is often used with large feeds to remove the finest finishing chips from cast iron. It has no longitudinal slope.
- Spring cutter. For turning wide shoulders and other shaped work where it is necessary to remove wide chips, as well as for finishing cast iron and steel (with water). When this cutter springs, its cutting edge moves away from the surface being processed.
- Flat (blunt-nosed) incisor. Very convenient for frontal turning of large diameter ends when a lot of metal needs to be removed. Feed from the circumference to the center. It is also used for finishing steel, with large feeds and small depths of cut (“thin chips”). For the cleanest finish, cool with water and soda. It has only a longitudinal slope, no transverse one. Lateral clearance - on both sides, therefore, can work as a right-handed or left-handed cutter.
- Centering cutter (cutter-drill). It is sharpened at an angle of 120°—corresponding to the angle of the tip of the twist drill. Works similar to the perk. The gap of both cutting ribs is directed in opposite directions. Used to mark the center of holes to be drilled with a twist drill.
- Cutter for cutting screw threads. Its toe is sharpened exactly according to the thread profile. For details, see chap. 16,
- Boring cutter. See § 162.
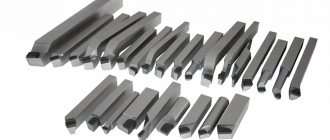
A lathe is used for a wide variety of work - turning, threading, boring holes, etc., and each operation requires specially shaped cutters. In fig. 62 shows various types of forged turning tools. However, recently they are gradually being replaced by more economical cutters of small sizes, inserted into special holders (see Fig. 66).
The basic principles underlying the choice of cutter sharpening angles, clearance angles, etc., set out in further paragraphs, are common to all metal cutting tools. Anyone who knows why a turning cutter is sharpened this way and not another, knows why certain bevel angles are chosen, etc., and knows how to hold the cutter on a grinding wheel while sharpening, will quickly learn how to properly sharpen other tools and understand which they must have a form.
The material from which the cutters are made must be sufficiently hard and tough to withstand the forces exerted on the cutter during cutting. Therefore, metal cutting tools are made of steel, hardened and then tempered.
Cutter point angle
The action of each cutting tool is similar to the action of a wedge, which pushes the particles of material apart. In relation to the cutters, the angle of the wedge formed by its edges is called the point angle of the cutter or, in short, the angle of the cutter (see Fig. 63).
The harder the material being processed, the stronger the cutter blade should be, i.e. the greater the angle of its sharpening should be. The angle of the cutter, suitable for wood, is not suitable for processing iron or steel, since its value will soon change due to the fact that the cutting edge will round off (“give in”) under the influence of the high cutting resistance of the metal. For metal cutters, the sharpening angle is made from 60° to 80°, depending on the hardness of the metal being processed.
Clearance angles
The action of a cutter removing shavings from metal is similar to the action of a knife used to peel an apple. The chips being removed rub against one of the faces forming the wedge, while the other face should not touch the product and therefore makes a certain small angle with it, the so-called. side clearance angle (Fig. 63). This angle should not, generally speaking, be more than 6°, since as it increases, the angle of the cutter decreases, therefore, the cutter will have to be sharpened more often.
The action of the cutting resistance force on the turning cutter is directed tangentially to the circumference of the workpiece being turned at the point of contact of the cutter with the workpiece (see Fig. 64). Since the top is the so-called. the toe of the cutter is usually installed at the height of the center line or slightly above it, then in order to avoid friction between the product and the front edge of the cutter, this face is given some slope. The angle between the rake face and the cutting direction is called the rake clearance angle or, in short, the clearance angle. Its usual value is about 10°. However, it depends on the height of the cutter in the support.
Cutting edge slope angles
In order to obtain the required sharpening angle, it is necessary to grind off the upper (cutting) edge of the cutter so that it has both a longitudinal slope - from the cutting edge back - and a lateral slope - from the cutting edge in the direction opposite to the feed. Otherwise, the sharpening angle of the cutter will not be sharp enough. The slope from the toe of the cutter back is called the longitudinal slope angle of the cutting edge, and the lateral slope is called its transverse slope angle (Fig. 65). The magnitude of these angles depends, naturally, on what sharpening angle is required, since the greater the slope, the smaller the angle of the cutter, i.e. the sharper the cutting wedge formed by its edges. For turning cast iron and tool carbon steel, the cutter angle should average about 70°, for mild semi-finished steel - 60°. When sharpening a cutter, first remove the clearance angle, then the slope angles, in such a way as to obtain the sharpening angle required for processing the material.
Compared to steel, brass is a soft metal and therefore, to process it, it would not be necessary to give the cutter the same large sharpening angle as a cutter for steel. However, in reality, bevel angles are usually not sharpened on brass cutters, since sharp cutters tend to “eat in”, i.e. delve into soft material.
Tool holders
High speed steel cutters are approximately twice as productive as carbon tool steel cutters. Therefore, recently turning cutters, as well as other cutting tools for metal processing, have been made mainly from high-speed steel. Since it is much more expensive than carbon steel, various holders have become widespread, in which a small piece of high-speed steel, sharpened accordingly, is securely fixed. This results in savings not only on the cost of steel, but also on the costs of forging cutters.
In fig. Figure 66 shows several common types of tool holders. In fig. 67 are shown on the right - inserted turning cutters (plates) made of high-speed steel, sharpened for various jobs, on the left - the operation of these cutters mounted in holders.
Sharpening cutters
A properly sharpened cutter, when used under normal conditions, remains sharp for quite a long time. As soon as it shows signs of dullness, it is necessary to immediately resharpen it, otherwise not only the cutter will suffer, but also the product being processed by it. A dull cutter does not so much cut metal as tear out particles of it, so the surface being processed cannot be smooth. One of the main factors in the productive operation of the machine is a sharply sharpened cutter.
It must be remembered that improper sharpening of cutters places a heavy burden on the cost of products simply by the cost of excessively worn material of cutters and grinding wheels. Where should the cutter be sharpened - from above, from the front, from the side, or from all sides a little? It is impossible to give definite rules in this regard, and when sharpening a cutter you should proceed from the work for which it is intended. The method of sharpening largely depends on how long the cutter should work without regrinding and how long it should last in total.
When sharpening a carbon steel cutter, you should not press it too hard against the grinding wheel, otherwise the cutting edge will heat up (usually it turns blue) and release, i.e. its hardening will be lost. It is preferable to use a wet sharpener. High-speed steel cutters do not lose their hardening so easily, but sometimes, if there is not enough water, cracks appear on their surface. Therefore, firstly, you should not spare water, and secondly, you should not press too hard on the cutter while sharpening.
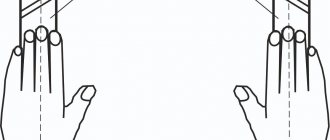
Do not keep the cutter in one place, move it so that it is pressed against different places on the cylindrical surface of the circle. In this case, the cutter must be gradually rotated, as shown in Fig. 68, i.e., so that it takes sequential positions a, b, c.
Small cutters should not be sharpened in holders, because, firstly, it is inconvenient, and secondly, the end of the holder can be ground down at the same time. In fig. 69 shows how to hold such cutters while sharpening.
It is recommended for a beginner to practice first on small pieces of simple ornamental steel of a suitable shape and only then proceed to sharpening high-speed steel insert cutters. At first, obtaining the correct clearance angle on such a cutter by sharpening presents some difficulties, since for work the cutter is inserted into the holder at a known angle. Therefore, at first, while there is no skill, it is best to use a template. In cases where it is necessary to obtain a relief angle of 10°, it is convenient to use a template for turning centers (see Fig. 85), the angle of which is 60°, since in most holders the cutter is fixed so that its upper edge is 20° with the horizontal (Fig. 70). If the cutter angle is other than 60°, it is not difficult to cut a corresponding template from a piece of sheet metal.
What not to do when sharpening a cutter
- Don't sharpen the cutter at random; be aware of where and how much metal needs to be removed.
- Hold the cutter firmly and confidently.
- Do not press the cutter to the circle with your left hand; hold it properly, that's the easiest thing.
- Don't skimp on water.
- Do not keep the cutter in one place on the grinding wheel all the time, otherwise you will cut a groove on it.
- If possible, do not use a circle that has lost its correct cylindrical shape or whose surface is heavily chipped.
- Do not sharpen a cutter on the end surface of a circle unless necessary: when you need to sharpen on the end, its surface will no longer be flat, but scratched by you or someone else.
- Do not rest the insert cutters on the tool rest: hold them in your left hand and rest your hand on the tool rest.
- Do not move the tool rest further than 1.5-2 mm from the grinding wheel.
- Do not round the tip of a thread cutter or turn a round nose cutter into a thread cutter: this is a waste of material and time.
Procedure methods
- abrasive,
- mechanical-chemical,
- special devices.
In the first case, a grinding wheel, sharpening or turning device is used. The second option is to treat the cutter with special means. Sharpening is effective, without cracking or chipping. This method is used to sharpen large carbide tools treated with vitriol solution. A chemical reaction is taking place. The surface is covered with a thin protective film. It is washed off by the smallest abrasive elements of the solution. The characteristics of a diamond cutting tool are restored with a silicon wheel or an electrocorundum wheel.
Types of incisors
All wood cutters necessary for manual work have the same design and consist of a metal blade with a shank on which a wooden handle is attached.
To cut simple geometric patterns on a flat surface, you can get by with a couple of simple cutters, but to create complex volumetric and openwork works from wood, you will need to use a large number of special cutters.
The most widely used types of these instruments are:
- jamb knife - a tool like a shoe knife with a short triangular blade, the bevel angle of which can be different, which makes it universal and suitable for a wide range of jobs;
- The chisel is the most common type of wood cutter. It performs the bulk of the work when creating most carved products; it has a smooth blade with a cutting edge at the end, which can be straight, oblique, semicircular or angled in the shape of the letter V;
- cranberry - a tool similar to a chisel, with a blade that has two bends of one hundred and twenty degrees (so that the handle does not catch the plane being processed when working). With a variety of cutting parts - semicircular, bracket, straight and others;
- spoon cutter - a cutter for cutting spoons and other utensils, made in the shape of a ring or half ring with a sharpened side edge;
- a hatchet is a knife that looks like a slightly beveled ax blade, which is a fairly universal tool, the corners of which can make cuts both towards you and away from you, and with the middle of the blade you can cut off bulges.
For those who are just starting to master the technique of wood carving, at first it will be enough to buy 5-6 cutters - a jamb knife, a flat chisel and two semicircular and corner ones with different radii and bending angles. But you need to take high-quality, professional tools, despite their rather high price. Cheap kits for beginners are made of poor steel, they become dull very quickly and working with them will not bring pleasure to the carver.
Experienced craftsmen prefer to make wood cutters for themselves. Making them is not very difficult and can be done by anyone, even at home.
Detailed diagrams and instructions on how to do it yourself
The master must know the complete technological process in order to properly sharpen the tool with his own hands.
Technological process
The technological process includes several main points:
- The rear surface is machined at an angle equal to the rear angle of the holder.
- At the second stage, the cutting surface itself is processed.
- The sharpening angle should be a couple of degrees greater than the back cutting angle by a couple of degrees.
- Already at the third stage, the rear angle is formed.
After finishing, grinding follows as the final stage of sharpening.
Conducting fine-tuning
Finishing should be carried out according to the chosen method. Basic moments:
- cutters are not immersed in water, as they may break;
- When finishing, be sure to supply water for cooling;
- First, the back face is processed, then the main and auxiliary faces.
Grinding
Grinding is carried out using an emery wheel. The best option is a fine-grained model.
Sharpening angles
The following is a list of sharpening angles for all common materials. The first fraction indicates the relief angle during roughing, the second - the relief angle during finishing. The third fraction shows the size of the front angle. The numerator indicates the angles for cutters that sharpen and bore parts, and the denominator indicates the angles for tools that plane workpieces.
- Steel (hardness less than eight hundred Megapascals) – 8/6, 12/8, 15/12.
- Steel (hardness more than eight hundred Megapascals) – 8/6, 12/8, 10/10.
- Steel (hardness more than a thousand Megapascals) – 8/6, 12/10, 10/8.
- Gray cast iron (Brinnel hardness less than two hundred and twenty) – 6/6, 10/10, 12/8.
- Gray cast iron (Brinnell hardness more than two hundred and twenty) – 6/6, 10/10, 8/5.
- Malleable cast iron – 8/8, 10/10, 8/8.
The main plan angle should be 30 - 45 degrees. The width of the chamfer depends on the cross-section of the cutting rods.
What abrasive wheels are used for sharpening turning tools? Sharpening of a tool through the holder and at an angle of 5 degrees is carried out with a wheel made of electrocorundum, having a grain size of forty - fifty, hardness CM1/2. The peripheral speed of the circle is 25 m/s.
Preparatory sharpening is carried out with products made of black silicon carbide, having a grain size of twenty-five to forty, hardness M3-SM1. The final sharpening of the cutting tool is carried out with wheels made of green silicon carbide, having a grain size of sixteen - twenty-five, hardness M3-SM1.
The parameters of grinding wheels for steel and carbide cutters are specified in the table of sharpening modes. There you can also see the circumferential torsion speeds.
Currently, final sharpening is recommended to be done using a diamond wheel. This is especially true for inserts made of hard alloys. The peripheral speed of the circle during preparatory/final sharpening should not exceed twelve to fifteen meters per second.
Description of sharpening technique
Safety precautions
Sharpening is carried out in compliance with safety regulations. The specialist puts on protective equipment for the face and gloves. Depending on the chosen technique, security methods vary. Do not touch the device or sample until it has completely cooled down.
Conducting fine-tuning
Finishing of slotting tools is carried out according to the chosen method. Used manual methods, automated machines. It should be understood that:
- the incisors are not immersed in water - they break;
- during finishing, water is supplied for cooling;
- First, the back edge is processed, and then the main and auxiliary faces;
Carbide versions are finished with copper deposits (impregnated with boron carbides). Other types are finished with whetstone soaked in kerosene, with minimal abrasiveness.
Modern thread turning tools
They are mainly used on CNC machines and have a design consisting of a holder and a replaceable insert, this insert is selected depending on the thread profile.
Thread turning tools for CNC machines
Turning thread cutters for CNC machines are also divided into external and internal . Their purpose is exactly the same as that of universal thread turning tools.
Modern thread turning tool for external machining in the picture below
Thread turning tool for external machining
And a cutter with a replaceable insert for processing internal threads.
Thread Cutter for CNC Machines for Internal Thread Processing
The cutters presented above have the designations: 266RFG-2525-16 and 266RKF-20-16
Next, we will open the cutter data models in SolidWorks and watch a video animation of processing with these cutters.