Wood engraving is one of the oldest folk crafts. Rus' has long been famous for its forests, so ancient artisans never lacked materials. Most often, soft, pliable wood species were chosen for work. However, real craftsmen did an excellent job with hardwoods (spruce, birch, oak). Engraving on various materials (glass, wood, metal) is an art popular among many peoples of the world. For example, in the Caucasus and Dagestan, the old traditions of engraving, or chasing, on metal are still alive.
Making intricately decorated wood products is an original Slavic tradition. Nowadays, engravers have many other materials, such as PVC and chipboard. Nevertheless, the tree also does not give up its positions. Wooden dishes and kitchen utensils , decorated with intricate engravings, can be found at folk craft fairs and thematic exhibitions in folk art centers. The younger generation is also actively learning the ancient craft in creative circles. Mostly boys are interested in wood engraving, but girls are also not uncommon in such circles and studios. Engraving can be an interesting hobby for a person of any gender and age.
From antiquity to modern times
Ancient Rus' is famous for its wooden architecture. Once upon a time, stone as a building material was in great short supply. Only churches and royal chambers in the capital were built from stone (hence the expression “White Stone Moscow”). The wooden huts in which simple peasants lived were entirely wooden. Boyars and nobles also lived in wooden towers. In those days, any home had sacred significance. The construction of a wooden house was approached very responsibly. Skilled wood carvers decorated with intricate engravings:
- Triangular pediments of huts, reminiscent of friezes of ancient temples.
- Platbands are decorative parts used to decorate window frames.
- Entrance and interior doors.
- Furniture in the interior of a mansion or hut: beds, cradles, tables.
- Wooden bars that were placed on windows to protect against robbers and thieves.
- "Skates" of sloping roofs.
Wood engraving developed in this direction until the eighteenth century. Since the era of Peter the Great, carved furniture decorated with intricate engravings has become fashionable in high society. European motifs appear in the subjects of the engravings . Now furniture in rich houses is decorated with skillfully carved scenes on the theme of ancient mythology, ancient Greek and so-called “Gothic” ornaments appear.
Engraving on Karelian birch is becoming increasingly popular, as this material is distinguished by its softness, pliability and noble color. Nowadays, carved furniture is still in fashion. However, the scope of activity of wood engravers has expanded significantly. Modern craftsmen work not only with wood, but also with materials of artificial origin, and engraving is performed not only from memory or a given ornament, but also from photographs. Sometimes a complete illusion is created that a black and white photo has been applied to the surface of the tree. This is achieved using modern equipment.
Hand engraved wood
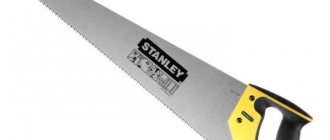
Despite the fact that scientific and technological progress does not stand still , in Russia there are still many craftsmen who prefer to work “the old fashioned way”, using the technique of hand engraving on wood. As a rule, this art is passed down from generation to generation: there are entire dynasties of engravers. Supporters of hand engraving (without the help of special equipment) believe that such a craft is much closer to its origins than working with special engraving machines. In order to master this interesting, but labor-intensive technique, a novice engraver will need:
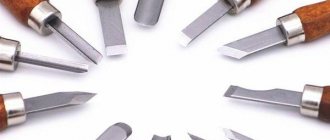
- Set of stichels. The German word "stichel" means a pointed rod with a wooden handle. There should be several of these rods. And all of different lengths and thicknesses. Using different gravers when working helps to draw lines of different depths on the surface of the wood. You can make the gravers yourself by turning wooden handles on a lathe and inserting iron rods into them. But it’s easier and more convenient to purchase them in a specialized store or order them online.
- A novice master will also need a punch (from the French word “puan” - “point”). A punch is a special device for applying broken dotted lines.
- In order for the work surface to be well illuminated from all angles, you will need a lamp with a lens, similar to those lamps used by jewelers and watchmakers.
- And finally, in order to fix the work in a strictly horizontal position on the surface of the desktop, you will need double-sided tape for repair work or a flat pad made of non-slip fabric.
Laser wood engraver
Proponents of modern working methods usually use a laser wood engraver. It works on approximately the same principle as the well-known children's burning devices, which were very popular in Soviet times. The only fundamental difference is that the line is applied not using a heated rod, but using a laser light beam. Using a special computer program, the wizard sets the basic parameters:
- Line depth;
- Color saturation;
- Line length and width;
- Its location.
Next, the laser engraver turns on and automatically responds to the user’s request. The result is a line on the surface of the tree that has the desired properties.
Compared to a router engraver, a laser engraver produces much less noise. However, many experienced craftsmen note that when working with PVC, a laser engraver emits an unpleasant, “chemical” smell, reminiscent of the smell of burnt rubber. Experts warn that using a laser engraver when working with PVC is strictly prohibited, since toxic substances are released into the air when the laser beam comes into contact with the synthetic material. These substances are hazardous to health and can cause poisoning. Therefore, if a master intends to engage in linocut (engraving on PVC), preference should be given to a milling engraver.
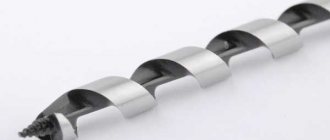
Engraving material with drills
When working with wood, you can use other tools that will help save time. The simplest of them are drills with replaceable attachments. The stages of engraving with these tools include:
- Choice of material. It is better to work on species with a monolithic texture: alder, birch, beech, linden, etc. Hard and resinous wood such as pine or oak is less suitable.
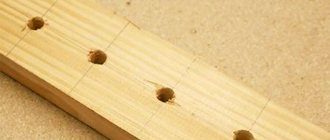
- Transferring a sketch. The drawing is transferred to the board using a simple pencil, shading the background of the picture.
- Elaboration of the contour. For engraving, select a round star drill. In this case, it is better to take a small diameter of the tool. The depth of the outline can be varied independently: the larger it is, the more the ornament will protrude above the background. Thanks to this, the master can create realistic and three-dimensional patterns.
- Engraving background. To “clog” it, use a medium-sized bur. When engraving the background, it is important to ensure that the tool does not touch the design itself.
- Grinding. The final stage. This is done using low abrasive sandpaper.
Do-it-yourself wood engraving, as well as processing the material with hand tools, is a rather complex process. However, experts have mastered it to perfection. By contacting us, clients will be able to buy a selection of souvenirs, furniture and original interior details, made in the best traditions of engraving art.
Popular subjects for work
Each “experienced” engraver has his own professional secrets and his own favorite subjects for his work. As practice shows , the most popular are wood products decorated with the following subjects:
- Abstraction - geometric and stylized floral patterns;
- Stylized images of animals, birds and mythical creatures, such as dragons or griffins in oriental style;
- Copies from photographs (portraits, landscapes and still lifes);
- Copies from reproductions of famous works of painting and graphics;
- Genre scenes (for example, scenes from village life).
For those who are just beginning to master the skill of a wood engraver, it is best to start with the simplest, rhythmically repeating patterns. They look very impressive on wooden dishes, children's furniture, cutting boards, and shelves for icons. Genre scenes are good for decorating cutting boards and making decorative panels. And round wall plates. And making gift photo portraits using wood or PVC engraving techniques can be a good source of additional income.
Wood engraving is a rather labor-intensive craft that requires a lot of time and effort to master. However, thanks to the use of modern equipment, anyone who has at least a little understanding of technology, good eyesight and artistic taste can master this rare type of needlework. The main thing is to start learning from simple to complex, and then success will not be long in coming. Wooden products decorated with engraving are in great demand among lovers of exclusive designer products.
From grabbishtikhel to cutter
The art of modern engraving originates from ancient drawings scratched on cave walls and carved spinning wheels and frames. But the modern process is so optimized that human participation is reduced only to brainstorming, leaving the painstaking cutting to the technology.
A modern wood engraving machine is designed to create:
- graphics;
- markings;
- photos;
- patterns and vignettes;
- reliefs and bas-reliefs.
Why not a picture?
Any wooden surface can be engraved - flat and round, the main thing is that the size of the working field is sufficient.
The image can decorate:
- furniture facade;
- doors, cornices;
- “gadgets” for the computer;
- dishes, cutting boards;
- boxes and other, sometimes, everyday objects.
For a real horseman, backgammon is a work of art
Hand engraving
Technology is technology, but a real piece of work is done only with the direct participation of a person. The tool is then an extension of the hand, and each cut line is unique. Do-it-yourself wood engraving will take a lot of time and all your attention, but that’s the beauty of creativity.
For manual work at home, you must have the following tools:
- a set of gravers - thin steel rods with ends of different shapes;
Each gravel cuts differently
- punch for dotted lines;
- 36 V lamp with lens;
- the device on which the workpiece will lie - double-sided tape or a flat pad with sand.
Note! Bright sunlight/electric light tires the eyes quickly. A special lamp or windows curtained with light blue thin curtains will diffuse the light, and the wooden surface will not glare.
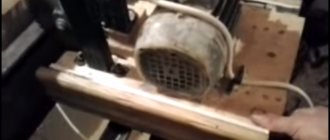
The work is greatly simplified by using power tools with attachments that allow you to make different lines:
- Dremel (the exact name is a straight grinder or, as they often say, a drill) makes up to 35 thousand rpm. The price for a tool with a set of consumables and a flexible shaft will average from 8 to 14,000 thousand rubles;
Full set
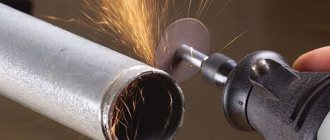
- various attachments, secured with a collet clamp, with which you can not only cut lines, but also drill, grind, cut and mill wood.
CNC and milling cutter - it sounds beautiful
A wood milling and engraving machine is usually associated with industry and huge, rumbling workshops. Nevertheless, there are “domesticated” versions of units suitable for processing boards the size of an A4 sheet, cylindrical objects, and souvenirs. The CNC capability allows you to carry out the entire cycle of work - from design to engraving.
Omitting the listing of components and parts of milling cutters, we will highlight several that directly affect the quality of machining of the material:
- cutter in a collet clamp, eliminating loosening;
- spindle is a tool responsible for rotating the cutter. For home use, a power of 400–800 W is quite enough;
- a rigid work table to firmly secure parts.
Note! Do not chase more spindle power and, accordingly, the number of revolutions of the cutter. Otherwise, the smallest dust will clog the grooves, heat up from the friction of the cutter and burn.
The wood engraving cutter is connected to the LTP port of the computer (the simplest option), on which you can:
- create a drawing;
- determine the depth of the sample material or the contour to be cut;
- set cutter operating parameters.
Determined by one goal
Guides allow the spindle to move up and down, lengthwise and crosswise over the wood piece, realizing the masterpiece you have in mind. The machine “communicates” with the computer, receiving commands for direction and speed of movement and sending signals about their execution.
Note! Since the machine is very heavy - weight 56 kg with a working field of 600x400x100 mm, additionally strengthen the place where you decide to place it. It is advisable to have a hood so as not to leave your lungs exposed to dust.
Word of praise
The operation of any mechanism is often accompanied by relatively loud noise, vibration, and smell. Wear of parts can also be considered a natural process.
But a wood engraving cutter still has more advantages:
- versatility - works with any material;
- produces 3D patterns of increased complexity;
You can get lost in the tangle of lines
- immersion of the cutter to any given depth;
- easy change of attachments.