Spot resistance welding has long been used in joining metal structures. For the automotive industry, the use of robotic spot welding has become a real salvation - instead of supporting frames, it has become possible to produce inexpensive load-bearing bodies that are superior in strength and safety to older technologies.
If it is necessary to repair such a product, the method of drilling and spot welding is usually used. This method has the following advantages:
- manufacturability;
- cheapness;
- speed;
- accessibility even for garage workshops.
Design
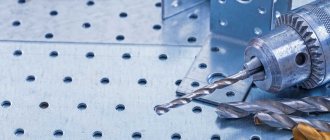
The possibility of carrying out the work in question can be primarily associated with the design features of the drill used. These include the following points:
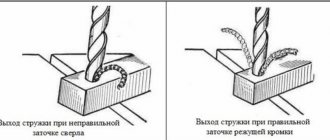
- The working end has a flat shape.
- Along the axis there are core protrusions, which are sharpened to a cone. When forming the cutting part, an angle of 90° is maintained. Due to this element, there is no need for alignment.
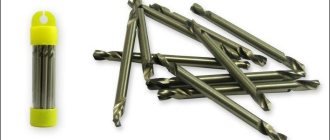
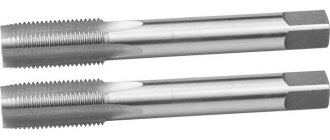
A drill bit for drilling spot welds can be purchased at a specialty store. Their cost is relatively low, but to work with difficult-to-process materials, versions made from special alloys are required.
Heavy-duty spot welding drill 8 x 50 mm
In some cases, a conventional drill is used for drilling spot welds. However, when using them, it is almost impossible to achieve the required result.
How to drill a spot weld correctly. Tools and accessories - DRIVE2
Novice bodybuilders often wonder how to properly remove a part (fender, sill) when replacing it, if this element is not attached with bolts or screws, but with factory spot welding.
Here you need to immediately decide why it is needed. If you remove it and throw it away, then you don’t need to think long, but just use a grinder or a chisel and chop as you want, but not everywhere... In places where the repair part is placed under the metal, for example, the threshold slides under the middle pillar and under the wings front and rear , this is where you need to carefully drill out the spots for spot welding.
Not knowing about the existence of special devices, I sharpened simple drills evenly so that they cut the metal around the welding point from resistance welding, oh, I had a lot of trouble with them, I’ll tell you. But let’s not talk about sad things, but let’s move on to the procedure of removing the threshold (for replacement) using special drills for drilling out spot welding.
To remove the threshold I use:
— an angle grinder (small) with a speed controller, a cutting disc (1.2 mm thick - the optimal thickness for working with car metal) and an angle grinder with a cleaning disk (6 mm thick), — pliers, — a finely sharpened chisel, — a crown for drilling spot welding, - drill, - core, - drill with a diameter of 2 mm (3 is possible) this is not essential,
- screwdriver.
Ask why so many things? The answer is quite simple - so as not to rearrange the drills, and not to change the discs on the grinder.
So, let's start removing the threshold. First, you need to drill out those places where a new threshold will subsequently be installed - the middle pillar, the boot of the rear and front (if it is not removable) wing.
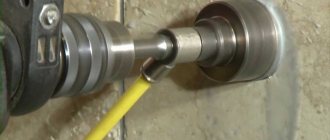
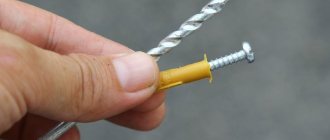
For this we need special drills for drilling spot welding. This entire device is called a “crown with a mandrel for drilling spot welding.” The crown is those “teeth” that cut the metal, and the mandrel is the thickening on it to impart rigidity and hold two oppositely located crowns.
It is problematic to buy them in a simple tool store. Therefore, I order such crowns from the online store.
As you can see, you can use both a drill and a crown, but for myself I chose and use a crown, which I’ll tell you about.
Why a crown and not a drill?
How can I tell you? This is an amateur thing, and besides, there is one nuance - the guide tip on the drill does not always cut through the hardened part of the spot weld, and you need to drill it with another drill so that it goes deep enough to cut off the top iron. Chaotic? Well how could I...
The price of a branded crown is more than a thousand rubles, Chinese (Taiwanese) from 130 rubles. I worked with both, and I’ll tell you a secret that I preferred the Chinese ones. Branded ones are sharper and hold an edge longer, but are more fragile and break at the slightest careless movement (misalignment).
The Chinese ones are not so susceptible to crumbling, and they hold an edge quite well. There is one drawback, this is the sticking of the guide rod. But if you had a branded one, like I did, then later you can simply put Chinese crowns on the shank.
By the way, they are (it turns out) on sale separately from the shank. In the photo it is 9.5 mm, I also have 8 mm, I have never seen a smaller one.
This device itself is dismountable - the crown is removed (unscrewed - the thread is normal) and, as you have already noticed, the cutting edge is on both sides, if one side is damaged, we turn it over and continue working.
In the center in front, there is a guide pin, it is on a spring, and when pressed it sinks. Don’t be alarmed if you suddenly start drilling and the edge doesn’t reach the metal because of the pin - it’s adjustable.
There is a bolt in the shank for a flat-head screwdriver (marked with an arrow in the photo below), use it to adjust the pin so that the edge plunges into the metal to the depth of one layer thickness.
Drilling technology
You insert this device into a drill, a drill for drilling spot welding, it is better to use one with a speed controller or one that has a lot of power at low speeds.
znak Don't rush to drill right away! First, find all the welding points and mark them. It happens that the guide pin jumps out of the cored point, which often leads to breakage of the crown.
They advised me to drill out the core points, now if the core makes a shallow depression, I use a drill with a diameter of 2-3 mm to deepen it (in order not to rearrange the drills, I use a screwdriver for this purpose).
Now you can drill out the spots from the spot welding.
Set the rotation speed on the drill to low, no more than 800 rpm, the bit should rest against the metal, strictly perpendicular, so that all the teeth are completely pressed against the metal. The crown will cut the iron around the weld point, and the weld will remain on the metal underneath.
Now you can cut off the threshold with a thin chisel (I use an old chisel) and pick out (if necessary, chop) the drilled iron. It is advisable to carry out the process of removing the threshold in the sequence I indicated.
I'll explain why.
If you first cut off the entire threshold and leave only those places where you need to drill, then you will definitely break the crown, because there will be no stop, and the metal will play and bend even from slight pressure.
Moving a little away from the topic of drilling out spot welds using a crown and drill, I will continue about removing the threshold.
If you are not going to use the threshold in the future as a donor, then you do not need to drill out all the points, but only those that I mentioned above. You can remove the rest as your imagination allows - cut it off with a grinder, chop it off with a chisel or an ax.
I cut everything closely with a grinder or cut it off with a chisel, cut through the fastening points with the remaining (not drilled points) with a grinder (to the depth of the metal sheet), and then use pliers to tear off the welding points. It's faster and more convenient than all the methods I've tried before.
After installing a new threshold, simply boil it through the already prepared holes, clean it and putty. That's all, go for it, you will succeed.
And I also found one useful video, like without special. tools for drilling spot welding can be done with little effort.
Spot welding bit
Spot welding can be processed using a special crown. It is also used for drilling. The features of such a proposal include the following points:
- The design includes a central spring-loaded rod.
- A cutting disc is placed on the rod, which has several end teeth on the sides. Due to their specific placement, metal is removed.
- The crown metal used is characterized by high wear resistance. That is why there are no problems with removing the alloy formed in the cutting zone.
The technology of using crowns for drilling spot welding is characterized by the following features:
- The roll is pressed into the metal. At the very beginning of drilling, the main thing is to eliminate the possibility of the rod moving relative to the surface being processed.
- As the tool is immersed in the metal, the alloy is drilled out. The main thing is that the working part only goes through the depth of the seam.
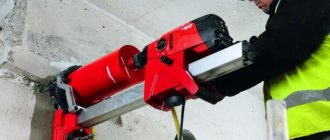
- In order to increase the rigidity of the structure, the tool is placed in a special frame.
Core drill for spot welding
It is worth considering that when making a drill for drilling a spot weld and a crown, almost the same cutting alloy is used. An example is high-speed steel P18, which can withstand prolonged exposure to high temperatures without changing the main operating parameters. It is worth considering that Chinese manufacturers use 45X alloy, which is characterized by less efficiency in use.
The crown is a fairly massive instrument. That is why when using it you need to press the working part tightly against the surface being treated. It is worth considering that when working with low-carbon steel during spot welding, the structure becomes more dense and durable. That is why more effort is required when working.
Another common problem is that the design of the crown determines the uneven cutting of the teeth into the surface being processed. This is due to the presence of various protrusions that are formed during spot welding. The result of such a problem can be called eccentric drilling of a hole, after which it is quite difficult to separate the fused elements.
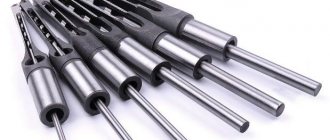
What size should the drill be for drilling resistance welding points?
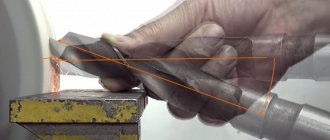
You can make a special drill for drilling out resistance welding points yourself. You need to sharpen a regular metal drill so that only the outer points of the drill are cut, and there is a point protrusion in the center for centering.
You can sharpen such a drill on a sharpening machine or even with a grinder. In this article we will look at the option of sharpening a drill on a sharpening machine. The grinding wheel must have a normal, not rounded edge, since sharpening will be done precisely using the edge of the grinding wheel.
The tip of the drill should be located exactly in the center. The cutting edges of the drill should be the same distance from the center of the drill. The edges should protrude the same amount so that when drilling begins, the drill does not move to the side and drilling begins evenly with both edges.
The tip of the drill should be slightly longer than the cutting edges, that is, when you start drilling, the central protrusion will first touch the surface, and then the cutting side edges.
If the central point is equal in height to the outer tips of the drill, then it will not be possible to start drilling from the central protrusion, and the drill will move along the surface when trying to drill.
The angles of the cutting edges should be approximately the same. They should not be very sharp or very dull. Blunt edge angles will not cut into metal well, and very sharp edges will quickly become dull.
Sharpening method No. 1
This method is the most common; it has been demonstrated more than once in videos by various masters. You need to take a metal drill with a diameter of 8 mm.
It is better to use a drill containing cobalt, as it is the most durable and will last longer until the next sharpening. First, its tip must be made flat by blunting it on a sharpening machine. You can completely blunt the tip, or leave the edges slightly unground.
Next, we sharpen the edge of the grinding wheel from the center to the edges, leaving a small point protrusion in the middle. Although the tip will be ground off, the center will be visible (where the spiral turns meet). The edges are ground down along the turns of each spiral.
This leaves cutting tips on the sides and a sharp tip in the center. The center should be 1–1.5 mm higher than the outer tips. You can check this by leaning the central part of the drill against a plane. The drill should swing slightly on the center lip, touching the outer cutting edges.
Finally, you need to carefully, also using the edge of the circle, sharpen the sides of the central part, making it sharper so that the drill is better centered and the central bridge does not interfere with drilling. Each cutting edge should be the same height so that they cut the metal at the same time.
Advantages of a drill for drilling spot welding
The tool in question, which is designed to work with seams, has a fairly large number of advantages. These include:
- The processing procedure is simplified.
- Long-term drilling can be carried out.
- The tool is ideal for creating flat surfaces.
Drilling Spot Welding
As previously noted, you should only purchase products from well-known manufacturers. This is due to the fact that alloyed alloys are characterized by a lower degree of resistance to high temperatures.
How to work with spot welding drills?
The drilling technology carried out is characterized by quite a large number of features. Recommendations for its implementation are as follows:
- The selected drill is installed in a drill, which should be able to adjust the number of revolutions. In addition, attention is paid to the power indicator.
- It is not recommended to use the drill immediately. This is due to the fact that it is recommended to pre-mark the joints. The case where the pin pops out and breaks due to the applied load has become quite widespread.
- The drill used is set to minimum speed. After this, the drill or crown is installed strictly perpendicular to the surface being treated.
After drilling the connection points, in some cases it is necessary to apply force to separate the part from the base. A chisel and hammer can be used for this.
Drilling process
Removing a body part consists of several logical steps:
- Preparation. It is worth removing all rubber bands, moldings, overlays. The entire edge of the joint should be visible. We clean the edge with sandpaper - this way all the points will be visible. If necessary, use a narrow sharp chisel to remove sealant, putty or paint deposits.
- Punching points. Using a sharp core, carefully strike the drilling center. The punched points will help you maintain the center and not break the drill when you start working.
- Drilling. Using a sharp nose, the drill is installed in the center of the weld point in the intended recess. It is necessary to drill out spot welding at low speeds; you should hold the drill firmly with both hands - the parts are uneven, and the edges of the tool always try to touch the protrusions of the metal.
- Detaching surfaces. As a rule, parts after drilling continue to adhere to paint, sealant or undrilled areas. Prying with a flat, thin chisel will help to disconnect, and un-drilled areas will be cut out with it.
Sharpening a drill bit for spot welding
It should be taken into account that if the drill is used frequently when drilling spot welds, the cutting part can become significantly dull. Sharpening a drill yourself is quite difficult. This is due to the following points:
- In manufacturing, metal that is resistant to temperature is used.
- The cutting part of the structure resembles a cone. In this case, the surfaces are located at an angle of 90°.
Drill sharpening
In some cases, a regular grinder is used for the job, in others a special sharpening mechanism is required. It is worth considering that if the technology is violated, the tool will simply fail.
Drilling out spot welding
The procedure in question is quite simple to perform. You can do it as follows:
- The most suitable tool is selected.
- The next step is to prepare the surface. To do this, mark the drilling point.
- After this, the minimum speed is set on the tool and direct drilling is carried out.
It is worth considering that in some cases the metal can be damaged. This is why you should work carefully.
How to prepare an area for drilling
When considering such a technology, it is worth considering that the final result largely depends on the quality of surface preparation. The features of this technology include the following points:
- It is recommended to core the drilling site. You can use a screwdriver for this.
- By cleaning the surface of various contaminants, you can significantly improve the quality of the work performed.
If you do not pre-prepare the surface, there is a possibility that the rod will pop out. If the load angle changes, the rod may break. In addition, with a fairly large contact area, the tool used can overheat greatly.
That is why it is possible to supply liquid to the cutting zone to cool the tool and the processed liquid.
Crown
The tool itself is quite massive, so initially you need to press the centering rod well against the surface of the metal, and then proceed to cutting out the metal at low speed. The problem lies in the fact that low-carbon steel, which is what all body elements are made of today, is significantly strengthened during spot welding, which is why a lot of effort is required from the worker to press the centering rod into the metal surface.
Another nuance during work is that the teeth of the bit do not cut evenly into the metal, since the steel at the welding site is always distinguished by the presence of microroughnesses formed due to thermal effects from the operation of the electrodes. As a result, there is a high probability of eccentricity of the new hole.
Experienced craftsmen recommend core drilling the drilling area in advance, for example, with a screwdriver, since it often happens that the centering rod unexpectedly slips out of the socket, as a result of which the crown begins to cut metal in the wrong place. With this approach, the worker needs to acquire a pair of power tools.
The problems do not end there - rapid overheating of the bits also negatively affects the work, because the thermal expansion of the bit causes the new hole in the body to become larger than necessary, and the attachment itself begins to crack.
Do not forget to thoroughly clean the crowns from chips after work!
Although not everything is so sad, because modern crowns are double-sided, so after one side has dulled, you can simply turn the tool around and continue cutting metal with the same set.
Effective removal of spot welds
Spot welding is used to produce a wide variety of products. That is why the technology of its removal by drilling has become quite widespread. The resulting seam can be removed in a variety of ways.
You can achieve high efficiency when carrying out such work as follows:
- Prepare the surface correctly.
- Use only professional drills and crowns.
- Correctly choose the operating mode of the tool used.
If you choose the right drill, you can remove almost any spot weld. It should be borne in mind that quality depends on compliance with all recommendations.