When is it necessary to drain the area?
Large puddles appear in a suburban area when water does not seep into the ground during rains or floods. This happens if the soil is clayey or the groundwater level is high. And if the area is in a lowland, water flows onto it from above.
The presence of large bodies of water or swamps nearby also affects the humidity level.
In all these cases, for normal living and harvesting, it is necessary to drain the area from groundwater. The problem can be detected in spring or autumn. Flooding usually occurs in the off-season, when the snow melts or there is a lot of rain. You can see places where moisture accumulates.
If a plot of land is purchased in the summer, you can also understand that it is flooded. This is detected by the following signs:
- doors and frames are warped, cracks are visible on the walls;
- smell of dampness, mold visible in the corners;
- there is water in the basement;
- a lot of mosquitoes, snakes, frogs;
- Weeds are dominated by nettle, wormwood, hemlock, and also a lot of reeds.
Selecting a drying method
Often, a moisture problem is discovered after purchasing a property. It needs to be resolved as soon as possible, before the water damages buildings and destroys plants. It is not difficult to drain a swampy area of water, but choosing a method for this, you need to take into account several factors:
- cause of flooding;
- soil features;
- the depth of groundwater and the direction of its movement;
- presence of bodies of water nearby;
- size of the flooded area;
- presence of buildings and vegetation.
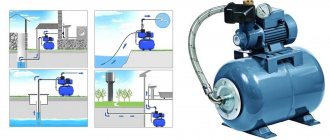
Each case may require different methods. For example, if the site is in a swampy area, raising it or installing an open drainage system will help. And when the groundwater level is high, closed drainage systems are used, possibly even with a well and a pump for their forced removal. This method is also used in areas that are located in lowlands.
Important! After draining the area, it is recommended to enrich the soil with fertilizers, since all nutrients are washed out of it with water.
Construction of a cesspool
If you are building a cesspool for a summer house or a house where you rarely visit, then it is cheaper and easier to build a cesspool without a bottom, that is, an absorption pit.
The construction process will go like this:
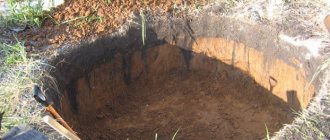
- At the first stage, a pit is dug. To the required depth, you must add space for a filter pad, which will help the drain water to be absorbed into the soil;
- At the same time, walls and sewer pipes are installed, which are laid at an angle;
- laying the pipe inside the pit. This pipe must also enter the hole at an angle so that the liquid flows there freely;
- if the walls are made of brick, then a ceiling is made at the top and a hatch is installed.
Such a pit can be constructed in the simplest way, and with rare use it will serve for a long time and reliably.
If you live on the site permanently, then you should make the same hole, but cover its bottom with tied reinforcement and fill it with concrete. Then it will be airtight and safe. On the outside of the walls, you can also make waterproofing from roofing felt or other materials. This will give strength to the cesspool.
You can also install it in a pit and a sealed container of the required volume, as shown in the image below.
Sealed cesspool
The most inexpensive options would be construction from a Eurocube or using a plastic container.
Ways to dry an area
To find out how to properly drain an area, you should consider all of your options. And then determine which one is right for you.
Surface drainage
It is possible to drain a plot of land without the use of pipes; ditches laid on the plot and along the perimeter of buildings are used to form drainage. Thus, moisture will be collected from the site and redirected to storage pits, from which it will be pumped out.
The depth of the ditches depends on the degree and level of swampiness, usually 400-700 mm, the depth of the pit is up to 1000 mm. The pit is made in the shape of a cone with a narrow lower part. The upper diameter is approximately 2 m and the lower 0.7 m.
To maintain the geometry of the pits, drainage wells can be installed in them.
Disadvantage of this design:
- constant crumbling of gutters;
- periodic contamination of channels;
- the system takes up a lot of space.
Advantages:
- low price;
- draining the dacha yourself;
- high speed of work.
In this case, the channels are not washed with high pressure water.
Closed system
It will not be possible to carry out such drainage with your own hands, since it requires special knowledge and equipment. This is the most progressive and effective system that takes up virtually no space. All elements are underground.
There are two types of drainage.
- Foundational - locally protects buildings and structures from moisture. It is laid along the perimeter of the object to a depth below the foundation pad. This system provides home protection.
If the area is small, you can install the equipment at some distance (2 - 3 m) from the foundation, and thus protect a large area.
- General - reduces watering of the entire area. It is formed in the form of a “herringbone” (a system with a main drainage channel) or beams with a distance of 8 - 10 meters.
This position prevents water from accumulating; it is completely removed through the drains. The pipes are buried at 400 - 600 mm, depending on soil moisture.
- The technology for bookmarking the system is common for both cases.
- The bottom of the formed ditch is filled with gravel and sand.
- Water-permeable geotextiles with a margin of width are laid on it.
- A drain - a perforated plastic pipe - is laid on the geotextile.
- Another layer of gravel is poured onto the pipe.
- The geotextile is wrapped, the ditch is leveled with the surface level.
- At turns and every 50 meters, inspection wells are installed.
- These are standard structures through which you can monitor the operation of the system and carry out periodic cleaning. The main well is installed at the lowest point of the site.
- The water that gets there is removed using a drainage float pump. If there is nowhere to drain the water, you can install a large storage tank and use it for technical needs or watering in the summer.
In other cases, water from the drainage well is discharged outside the territory into a ditch or natural reservoir.
- When laying pipelines, it is necessary to ensure a natural slope for the movement of water by gravity. It is approximately 20 - 30 or 3 - 6 cm per linear meter.
- Gradually, the pipes will become clogged and silted. They are cleaned approximately every 2-3 years. To do this, the system is filled with water under pressure with maximum pumping capability.
Wellpoint systems
Drainage of an area with a high groundwater level is carried out using a special technology. Wellpoints, which are steel pipes with holes at the ends, are mounted at the ends of the pipes included in the structure. To protect against soil ingress, brass or polymer meshes are installed in the pipe.
All wellpoint filters are connected to the system and connected to a vacuum pump.
In this way, you can reduce the groundwater level to a depth of 4 - 5 meters. If it is necessary to drain a swampy area, the equipment can be installed in cascade, in several tiers, and ensure the removal of moisture from a depth of up to 20 meters.
Draining a site using such a system is very labor-intensive and costly. This is usually a temporary measure to stabilize the water level while other options are sought.
It is better to entrust the choice of drainage method to specialists who will carry out calculations, examine the water level and soil composition and offer the optimal solution.
You can drain the site yourself if there is slight watering in some areas or to protect buildings from flooding.
Open drainage
Open drainage is a system of ditches located on a slope. Through them, water flows into drainage wells or beyond the boundaries of the site. The distance between them is at least 6 m. It is better not to do them around buildings, this can lead to deformation of the foundation.
Such ditches are made with sloping walls, the depth is at least 40-50 cm.
A variant of such a system is backfill drainage. The bottom of the ditch is laid out with geotextiles, then filled with gravel or stones to 2/3 of the depth. Fine gravel is poured on top, and then a layer of sand and soil.
This method is most often used if the soil is clayey. It helps drain water during floods and heavy rains, preventing the soil from becoming saturated with moisture.
For soil with a lot of sand, this system is not used. This method is also not suitable for high groundwater levels.
The disadvantages of such a system include a reduction in the usable area of the site. This can be avoided by breaking a ditch near the fence. In addition, such trenches quickly become clogged with debris and leaves, and they have to be cleaned regularly.
What to do before developing a project
Before creating a pit design, a soil study is carried out.
Things to remember:
- if the yard is located on a hill, then the pipes to the pit are laid across the slope line;
- it is necessary to take into account how far the structure is from the residential area;
- what is the distance to the nearest body of water. The pit is dug as far as possible from it;
- is there a cellar or other underground structure nearby;
- if it is planned to pump liquid out of a structure, then you need to choose a place so that there is access for a sewer truck;
- if the area is small, then it is necessary to equip an isolated pit concreted along with the bottom. It is necessary to build walls to avoid collapses. More often they are made of brick - a durable and not the most expensive material.
It is better to carry out excavation work in summer (July-August).
Construction of ponds, sewage pits or ditches
Owners of country houses are often interested in how to dry a plot of water with their own hands without drainage. This is also possible, but it is best to use such methods in the country, and not in a country house. This is digging ditches, sewage pits or decorative ponds. They can become not only a means of draining water, but also an element of landscape design.
The choice of method depends on the characteristics of the site and the reason for the accumulation of moisture.
Note! The disadvantage of this method is the need to regularly clean the resulting reservoirs. Without this, they will bloom, mosquitoes will appear, and there will be an unpleasant smell.
Types of drainage pits
There are three types of sewage pits: a sealed tank, a drainage type pit and a multi-chamber septic tank.
A sealed cesspool is the simplest and safest construction option, which prevents the penetration of polluting wastewater and household chemicals into the soil and aquifer. It is being constructed on land with a high level of groundwater.
The design is represented by a simple sealed tank dug into the ground to the required depth. A special feature of a cesspool is the need to regularly pump out accumulated water waste. Significant disadvantages of a sealed tank include the complexity and high cost of maintenance.
A drainage pit for drainage is the most popular option for private baths that do not have bathrooms. In this case, an open container is installed that does not have a sealed base. A gravel-crushed stone mixture is used as a bottom filter. The design of the drainage pit provides for the presence of special holes necessary for the removal of purified liquid into the soil.
A septic tank is a technically complex version of the sewer system for baths equipped with sanitary facilities. Structurally, it is represented by several cameras connected to each other and performing various functions.
The primary sealed chamber ensures the collection and initial filtration of wastewater: solid waste sinks to the bottom, and the liquid undergoes additional purification by aerobic microorganisms. The reservoir is connected to the second compartment by an overflow pipe, which provides the supply of purified liquid. The second chamber serves as a drainage pit, where water undergoes secondary purification and is discharged into the soil.
If the septic tank consists of three compartments, then the drainage chamber is installed last. In this case, a deeper cleaning of impurities and pollutants occurs in the second chamber, after which the purified liquid enters the drainage tank.
Ditches
Ditches are more difficult to dig, but such a system will drain excess water more efficiently. They are organized around the perimeter of the site. To prevent the walls from crumbling, they are reinforced with boards or concrete slabs. You can put a metal box on the bottom.
A variant of this drainage method is the installation of decorative streams. This is appropriate if the site is located on a slope. The bottom of the artificial stream is laid out with pebbles, pebbles or geotextiles. It is recommended to arrange streams under trees, as in a sunny place the water will bloom.
Moisture-loving plants
If you are wondering how to drain a site with your own hands at no cost, you can consider the option of planting moisture-loving plants. This method will be effective only in small swamps and if there is no urgent need to remove water.
By using plants that require a lot of water, you can lower the groundwater level and speed up the drying out of the area after rains and floods. This will also help decorate the area. Willow, maple, poplar, alder and birch are used.
If you need plants that grow faster, you can plant shrubs: hawthorn, viburnum, serviceberry, rose hips. This is an ideal way not only to reduce the amount of water on the site, but also to create a hedge. There are also moisture-loving herbaceous plants.
These are perennial flowers: iris, aster, aquilegia. You can plant cranberries and blueberries.
Open and closed channels
Soil drainage can be done using open trenches or specialized pipes placed in the ground. The first of them are simple in design, but do not look very aesthetically pleasing. In this regard, some developers create closed channels that do not interfere with the attractiveness of the landscape.
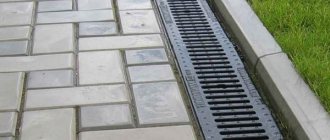
Open drainage around a residential building using trays and grates
Surface lines
- high construction speed;
- low costs;
- sufficient level of efficiency;
- ease of cleaning.
Drainage trench at the edge of a suburban area
Helpful advice! If we are talking about how to make drainage on a site with your own hands without unnecessary financial investments, then first of all you should consider the option with a system of open channels.
Closed drainage systems
Systems with deep lines are ideal for draining both stormwater and groundwater located in the immediate vicinity. Most often, they are arranged using polymer pipes that are immersed in the ground at a certain distance.
Closed piping system designed for point moisture collection
- point (water collection occurs in one place);
- linear (moisture collection is ensured throughout the pipeline through special holes).
Note! Within one site, the presented species can be combined. For example, point collection can be used for the drainage system of a house, and linear collection can be used for groundwater.
Drainage well for a deep system made of a pipe with a large diameter
Homemade ventilation riser for sewer drainage system
At the upper end of the drainage pipe (at the highest point of the site), we made a sewer ventilation riser in the following sequence:
- put a plastic sewer outlet on the corrugated pipe (red - for external networks)
- the outlet was connected to a straight section of plastic sewer pipe to obtain a vertical riser of such a height that it would not be covered with snow in winter. It is advisable to use all plastic pipe elements for external work (red ones), since gray ones are intended only for internal sewerage. We used leftover materials, so we combined what was available.
- They placed a mayonnaise bucket on top of the sewer riser, after making several holes in it for ventilation. This is temporary. In fact, you need to put a plastic plug on the pipe with holes drilled in it.
- sprinkled the connection point in the ground with a small amount of crushed stone in order to make the place heavier, just in case from possible soil movements (during soil shrinkage after backfilling or during seasonal freezing and thawing)
- filled the holes with local soil
Subsequently, this ventilation riser “went” under the blind area.
The second end of the drainage pipe is located at the lowest point of the site. In the spring, a lot of water flows into this hole, which is collected by a drainage pipe on both sides of the house. Therefore, you cannot simply bury a hole here, but you must make a drainage layer so that the water flows freely into it, and the end of the pipe does not become clogged with earth.
How to make a drainage hole correctly? So that after filling the hole everything works like clockwork.
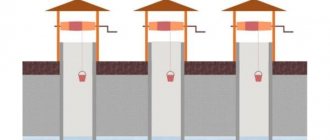
Raising the area
If the groundwater level is high or if the area is very swampy, only raising the site can help. It is backfilled with soil. This is a complex and expensive method, but effective. It consists of several stages:
- Drawing up a detailed plan indicating aquifers, clayey areas, voids.
Demolition of all buildings, clearing of debris. - Laying a drainage system, preferably a closed type.
- Before backfilling begins, a strip foundation is laid around the perimeter of the site.
- Then the soil is covered in layers of 10-15 cm. Sand and crushed stone are usually used. Each layer is laid with geotextiles, compacted, and compacted. After this, you need to wait 2-3 weeks for the soil to shrink.
- Fertile soil is poured on top.
- Then you need to sow the soil with cereal crops. They have an extensive root system that will secure the fill.
Selecting a drying method
Often, a moisture problem is discovered after purchasing a property. It needs to be resolved as soon as possible, before the water damages buildings and destroys plants. It is not difficult to drain a swampy area of water, but choosing a method for this, you need to take into account several factors:
- cause of flooding;
- soil features;
- the depth of groundwater and the direction of its movement;
- presence of bodies of water nearby;
- size of the flooded area;
- presence of buildings and vegetation.
Each case may require different methods. For example, if the site is in a swampy area, raising it or installing an open drainage system will help. And when the groundwater level is high, closed drainage systems are used, possibly even with a well and a pump for their forced removal. This method is also used in areas that are located in lowlands.
Important! After draining the area, it is recommended to enrich the soil with fertilizers, since all nutrients are washed out of it with water.
Disguise as design - ponds, streams
If groundwater lies at a high level near the surface, and its quantity is large for the drainage system, you can use the water to decorate the site. If the territory of the dacha is flat, then the pond will look good, and if the site has a slight slope, you can organize a stream with your own hands to drain the water.
To create an artificial reservoir to collect water in order to drain the area, you will need to dig a hole or lay a trench, forming a stream bed. Line the bottom of the ditch with construction geotextiles.
Sunny areas are not recommended for the construction of artificial ponds, since groundwater often blooms from the sun, and the pond will have to be cleaned much more often.
Step-by-step arrangement of a drainage pit for a bathhouse
Now let's look at a question that interests many - how to make a drainage pit for a bathhouse with your own hands. The easiest option for beginners is a drainage hole made from a barrel. A metal barrel with a volume of up to 250 liters is used as a drainage tank.
First you need to choose a suitable location for the pit. The distance from the foundation of the bathhouse to the treatment device should be from 3 to 7 meters. When determining the depth of the sewer pit, it is important to take into account the total volume of wastewater and groundwater. The optimal value is no more than 7 meters.
The process of arranging a pit for drainage involves stage-by-stage execution of work.
Pit preparation and pipe laying
- Preparing the construction site for the pit. An earthen ditch must be dug from the base of the bathhouse, having the necessary slope for convenient drainage of wastewater. The average slope is 4 degrees per linear meter. The bottom is insulated and covered with drainage made of gravel and sand. A drainage pipe connecting the steam room and the waste pit is laid on the pillow.
- Next, they dig a pit and also insulate it. A drainage cushion made of gravel and crushed stone (thickness up to 25 cm) is installed at the bottom.
Average prices for turnkey plot drainage
Many companies offer professional services for installing drainage systems, but they are not that cheap. During the work, a double-wall pipe with a geotextile filter will be used.
| Depth in centimeters | Price in rubles per linear meter |
| 100 | 2 500 |
| 150 | 3 200 |
| 200 | 4 200 |
| 250 | 6 900 |
Rules of care
Drainage structures will function properly for many years if the basic rules are followed during operation :
- the top layer of soil must remain loose throughout the entire time so that moisture is absorbed as best as possible, which means moving heavy equipment directly over it should be prevented;
- collectors and wells must be regularly cleaned of contaminants, otherwise maintaining the system may be difficult;
- Pipelines should be cleaned every 10-15 years.
The choice of cleaning method largely depends on the location of the drains and their design features. Contaminants from elements located on the surface can be removed manually without the involvement of professionals. If the components of the system are deepened into the ground, then the measures become more complicated.
The work may require a special installation with a cleaning roller that can remove deposits from the internal surfaces of the pipes.
Features of do-it-yourself point drainage on clay soil
A point-type drainage system does an excellent job of protecting certain areas of the territory from excess moisture. Before draining a site on clay soil, as a rule, problem areas are identified, which may be:
- placement of drains leading from the roof of the house;
- door pits;
- entry zone;
- terrace;
- points where water is collected for irrigation of vegetation.
To arrange drainage for a site on clay soil, the following elements are used (prices for them are posted in the tables above):
- storm water inlets;
- settling tanks equipped with containers for collecting large particles and debris;
- trenches-ladders transporting water to the storm sewer system;
- dampers that prevent the reverse flow of water and the entry of large particles of debris into the system.
Protection of the foundation from melt and storm water
Protection against melt water
Seasonal formation of surface water is also a big problem. It can be solved with the help of comprehensive protection, which includes a drainage system, blind area and drainage system.
Drainage system
The design is designed to collect rain or melt water from the roof of a house. Water flows through special gutters into funnels and is carried away from the foundation of the building through pipes.
Ring drainage helps drain stormwater away from the foundation. It works like this:
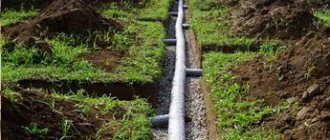
Pipes are laid in an open trench that lead to a general sewer system. The pipes are laid on a compacted bed of sand and crushed stone.
It is very important that the diameter of the drainage and downspout pipes be the same. Wells are installed that receive water from drains. All water is collected in a common well, from which it is removed by pumping, direct drainage into an open reservoir, or absorbed into the soil through a drainage field.
Blind area
Water that accumulates on the surface is drained from the foundation using a blind area. Its arrangement looks like this:
- Marking in progress.
- A layer of soil is removed to a depth of 25 cm.
- The formwork is being installed.
- The soil is covered with a layer of clay and thoroughly compacted.
- This is followed by a 10 cm layer of sand, which is also compacted well.
- Fine gravel is poured on top of the sand in a layer of 5 cm.
- At the junction of the blind area with the wall of the house, an expansion joint of 2 cm must be formed.
- The blind area is filled with concrete.
Drainage
Water is removed from the drainage system and blind area through surface drainage. Its arrangement is carried out according to the following scheme:
- On the outside of the blind area, they dig a shallow ditch with a slight slope.
- The bottom of the trench is covered with sand and gravel, creating a sand and gravel cushion.
- Next, special trays are laid and covered with gratings.
Constructing a drainage well with your own hands - how to do it right
First, let's look at the three main types of this drainage part. He can be:
- Inspection – used for visual observation and prevention of blockages;
- Accumulative - excess moisture from the area accumulates inside. Such a device requires periodic pumping;
- Absorption - water collected from the territory goes into the ground or into a nearby body of water.
The fact is that before making a drainage well, it is necessary to take into account several factors, such as the slope of the soil, the depth of groundwater, the possibility of drainage into any body of water, etc.
Already based on these data, a conclusion is drawn about the appropriateness of one type or another.
As for the dimensions, there are no standards for diameter, but the depth of the drainage well should not be less than 2-3 m. This value is calculated from the fact that in addition to the slope of the drainage pipes, there must be a volume sufficient for rain or groundwater below. Simply put, moisture should not flow back into perforated pipes.
Where to start
What you need to know before creating a system for draining water from a site is that you cannot do it at random. First, a geological study of the soil is required. Its purpose is to determine at what depth the impermeable layer is located, how close the groundwater is, and what kind of water leads to flooding/wetting of the area.
Both surface and underground water can flood a site. Superficial ones appear during snow melting and prolonged rains. Underground are divided into three types: capillary, ground, and perched. What the site owner needs to know: there is no point in hoping that surface water will disappear when warm weather arrives. They will be absorbed into the soil and replenish the underground. Therefore, it will not be possible to avoid problems with flooding of the territory.
Do-it-yourself drainage system on the site: some secrets of performing the work and nuances of the device
Do-it-yourself installation of drainage in areas, although quite labor-intensive, is a completely doable process on your own. The main thing here is not to deviate from the execution plan and the order of work. And although an approximate algorithm will now be presented, it is worth understanding that for each site it can be supplemented, depending on the soil, landscape, etc.
Drawing up a detailed work plan and a diagram of future drainage on the site. At this stage, every little detail, every nuance is taken into account (slope of the soil, its composition, depth of groundwater, required pipe diameter, etc.
- Marking the site according to the plan diagram, taking into account the dimensions
- Digging trenches for drainage gutters or pipes. Preparing sites for wells and drains
- Laying geotextiles in trenches (if necessary), as well as filling them with sand or gravel
- Laying direct drainage material (pipes, gutters, etc.). Installation of wells
- Filling the drainage with soil and bringing the area to its original condition
Important advice! Before making drainage on the site, it is necessary to make sure that there are no other communications, and also to clarify the depth of groundwater. This will eliminate unexpected problems during the installation process.
As for do-it-yourself drainage at dachas, namely how to make drainage around the house with your own hands, there will be no significant differences with draining the area. It is only necessary to recall that the blind area must be of high quality and have good waterproofing. Otherwise, the drainage lines will be of little use.
Installation of surface drainage
Point system
Advantages:
- ease of installation;
- high throughput;
- the presence of compartments for waste collection and sand traps facilitates operation;
- elements of the system are hardly noticeable.
Important! The choice of design depends on loads. If the system is installed in an area where small-sized equipment will travel, then it is necessary to choose products with increased strength characteristics.
What elements will be needed?
- A drainage pipe designed to drain water.
- Rotary type drainage well.
- Storm water inlets, which must be placed on concrete pads.
Sequence of work
- Where it is intended to install system elements, pits are arranged. A reserve is left. The depth should not be too small. After all, we still need to make a concrete pad.
- A concrete pad is constructed (thickness of at least 10 centimeters).
- Storm water inlets are being installed.
- Pipes laid underground are connected. Their slope is at least 5 millimeters per 1 meter.
- Decorative gratings are laid, which should be 3-5 millimeters below ground level. If this condition is not met, the depth is adjusted.
- The gratings laid on the rain inlet are not additionally secured with anything. If necessary, the depth of their installation is adjusted. The voids between the walls of pits and storm water inlets are filled with concrete.
Linear system
Linear drainage differs from point drainage. The shape of the storm water inlets is different, the length of communications is greater. Installation of a linear type drainage system is advisable if there are no places where a significant amount of moisture collects. The gutters are installed along the entire length of the drainage line and are connected using highways laid underground.
The materials for the manufacture of gutters are polymer and fiber-reinforced concrete, frost-resistant plastics. Therefore, the products are resistant to mechanical stress, but cost more. The width and depth of the profiles are selected depending on the volume of liquid drained from the territory.
The area from which water is drained is large, which is why before entering the sewer system or in front of the well, sand receivers are installed to prevent pebbles, sand, and earth from entering the system.
Technology
- A diagram is drawn up. The location of the drainage elements is determined taking into account the angle of inclination. It is advisable to develop a large-scale plan. This will eliminate unnecessary difficulties when determining the length of gutters and making other calculations.
- In places where drainage systems will be built, pegs are driven in and ropes are pulled.
- Trenches are dug in which the gutters will be placed. The depth depends on the profile height. There is a margin (10 centimeters) necessary to create a concrete cushion. The width of the recess is 5-10 centimeters greater than the width of the gutter. The technology for installing the drainage system involves placing the gratings below ground level (3-5 millimeters) and creating a slope. If it is necessary to lay communications on a paved area, use a hammer drill or jackhammer.
- The bottom of the trench is compacted.
- The concrete mixture is poured (layer thickness 10 centimeters).
- A sand receiver is installed at the lowest point. Correct installation is checked using a level.
- Gutters are being installed. This process is usually not associated with problems. The products have arrows and grooves that allow you to securely connect the structural elements. For better sealing, sealant is often used.
- Sewage wells and sand traps are connected to gutters, which is done through adapters. The sand receiver body is equipped with plugs. You can punch a hole using a hammer and chisel.
- The quality of work is assessed.
- Concrete is being poured. If plastic gutters are used, it is advisable to install decorative grilles first, since the holes can be deformed under the influence of the concrete mixture.
- The trench is filled in and the soil is laid out.
- The gratings are being laid.
The installation of the drainage system on the site has been completed. Next, you need to clean the grates and sand traps from debris. The frequency depends on the frequency of precipitation.
Summarizing information
If we summarize all the information presented, we can come to the conclusion that in most cases, even the simplest methods of drainage in summer cottages or around private houses help quite significantly both in preserving buildings and their foundations, and in gardening.
Of course, this is not an easy job, but with certain knowledge and compliance with the rules for drainage production, it is completely doable with your own hands. The main task here is accurate calculation and compliance with it at all stages.
If we think logically, then the main work, such as drawing up a project, can be taken on by one person. The rest may understand absolutely nothing about such work, following only the instructions of the first.
This means that if a home master tries to understand the essence of installing drainage systems, then he can hire any auxiliary workers as assistants.
Well, if a person is not confident in his abilities, then it is quite possible to entrust this work to the specialists of any company that provides similar services. The only thing that should be taken into account in this case is the period during which the company has already provided similar services, as well as reviews of those for whom such work was performed.
Important advice! You should not entrust the drainage installation to the so-called “shabashniks”. After all, it may turn out that hired workers understand less about such systems than the owner.
In this case, the entire drainage may “stand up” during the first rainstorm, and redoing it will cost much more. And therefore, proven companies that provide a guarantee for their work are more acceptable here. And this is despite the fact that the cost of their services may be slightly more expensive.
One thing can be said quite accurately - drainage of the site, foundation and garage is necessary in almost any private areas and courtyards, and therefore it is not worth saving on it.