Draining water from the house is a problem for almost every owner of a country house, which must be solved immediately, without debugging “for later.”
During rains and heavy rains, water can destroy the stability of the house, destroying the foundation. Of course, this will not happen from one rainstorm, but if such incidents occur constantly, then the house may simply go underground, that is, “grow” into it. The foundation of the building will be washed away by sewage, the ground under the foundation will be soft and the foundation will sink down under the weight of the house. And, for example, if the house has a basement? In this case, this problem must be solved immediately; it cannot be postponed even for a short period of time. After all, if the basement is constantly flooded, then within a few years it will fall into an unsatisfactory condition and it will no longer be possible to use it for its intended purpose. Why? Because due to constant dampness in the basement, mold fungi may soon appear, which in turn are extremely harmful to the health of people and animals.
Groundwater and its dangers
Groundwater can also pose a danger to the site. If your house is located near a river, lake or even a swamp, then you can be sure that there are some on the site. The danger of groundwater lies in the fact that it lies in the depths of the earth. If water from the house flows there during heavy rains, then there is a high probability of disturbing the balance and stability of the house, which may subsequently lead to its collapse. It is for this reason that it is so important to properly drain rainwater from a residential building.
Existing drainage systems and schemes
Sewerage is one of the types of engineering equipment and improvement of populated areas, residential, public and industrial buildings, providing the necessary sanitary and hygienic conditions and a high level of amenities for work, life and recreation of the population.
Sewerage means a complex of equipment, networks and structures designed for the organized reception and removal of contaminated wastewater through pipelines outside populated areas or industrial enterprises, as well as for their purification and neutralization before disposal or discharge into a body of water.
Sewerage is divided into internal and external by purpose. Internal sewerage serves to receive wastewater at the places of its formation and discharge this wastewater outside the building into the external sewer network. External sewerage is used to transport wastewater outside a populated area or industrial enterprise to treatment facilities. Treatment facilities serve to neutralize wastewater, release purified water into a reservoir without disturbing its natural state, and process sludge for further disposal.
Depending on the origin, type and qualitative characteristics of impurities, wastewater is divided into three main categories: domestic (household), industrial (industrial) and rainwater (atmospheric).
Drainage of water from the roof: features
Water drainage from the roof must be mandatory. For example, in winter a huge amount of snow falls on the roof, which accumulates on it and can simply break it. There is also another significant danger: during daytime snow melting, icicles may form in the evening. They, in turn, can fall on someone’s head. If you drain thawed snow and rainwater from your home, you can forget about the formation of icicles and the danger of them falling on someone’s head forever.
How to make a drainage system yourself, that is the question. You can immediately answer that this is not a complicated process; you can handle it yourself. To do this, you need to buy gutters and drainpipes at a construction hypermarket or market that will drain water from the roof. Gutters for draining water from the roof are the least expensive and simplest option. It is also the most popular. Installing gutters to drain water from your home is quite simple and can be done with your own hands.
There are three types of gutters:
- semicircular,
- rectangular or square
- trapezoidal.
How to decide which one is best for your building? You can only rely on your taste, and you should also take into account the design of the building. In terms of functionality, these gutters are practically no different; we can say that they are the same in their properties and characteristics. Therefore, the choice falls entirely on your shoulders.
You can only help with the choice of color: you should not buy light-colored gutters, since in winter the snow on them will melt more slowly than if they were darker. This happens because dark colors attract more solar energy. Light colors, on the contrary, reflect the energy of the sun, so the snow on them will melt more slowly. Also, many experts recommend installing storm gutters that are larger in size and therefore can withstand the loads during heavy rainfall.
There is nothing complicated in installing gutters, you just need to follow the instructions from the attached instructions.
The system for draining rain and melt water using gutters is as follows:
Water flows from the roof into an attached gutter; it travels along the gutter to a downspout, through which it flows down to the ground. But the problem remains unresolved; water continues to flow directly under the foundation of the house. To bring the water drainage system from the house to perfection, it is necessary to make an additional drainage system.
Features of an autonomous sewage system
If desired, you can connect the local pipeline to the central main; to do this, you need to lay internal drainage and bring the pipes to a common riser.
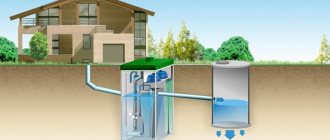
The equipped autonomous sewage system has:
- - internal wiring.
- -street sewerage system.
- - storage well.
- -septic tank.
Indoor drainage consists of pipes connected to plumbing fixtures.
Pipes have different internal sections:
1.for the outlet pipe from the sink, a diameter of 40 millimeters is required.- 2. pipe drainage from the bathtub, shower, with a cross-section of 50 millimeters.
- 3. pipes from the bathroom and a riser of 110 millimeters.
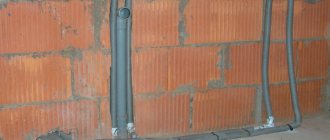
Pipes for drainage are made of durable plastic of various origins. Plastic has many advantages for use. Pipes made of this material are lightweight, their installation is quick, does not require special skills, and the smoothness of the walls inside the pipes prevents the formation of silt deposits.
When installing sewerage inside a building, gray pipes are used that can transport high-temperature water. For street sewerage, orange pipes are used, which are durable because they can withstand the weight of the soil.
All connections must be equipped with sealing gaskets or lubricated with sealant. The sockets of the system are laid against the flow of liquid through the pipes. To ensure sewer turns and various branches, fittings are used, for example, couplings, crosses, tees.
Important! When connecting sockets, you should not create sharp, right angles to avoid the formation of blockages.
Drainage systems
What is a drainage system? What is it used for? What types does it come in? In what cases should it be used?
In fact, the drainage system is a system for draining water from the house, only it removes water almost completely, which will have a good effect on the building and extend its service life.
Types of drainage systems:
- Ground drainage (surface)
- Drainage lines
- Drainage in certain places (spot)
- Open drainage system
- Closed drainage system
- The trenches are filled
- Deep drainage
When there is an urgent need to install a complex drainage system:
- If there are natural water bodies near the house.
- The house is on a low ground.
- On clay soils, since water drains out quite slowly on such soils, especially after rainstorms.
- Your area receives high rainfall throughout the calendar year.
- Groundwater is located close to the surface of the earth's crust.
- The presence of concrete or tiled paths on the site, as they do not allow water to pass through.
- Low foundation of the house, because the possibility of flooding increases significantly.
Installing a system that will drain rainwater yourself will help save money on further repairs of the building due to possible flooding.
Design of an internal drainage system
Internal drainage systems from a residential building are designed to drain household wastewater from sanitary fixtures into the yard and then into the city drainage network.
The internal drainage network consists of sanitary fixtures (washbasins, sinks, bathtubs, toilets, etc.), drainage pipelines connecting to water seals (siphons) of risers, exhaust parts, outlets, and cleaning devices.
Discharge pipes are used to drain wastewater from sanitary fixtures. They are laid straight along the walls above the floor with a slope of 0.03 (at d = 50 mm) and 0.02 (at d = 100 mm) towards the riser. The diameters of the outlet pipes are taken depending on the type of devices connected to them. Discharge pipelines from toilets are assumed to be 100 mm, from other appliances - 50 mm. Discharge pipes are connected to the risers of the drainage system using fittings (tees, crosses). Double-sided connection of drain pipes from bathtubs to one riser at the same level is allowed using oblique crosses. Crosses and oblique tees should be used in basements. It is not allowed to use straight crosses in the horizontal plane. Hydraulic valves are designed to prevent gases from entering the premises from the drainage system. They are installed under sanitary fixtures.
Risers transporting wastewater from outlet pipelines to the lower part of the building are placed openly in bathrooms near wastewater receivers, against the walls or in niches in the internal walls of the building, next to the cold water riser. For two adjacent sanitary units, one riser of the drainage system is installed, and in sanitary cabins (in panel buildings) one per cabin. Over the entire height, the risers must have the same diameter, equal to the largest diameter of the floor outlet or outlet pipe of the connected wastewater receiver (the toilet bowl has the largest diameter of the outlet pipe with a diameter of 100 mm).
The network of the domestic internal drainage system, which discharges wastewater to the external network, must be ventilated through risers, the exhaust part of which is discharged through the roof to a height of 0.3 m from the flat unused roof. Connecting the exhaust network of drainage risers with ventilation systems and chimneys is prohibited. The diameter of the exhaust part of the riser is equal to the diameter of the drain part of the riser.
The drainage riser in the lower part turns into an outlet that serves to drain wastewater into the yard network. The diameters of the outlets are assumed to be equal to the largest diameters of the risers (100 mm).
The number of outlets from one building is usually taken equal to the number of entrances in the building. Drainage outlets should, if possible, be located on one side of the building perpendicular to the outer walls; the minimum depth of the outlet is determined by:
depending on soil freezing (the bottom of the pipe is laid 0.3 m above the freezing line);
taking into account the mechanical strength of the pipes (0.7 m to the top of the pipe).
The outlets should be connected to the external yard network at an angle of at least 90 (calculated according to the movement of wastewater). The shortest length of the outlet pipe from the outer wall to the inspection well in dry soils is 3 m, in wet soils - 5 m.
To eliminate blockages in the drainage network, it is necessary to provide cleaning devices (inspection and cleaning). The inspections are used to clean the network in both directions and consist of a hatch in the pipe with a lid and a rubber gasket. Cleanings allow you to clean the pipe in only one direction; they are made in the form of an oblique tee 45 and a bend 135 or two bends 45, the socket is closed with a plug.
Inspections or cleanings include:
on risers, if there are no indentations on them, in the lower and upper floors, and if there are indentations, also on the floors located above the indentations;
in residential buildings with a height of five floors or more - at least every three floors;
at the beginning of sections of outlet pipes when there are three or more connected devices, under which there are no cleaning devices;
at network turns (cleaning - before turns, revisions - before or after turns).
Types of water drainage systems
Surface drainage
Surface drainage will allow for the removal of storm water; it is also called a storm drain. It is very simple to install this type of drainage system that drains storm water. Such a system will help to cope exclusively with the drainage of rain and melt water, but such a system will not be able to cope with groundwater. Surface drainage itself is divided into two more types: linear and point.
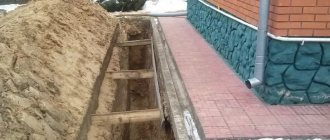
Linear water drainage works as follows: special trenches are dug throughout the entire area, which merge into one common drainage well. Usually the trenches are covered with gratings.
Point drainage of water allows water from different places on the site to be drained into a common well, and such a system is usually used simultaneously with a linear one. Point drainage is usually installed in places where there is no need for constant mandatory drainage of water. For example, in outbuildings or bathhouses.
There is also combined drainage, that is, both linear and point drainage. This type of drainage system is most often used in country yards and country houses.
Drainage systems on private properties will not affect the water supply, as they usually draw water from deeper wells or boreholes.
Drainage systems: open and closed type
Open systems are a set of trenches, channels and gutters that allow water to be drained from the house to a specially designated place, usually a well.
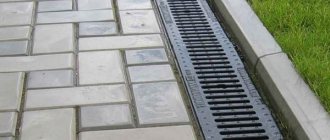
Closed drainage systems also represent a combination of various drains and channels, but they have a more aesthetic appearance, since they are covered with decorative gratings. The outlet channel in the form of a pipe is often buried underground and is in no way visible from above.
All construction experts agree on one general plan when organizing drainage systems on a private site: “It is not so difficult to install a drainage system on your site in modern conditions. Before construction, it is advisable to take a site plan and mark all the channels and trenches on it, as well as determine the best place for the well into which the water will be drained. The next important step is to count the materials needed. You need to do this so that you don’t waste your time on unnecessary shopping trips. Work must begin from the roof, and only then construct surface drainage channels on the ground.”
Disposal of purified water
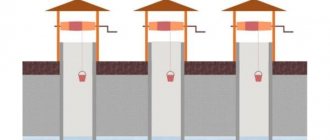
Where to discharge purified water directly depends on the type of treatment device. If this is a biological or mechanical treatment station, then after cleaning the liquid can be discharged directly into the soil of a personal plot or behind it. When installing an autonomous sewer system, it is best to equip septic tanks with three chambers.
The first chamber serves to allow large masses of sewage fragments to settle and be processed by anaerobic microorganisms. In the second compartment, the compressor operates with the help of aerobic bacteria. The third chamber purifies water to almost one hundred percent.
Where can purified water be disposed of:
1. into the nearest river, into the ground, is considered the simplest option, but there is a risk of harming the environment.
2. into the infiltrator, which is considered a post-treatment system using soil, then the water is transported along with groundwater.
3. into a storage tank from which water cannot be disposed of naturally.
When creating an autonomous sewer system, do not forget about creating a stormwater system to remove excess moisture from rain and melting snow from the building and the site.
The principle of arranging sewerage in a private house.
Before starting installation work, you should create a project for laying all sewerage elements. The scheme should be simple and effective, minimizing the negative aspects of operation.
When choosing a scheme, you should rely on general rules:
1. taking into account the location of the residential building on the site; sewer pipes must be laid at an angle and the system must end not far from the road.- 2. relief conditions on the site, that is, where it is located on a slope or lowland, it can be flat.
- 3. soil characteristics, that is, soil looseness. For a sandy area, any type of sewage system is suitable; for clay soils, certain features of liquid absorption will have to be taken into account.
- 4. the volume of septic tanks and storage tanks, the diameter of the pipes used depends on the number of permanent residents, as well as the area of the building.
Important! The norm is considered to be the consumption of two hundred liters per day, calculated to maintain hygiene, the volume of water consumed by the washing machine and dishwasher.
5.calculate the average value of soil freezing depth for a given region and the groundwater level. These values are important when calculating the installation depth of the system and choosing the type of insulation materials.
These conditions may change the pipe laying plan, but the main features and elements will remain the same.
Important! Under any conditions of sewer installation, the connection of the bathroom to a riser located vertically remains unchanged in order to prevent the penetration of gases and odors from the pipes.
The area of the site dictates the possibilities for the location of sewer pipes in accordance with GOST. The distance from the septic tank or well must comply with the prescribed standards. If it is not possible to comply with these requirements, it is worth considering the option of a sealed storage tank or a station with biological treatment.
Important! If the dacha plot is limited to a small area and is equipped with a well with clean water, then the waste water should be separated: to dispose of household wastewater, drain it through sewer pipes into a septic tank, and install a bio-toilet to process fecal matter.
If the groundwater level in the area is high, and there is a risk of flooding wells and settling tanks, then this will likely lead to contamination of surrounding soils and the spread of stench.
During flooding, the septic tank may move from its place, this will destroy the street sewer network.
How to prevent your septic tank from flooding:
1. construction of a sealed septic tank that does not allow moisture to enter.
2.strengthen the septic tank with anchoring.
3. arrange drainage to facilitate the removal of groundwater.
4. if the soil has poor absorbent properties, then it is worth taking care of a post-treatment system, or installing forced pumping.
Pipes should be laid below the layer in which the soil freezes; if this is not possible, then the structural elements must be insulated or an electric cable must be laid in them to heat the system.
DIY installation methods
The use of plastic products - pipes, septic tanks, drainage structures and trays - greatly facilitates independent installation of highways. The hardest work is digging a pit for a sump. Lightweight lines can be assembled and laid yourself. When using heavy concrete rings, you will have to invite equipment and assistants.
Popular ways to make a sewer system for a private home:
- highway made of plastic, septic tank made of concrete rings;
- All elements of external wiring and septic tank are made of plastic.
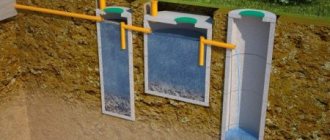
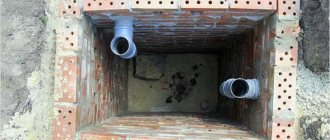
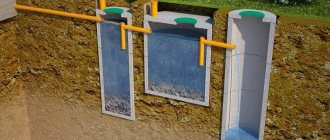
Concrete is a durable material that will last a long time. If desired, you can make two compartments connected by a pipe. Large particles will settle in the first one; if it overflows, dirty water will flow into the next septic tank. Usually the first one is made with a closed bottom so as not to pollute the site and groundwater with waste, the second one has a drainage pad made of gravel or sand. The type of soil should be taken into account here. Clay does not absorb water well and dirty liquid may overflow into the garden or flower bed. The presence of a layer of sand makes it easier to choose a septic tank design - it can be made with an open bottom. Some craftsmen route perforated pipes underground from the second tank in different directions to increase the area of the filtration fields.
Drainage and stormwater systems are combined or made separately. If the average annual precipitation is low, but the groundwater level is high, they can be combined and sent to a separate septic tank. If there is a lot of rain and snow all year round, it is better to make both highways separately. Since lightweight materials are used during installation, installing them yourself will not be difficult. It is also important to observe the slope of the wiring in the direction of the septic tank so that the liquid does not stagnate in the pipes.
Installation of roof drainage trays
So, the entire installation is done from top to bottom (see video). This is a strict rule that guarantees the quality of the final result. It is necessary first of all to determine the angle of inclination of the tray structure. What is 2% incline? This is a difference of one edge of the line relative to the other by 2 mm, taking into account one meter of the length of this line. So, in a drainage system, the edge of the line at the funnel will be the bottom. And if two risers are located at the edges of the roof, then the middle of the length of the eaves will be the highest point in the line of installation of the trays.
Therefore, we select the middle of the cornice and mark on it the point where the first bracket will be mounted. It should be installed so that the upper edge of the tray laid on it does not reach the edge of the roofing material by 2.5-3.0 cm. This will ensure water drainage without splashing or overflowing.
Now a self-tapping screw is screwed into this point, to which a fishing line or strong thread is tied. Its free end will be connected to the edge of the roof, where the drainage drain pipe will be installed. We know the length of the thread equal to half the length of the cornice. For example, it will be equal to 10 m. That is, the line difference should be: 10x2 = 20 mm. This means that the thread of the pipe should be lower than that of the twisted screw. The brackets will have to be installed along this line. Trays are also laid on them.
Attention! Often one outer tray does not fit in length. It is usually trimmed, for which only a hacksaw is used. The cut edge must be processed with a file to prevent burrs.
Calculation of required materials
Let's start with the fact that in any hardware store today you can purchase a ready-made drainage system made of metal sheets or plastic. The metal structure is usually galvanically painted, which guarantees long service life in the open air in rather harsh conditions.
So, what drainage elements will be needed.
- Trays or gutters with a standard length of 3 m.
- Pipes for vertical drainage of rain or melt water. Their length: 3 or 4 meters.
- Knee.
- Funnels.
- Brackets for fastening trays.
- Clamps for fastening pipes.
- In addition, silicone sealant is used to seal the joints of roof drainage elements.
Tools for installing a drainage structure will require:
- A hacksaw (cutting metal or plastic with other tools, especially electric ones, is not recommended).
- Roulette.
- Screwdriver.
- Plumb.
How to correctly determine the number of trays needed. Let's look at this using the example of the simplest roof - a gable roof. Gutters are installed under the eaves, so you need to measure the length of one of them. We divide the size by the length of the tray, that is, by three meters. We get a number that is rounded, usually up. Please note that the trays themselves are installed at an angle of 2-5% and are inserted with their edges into each other to ensure the tightness of the tray structure. This results in an overlap connection. The overlap indicator itself is within 5-10 cm. And this must be taken into account when calculating the number of gutters. Now the resulting number is multiplied by two, because there are two stingrays in the house.
You can calculate the correct pipes for vertical water drainage in exactly the same way. But there is one small nuance here that needs to be taken into account. Everything will depend on the area of the slope, and, accordingly, on the volume of water that will collect on the slope. It is the volume of passing water that will affect the permeability of the pipe, so the larger the volume, the larger the diameter of the installed pipe. By the way, this also applies to trays. That's why:
- If the area of the slope does not exceed 50 m², then a pipe with a diameter of 75 mm and trays with a width of 100 mm can be installed in the drain.
- Accordingly, the area is 50-100 m², the pipe is 87, the tray is 125.
- Above 100 m²: pipe – 100-120, tray – 190.
If the eaves of the house are long enough, then you can install several outlet risers. In principle, there is no such calculation in the rules, but in order to relieve the roof from precipitation, sometimes you have to approach this problem in exactly this way.
Now, as for the standard number of risers. They are usually installed in the corners of the building. And since a gable roof has four corners, there will be four risers. Accordingly, there will be four funnels. But the number of pipes used, for example, 3 m long, will need to be calculated. Why measure the height from the ground to the cornice, multiply this by four (four risers) and divide by 3 m.
Attention! The vertical drain riser should not reach the surface of the blind area by 25 cm. Almost four risers equal one meter. It will need to be subtracted from the resulting total length of the risers.
Now the required number of brackets for the trays. It couldn't be easier here; brackets are installed every half meter. The number of clamps is at each junction of two pipes. But with the knees it’s a little more difficult. Look at the photo above, it shows how to install knees on different roof designs. From here the exact calculation will be carried out.
Where to start working with engineering systems
It is recommended to start designing at the initial stage, when you can calculate the networks and think through their wiring. But this situation is not always possible - people often buy ready-made houses that require updating or supplementing the existing system.
The preparatory stage consists of the following steps:
- ordering a project from a licensed company;
- visit of a specialist to the site, drawing up a preliminary estimate and its coordination with the customer;
- purchasing materials, performing installation work and connections;
- delivery of the object.
During the design, such nuances as the area and number of floors of the house, the number of residents, the availability of water and energy-consuming equipment will be taken into account. A preliminary design is drawn up, which is agreed with the customer and serves as the basis for drawing up technical specifications and estimates.
Water pipes
What has changed today in the design of the water supply system, besides its main function? As in the case of sewer systems, new devices and materials have appeared in water supply systems:
- durable polypropylene and copper pipes, practically resistant to corrosion;
- leakage sensors, allowing the owner of a country house to forget forever about possible problems with depressurization of the water supply system;
- all kinds of “smart” pumps for wells and wells, capable of independently adjusting the parameters of water supply to the system;
water treatment systems and much more.
Installation of roof drainage pipes
The simplest option is if the pipe from the tray is installed vertically without bends. Simply, the edge of the tray is inserted into the funnel (see photo below), which itself is installed using a socket method into the pipe. The most important thing in this process is the verticality of the structure, so a plumb line is required for alignment.
But such an opportunity does not always occur. Something will definitely get in the way, so elbows are added to the riser design. As already shown in the photo, there may be several of them.
The installation of drain pipes itself is a simple process (see video). To secure them, special clamps are used, which come with the drainage system. Manufacturers today offer many of their shapes and designs. There are clamps that are attached directly to the wall of the house, and there are options with extensions in case the riser is located a little further from the surface of the wall. But in any case, this is a reliable mount.
As mentioned above, the installation location of the clamps is next to the connecting joint of two pipes (see video). You can also install a third element in the middle of each pipe. Typically, this option is used only if four-meter pipes made of metal are selected.
Attention! If storm drainage was installed on the site where the house was built, then the lower edges of the drainpipes must be led into water inlets.
As you can see, making a gutter for the roof of your own house with your own hands is not so difficult. It is clear that not all points can be taken into account when performing installation, especially if the work is being done for the first time. Therefore, we suggest watching a video in which everything is laid out on the shelves.
Sewerage of a country house
Sewage systems belong to the category of centralized communications, the design of which has not undergone major changes over the past decades. But there are still certain shifts in their development, and they relate to the introduction into the design of modern materials and devices that are responsible for the more efficient functioning of individual modules and systems as a whole.
Particular attention is paid to the materials that sewer lines are made of: polypropylene and PVC - they increase the durability of sewer systems and significantly reduce the cost of their installation.
Also, when discussing modern sewer systems, it should be noted that the introduction of elements such as aerators for septic tanks into their composition can significantly reduce the cost of sewer services and get rid of the unpleasant odor that occurs in an anaerobic sump.