The accumulation of melt or sediment water on the site leads to many unpleasant consequences. To solve this problem, drainage structures are used, the functionality of which is especially important for clay soil that does not conduct moisture well. Read below for a step-by-step guide to installing a drainage system with your own hands.
- 2 Drainage system
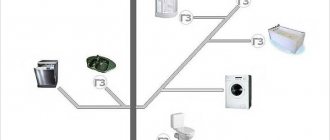
2.1 Drainage diagram
- 3.1 Deep drainage: step-by-step instructions
- 4.1 Video: how to make a storm drain
Features of clayey areas
Plants suffer from excess moisture first of all. Their roots do not receive the amount of oxygen necessary for development. The result is disastrous - the plants first wither and then disappear altogether. Moreover, this applies to both cultivated plants and lawn grasses. Even in cases where the clay is covered on top with a layer of fertile soil, water drainage will be difficult.
The comfort of working on the site is also important, because in the absence of drainage, even a little rain can turn clay soil into a swamp. It will be impossible to work on such land for several days.
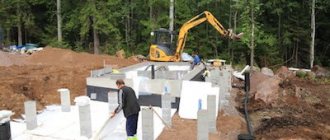
When the water does not drain for a long time, there is a risk of the foundation flooding and freezing when cold weather sets in. Even very good waterproofing is sometimes unable to protect the foundation from destruction, since it itself can be destroyed by frozen moisture.
Advantages of having a drainage system on site
We conclude: drainage of the site from groundwater is simply necessary. And if it has not yet been done, then there is no need to delay its construction.
Where does site drainage begin?
This event seems difficult only at first glance. In fact, you can do it yourself. To do this, you need to carefully think through and plan your actions, calculate materials, forces, and proceed confidently.
You need to have a system diagram. It will be useful not only for step-by-step work. Subsequently, you can always determine where the pipes run, the main connections and the well are located, the distance from the foundation and at what depth you need to look for the pipe. Over time, data is forgotten, so it would be useful to record everything on paper. You can make a plan schematically, but accurately express in numbers the depth, width, length, distance to the main objects.
Preparing for the construction of a drainage system
Before choosing the type of drainage system, you should analyze your site.
Attention is drawn to the following points:
- Soil structure. In our case, we consider clay that is not capable of quickly passing water;
- Source of increased moisture. This may be frequent precipitation or groundwater lying close to the surface;
- The type of drainage is selected or several types are combined;
- A plan for the location of drainage trenches, inspection and drainage wells is drawn up. The plan indicates the depth of the drains, the dimensions of all elements of the system, and their slope relative to the soil surface. The plan will allow you to quickly find the location of all elements of the system.
Layout of the elements of the drainage system on the site
After such preparation, they begin to build the drainage of the site with their own hands on clay soils. Let's consider what kind of drainage there is, and which one is better suited for a clay area.
Why is clay soil dangerous?
When starting to create a drainage system with your own hands, there is no need to rush to buy materials and dig
trenches. Initially, you need to determine the type of soil and make hydrodynamic calculations. It is the composition of the soil that will determine the future design of the drainage system. For example, everyone knows that building a house on black soil or sandy soil is much easier, since this type of soil absorbs and removes moisture very quickly. But owners of plots with clay soil will have to make a lot of effort to drain it. Clay can retain moisture for a very long time, and this property poses a great danger both to all buildings located in a given area and to the plants growing around it.
Wet clay can not only cause discomfort to the inhabitants of a given area, but also cause significant damage to all structures and outbuildings. Wet clay soil is especially dangerous in winter. Freezing to the very depths, it can destroy the foundation of a house, destroy garden trees and even disrupt the water supply system. And then puddles, sticky dirt and slush will seem like a minor nuisance compared to more serious problems.
Plants on the site will also suffer from clay soil. During prolonged rains, such soil immediately turns into a swamp. And after drying, it becomes hard and cannot be loosened. A continuous crust forms on its surface, which completely disrupts air exchange in the soil. As a result, all trees, flowers and other plants, not receiving enough oxygen, stop growing and begin to die.
Types of drainage systems
Drainage in a clayey area can be surface, deep or reservoir. Sometimes it is advisable to combine several of these types to achieve the greatest drainage efficiency.
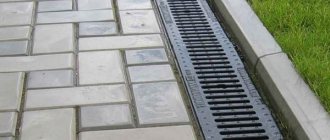
Surface drainage
If the site has even a slight natural slope, this creates additional benefits for surface drainage. The water flows on its own through channels laid on the site to a designated place. Such channels are located on the surface of the soil, slightly deepening them into the ground. Surface drainage of a site on clay soils can be laid on almost any level places: along paths, around buildings, along the perimeter of lawns, near recreation areas and in other places.
An example of a surface drainage device from drainage trays
Water flowing down concrete or plastic gutters is collected in drainage wells, from where it is used for its intended purpose or discharged to a disposal site.
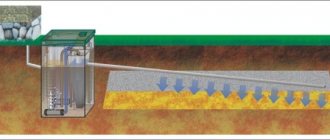
Deep drainage
When it is necessary to remove significant volumes of water from the soil, deep drainage is installed in clay soils. This is an underground system of canals and pipelines located in them, through which water flows and accumulates in wells. The system consists of one or several main (main) channels having a depth of about 1.2 m and a width of about 50 cm with drainage pipes laid in them. The direction of the main channels is towards the drainage basin. Water is discharged into these canals from auxiliary canals, which collect water from the entire site. They have less depth and width. The number of additional channels should be such that the areas with the greatest stagnation of water are covered.
Deep drainage device
Tip: The more clay there is in the soil, the more drainage lines will need to be laid.
The distance between drains on this type of soil is a maximum of 11 meters.
Recommended distance between drainage pipes depending on soil type and trench depth
Formative drainage
This is a unique type of deep system, since all drainage elements are located at a considerable depth. Reservoir drainage is used in cases where it is necessary to divert water constantly flowing to the foundation of a building. Reservoir drainage is installed under the foundation itself, placing it deeper than the lowest point of the foundation . The system consists of a layer of crushed stone through which water flows into drainage pipes located around the perimeter. The dimensions of the reservoir system always exceed the dimensions of the structure.
Scheme of formation drainage device
Water drainage plan from the foundation and choice of option
First of all, you need to drain the water from the foundation. To do this, we draw up a plan. The first thing to do is to study the territory and find holes and ditches where water could be drained. If they are not there, you will need to prepare a water intake well.
After this, we decide on the type of water drainage system. When choosing, we take into account the area, frequency of precipitation, and our financial viability.
If the situation is not critical, drainage can be surface, but if the water hardly leaves at all, a buried option is needed. For the surface, shallow trenches and trays with grid covers provided for this are sufficient, but the second option involves deeper trenches lined with geotextiles, with a layer of crushed stone and laid drainage pipes (drains).
On heavy soils, use a combination of both options. Melt water will flow into the trays, after which the second part of the system will drain the water to a safe place. This will allow the owners to feel comfortable immediately after precipitation or melting, and not wait until the water seeps through and gets into the pipes.
Recessed drainage consists of the main main pipeline in the center or along the perimeter of the site, and perforated pipes connected to it. If you place the main in the center, the pipes are connected to it in a herringbone pattern.
Tools and materials
We list the tools that may be needed in order to carry out drainage in clay:
- Shovels for digging trenches.
- Construction level for creating a slope in trenches.
- Wheelbarrow for transporting materials and removing excavated soil.
- Cutting and drilling tools for plastic pipes.
- Marking cord.
For work you will need the following materials:
- Geotextiles necessary for filtering water entering the drainage system.
- Crushed stone and sand to create a cushion and sprinkling.
- Concrete or plastic channels for surface drainage, storm water inlets, sand traps, and cement.
- Perforated plastic pipes with diameters of 100-110 mm for the construction of deep drainage.
- Connecting elements for joining pipes.
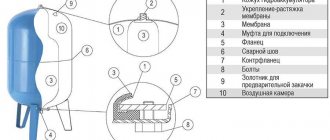
- Ready-made drainage wells or elements for their assembly.
Why is a drainage well needed on the site?
For many owners of suburban areas, groundwater is a problem. Located close to the surface, they pose a danger to foundations, basements and cellars, destroying them or preventing them from being fully used.
It is necessary to distinguish:
- a permanent groundwater horizon, which you should take for granted, since you can’t do anything with it;
- perched water, which is formed from precipitation or melting snow. It is possible to minimize its harmful effects with your own hands, quickly and without special financial costs.
But to solve the problem, you need to figure out where the high water comes from in order to develop a mechanism for saving you from it. Without knowledge about the nature of the soil and its features in your area, this is virtually impossible to do.
Soil structure
In most cases, it is heterogeneous, where in turn there are more or less permeable layers. The former include sandy soils called sandy loam, and the latter include clay or loam.
Water enters the ground from above, when snow melts or rainfall occurs. In most cases, the topmost layer is permeable, so moisture quickly rushes down until it meets the first waterproof layer.
Then it begins to accumulate in “lenses” or underground “lakes”. It is not uncommon that such reserves are so enormous that they begin to be mistaken for permanent groundwater, and boreholes and wells are constructed.
But much more often only a couple of cubes or many liters of water accumulate here. They slowly pass even lower and are distributed over the lower permeable layers of soil. Flowing from one impermeable layer to another, water from the surface ends up in permanent groundwater.
What can you expect
If you have sandy soils on your site, you will begin to experience the effects of high water 1-2 months a year, at a time when the snow begins to melt intensively or heavy rainfall begins to fall. But even during this period, water will cause a lot of trouble, washing away the foundation or flooding the basement.
While the soil in the area is mostly waterproof and contains a lot of clay, high water causes problems all year round, despite the cold winter period. Water saturates the soil to such an extent that it becomes very heaving (moisture expands by 9% when freezing), making construction very difficult.
What to do
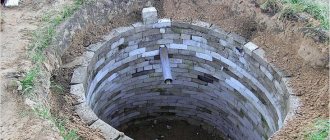
To reduce your life outside the city and get rid of high water, go do drainage work. They will provide a chance to take her to a certain place, guaranteed and quickly. Much more often drainage wells are used for this purpose.
Having drilled through the water-resistant layers, we will open a swift and direct path for the perennial water to the very bottom. Drilling to water, as many people think, is a mistake. The aquifer is a source of clean drinking water, and adding unfiltered liquid from the surface to it means deliberately destroying its quality level.
And also, if now everyone is trying to use water from a well through a filter, there is no need to complicate the situation. Based on this, drilling a drainage well must be carried out to the minimum required depth.
Agree, in addition, if you “pierce” 1-2 waterproof layers, you will get entire horizons for use, which you are ready to accept high water. It is necessary to understand that the main trouble is precisely the uppermost layers of soil, and often it is enough to drill only them in order to remove high water from the site.
Experts are confident that a hydraulic cone with opening angles of 45? is obtained along the perimeter of the drainage well. from the vertical axis. Based on this, the closer to the well, the better it drains the soil. But this is all quite conditional, due to the fact that the structure of the soil, the location of water-resistant layers and other factors are included in the matter.
But, as a starting point for calculating the number of drainage wells needed on the site, their frequency, placement and depth, this parameter fully suits everyone. It doesn’t matter what diameter the well has, for example, 100 mm or 150 mm will provide enormous drainage, especially if there are a large number of them.
Device
To make a drainage well, you need to prepare available materials, the price of which is fully affordable for everyone:
- expanded clay or washed large crushed stone;
- a small amount of polypropylene fabric, it is quite often used for the manufacture of garbage bags, or non-woven material such as “Spunbond”, “Agril”, fiberglass; stapler with staples;
- a narrow wooden strip the size of the well depth.
It probably goes without saying that you should use a special drainage pipe, even a homemade one. Despite the fact that this will raise the price of the work, it will significantly facilitate it.
Below are the instructions:
- Drill a hole with a drill, the depth of which must first be determined by the soil structure and needs. In some areas, 3-4 m is enough, despite the fact that in most cases the waterproof layers end at 12 m. In this case, it is necessary to ensure rapid access to permeable layers, which can absorb a lot of water and distribute it.
- Make a “stocking” out of fabric, so you can protect the well from being covered with sand and rapid siltation. It can be made using a sewing machine, if anyone can use it, or you can “shoot” it with a stapler to a wooden strip, leaving a diameter slightly larger than the drilled hole. It’s okay that the tree will rot in the well over time. It is needed only at the initial stage in order to give the “stocking” the desired shape before filling it with crushed stone.
Advice: do not cover the solid drainage pipe with anything.
Crushed stone allows the well to maintain its shape and acts as a kind of casing pipe. Its water permeability is complete, meaning its structure, water flows through it instantly, so you won’t need a drainage pump for a well. Carefully fill the well to the very top with washed crushed stone.
- Cover the hole with a waterproof cover, often just PVC film, and fill it with a small layer of soil. The structure will not be visible, but will do its job for many years, draining melt and rain groundwater down. This will make it possible to protect the foundation and basements from destruction.
Advice: if you have solid clay on your site, and it is difficult to drill, and water is close, you still need to drill at least one well in order to drain the soil in the area.
Conclusion
The creation of drainage wells on the site will relieve their owners from periodic or constant high water, water that accumulates on the surface of the soil. It’s not difficult to make them yourself, and they don’t require any special financial expenses. In the video presented in this article you will find additional information on this topic.
Drainage device
Let's look at how to drain a site on different types of clay soil.
Surface drainage
A simpler device has an open backfill type of drainage:
- According to the existing plan, shallow trenches are dug and carefully compacted. The slope of the trenches towards the drainage basins is maintained. If you are lucky and the site has a natural slope, then the depth of the trenches may be the same. The depth of the trenches reaches 80 cm, and their width is 40 cm.
- A sand cushion is formed in the trenches, on top of which a layer of crushed stone is poured. Since the drainage device on clay soil will be open, crushed stone is poured to the soil level or space is left for laying a layer of turf on top. The system is operated in this form.
Tip: To make open channels more aesthetically pleasing, it is recommended to cover them with decorative stones, pebbles, and decorate them in other ways. You can form a dry stream from them by planting perennial flowers along the edges of the channels.
Tray type drainage is formed as follows:
Installation of plastic drainage trays
- Trenches are dug as in the previous version, but not as deep.
- Concrete mortar is poured onto the crushed stone layer, onto which plastic or concrete gutters are immediately installed. Concrete secures the trenches, preventing the earthen walls from collapsing. Sand traps (usually at the end of a line of trays) and storm water inlets (under drainpipes) are installed in a similar way.
- The gutters are covered with protective grilles.
Scheme of laying drainage gutters with sand traps
Deep drainage
This is a better drainage system, the manufacture of which will require a lot of time and effort.
- A collector well is installed in the designated place.
- Main and auxiliary trenches about 50 cm wide are dug. The average drainage depth on clay is about 120 cm in the main channels and about 100 cm in additional channels. The main lines must extend to the catch basin. The slope of the auxiliary trenches is ensured at 5 cm per meter of their length.
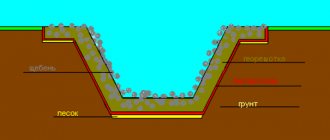
- A sand cushion is poured into the bottom of the dug trenches and geotextiles are laid on it, the edges of which are wrapped on the walls of the trenches.
- Crushed stone with a thickness of at least 20 cm is laid on top of the geotextile.
Preparing the trench for laying drains - Perforated pipes are laid with mandatory slope checking.
- The pipes are joined together using socket or coupling joints.
- Inspection wells are installed in places where pipes turn, as well as every 25 m on straight sections. These can be pieces of large diameter pipe or specially manufactured products. Their height should be such that they rise above the soil level. Through these wells, the cleanliness of the pipelines will be monitored, as well as their periodic cleaning.
Drainage inspection well - Crushed stone is again poured on top of the pipes. It should completely cover the pipes.
- Geotextiles are wrapped so that the crushed stone along with the pipes is in its cocoon. A filter for drainage is provided.
- The remaining space in the trenches is filled with sand.
- The last layer is soil, which is used to level the trenches to the soil level.
Scheme of laying drainage pipes in a trench
If you want to learn more about reinforced concrete drainage trays, their characteristics and installation features, then you will find this information in a separate article on our website.
For the installation of drainage systems, geotextiles are often included in the list of required materials—read what it is and how it is used in another article.
Tips for organizing a sewer system in a bathhouse are here.
Carrying out work
The design of a system for drainage water includes several important steps:
A plan is drawn up according to which markings are made on the site . The depth of the trenches is determined by the freezing point of the soil in a particular region. But at the same time, pipes are not laid below the foundation level of nearby buildings. The drainage pipeline is laid 50 centimeters above the lower level of the foundation. According to technical standards, the following construction rules are also adhered to:
- at least 50 cm to the fence;
- and one meter to the foundation of buildings.
Excavation is in progress . If the landscape is flat, at this stage the natural slope of the highway and side ditches is developed.
A sand cushion is constructed . It must be compacted and covered with crushed stone or expanded clay. The slope is 70 mm for every meter of pipe!
Pipes are being laid . The connection is made using tees or crosses. The best are considered to be perforated polymer pipes already wrapped in geotextile fabric. Asbestos-cement pipes are used less frequently due to possible environmental damage.
Backfilling is in progress . If pipes without geofabric were used, it is laid out on the pipeline. Ready-made polymer pipes do not require additional winding. Crushed stone, a layer of sand and soil are placed on the pipes (use previously dug soil).
Many experts advise not to fill the soil, but to test the system. To do this, you can wait for the next rainstorm or forcefully flood the area with water from a hose. If the water drains quickly, the drainage was completed without errors. Slow outflow requires the installation of additional side ditches.
Backfilling with soil is carried out with the formation of a tubercle in the center - this is a reserve for soil shrinkage. Over time, it will settle and the surface will become smooth.
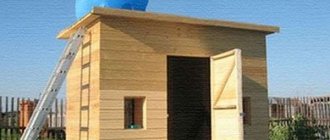
If it is not possible to drain moisture into a natural reservoir or let it flow by gravity, it is necessary to build a well from concrete rings or a special plastic container. At the top of the sump there is a signal pipe to remove excess liquid or a drainage pump.