To wash things, you need to connect the washing machine to the water supply and sewerage system; the drainage must be carried out correctly, be it in the bathroom or in the kitchen. In this regard, the location of the unit should be chosen where all systems are located nearby.
Leading engineer for sewerage and water supply - Sergey Krushev (Moscow “Specialist Advice”)
This could be a toilet, bathroom or food preparation room. Please understand that some minor modifications will be required. In general, connecting a washing machine is not such a difficult task; connecting all systems can be done independently.
Given
First, let's formulate the terms of reference as clearly as possible:
- Modern washing machines are connected only to cold water supply. The water is heated to the required temperature by its own heating element;
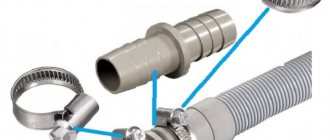
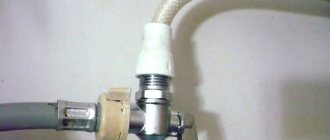
- The thread diameter of the inlet hose is DN 20. To connect it, you will need an external thread of the same size;
The photo shows the inlet hose. The size of the attached threads is 3/4 inch, or DN 20
- A hermetically sealed solenoid valve is responsible for drawing water from the water supply system. Accordingly, turning off the water with a separate tap is necessary (for example, in case of going on vacation - it will serve as additional insurance against flooding of neighbors), but the corresponding element of the shut-off valve will be used infrequently;
- The automatic machine is installed at a minimum distance from the water supply and sewage system. Its typical location is a bathroom (or a combined bathroom), a kitchen, or a storage room located near the bathroom.
Leveling the washing machine
The device is installed in a certain sequence. Correctly aligned legs play a role in the alignment process. There are models on sale in which only two of them are regulated, and there are models in which all four are regulated.
Before installing the machine, you need to check the floor surface for a horizontal line; only after making sure that the surface is absolutely flat can you begin installing the equipment.
For a safe washing process, the machine must be level. Not everyone knows how to install a washing machine correctly, especially if the surface on which the machine is installed is uneven.
To ensure a level surface, a building level is used when installing the machine. If there are significant differences, hills or, on the contrary, holes at the installation site, it will not be possible to install the machine levelly. The floor surface must first be leveled.
After leveling the floor, the machine must be connected to the water supply and sewerage system, so that after the final installation, the equipment will no longer be moved from its place. Using a wrench, unscrew the locknut on the legs.
Next, the machine is installed in a permanent place and the surface of the machine is leveled using a building level. Focusing on the level, adjusting the legs achieves a flat surface.
Installing and leveling the washing machine
The corner of the washing equipment rises when the corresponding leg is unscrewed, therefore, by twisting it in the opposite direction, the corner lowers. It is necessary to control the level in several zones.
The level is placed on the top cover of the machine, first along, and then across and diagonally. All indicators should point to zero, or the control bubble in the level should be located strictly in the middle.
Despite the fact that the level shows zero on the horizontal surface of the machine, it is necessary to check that the vertical sides also correspond to the level.
After all the legs are set to the desired length, their surfaces remain equal relative to the level, the nuts are fixed to maintain the selected position.
Important! The machine periodically vibrates when washing, which causes imperceptible movement. As a result, re-alignment will be necessary after some time.
Leveling a washing machine is not only an aesthetically external necessity, but also a characteristic, if not observed, it is pointless to expect high-quality work from the machine.
An uneven position will lead to displacement of the drum, especially when there is heavy laundry inside, which in turn will lead to an uneven position relative to the axis. As a result of an unstable position, the machine may move during the washing process and vibrate strongly.
Rubber pads to reduce vibration
Vibration and movement during washing will contribute to rapid wear of the fixing and other elements inside the device.
Special rubber pads can not only reduce vibration, but also create additional shock absorption and also fix the machine in place.
Helpful advice! After installation is complete, you need to check the machine by loading a small amount of laundry and set a short-term program, preferably “spin”. It is during intensive spinning of the drum that the machine shows how level the device is installed.
- If during the spinning process the machine remains in place and there is no visible vibration, then it is installed in compliance with all the rules.
- When spinning, the machine vibrates, rattles or moves; additional position adjustment is necessary.
- If anti-vibration pads are not used, it is worth purchasing them and installing them under the legs.
It is better to choose a level length of approximately 40 cm, with a bubble, and not electronic or laser. This type of level is more suitable for leveling small surfaces.
If you don’t have it at hand, you can replace it with a plastic container into which water with dye is poured, and on the outside, at the level of the edge of the water, a strictly horizontal line is applied, which will serve as a control point. If, after adjusting at a homemade level, the strip and the liquid level clearly coincide, and the device is stable and does not wobble, then the machine is installed correctly.
Reference! This technique is installed taking into account small gaps from the wall or furniture.
Can you see everyone?
Here is a brief description of all the connection diagrams that we are going to introduce the reader to:
| Image | Description |
| The water tap is installed between the cams (eccentrics) and the corners or water sockets under the faucet in the bathroom. For hot water, a chrome extension is mounted, the same length as the faucet. The advantage of the scheme is the convenient and accessible location of the tap, the disadvantage is that the mixer extends 8-10 cm from the wall. |
| The tap is screwed into the thread on the rigid cold water supply in front of the flexible hose, which is responsible for connecting the on-board faucet or toilet flush cistern. The union nut of the flexible connection is connected to the external thread of the faucet. Advantages: the tap solves the problem of sealing a flexible connection with an uneven edge of a steel thread; The connection node is in most cases hidden from the view of the visitor to the room and does not spoil its design. Disadvantage: inconvenient access to the tap |
| The connection is made with clamps to a smooth steel pipe at any convenient water supply point in the apartment or even directly to the riser to the valve at the entrance to the apartment. Advantage: arbitrary location of the tap, not tied to a threaded connection. Disadvantage: violation of the integrity of the water supply system. After turning off the washing machine, the clamps will remain on the pipes. |
Non-standard options
Installation of built-in equipment
A built-in washing machine is a great space saver in an apartment or house. You can build a cabinet for the washing machine, place it in a closet, on a shelf, mount it in a wall and other places. Only such creative ideas should be carefully thought out to avoid trouble.
In a private house
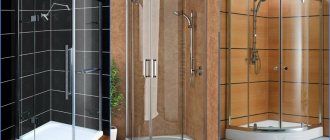
The classic installation option is the bathroom. All the necessary communications are present here, and it will be convenient to use the machine here. The only risk is increased humidity in the room, which in the future may affect the performance of the equipment.
In a private house there are many unusual ideas for installing a washing machine: in a closet, under the stairs, in a closet, in any buildings located in the courtyard of the house, etc. Only here can a problem arise with communications, water and electricity.
In the kitchen or hallway
If there is not enough space in the most common places, then the equipment can be installed in the kitchen or in the hallway. But it’s unlikely that anyone in the corridor will have the required communications. You will have to bring everything to the installation site, and this will significantly complicate and increase the cost of the process. But it will fit quite comfortably in the kitchen. Most often it is mounted next to the sink or in a built-in kitchen unit. It is worth considering that the temperature and humidity of the kitchen will not always correspond to the operating rules of the device.
Above the toilet
For installation in a toilet, wall-mounted and narrow washing machines are best suited.
You should build a shelf that will be located above the toilet. And place it at such a level that it is convenient to use the toilet without hitting your head. In addition to the fact that the shelf needs to be very strong and reliable so that the unit does not fall on your head, it is also recommended to additionally make several slats.
Such installation will require a sophisticated method of supplying communications and a set of tools.
If there is no running water
In a private or country house, as well as in a country house, there may not be running water. No problem. The lack of a centralized water supply is not a problem, the main thing is that there is a well or other source of clean water. The equipment will work fully thanks to alternative installation methods. For example, using a volumetric water tank (from 500 liters), raised to a height of 1 to 5 meters, to create pressure when supplying water. A hose is connected to the bottom of the tank and goes to the machine. The connection process is not much different from usual.
Method 1: connection in front of the mixer
What do you need to connect the washing machine in front of the faucet in the bathroom with your own hands?
Materials
This:
- Connection tap (three-way, with 1/2" male and female threads and one 3/4" male thread). It is better to prefer a ball valve (rotating 90 degrees) with a long flag: it is more reliable than a screw valve and does not require significant effort to open/close. It is advisable that the external thread of size 1/2 ends with a flange: it will simplify the sealing of the threaded connection;
An ideal three-way valve in every way
- Chrome plated thread extension (1/2 inch male and female threaded pipe) with a length equal to the length of the faucet;
Chrome 1/2" Thread Extension
- The sealing material for threads is thread sealant or plumbing flax impregnated (for example, silicone sealant).
Reference: linen impregnated with silicone or organic solvent paint does not rot during prolonged contact with water and does not fade at high operating temperatures. To avoid getting your hands dirty when winding flax, apply a little sealant to the thread, apply three or four turns of winding and lubricate its surface with a thin layer of silicone. When tightening the thread, the winding will be evenly saturated throughout the entire volume.
Sealing a threaded connection: first apply sealant to the threads, then wrap flax
Installation
Here are step-by-step instructions for connecting:
- Close the cold water and hot water valves at the entrance to the apartment;
- Open the taps to make sure the valves are working properly and the water is completely turned off;
- Unscrew the union nuts of the mixer with an open-end or adjustable wrench and remove it;
- Unscrew the eccentrics from the corners or sockets;
The first stage is dismantling the mixer
Hint: to unscrew the eccentric, insert a sponge of pliers or any other suitable object into it. The eccentrics are equipped with an internal cut that allows them to be screwed in and out without damaging the decorative coating on the outer surface.
- Wind up the external threads of the faucet and extension and screw them into the corners or water sockets;
- Rewind and screw the eccentrics into the internal threads of the faucet and extension;
- Reinstall the faucet;
Tip: when installing, it is better to replace the old gaskets under the mixer union nuts with new ones. Rubber loses its elasticity over time due to liming, and the joints may leak after assembly.
The best gaskets are silicone. They combine elasticity with a long service life
- Turn on the water and make sure there are no leaks;
- Connect the washing machine with a standard inlet hose to the tap and start washing.
Method 2: connection before the flexible connection
This connection option is even simpler than the previous one. What does it need?
Materials
This:
- Faucet for washing machine . All requirements are the same as when installing it under a bathroom faucet, with the exception of the collar after the external thread: in this case it is not needed;
- Rewinding for threaded connections;
Easy to use and durable winding - Tangit Unilok thread
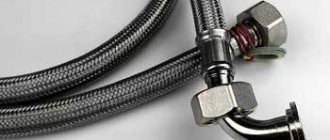
- Gasket for the union nut of the flexible hose or a new hose with the same length as the old one.
Reference: the trouble-free service life of flexible hoses in stainless steel braiding does not exceed 5 years. If the service life of the hoses is approaching five years, do not be lazy to replace them with new ones, without waiting for a break and flooding of the apartment.
The average service life of such eyeliner is 5 years. During this time, the rubber core loses its elasticity, so after dismantling and reinstallation the hose often leaks
Installation
Connecting the water supply to the washing machine is carried out in the following order:
- Turn off the cold water and make sure that it stops flowing to the site of the upcoming work;
- Unscrew the union nut of the flexible connection;
- Wind the thread underneath;
- Install a three-way valve;
- Replace the gasket under the union nut of the flexible hose or the entire hose;
- Connect the flexible connection and inlet hose of the washing machine;
- Turn on the water and check all pressure connections;
- Wash it.
Regular drainage system
This is the easiest way to connect any washing machine. The design of the SMA takes into account the height of the side of the plumbing fixture: 60–80 cm. The semicircular nozzle on the hose has a hole for fixing the bracket on the edge of the device using a chain to prevent the drain hose from falling to the floor. To discharge dirty water, use the following plumbing equipment:
- bath;
- toilet;
- basin or sink.
It is difficult to call this method a connection; it is usually used as a temporary one. If it is impossible to connect to the sewer system in any other way, the standard connection provided by the manufacturer of the washing machine is also used. The drain pump of the device has characteristics corresponding to the length of the hose.
Expert opinion
I work in the household appliance repair industry. Extensive experience in restoring washing machines and dishwashers.
Ask a Question
It must be taken into account that attempting to add a drainage hose more than 3 m will lead to damage to the pump. For craftsmen who are accustomed to doing everything thoroughly, other connection options are available.
Check valve
Method 3: connecting to a direct section of water supply
The last scenario is inserting a tap into a straight section of water supply.
Materials
Required:
- Clamp with internal thread size 1/2 inch (DN 15);
Brass clamps for inserting into steel water pipes
- Ball valve with male-female threads;
Ball valve with external and internal threads
- Adapter from DN 15 thread to DN 20 thread.
Captain Obvious suggests: the adapter must have two external threads. One is screwed into the ball valve, and the union nut of the inlet hose is screwed onto the second.
Brass Pipe Thread Adapter
- Sealing material for threads.
Installation
- Turn off the cold water;
- We drill a hole with a diameter of 8-10 mm in the HVS liner;
- We clean the surface of the pipe around the hole from paint and rust;
- Install and tighten the clamp;
Tip: if the clamp does not include a rubber gasket, cut it from an old car inner tube.
- We sequentially install the ball valve and adapter, tightening the threaded connections;
- We connect the machine with the inlet hose;
- We check connections under pressure.
A special case
What to do if for some reason you cannot turn off the water (the valve on the supply line is faulty, the tap needs to be embedded in the riser, etc.)? This scenario differs from the scenario described above only in the sequence of actions and a specific tool.
- Mount a clamp on the pipe that has been cleaned of paint and rust and install a ball valve on it;
To clean the pipe, it is most convenient to use a drill with a wire brush.
- Open the faucet and drill the pipe directly through its valve;
- As soon as the wall of the supply or riser is drilled, remove the drill and turn off the tap. Further actions are no different from those described above.
Scheme of tapping into a water supply system under pressure
Important: in this case, you can drill the pipe only with a hand tool - a hand drill or a brace. A water-filled electric drill combined with a puddle on the floor will turn into a type of portable electric chair.
For work under pressure, use only hand tools
About connection without using a siphon
Direct connection to the sewer is a simple process. The main thing is not to forget about compliance with height requirements and the use of a suitable tee. The diameter of the tees is at least 50 millimeters. Installation is carried out inside the socket, which is supplied with plastic sewer pipes.
Installation of tees on a plastic, polyethylene base is carried out as follows:
- We take out the old siphon.
- We insert adapters.
- We are installing the tee itself.
There should be no problems installing such systems in the bathroom. You just need to adhere to the following recommendations:
- We lower the hose into the tube.
- We carry out fixation.
- We connect the parts with maximum tightness.
Unpleasant odors from the sewer will penetrate into the room if sealing is not enough.
It’s not for nothing that the covers on the back are equipped with additional fasteners. This is done for hoses whose location is higher than the outlet. The correct position of the device and its parts ensures that there is no backwash of dirty water. If the cover does not have a corresponding fastening, then you need to bend it yourself so that the hose becomes like the letter S.
Casting involving contaminated water is more likely to occur with a straight hose. Then the laundry will suffer, even if it is washed well. The main thing is to ensure that the position of the hose is correct.
To improve sealing, it is recommended to choose high-quality conductors. The same steps described above will need to be performed when the hose is replaced with a new one. The back cover must be removed before the design is completely changed to an analogue one.
Sewerage
Water drainage can be arranged:
- In a rented apartment - in the sink or bathtub. The plumbing fixture will be unsuitable for use for its intended purpose for no more than an hour and a half a day. As a bonus, you will receive a guaranteed absence of sewer blockages: hot water with powder perfectly washes away fat from the walls of sewer pipes, which is the main cause of blockages;
Not easy, but very simple: the drain is directed into the kitchen sink
- If you have a plastic prefabricated sewer comb installed in your apartment (intra-apartment sewerage distribution) - into the tee installed in its gap. Preferably - oblique, with a drain directed in the direction of movement of the drains. In this case, a volley discharge of water (for example, from a bathtub) and its simultaneous drainage by a washing machine will not lead to overflowing of the pipes;
Connecting the drain to the oblique tee
- Owners of cast iron sewers should take a closer look at siphons for sinks with an outlet for connecting the drain hose.
Connecting the drain to the siphon
The general rule is that the connection of the drain hose to the sewer must be sealed. Sealing is carried out with standard rubber cuffs or any available material (adhesive tape, polyethylene foam, etc.). Through leaky connections, fumes from sewer drains and risers will enter your apartment, and they will not smell like roses.
Sealing the connection between the drain and the sewer with a rubber cuff
Preparing washing household appliances for installation
First of all, when the unit is delivered to the installation site, it needs to be unpacked. Usually the machine is packed in a cardboard box and secured with plastic tape. It needs to be cut and removed.
After this, the cardboard box is carefully removed and the foam pads are removed from the top and sides. Next, you need to lift the car and pull out the lower foam platform.
In this case, it is worth paying attention to its design - if there is no special boss in the middle on which the device drum rests in the transport position, then in this design it is manufactured and installed separately. You need to tilt it and remove this insert.
Please note that the cardboard packaging and foam pads must be retained for the duration of the warranty. If a situation arises in which you need to replace the machine due to its defect, this operation will not take place without packaging. These are the terms of the guarantee.
Inside the cardboard package there is an envelope or folder with technical documentation. It contains:
- A passport for the purchased washing machine indicating the personal unit number and other credentials. All entries in it must be certified by the store’s seal.
- A warranty card, which is certified by the store’s seal indicating the date of sale, since the countdown of the warranty period begins with it.
- Operating instructions, starting from the moment of unpacking, and instructions on the installation procedure.
You should strictly follow all the manufacturer's requirements, since failure to comply with any of them will result in a waiver of warranty obligations.
Watch the video
The packaging also contains the components of the purchased washing machine. Typically they include:
- Flexible filling hose equipped with plastic union nuts for connection to the machine and water supply;
- drain hose for removing used water after washing and spinning clothes;
- reduction – an intermediate part for connecting the drain hose to the sewer pipe;
- bracket for fixing the drain hose on the wall;
- wrench for removing transportation screws and adjusting the position of household appliances in space before turning them on;
- plugs installed on the holes for transportation screws after they are removed.
These are the main items of the sales kit, which may differ from model to model.
Removing shipping screws
This is a mandatory operation before connecting washing machines to water supply and sewerage. Their purpose is to secure the drum during transportation to prevent damage.
As noted above, a tool for removing bolts is included in the sales package.
Under no circumstances should the removed screws be thrown away; they will be useful if you need to transport the washing machine to a warranty workshop. The holes where the transport screws were must be closed with the covers included in the sales kit.
Placement options for washing household appliances
Household appliances of this kind are not purchased spontaneously; the purchase is preceded by careful analysis and preparation. First of all, this applies to the installation location.
The need to drain used water determines the location of washing machines as close as possible to the distribution of the sewer system.
Such points are located either in the bathroom or in the kitchen. There is also a water supply network there.
As for connecting to electricity, washing machines may require a separate power supply line from the input panel to the location where the outlet is installed.
Washing machine in the kitchen area
Installing a washing machine in the kitchen is common and relevant. This distribution is due to technical parameters that make it possible to simplify the connection without additional laying of water supply and drainage pipes.
Besides:
- more space than in the bathroom;
- less destructive moisture;
- in the kitchen it is easier to connect to the power supply;
- the ability to create a separate area for electrical appliances to make it easier to do everyday life and have everything “at your fingertips”;
- the surface of the washing machine can be used effectively, for example, it can be equipped with a place for an electric kettle and a microwave oven;
- The washing process will not interfere with water procedures.
Washing machine in the kitchen under the countertop
In addition to the advantages, there are also disadvantages. Washing involves the use of a number of chemicals that are harsh and can cause significant damage to the body. Therefore, all chemicals should be kept separately and away from food.
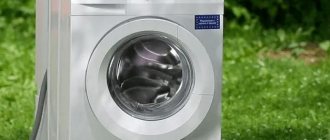
Installing a washing machine in the bathroom
Placing a washing machine in the bathroom is a classic option. Among the advantages of installation in this area are:
- in the bathroom, the floor often has enhanced waterproofing, which will avoid conflict with neighbors in the event of a water leak due to equipment breakdown;
- The close proximity to the bath allows, if necessary, to soak the laundry and easily transfer it to the washing machine or, conversely, remove it and wring it out manually.
- Chemicals and the accumulation of laundry waiting to be washed fit more harmoniously into the interior of the bathroom.
Washing machine in the bathroom
If there is no free space, you can plan installation under the sink or purchase a combined set, machine + sink.
In any case, the installation location is selected before the automatic assistant is purchased, and the washing machine model is selected to fit the dimensions of the installation location.