How to make an extruder for feed with your own hands
The life of a farmer is full of worries, as many people know. You can make hard work easier with the help of modern technology or machines. The feed extruder is designed for preparing pet food of different qualities and in different quantities. But not everyone can purchase it for the farm due to its significant cost. A do-it-yourself feed extruder will significantly reduce costs and provide you with an excellent household assistant. Is it possible to make such a unit with your own hands? Let's try to figure it out.
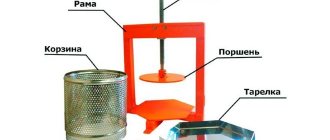
DIY clay extruders
To make a simple extruder for clay, you will need a regular plastic bottle of any shape.
Such extruders are called sculpting extruders. With their help you can work with a variety of clays and plasticine. These extruders allow you to make various parts and shapes. For example, you can make human hair or clearly draw grass.
The basis for this extruder is a simple transparent plastic bottle. It must be washed and dried well, and the lid too.
You need to remove the plate from the inside of the cover. This can be done with a needle or pin. Next, you need to make a hole in it from which the clay will be squeezed out. Its diameter should be the same as the thickness of the desired lines. This is done using a sharp knife. The edges of the hole are made smooth.
Next you need to take a metal disk to which you need to attach a handle in the shape of the letter “T”. The resulting extruder should look like a syringe. The plate must be made of durable material so that during operation it does not change its shape under pressure.
Return to contents
What is an extruder used for?
Using such a unit, you can process grain into animal feed with high digestibility. Any grain, even not the first freshness, can be processed in an extruder under pressure (no more than 60 atmospheres) and exposure to high temperatures (up to 1600 degrees). The output is products resembling rods or flagella with a diameter of about 3 centimeters . The power may vary depending on the desired quantity of the final product. A productivity of 20-40 kg/hour will be enough for a small farm, and for large farms - a device capable of processing 1-1.5 tons/hour.
Of course, you can prepare the food yourself, steam or boil the grain, adding different components to it. But its quality will be completely different, and animals will need more time to digest it. You need to spend a lot of time, production will produce a lot of waste. All these problems can be avoided by using a feed extruder.
Not everyone can afford to buy such a device, even if it has been used, due to its considerable cost. Many people use their imagination, ingenuity, and their own skillful hands - and creativity begins. Some craftsmen manage to assemble good examples of a household extruder with their own hands. Every owner can try to make one, the main thing is to familiarize yourself with the device and not be afraid to experiment .
Feed extruder - what kind of beast is it?
This is a unit for processing grain into easily digestible animal feed. Any grain, even slightly spoiled, is processed in an extruder under high pressure (up to 60 atmospheres) and high temperature (up to 1600). The output is a product in the form of a stick or flagellum with a diameter of up to 3 cm. The power of the unit varies, it all depends on the desired amount of the final product. For a small farm, a productivity of up to 20–40 kg/h is sufficient. A large farm will need a device that can produce up to 1.5 t/h.
You can prepare the food yourself by steaming or boiling the grain and adding different ingredients. The quality of the feed will be different, the animal will have to devote more effort to processing it. A lot of time is wasted; waste-free production cannot be achieved. An extruder will help avoid such problems.
Buying a machine, even a used one, is not always affordable for farmers. Many people use their imagination, ingenuity, their “golden hands”, and begin to create. Some craftsmen create good examples of a household feed extruder. You too can decide to do such an experiment with your own hands, having studied the unit inside and out according to the drawings or instructions.
How the unit works
The extruder is composed of the following elements:
- frame base to which the entire installation is attached;
- drive;
- bunkers for loading grain;
- dosing screw and drive to it;
- injection screw;
- cylinder;
- receiving chamber;
- cutting knife;
- control center/controller;
- engine;
- gearbox;
- cuffs;
- belt;
- washers;
- nuts;
- adjusting key.
The main work is performed by the pressing unit. It is assembled from a forcing screw, which is inserted inside the collection cylinder. Using a matrix with a cutting knife, the resulting mass takes the form of sticks or flagella.
The injection screw consists of three stages:
- entrance part;
- middle part;
- output screw;
- heating washers.
All components are mounted on a stud with a left-hand thread. The part is closed with a metal casing. The keys transmit rotation from the main shaft to the composite screw. The entire structure is attached to the supporting frame using powerful bolts. The case has a window with an attached tray.
Inside the housing itself there are several longitudinal grooves that move components along the axis of the screw. A pellet regulator is located near the exit. It includes:
- bow body;
- matrix (disk), which regulates the process with a handle;
- roller and knife, which are pressed to the matrix by a spring.
Rotate the shaft with the knife through the leash with the fingers.
The finished extrudates exit through the nose housing and the hole adjustment dial. The disk is fixed in one position with a bolt; when the position changes, the temperature and pressure level in the apparatus will change. A thermocouple placed on the housing allows you to monitor the temperature. It runs on electricity, but new models are appearing that run on liquid fuel. Warming up occurs gradually . At the first stage, while the extruder is heating up, cake or flour is loaded into it. The grain is fed only when the system is well heated; it breaks and turns into sticks only at high temperatures and strong pressure.
Feed extruder device
photo: Drawing of the extruder device
Let's study the principle of the design and operation of the device.
The extruder consists of the following parts:
- frame base on which the entire unit is fixed;
- drive unit;
- grain loading hopper;
- dosing screw; dosing screw drive;
- injection screw;
- cylinder;
- reception chamber;
- cutting knife;
- device control/control center;
- engine;
- gearbox
- cuff;
- belt;
- washer;
- screw;
- adjusting key.
Is it possible to make an extruder yourself?
You can do many useful things with your own hands if you have a set of tools and the necessary parts on your farm. Many drawings can be found on the Internet or by reading the instructions before the factory machines. To create a unit yourself, you cannot do without:
- electric motor (for example, 2.2 kW, 300 rpm);
- gears from the tractor box;
- rod from a hydraulic cylinder (diameter 50 mm);
- wire (8 mm) or springs;
- turning and welding machines.
After preparing the tools and workpieces, they proceed directly to the process of manufacturing the unit .
- To obtain a screw cylinder, two gears are welded together. The result is a part with a diameter of 62.5 mm.
- To make an auger, a wire is wound into three balls onto the hydraulic cylinder rod, each ball must be narrower than the previous one. Wind it as you feel comfortable. The presence of a spring greatly simplifies the task.
- All components should be boiled. If the seam is uneven, you need to trim it using a grinder.
- Turn a couple of axle boxes on a lathe (gear shaft and auger).
- Weld to connect the axle boxes, shaft and auger into one unit, without missing the thrust bearing between them.
- An experienced turner can help you make high-quality parts in a short time.
- The extruder head is fixed to the screw. Its adjustment will be carried out using a die to which the pipes are welded.
- The auger is hidden in a steel casing and is made separately.
- Next, we begin assembling the entire unit. The engine is mounted on the frame and connected by belts to the starting part and the extruder part. At the top there is a bunker for loading grain. Next is the loading part, into which the grain enters after passing through the bunker before entering the three-stage feeding system, gap, and press.
- The spinneret should compress the grain mass to the maximum and dispense the resulting product into the nasal dispenser.
A DIY feed extruder can operate continuously for a long time without consuming too much electricity. The operating principle is reminiscent of a regular meat grinder, only in the end you get not minced meat, but harder sticks. The size of the finished feed depends on how large the spinneret holes are.
Extruder for feed: drawings and useful recommendations
A simple to use feed extruder makes it possible to independently produce compound feed for animals.
This device is considered an indispensable assistant both in large-scale agriculture and in small farms for raising animals and birds. In specialized stores, such equipment costs decent money.
To save money, you can assemble the unit yourself; drawings and recommendations from specialists will serve as an auxiliary informant in this matter.
What it is
An extruder is used to process grain crops into compound feed, which is much easier to digest in the stomach of animals. Processing is carried out using a press under a pressure of 60 atmospheres and at high temperature. The result is a product shaped like 20-30 mm corn sticks, but with a dense structure.
Extruded feed
Apparatuses for preparing feed exist with different power ratings, and the volume of product produced depends on it. For a small farm, a device with a productivity of 25-45 kg/h is perfect - the price of such a device starts from 47 thousand rubles. But a large farm will require more powerful models capable of producing up to 1.5 tons per hour and they cost from 160 thousand rubles.
Extruder device
Due to high prices, equipment for processing products into mixed feed, even second-hand, is available to a narrow circle of consumers. But if you make an extruder for feed with your own hands, you can save a lot. Only in this case you need to study in detail the structure of the unit, the principle of operation, and also have all the necessary spare parts available.
Diagram of a large extruder
Components of the complex
The design of the device includes the following elements:
- frame - serves as the basis, all the details are fixed on it;
- drive unit;
- belt;
- loading capacity;
- cuff;
- dosing screw with separate drive;
- gearbox;
- receiving tank;
- motor;
- injection screw conveyor;
- Control block;
- carved blade;
- washer;
- adjustment key.
Operating principle
In a homemade extruder, the main function is performed by the pressing mechanism. The element includes a discharge screw unit mounted in the cylinder. The blade block gives the product the shape of oblong sticks.
The functions of the electrical appliance are not limited to pressing feed. With its help, you can grind grain, carry out heat treatment and disinfection of feed, and mix different components into a single mass.
The design of the injection screw includes:
- outer part;
- internal;
- heating washers;
- outgoing auger.
Each unit is installed on a stud with a left-hand threaded part and covered with a housing made of metal material. Thanks to the keys, the revolutions flow from the main shaft to the combined auger. All components are firmly fixed to the frame.
Detailed extruder design (download)
The housing element is equipped with a hole, and the receiving part is mounted to it. The internal area is equipped with longitudinal grooves, due to which all feed components are mixed along the longitudinal side of the axis.
A pellet regulator is installed on the output part; its design includes:
- matrix block;
- output housing;
- blade pressed by a spring element to the matrix block.
The rotation of the shaft with the blade is carried out by means of a rein. You can monitor the temperature using a thermocouple mounted on the frame. The grain extruder operates from electrical voltage. But there are already modifications that run on fuel.
Making an extruder for feed with your own hands
If you have the necessary material, parts and tools, you can make an extruder with your own hands. Let's look at how to get a low-performance model.
Blueprints
To do this you will need:
- electric motor with a power of 2.2 kW at 3,000 rpm;
- gears from a tractor box - parts from YuMZ would be an excellent option;
- spring 8 mm;
- rod with a cross section of 5 cm;
- welding equipment.
Step-by-step work on making a feed extruder with your own hands:
- To obtain a cylinder, you will need to weld the tractor gears together. As a result, a spare part with a cross-section of 625 mm should be produced. Next, a spring with a diameter of 8 mm is mounted on the hydraulic cylindrical rod. Weld all the parts; if the seam is uneven, treat the area with a grinder.
Tractor gear
- Using turning equipment, grind 2 axle boxes that will be used for the auger and gearbox. Weld the auger, shaft element and axleboxes into a single piece, and do not forget to insert a bearing between the last parts.
Blanks in the form of axle boxes
- The equipment head is mounted on the screw; it will act as a regulator of the die to which the nozzles are welded.
Workpiece on auger
- The auger is covered with a housing, all parts are assembled and fixed to the frame, an electric motor, belts and a starting part are also mounted. A loading container is installed on top.
In general terms, a homemade extruder is similar in external and functional characteristics to a household electric meat grinder.
VIDEO: Making a screw granulator with your own hands (Part 1)
How to use a homemade design
A grain granulator assembled with your own hands before large-scale production requires preliminary testing and verification work. Equipment should be tested in a safe environment.
Homemade extruder for the production of animal feed
- The first thing that needs to be checked is the quality of all connections, as well as fasteners and the maximum level of lifting to the stop.
- Then the device is fixed on a flat, stable surface. If the coating is shaky, the device may not perform its functions properly.
- Connect to a power source, start and leave for a few minutes to fully warm up the system. To prevent the elements from rotating in vain, you can check by passing a light product in the form of flour or cake from sunflower seeds through the mechanism. The correctness of the form determines whether the device has warmed up sufficiently.
When the “sausage” shape becomes smooth and dense, then the unit is ready to work with grain
- After the feed comes out in the desired shape, you can add the grain product. The supply of grain must be regular without stopping; the mechanism must not be allowed to function idle. You should also add raw materials in even portions so as not to load the system and create a jam.
- At the output, you need to adjust the feed fraction by periodically tightening the bolt and reducing the hole in the spinneret plate.
- At the end of the productive process, it is necessary to thoroughly clean the internal components from product residues. To do this, you do not need to disassemble the device; just pour the seed shells into the equipment. This raw material is capable of well collecting grain product particles due to the oils it contains.
- Reduce the rotation level to gradually cool the mechanism components. If you need to disassemble the device, you should wear heat-protective gloves, there is a risk of getting burned.
The homemade device is capable of producing up to 40 kg/h of feed. The level of performance depends entirely on the degree of motor power that is included in the design of the equipment. For personal use, such processing efficiency will be sufficient.
Mechanized processing of raw materials makes it possible to fully provide livestock with compound feed, while reducing the cost of purchasing factory-made feed. In the process of preparing feed pellets, you can use a variety of grain products with additives, enriching the diet with various microelements and macroelements, which are so lacking in regular feed.
VIDEO: Making a screw granulator with your own hands (Part 2)
Homemade feed extruder: step-by-step instructions
Most farmers prefer to make an extruder with their own hands. The fact is that the cost of factory products varies from 70,000 to 150,000 rubles. Not every novice farmer is able to shell out that amount. But in the conditions of modern agriculture, a feed extruder is an indispensable component. Without this unit, it is almost impossible to prepare high-quality combined feed for a large number of animals.
In this article, we will look at how a feed extruder works, tell you how to make one yourself, and understand the feasibility of using homemade units.
What is an extruder
An extruder is a device designed for processing grain and vegetables for combined feed. Such raw materials are much better absorbed in the gastrointestinal tract of farm animals and birds.
Processing of grain raw materials in an extruder is carried out through maximum temperatures, as well as pressing, which is carried out under a pressure of 50 atmospheres. The output is a product that looks like small corn sticks, 3-4 cm in size, with a dense and elastic texture.
There are various models of extruders on the market, which differ in power and output volume. For a household, a unit with a productivity of 30-50 kg/hour is quite sufficient. The cost of this device is from 50,500 rubles. Using detailed instructions and drawings, every owner can make a grain extruder with his own hands, saving a lot of money.
A homemade unit allows you not only to press plant materials for animals, but also to process grains, disinfect feed and heat treat it, and mix several products into a single mixture.
What to make a feed extruder from
The difficulty of making a homemade design is that most of the necessary parts still have to be purchased. It is unlikely that one will be able to limit oneself here to improvised materials.
In addition, you will need a welding machine and a lathe to process the parts and fit them to size. Before starting work, it is necessary to prepare drawings. This will help you better imagine the future design and will greatly facilitate the assembly process. Drawings can be found on the Internet or made yourself.
In addition, you will need:
- electric motor with a power of 2.2 kW and a rotation speed of 3000 rpm. It is not necessary to purchase a new motor; a used motor will be quite suitable for your purposes;
- gears. You can use the contents of the gearbox from any tractor;
- wire with a diameter of 8 millimeters;
- rod from a hydraulic cylinder. Diameter – 50 mm;
- gearbox for load distribution;
Having prepared all the necessary parts, you can begin installation.
Assembly of the unit
The key component in the operation of any extruder is the screw. That's where we'll start. To make the body, you need to take the gears and weld them together. The auger body is made from a hydraulic cylinder rod onto which a wire is wound. You should get a spiral with different pitches of turns.
At first, the distance between the turns should be approximately 25 mm, in the end - no more than 20 mm. If you manage to get a steel spring that goes to the cone and has the required diameter, you can use it . After this, all turns must be secured using electric welding. The resulting unevenness and scale must be removed with a grinder and processed with a file.
After this, on a lathe it is necessary to turn two bushings that will connect the gearbox and the auger shaft. A support bearing is installed between the sleeve and the shaft, after which all components are welded into one structure.
The auger is retracted into a metal housing, which can be made from scraps of water pipes. On one side of the screw, an extruder head is installed, complemented by metal tubes - fillers. The diameter of the tubes depends on the size of feed you want to receive. On the other side, a gearbox is attached, with the help of which the entire structure will be driven.
It is recommended to install the power plant (engine) on a reliable support. You can weld a frame from metal corners, which are attached to the floor with anchor bolts.
The interaction between the power plant and the gearbox is carried out through a belt drive. A hopper for supplying raw materials is installed on the auger. For these purposes, a regular bucket or metal tank with a hole made in the bottom is suitable.
You should have a three-level raw material processing system: loading part, mixing, pressing. At the exit from the pressing there are tubes - fillers, through which the finished feed will be supplied. By and large, a grain extruder resembles a large electric meat grinder that you made yourself.
First start
Before operating the grain extruder at full capacity, it is recommended to carry out a test run . Before turning on the engine, it is necessary to check all connections for their reliability.
A homemade unit should only operate on a flat surface; a slight tilt can lead to damage to the device. For the first performance test, it is recommended to use soft and plastic raw materials, such as cake or flour. This will allow you to warm up the system and check its performance.
If everything is in order, you can pour grain into the receiving hopper. Make sure that the raw material is supplied continuously, but do not overload the auger . After completing the work, a small amount of cake must be passed through the extruder again. It will help clean the inside of the auger, collecting all the residues from grain processing.
Recommendations for using a homemade extruder
A homemade device requires verification and testing. Conduct them in conditions that ensure safety.
- Check all connections and fasteners, tighten as far as possible.
- Install the unit on a flat surface; any difference will disrupt the operation of the DIY feed extruder.
- Turn on the power and allow the system to warm up. At this point, you can pass flour or sunflower cake through a press. The shape of the mass formed will indicate whether the system has warmed up.
- Let's move on to grain feeding. It must be constant so that the system does not run idle. Excess grain can make work difficult and create a jam. Follow the process.
- At the outlet, adjust the fraction of the outgoing feed by gradually tightening the bolt and reducing the gap in the spinneret part.
- When completing the processing of grain into extruded feed, take care of the cleanliness of the internal mechanism. Start adding flour or cake, which will collect the remaining grain mass and extracted oils.
- Reduce speed to allow the press mechanism to cool. Disassemble the mechanism with gloves, there is a risk of burns.
Homemade extruder for the production of animal feed
A homemade extruder can process up to 40 kg/h. Performance depends on the power of the engine installed on the unit. For private use, this performance is sufficient. Mechanical preparation of feed will provide pets with adequate nutrition and reduce the cost of purchasing industrial feed. Prepare the compound feed with your own hands quickly. By mixing different grain crops, you get a complete diet for any livestock.
Use your wits and your abilities. Then farming will become not only an opportunity to earn money, but also to realize its potential for savings. Not every farmer can decide to experiment, but it is desirable to have an extruder on any farm.
Differences between a Granulator and an Extruder.
An extruder and a granulator are devices for the production of compound feed. There are some similarities in their work, but overall they are quite different from each other. Both devices have their pros and cons. Before you buy this or that device, you need to understand the differences between a granulator and an extruder. Having learned the operating principles, advantages and disadvantages of both types of feed production equipment, you can make an informed decision about what is better to purchase: an extruder or a granulator.
What is an extruder?
The feed extruder enjoys well-deserved popularity in production among farm owners. The main operating principle of such a device is extrusion - this is the process of processing grain crops using a press under a pressure of 60 atmospheres, at high temperature. This effect takes only 10-13 seconds.
At the same time, the grain is deformed and swells, turning into a solid homogeneous mass. Not all users of such devices know about extrusion, what it is and how it is useful: in fact, extrusion allows you to convert complex sugars contained in grain and grain waste (fiber, starch) into simple mono- and disaccharides, which are absorbed by animals by 100 %.
There are extruders of different power for preparing feed: for a small farm with minimal consumption, devices with a capacity of 25-45 kg/h are suitable, and for wider production a device with a higher power, up to 1.5 t/h, is needed. The product obtained as a result of extrusion resembles corn sticks in appearance and consistency. It is ready to use and can be stored, unlike pure grain.
The extruder is used for processing grain into feed for pets. Thus, the grain is absorbed much better, and it takes much less time to digest it.
What is a granulator?
A granulator is a device that, using a special process called granulation, allows the production of feed in the form of pressed granules - the so-called pellets. Granulation is, in simpler terms, the clumping of finely divided materials.
After the initial clumping of finely dispersed material, granules, or pellets, can be compacted. The raw materials for the production of granules must be sufficiently moist, contain adhesive substances and be free of foreign impurities.
The production process includes the following stages:
- crushing of primary raw materials in a special crusher;
- drying the crushed material in a drum or aerodynamic dryer;
- bringing to the required degree of humidity: if the substance is too dry, it is treated with hot steam;
- secondary grinding of raw materials;
- processing of the resulting mass in a granulator, production and compaction of pellets.
There are many types of granulators of different designs.
The most common are press granulations. The structure of the apparatus includes the main frame, granulator press and door. The raw material enters the mixing device of the granulator through a dispenser, then a mass is squeezed out of the finished mixture using rollers, from which future pellets are formed: they are cut with special knives, then after cooling they are ready for use. Granulators are used not only for feed pellets, but also for fuel pellets.
Comparison of extruder and granulator
Which is better - an extruder or a granulator? This can be understood by comparing the advantages and disadvantages of both devices and the products that can be made using them. If we compare the operating principles of an extruder and a granulator, the differences will be fundamental: the extruder heats the raw material and then presses a homogeneous mass, and the granulator compacts the pre-crushed raw material into pellet granules. An extruder, the price of which depends on the performance of the device and is often quite high, is not bad for preparing compound feed for large and small farms.
However, the granulator has many advantages:
- has higher productivity at an affordable price, processes a larger amount of raw materials per unit of time;
- easy to use;
- at the output it produces a high-quality product, ready for use, which allows reducing the production cycle time;
- allows you to process waste and switch to waste-free production;
- Due to their small size, the manufactured pellets are easy to store and do not take up much space.
What it is
An extruder is used to process grain crops into compound feed, which is much easier to digest in the stomach of animals. Processing is carried out using a press under a pressure of 60 atmospheres and at high temperature. The result is a product shaped like 20-30 mm corn sticks, but with a dense structure.
Apparatuses for preparing feed exist with different power ratings, and the volume of product produced depends on it. For a small farm, a device with a productivity of 25-45 kg/h is perfect - the price of such a device starts from 47 thousand rubles. But a large farm will require more powerful models capable of producing up to 1.5 tons per hour and they cost from 160 thousand rubles.
Extruder device
Due to high prices, equipment for processing products into mixed feed, even second-hand, is available to a narrow circle of consumers. But if you make an extruder for feed with your own hands, you can save a lot. Only in this case you need to study in detail the structure of the unit, the principle of operation, and also have all the necessary spare parts available.
Diagram of a large extruder
The design of the device includes the following elements:
- frame - serves as the basis, all the details are fixed on it;
- drive unit;
- belt;
- loading capacity;
- cuff;
- dosing screw with separate drive;
- gearbox;
- receiving tank;
- motor;
- injection screw conveyor;
- Control block;
- carved blade;
- washer;
- adjustment key.
Operating principle
In a homemade extruder, the main function is performed by the pressing mechanism. The element includes a discharge screw unit mounted in the cylinder. The blade block gives the product the shape of oblong sticks.
The functions of the electrical appliance are not limited to pressing feed. With its help, you can grind grain, carry out heat treatment and disinfection of feed, and mix different components into a single mass.
The design of the injection screw includes:
- outer part;
- internal;
- heating washers;
- outgoing auger.
Each unit is installed on a stud with a left-hand threaded part and covered with a housing made of metal material. Thanks to the keys, the revolutions flow from the main shaft to the combined auger. All components are firmly fixed to the frame.
Detailed extruder design (download)
The housing element is equipped with a hole, and the receiving part is mounted to it. The internal area is equipped with longitudinal grooves, due to which all feed components are mixed along the longitudinal side of the axis.
A pellet regulator is installed on the output part; its design includes:
- matrix block;
- output housing;
- blade pressed by a spring element to the matrix block.
The rotation of the shaft with the blade is carried out by means of a rein. You can monitor the temperature using a thermocouple mounted on the frame. The grain extruder operates from electrical voltage. But there are already modifications that run on fuel.
Making an extruder for feed with your own hands
If you have the necessary material, parts and tools, you can make an extruder with your own hands. Let's look at how to get a low-performance model.
Technical features of extruders
The device consists of several parts, and is divided into three sections:
- The first is responsible for receiving raw materials,
- In the second, plasticization and compression occur,
- In the third - pressing.
Grain processing in industrial extruders occurs at high temperatures: from 110 to 180°C, and pressure above 40 atmospheres. Such conditions are necessary for the breakdown of fiber, proteins and starch contained in whole grains. The whole process takes only a few minutes, which means the split protein does not have time to coagulate.
Another advantage of extrusion is the production of clean and safe feed: almost all types of bacteria and fungi die during heat treatment.
The grain extruder is equipped with a special chamber in which the products are pressed. It also contains a shaft with screw pressing, intermediate and feeding elements. The power of the device depends on the engine and rotor, which is responsible for the operation of the cutting unit.
Types of homemade extruders
Industrial models of the device start at 45,000 rubles in price, which is not always acceptable for small farms and private farmsteads. To prepare complete and healthy feed for livestock and poultry, many farmers have learned to assemble the device themselves. There are several ways to make an extruder with your own hands:
- For large volumes of raw materials,
- From spare parts for agricultural machinery,
- From a vacuum cleaner.
Before you start manufacturing, you need to find diagrams and drawings. They will help you understand the intricacies and nuances of fastening and location of the main working units.
A homemade extruder will not only be cheaper. It can be made in a size suitable for the needs of the farm, equipped with additional figured knives or several matrices.
Extruder for large volumes of feed
This device consists of:
- Receiving bunker,
- Motor and drive,
- Frames,
- Gearbox,
- cuff,
- cutting unit,
- Dosing screw with drive,
- Cylinder.
The chamber of the pressing unit is a cylinder into which the injection screw is inserted. The auger is divided into three parts: initial, middle and outlet. For greater strength, each of them is secured with a stud with a left-hand thread. The unit is covered with a casing made of steel sheet.
The frame is welded from a corner or pipe sections. The dimensions depend on the planned volumes of processed raw materials and the length of the cylinder. The pressing unit is installed on the frame and secured with several bolts. Next, we begin to manufacture the receiving hopper. Usually it is welded from steel sheets, and a hole is made in the lower part under which a tray is placed. Through it, the raw material flows from the receiver to the supercharger screw. To move the grain, longitudinal recesses are made in the lower part of the body. At the end of the screw section, a cutting unit is installed to regulate the size of the granules. It includes:
The knives are pressed against the matrix by a spring, and the shaft rotates using a drive and a driver. The finished product comes out through the holes in the matrix and is cut with knives according to the specified parameters.
The feed extruder processes grain only at high temperatures created by the operation of the motor and gearbox.
They are connected to the shaft and bow housing by a chain drive and attached to the frame. For safety, the electrical assembly can also be covered with steel cuffs. Temperature regulation is carried out by changing the position of the matrix, and control is carried out with a thermometer. Install it next to the cutting element.
Extruder made from spare parts for agricultural machinery
To make this device, you must have:
- Electrical engine,
- Gears from a tractor gearbox,
- Rod, diameter 5 mm, from a hydraulic cylinder,
- Wire, 8 mm thick,
- Sheet metal.
To make a cylinder, several gears are welded together. The result should be a screw with a diameter of about 6.25 cm. Next, a wire is wound onto it at variable pitches. The step width gradually decreases from 2.4 cm to 2 cm. All elements are welded, and the seam is cleaned with a grinding machine.
The next stage: turning the axle boxes on a lathe. One is made for the auger, the second for the gear shaft. When the elements are ready, the parts are welded together in the following sequence: shaft, axle boxes, bearing, auger. The extruder head is attached to the latter using a die.
The assembly of the feed extruder begins with welding the frame on which the motor is mounted. It is connected to the working unit and the starting element using a chain drive. A loading hopper is placed on top: it can be either a bucket or a box welded from iron. At the opposite end, a form is installed to compress the processed mass. Passing through the die, the grain is pressed through the holes and enters the dispenser.
A grain extruder operates on the principle of a meat grinder, and the size of the granules depends on the shape and size of the holes in the die.
Extruder from an old vacuum cleaner
For production you will need:
- Housing and motor from a vacuum cleaner,
- plywood sheet,
- Steel blank for knives,
- Metal disk,
- Wooden pins,
- Fasteners and bushings.
This device is not very powerful, so it is most often used to prepare feed for a small number of poultry, rabbits, piglets or small cattle.
How to make a grain extruder: a square is cut out of a sheet of plywood - a base with a side of 30 cm. A motor is installed on it so that the shaft is 4 cm below the base. For the manufacture of knives, steel grade STZ or higher is used, or they are machined from car holders. The thickness of the knife should not be less than 1.5 mm, and the length and width should not be less than 20 * 1.5 cm. The knife should be sharpened in the direction of the rotating axis. For greater efficiency, the workpiece is shaped like a propeller or the angle of the corner edges is changed.
To attach the cutting element, a hole is drilled on the motor axis, and a regular bushing acts as a fastening element. The working chamber is made of metal sheet. Container dimensions: 70*6 cm. The sheet is bent into the shape of a cylinder, and the upper and lower parts are bent outward. Flanges 1 cm wide should form. They are needed to secure the chamber and hold the sieve. Three pins are installed at the bottom of the cylinder.
The mesh size of the sieve determines the size of the finished granules. The smallest is used to obtain feed flour. A receiving hopper with dampers is welded above the working chamber. With its help, you can regulate the volume of supplied raw materials.
Recommendations for use
The grain extruder is installed on a flat, flat surface. It is advisable to use the device in a room with low humidity and good ventilation. The grain is fed evenly and constantly, otherwise the compartment with the press will be overloaded. To adjust the size of the finished granules, change the sieve or tighten the matrix bolt.
Finish the work by gradually reducing the speed. After each use, the device must be disassembled and washed to avoid clogging of the working and cutting units with particles of dried food.
Some useful tips
The homemade device should be thoroughly checked and tested before use.
- First you need to check the reliability of all connections and fasteners.
- The unit must be installed on a flat surface; any changes will disrupt the operation of the extruder.
- Connect to the mains and let the system warm up. At this time, you can pass a small amount of flour or sunflower cake through the press, observing the shape of the emerging mass - this way you can understand whether the system has warmed up enough.
- Next is the grain supply. It must be constant to prevent the device from idling. Grain should be poured without excess, otherwise congestion may occur.
- At the outlet, the fraction of the exiting product is regulated by gradually tightening the bolt and reducing the gap of the die part.
- Once recycling is complete, the inside of the mechanism should be cleaned. Use the same flour or cake for this purpose - they will absorb the remaining grain and oil.
- To ensure that the mechanism cools down faster, clean at minimum speed. Disassembly should be carried out only with gloves to avoid burns.
The extruder, made by hand , can process no more than 40 kg of grain per hour. For a small farm this is quite enough. Food prepared by mechanical processing provides complete nutrition for pets, reducing the cost of purchasing food and reducing the time for preparing it.
- Author: Maria Sukhorukikh
Rate this article:
- 5
- 4
- 3
- 2
- 1
(0 votes, average: 0 out of 5)
Share with your friends!