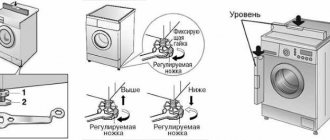
Installation and connection of the dishwasher can be divided into 3 stages:
- preparation and securing of built-in equipment in a special niche
- connection to the electrical network
- connection to water supply and sewerage
Let us consider in detail, indicating common errors, precisely the stages of installation to utility networks and communications.
Electrical connection
To connect the dishwasher to a 220V network, you will not need many materials:
- three-core copper cable VVGnG-Ls 3*2.5mm2
- 16A socket “Schuko” type with grounding contact
- RCD or diffavtomat 16A with leakage current 30mA
A dishwasher (DMM) is not a particularly powerful consumer of electricity, such as a hob (from 7 kW and above). Its power usually does not exceed 2.0-2.5 kW.
Modern energy consumption models correspond to class “A” or “A+”. That is, in a year, approximately 220 kW will run on your meter.
Despite this, it is still advisable to connect the PMM at the repair stage to lay an independent cable line in a separate groove.
If your renovation has been completed a long time ago, and after purchasing the equipment you don’t feel like scratching the walls again and ruining the wallpaper, then you can make do with the existing outlet. Just be sure to make sure that it is protected by an RCD.
Connecting a dishwasher through a simple modular machine is extremely dangerous.
The socket should be placed at a convenient height - up to 90cm from the floor level.
At the same time, place it on the right or left side of the washing machine, but not behind it.
Please also take into account the fact that the total length of the cord with plug for this equipment rarely exceeds 1.0-1.5 m. Based on this, choose a place for the outlet so that you don’t have to use an extension cord later.
The outlet itself must, of course, be grounded. But not everyone has this same grounding. Especially in apartments in old high-rise buildings.
Therefore, many people use regular ones, and everything seems to work fine. However, the level of protection will no longer be sufficient.
Roughly speaking, if there is a grounding contact and there is a current leak, then you will not even be able to turn on the RCD. The consequences of these leaks, even small ones, can be quite lethal.
With a simple socket, the shutdown will occur only at the moment when you touch the body, which is already energized.
And you will still feel this electric shock, at least at the initial moment.
What water is the dishwasher connected to?
The vast majority of dishwasher models are designed to be connected to cold water lines (CWL). This is clearly stated in the instructions.
There are models that can be connected to hot water supply lines , but this must be indicated in the machine's passport.
If it does not clearly indicate the ability to work with a connection to a hot water supply, attempting to independently rationalize the operation of the PMM is prohibited.
Connection to water supply and sewerage
Connecting the dishwasher to the water supply can be done in two ways.
The first is when you are at the stage of construction or major renovation, and you can afford to lay separate pipes, trench walls, etc.
The second is when your entire kitchen has already been installed and all finishing work has been completed. At the same time, you bought a dishwasher and you need to connect it all somewhere, to the existing water supply and sewerage system with minimal alterations and hassle.
How to install a tee on a dishwasher
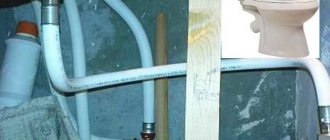
Installing the tee on the pipe under the sink is especially important, as this will be the area that will be subject to the most pressure. First you need to install the tee on the water pipe itself. This is why it is important to use a brass or metal piece. Afterwards, the sink faucet is first connected to it. And to the other outlet is the dishwasher hose. After this, be sure to wrap the parts with waterproofing tape.
We install a tee with a three-way corner valve, restore the water supply to the existing consumer and connect the inlet hose of our washing equipment.
Installation of new pipes
For major installation you will need a varied range of materials:
- polypropylene pipe PPR PN20 with a diameter of 20mm
- water socket
- union nut connectors
- 90 degree connection fitting PPR-90
- HP/HP elbow with ¾" external thread
- FUM sealing tape
When installing pipes, the socket method is used. To do this, you will need a special apparatus for soldering polypropylene pipes.
The total length of the pipe and the number of fittings are selected individually. This depends on how far the dishwasher is from the cold water collector.
To begin with, mark the route where the pipes will be laid from the distribution manifold to the installation site of the PMM.
Then, use a wall chaser to cut to the required depth.
Next, connect the PPR connectors with a union nut to one of the manifold outputs.
Cut a piece of pipe so that it will last until the first turn or corner. At the same time, do not forget to leave a margin of 15mm for connections on each side.
Connect the pipe and fittings using the soldering method, controlling the position of the elbow.
After connecting all the pipes along the marked area, install a water socket at the very end. Be sure to fix it on the wall.
Next, screw a ¾-inch male threaded elbow into the water socket.
Mount the water supply hose onto the angle.
The AquaControl or AquaStop system with which it may be equipped should protect against leaks in the event of a breakdown and automatically stop the water supply.
Turn on the water and check the entire system. If everything is fine, you can finally seal the groove.
Basic connection steps
Read also: What to make an apron from in the kitchen: choosing a durable and beautiful option (150+ Photos & Videos) + Reviews
Successful connection of communications (electricity, water, sewerage)
Conventionally, the process of putting PMM into operation can be divided into three main stages:
- installation of the dishwasher at its installation site
- connection to water communications (water sources and sewerage)
- electrical connection
The principles that guide each stage of connection are quite simple and are based on the rules for operating a particular type of resource (water and electricity).
Failure to comply with certain standards can lead to emergency situations in the operation of the machine and be a source of danger during its operation.
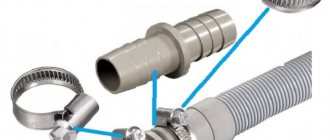
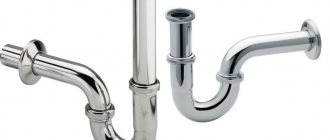
To install the machine you will need additional parts:
- specialized siphon for drainage (installed on the sink)
- water ball valve
- connecting hoses (if they are not included with the dishwasher)
- clamps for fixing
- grounded socket
- protective differential circuit breakers or residual current device (RCD), if they were not provided for in the power supply project of the premises
Read also: Connection diagrams for fluorescent lamps: with and without choke, 2 or more lamps (Photo & Video)
Elements for connecting the dishwasher to the water supply
Tools required for installation:
- building level
- adjustable wrench
- Screwdriver Set
- drill with additional attachments
- knife
- wire cutters
At each installation stage, various errors may appear. These mistakes, although insignificant at first, can later lead to undesirable consequences. To avoid them, let's consider each of the stages in more detail,
Drain connection and installation in the kitchen opening
All that remains is to connect the drain hose from the PMM to the sewer outlet through an adapter collar of the appropriate diameter.
Do not forget that the drain pipe must be mounted at an angle, allowing for a 1cm height difference per 1m of length.
And the drain hose itself has a bend at 70cm from the floor. That is why it is attached to the top of the dishwasher, and not at all so that it does not dangle.
All that remains is to connect the washing machine to a power outlet and check the functionality of the entire system. Then secure it in a specially prepared opening.
By the way, some models, for example from Siemens, have non-standard sizes. Therefore, think about your kitchen furniture in advance.
When installing in an opening, do not forget about the metal plate that must be nailed to the bottom of the tabletop (for the Bosch model).
This thing is mounted at the very edge and is a vapor barrier, like a screen. With it, the countertop will not swell from steam.
For some reason, many people throw it out and replace it with aluminum tape, securing it both to the table top and to the side walls of the car.
Electrolux, instead, comes with something like a piece of rubber that sticks on the sticky side.
After installation and connection, the first wash should be done without dishes, using powder or special cleaning tablets.
This procedure should destroy all bacteria and deposits formed after long-term storage in the store.
Step-by-step instructions for connection
Almost all machines are recommended to be connected to cold water. This is usually prescribed in the instructions, deviations from which can cause many problems.
Therefore,
you must first familiarize yourself with the product passport and find there the possibility of connecting a hot water supply.
If this item is not there, then it is strictly not recommended to carry out any manipulations.
This can cause a lot of unpleasant moments that threaten not only the performance of the device, but also the safety of the home, and sometimes the health of people.
There are several ways to connect the hot water supply to the dishwasher. We recommend the two most common ones for consideration, which are suitable for most devices.
Traditional way
This is perhaps the most common method of connecting hot water to a dishwasher. It will not require any specific skills from the user, and will not take much time.
Tools used:
- wrench;
- fum tape for sealing;
- tee for mixer;
- hose for connection to the dishwasher.
The connection process will include the following procedure:
Shut off the water supply tap.- Using a wrench, the mixer nut is unscrewed and the thread of the pipe is released.
- A sealing fum tape is wound around the pipe.
- A tee is also installed here. All exits are conveniently located.
- The mixer returns to its place.
- The tee is switched to closed mode, after which the tightness of the connection is checked by releasing water.
- The water supply hose to the dishwasher is connected to one of the outlets of the tee.
Now you can open the tap on the tee and check the functionality of the equipment, making sure that no leaks appear.
Hybrid method for simultaneous cold water supply and hot water supply
Expensive dishwasher models provide separate connections only to cold, only to hot, or to both water supplies at once. It is the latter option that seems to be one of the most convenient and functional.
It almost completely eliminates all the risks associated with the use of hot water, since the equipment is able to independently adjust the required temperature for comfortable work.
Tools:
- adjustable wrench;
- sealing tape;
- hot water hose;
- cold water hose;
- two tees.
The process is not much different from connecting to only one pin.
You need to do the following:
- Shut off the hot and cold water supply.
- Unscrew the mixer.
- Place a seal on both pipes.
- Connect a tee to each pipe.
- Return the faucet;
- Connect the hoses to the tees and corresponding terminals on the dishwasher.
More details about hybrid connection in the video:
This connection method implies the presence of two hoses, which cannot always be hidden. But such a design does not always look aesthetically pleasing.
Connection via sink siphon and faucet.
There is a simpler option for connecting a dishwasher, in which there is no need to install separate pipes for draining and supplying water.
You only need to change two things:
- standard siphon under the sink to a special one
It differs in that its design already has a place for connecting the drain hose - a fitting, and sometimes two.
You can, of course, redo the sewer drain by installing an additional pipe and seal there.
The whole thing is inserted by hand, without using any special tools.
However, do not forget that connecting dishwashers and washing machines directly to the sewer pipe may be accompanied by the appearance of unpleasant odors.
Experts advise making this connection through a check valve.
Kinking or bending the hose at a height, which should act as an alternative to the valve, only helps with constant use of the equipment. Of course, your water will not return.
However, if the system stands for a couple of weeks without work and water (for example, in a country house or in a country house), everything will dry out and the stench in the kitchen will be very sensitive.
- the second thing you need to install is a tee with a ¾-inch thread
Through it, the water itself will flow into the machine. It is installed instead of the standard connector that goes from cold water to the mixer.
Screw this tee to the cold water supply hose or pipe.
Next, change the siphon. Unscrew the screw from above, holding the siphon itself from below so that it does not fall.
Disconnect the drain from the sewer. To do this, simply pull it towards you with force. It should come out of the rubber retainer.
Assemble a new siphon from the components, not forgetting the gaskets, and install it in place of the old one.
Connect the flexible drain pipe to the sewer pipe. All that remains is to connect the dishwasher drain hose to the siphon tube through a special adapter.
Included with this adapter, be sure to look for a valve, it blocks the reverse flow of water.
Fill the sink with water and check that there are no leaks anywhere.
Functionality check
After installing the outlet for connecting the dishwasher and connecting it to the water supply and sewerage system, you need to conduct a dry test of your new item.
- You should check:
- the speed of pouring water into the machine;
- heating the incoming water;
- operation of the dish drying mode.
The operation of all modes of the machine should be checked without dishes, but using detergent and reducing salt in accordance with its operating instructions. You should also carefully check all connections of pipes and hoses for leaks again.
After you have succeeded in connecting the dishwasher yourself, following all the recommendations in the installation manual, you can install the kitchen furniture that was moved during operation into its place, and attach the closing panel to the new machine.
Important Features
- In order to reliably connect the device, you must:
- install a water filter. Due to this, debris and rust from the water supply will not get into the machine, which negatively affect its operation;
- Do not connect the device to hot water supply. Hot water is usually of worse quality than cold water. Mechanical impurities that it contains will negatively affect work;
- Do not connect the machine to the boiler. There will be no savings from this - the water heater will still turn on periodically to heat the water. And residents will have to use cold tap water while the machine is running;
- use a check valve when connecting the sewerage system. This will protect against sewage being sucked into the machine;
- when connecting the drain hose to the drainage system, the water drainage circuit is bent so that water from the sink does not enter the machine;
- carefully check the tightness of the connected parts;
- It is advisable to purchase taps from bronze. This material is more durable than plastic;
- Avoid using extension cords to connect the device to power. The machine is a fairly powerful device, so such a connection can lead to a fire.
These simple recommendations will help you avoid common mistakes when connecting a dishwasher to water supply and sewerage.
When installing, you must follow the instructions that came with the device. You should check the reliability and tightness of all connected parts several times. If difficulties arise, it is better to contact specialists than to fix the breakdown later.
Author: Sergey Vladimirovich, electrical engineer. More about the author.
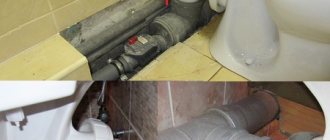
Drainage from the dishwasher to the sewer
First you need to inspect the drain from the sink. A siphon is attached to the bottom of the sink opening, through which the liquid flows into the sewer pipe. This is the most convenient place to organize drainage from PMM. Also, on the drainage main itself, a backup inlet pipe is installed for connecting plumbing. Both options are suitable for arranging the connection point for the drain from the washing machine.
It may turn out that the available connection location will be a sewer section without branches. Then a modification will be needed:
- Find a joint on the main pipe, make a connector by removing one element.
- Insert a tee into the resulting gap and increase the length with an additional insert.
- Seal new joints.