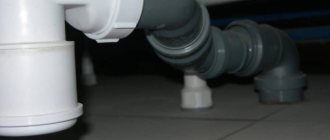
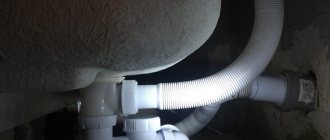
- Forms of release in the drain system
- Location of drain holes
- How to change the cuffs on the cistern
- How to replace a drain
It is important to immediately note that the drainage system consists of more than just a drain assembly in the tank. An equally significant role here is played by the pipe through which water enters the sewer directly after flushing. Replacing a toilet flush is a rather complicated job and requires some skills. Before you change the drain system, you need to choose a new one. The choice must be made not based on certain wishes, but on the basis of certain conditions.
Flushing the toilet
You need to know how the sewer pipe is located, what the socket should be, whether it is possible to use corrugation, whether the place in the toilet room will allow you to install this or that system, etc. There are a lot of nuances and it is important to take them all into account. We install a toilet not for 1-2 years, but for a fairly long period. In addition, here you will be dealing with water, so you need to take care of the correct connection. You need to make sure that all the parts fit tightly to each other. Remember, you can ruin not only your renovation, but also harm your neighbors.
Priority tasks when laying sewerage
In order not to make mistakes when understanding the installation of residential sewage systems and pipe routing, you need to use the services of experienced professionals. You should contact the Plumbers Service and professional craftsmen with experience in this profile will come to your aid.
To solve such an issue as replacing sewer pipes, experienced installers of our company will begin by:
- Draw a diagram of the location of the sewer system in the apartment. The diagram will show all the pipe layouts, their connections, and the placement of plumbing fixtures.
- They will determine, depending on the layout of the apartment and its area, what length of sewer pipes to purchase.
- They will calculate the number of components needed to purchase (tees, adapters, fittings, fasteners, clamps).
- They will provide the client with the opportunity to choose from the proposed list pipes and other components that are suitable in price and quality.
- They will go to a store with a plumbing assortment of goods in order to purchase everything necessary to complete this work.
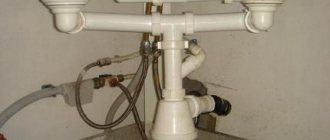
Connection methods
Various toilet designs
With today's wide range of plumbing equipment in the retail chain, you can choose a high-quality toilet complete with connecting elements that are easy to install and connect to the riser.
On sale today there are models of sanitary equipment with horizontal, vertical and oblique pipe outlet. They differ in that the toilet drain pipe can be located, respectively, parallel to the floor, perpendicular to the floor and at an angle. Accordingly, the connection of the toilet to the sewer will be carried out differently.
With Plumbers Service Your sewer system lasts a long time
By making a request to the company by phone, you can be sure that the replacement of sewer pipes in your apartment will be carried out urgently and with high quality. We guarantee you:
- efficiency in dismantling and installation;
- accurate and accurate performance of work using modern materials;
- high professionalism of the craftsmen;
- selection of the most modern sewer system components;
- use of professional tools and modern devices;
- ensuring perfect tightness of all connections and joints;
- testing the functionality of the installed system;
- application of a flexible pricing system and discounts;
- carrying out work in compliance with construction standards;
For our “neighbors” within the Moscow Ring Road, if it is important for them to replace the sewer pipes in their apartment, we will serve them first. And the cost of replacing the sewer system in an apartment will surprise you.
Tools and materials
Sewerage diagram.
When purchasing the required materials, you must mainly pay attention to their quality, and not to the price (as many do). Unnecessary savings and the use of cheap, low-quality materials often backfire in the future. It is necessary to make sure in advance that all purchased equipment is not subject to corrosion and is resistant to mechanical damage.
To remove worn out sewer pipes you will need:
- pencil for marking;
- Bulgarian;
- hammer;
- chisel;
- sealant;
- cement mortar.
Materials that may be useful:
- rubber cuffs for fastening pipes in sockets;
- pipes of the required diameter and required length;
- tees;
- compensators for joining sewer pipes;
- special adapters made of plastic;
- clamps for mounting pipes to the wall surface.
Is it possible to save money on sewer replacement services?
Many people believe that replacing a sewer pipe is not such a difficult job and can be entrusted to a self-taught plumber or an unknown company in order to save a little money. There are many organizations offering their services in the field of plumbing work, but not everyone can perform them with high quality and with a guarantee.
Unqualified plumbers are negligent in their work, take a long time to complete the work, are not organized, and replacing a sewer pipe in an apartment turns into a “natural disaster.” The consequences of such poor quality work can be very different. These include possible leaks due to incorrect pipe connections, stench spreading throughout the apartment and the need for re-installation. Then the cost of replacing sewer pipes will be much higher.
How to change the cuffs on the cistern
Replacing the drain mechanism
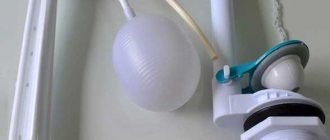
The most common problem with toilets is leaking. Even if the water does not flow, but drips, it is very annoying. Here the reason usually lies in the cuff. In this case, you just need to replace it. This part is made of rubber and is therefore not suitable for repair. In general, this part needs to be changed at some intervals; it loses its strength over time. Replacing the cuff on a toilet cistern does not require any specific skills. To do this, you just need to know a few steps and try to do them all correctly.
The cuff comes in two types: rectangular and cone-shaped. They vary in thickness, which depends on what kind of rubber a particular cuff is made of. They also differ in softness. It is thickness and softness that you need to pay attention to, and color does not play any role here. It should be noted that a rectangular cuff is much easier to change than a cone-shaped cuff.
To change it, you need to follow several steps:
- Remove the toilet cistern;
- Remove the old cuff;
- The new cuff must be inserted into the wetted neck of the tank;
- Carefully bend the upper edges of the cuff to the edge of the neck of the tank;
- Place the tank in place and secure it;
- Pull the part of the cuff that is folded over the neck of the toilet.
It is important to comment on each of these steps to make the cuff replacement process clearer. So, the toilet tank must be removed carefully. First you need to empty the tank and turn off the water, then carefully unscrew the bolts. The old cuff should also be removed carefully so as not to damage other parts.
After this, the neck of the tank must be moistened so that the new cuff fits snugly to it. After you have installed the cuff, you should check its tightness. It is important to note that the installation of the cuff is completed only after the tank is firmly in place with bolts.
When the work is done, it is necessary to check whether it was completed correctly. To do this you need to drain the water. If there are no leaks and no water drips, then everything was done correctly. If water is still leaking, then diagnostics should be carried out.
Cost of work to replace plumbing communications
The price for replacing sewer pipes is determined taking into account the complexity of dismantling and installation, taking into account the use of expensive materials, and taking into account the volume of the order as a whole. Our company's plumbers will help you calculate how much it costs to replace sewer pipes in your apartment.
Replacing old cast iron pipes will cost slightly more than replacing pipes made from plastic materials. A rotten riser can be replaced immediately after sewer work in the apartment. If it is planned to replace a sewer pipe with more expensive materials, then this will not be an obstacle for our craftsmen.
When wiring, you can provide for the need to install additional wiring to the washing machine or to the sink, if such additions were not available in the old sewer system. In general, the price for a sewer system will be quite reasonable and consistent with high-quality work performed.
All you need to do is contact Plumber Service by phone, and our service's drain replacement team will do everything possible to ensure that you never have any plumbing problems again.
The company employs craftsmen with extensive practical experience and for them neither changing sewer pipes in an apartment nor any other plumbing task is a problem. We issue a guarantee for all types of installation work, including replacing old sewer pipes in an apartment. Call now!
Details
What is the design feature of the riser
There is a riser in any house where there is a sewer system. The riser design is durable. In some situations it is necessary to replace the pipe.
During the process you should know the design features:
1. When dismantling an old cast iron pipe, everything should be done carefully to avoid splinters of material getting into the system, which could clog it.
2. It is important to pay special attention to the joints of pipes made of different materials; the sealing must be done reliably so that they last a long time.
3. when replacing riser pipes in an apartment building, you must submit an application to the management company to obtain permission, then notify neighbors about the work, because you will have to turn off the water in the entrance.
Material for riser pipe
Instead of the cast iron material from which the riser pipe was made, new, improved ones came. Of these, the following are distinguished:
1.polymer materials for plumbing. The products are distinguished by their light weight, ease of installation, and resistance to corrosion, while the products have an affordable price for many. The elements of the system are connected using special seals; there is no need to additionally use other means for sealing, for example, silicone.
2.ceramic material, requires careful installation. The product is resistant to corrosion and does not form deposits on the internal walls.
3. steel coated with anti-corrosion coating. These pipes are installed in private homes. They are easy to install, inexpensive, but develop rust over time.
The best material for a riser is plastic. With the correct inclination of the horizontal sections of the structure, the formation of plaque inside the pipe is eliminated, no worse than in ceramic products.
How to determine cross-section and size
When installing a riser, it is important to correctly determine the size of the pipe. The parameter is influenced by the area of the room, as well as the types of plumbing that are connected to the riser:
1. For apartments with a small area, where the number of devices for connection is limited, pipes with a cross-section of 100 millimeters are suitable.
2. Pipes of 50 millimeters in size are suitable for draining water from the bathroom, bidet, and kitchen, because only water without debris gets into the drain hole.
3. When organizing sewerage in a high-rise building, it is optimal to use pipes of at least 15 centimeters in size.
4.from the toilet the pipe to the riser should be over 10 centimeters.
Attention! After some time, a coating forms on the inner walls of the pipes, which reduces the opening for the passage of waste, so it is better to immediately use rolled pipes with a larger cross-section.
Installation features
In a high-rise building, you can carry out all the work on replacing the riser yourself. Before starting work, it is required to obtain consent from the management company to carry out the replacement. You also need to notify your neighbors about the upcoming work, because you will have to shut down the system.
It is recommended to change the risers collectively in the entire entrance at once.
Stages of work to replace a riser in an apartment:
1. dismantle the old riser pipe, leaving pipe sections in the lower and upper parts. Cuffs are installed in the holes of the segments.
2. Place an adapter in the upper hole and a tee in the lower hole. Instead of a tee, you can use a compression adapter. Connections should not have gaps to prevent leaks.
3.To fix the riser, install clamps. If the ceilings are lower than three meters, then you will need three holders: at the bottom, at the top of the pipe, in the center.
4. All parts of the riser are connected, the riser is secured using clamps.
5.installing the unit is easy. It should not be placed behind the toilet, and the distance from the wall should be more than four centimeters.
Possible errors and ways to prevent ↑
When dismantling old equipment and re-arranging sewer lines, try not to repeat mistakes that could cause another repair.
Possible pipe layout
Here are some important points:
- when changing the riser in a multi-storey building, try to agree on replacing it in all apartments - this will simplify further maintenance;
- watch the location of the socket - it should be directed towards the movement of the drains;
- if you are changing the system on two or more floors of a private house, start the repair from below, from the first floor (or basement);
- take into account the dimensions of the products: for external sewerage - at least 110 mm, for a riser - at least 100 mm, for internal network outlets - 50 mm;
- to make joints and connections between elements of different diameters, use adapters and tees;
- Spend a little time on preliminary markings and calculations - this way you will save time and money.
Analysis of practical shortcomings in the following video:
Dismantling a sewer system is easier than installing a new one, however, even here, special knowledge is required and work experience is desirable. If you want to quickly get rid of old pipes and install new communications, contact an engineering and construction company that will quickly and efficiently carry out all dismantling work, as well as organize the removal of used parts.
Source
Reasons for sewer repair ↑
All types of restoration work can be divided into three categories:
The reasons that guide the performance of routine repairs lie in ensuring the uninterrupted functioning of the network, that is, in the timely replacement of worn-out fragments (usually small in length or volume). These can be linear products, fittings, tees, water seals, etc. Sometimes it is necessary to change the direction of the line or add an additional outlet when connecting another plumbing fixture.
Dismantling the old sewer
A major overhaul includes a complete replacement of sewerage equipment: riser, wiring, internal and external outlets. More ambitious changes are possible, for example, installing a new septic tank or laying a prefabricated structure from a separate building (for example, a guest house) to a common highway. Capital changes can affect the internal and external segments separately or be carried out simultaneously.
The most common reason for dismantling sewer pipes is wear and tear of the system. Old-style parts inside the house - usually cast-iron vertical and horizontal lines - are replaced with plastic and metal-plastic analogues. For outdoor installations, both popular PVC elements and products made from traditional materials are used: ceramics, asbestos cement, steel. Combined options are also possible. For example, when partially replacing the intra-house network, a riser made of cast iron is left, and the pipe distribution, including all fittings, is replaced with plastic
Replacing cast iron with a polymer analogue
If you don’t take care of preventive maintenance in time and delay with current problems, you can wait for the most unpleasant type of repair – emergency repairs. Minor emergencies are resolved fairly quickly. For example, a clog in the kitchen can be cleared using a special cable, cleaning fluid or a plunger. A major accident disables the entire system and can disrupt the ecological balance in the local area. Thus, depressurization of external equipment leads to contamination of soil and groundwater with household waste, which is contrary to sanitary standards. It is necessary to establish the cause of the leak, isolate the emergency area, or completely change the entire network.
What is better - to disassemble it yourself or turn to professionals?
To answer this question, you need to understand what sewer dismantling is and how it is performed. There are two types of dismantling:
- break completely to throw away;
- Carefully disassemble to store.
If the sewer system is dismantled for a complete replacement, then the first method is appropriate. It's easier to implement. It requires a crowbar, a sledgehammer, an angle grinder, a gas torch, a welding machine and a plasma cutter. During this method, pipes that cannot be removed “in a good way” are broken and pulled out whole or in pieces, then taken to a landfill.
Such dismantling is characterized by an increased level of contamination of the room, because the contents of the sewer remain on the flying fragments.
If the sewer system is dismantled for major repairs, or it is necessary to ensure a minimum level of pollution in the room, then the second method is used. Sewer pipes, connections and bends are pulled out, being careful not to damage them. They resort to a sledgehammer, a crowbar and more serious equipment when it is impossible to remove the pipe from a wall or ceiling in any other way.
Flare joint covered with rust and dirt
Dismantling the external main ↑
Changes in the design of external communications are made quite rarely, since the most suitable pipes are selected during the design process. The cross-section of the products is calculated based on the actual amount of wastewater, and the structure is positioned so that household waste flows by gravity into the septic tank. If the calculations are carried out correctly and the installation is carried out according to all the rules, the system will function for a long period - from 10 to 50 years. In the event of incorrect calculations, installation errors or the choice of low-quality building material, the situation can be corrected in only one way - by completely replacing the outlet main, having first dismantled the unsuccessful option.
Replacement of external sewerage pipes
Disassembly is carried out in the following order:
- using the initial installation diagrams, determine exactly where the underground external main runs;
- carry out excavation work - remove the top layer of soil from the outlet in the area of the foundation of the house to the septic tank (if necessary, in the area between two chambers of the treatment plant);
- when all sides have been cleaned, depressurization is carried out: insulation and waterproofing material are removed, connecting elements (fittings, clamps, couplings) are removed;
- take out old parts.
As a rule, worn-out pipes are not used in the future, therefore, to disassemble problem areas (for example, elements glued together using a socket method), a cutting tool is used - an electric saw, an angle grinder, a hammer drill. Some areas (especially around the joints) can be simply cut and then broken with a sledgehammer - this applies to cast iron and ceramic products. Plastic is also cut into pieces that are convenient for transportation, but larger, since its weight is much less.
Upgrading the main line leading to the septic tank
Simultaneously with the dismantling of the main line, the trench is prepared for the installation of new communications. The assembly is carried out taking into account the errors of the original device, which may include the following:
- insufficient sealing of joints;
- lack of correct angle of inclination;
- selection of products with incorrect parameters (narrow cross-section);
- violation of installation technology (for example, lack of inspection wells at turning points or intersection points).
If you do not know how to properly dismantle sewer pipes, contact specialists - for a small amount you will save both time and your own efforts. And most importantly, you will be able to avoid repeated repairs.
How to dismantle sewer pipes: technical nuances of dismantling
The level of comfort in a private home depends on the smooth operation of a whole complex of technical systems: plumbing, heating, ventilation, sewerage, electrical. As soon as one of them fails, living in the building becomes problematic. Failure of communications that discharge household wastewater is considered an emergency and requires immediate repair. Let's try to figure out when local replacement is necessary and how to properly carry out major dismantling of sewer pipes.
Dismantling process
Any sewer dismantling begins with shutting off the water in the apartment, removing furniture and dismantling all plumbing fixtures. If you do not turn off the water, an accidentally damaged water pipe will flood both you and your neighbors. If you don't remove the furniture, the smell of sewage will be absorbed into it. If plumbing fixtures are not removed, one or more of them may be damaged during the removal process.
Dismantling cast iron sewer
To remove a cast iron pipe, remove the fastenings to the wall, swing it in the socket mount of the next pipe (swing amplitude 5-10 cm) and pull. If the fastening is not overgrown with rust and dirt, the pipe will come out. If you can’t swing the pipe, warm the socket joint with a gas burner, then insert a crowbar into it and swing it with it.
When this does not help, hit the socket joint firmly with a sledgehammer several times. In half the cases, this removes rust and dirt, after which the pipe is rocked and removed.
If a sledgehammer doesn’t help, use a grinder, plasma cutter or welding machine. Cut the pipe 5-10 cm from the socket joint of the next pipe, then remove it. If this is not possible, take a heavier sledgehammer and break the socket joints. Cast iron is a hard but brittle material, so after 5-10 strong blows the pipe breaks into pieces.
Cutting a pipe with a grinder
When working with a crowbar, sledgehammer, grinder, plasma cutter or welding machine, try not to damage the walls and floor. The cost of replacing tiles, especially artistic ones, will be significantly higher than paying professional dismantlers.
Dismantling of plastic sewerage
Dismantling of plastic sewerage
Dismantling a plastic sewer system is easier than dismantling a cast iron one. The pipes are light and do not rust. Therefore, it is enough to pull the pipe in the opposite direction. If you can’t pull it out, make a loop out of the rope and throw it over the pipe. Using a rope will create much more force and overcome the resistance of the stuck rubber seal. If even a rope doesn’t help, cut the pipe 1-3 cm from the bell joint of the next pipe.
Even though the pipe is shorter than the original one, it can be reused. You can try to restore a pipe with a stuck rubber seal. To do this, insert a thin knife (a utility knife is suitable for this job) into the socket joint between the outer and inner pipe and try to cut through the seal. Half the time it works.