How to make a brush for cleaning a chimney with your own hands? — Prof Pipes
Stove heating not only does not lose ground, but is also experiencing its rebirth.
For this reason, issues of proper operation and maintenance of solid fuel units are no less pressing than they were several centuries ago. Owners of private households do not have any difficulties with how to light a stove and what kind of firewood is best to use. Problems begin when the draft disappears and smoke begins to flow into the room. And the whole reason is a smoke duct clogged with soot and soot. It is difficult to find a chimney sweep today, so you will have to carry out the maintenance of the chimney yourself. All you need for this is a chimney brush, which you can make yourself.
What causes clogged chimney pipes?
The advantages of stove heating, such as efficiency, autonomy and the ability to create a special, homely atmosphere, cannot be surpassed by any modern heating device.
Thanks to this, stoves and fireplaces are still widely used in both rural areas and cities. However, the use of solid fuel has many disadvantages, one of which is the need to regularly clean the smoke ducts.
But the frequency of their maintenance can be significantly reduced if you know where so much soot and soot comes from.
Deposits in the chimney can completely block the smoke exit channel
So, the main factors that contribute to chimney clogging are:
- burning of waste, which consists of high-carbon materials (all types of plastic, polyethylene, polystyrene foam, cardboard, etc.);
- use of wet firewood;
- violation of the operating mode of the heating device;
- heating with wood that contains a large amount of resin (pine, spruce, fir, etc.);
- ash is rarely removed from the working chambers of the furnace;
- violation of the fuel supply mode;
- ingress of third-party debris.
In addition, rapid contamination of the chimney can be caused by increased roughness of the walls of the flues and their incorrect configuration. For this reason, it is better to entrust the construction of the furnace to an experienced craftsman.
Dangers of soot accumulation
It is impossible not to notice problems with the chimney. Most often they will be indicated by the following signs:
- craving decreases;
- firewood does not light well when kindled;
- smoke is coming into the room;
- reduction in the thermal efficiency of the furnace.
All these factors indicate that the gas duct is so clogged that only a narrow hole remains for the combustion products to escape. Using a heating device in such conditions is prohibited, as this often leads to tragic consequences:
- a decrease in the cross-section of the smoke channels can provoke reverse draft, so the room may become smoked with carbon monoxide;
- soot flakes can ignite and fly out of the chimney, creating a fire hazard. Accumulations of soot in a chimney can cause a fire
If the soot is not removed in time, then the process of its deposition proceeds like an avalanche, since the combustion mode of the fuel is disrupted and, along with solid particles, unburned tarry secretions and moisture are deposited on the walls of the flues.
Chimney cleaning equipment
Deposits can be removed from the chimney using chemical and mechanical methods. The first involves burning substances in a furnace, the combustion products of which soften soot deposits and promote their combustion and removal naturally. The second is to remove soot from the walls of the chimney using various scrapers, brushes, etc.
Chemicals for cleaning the chimney allow you to do without mechanical devices, but are quite expensive
Practice shows that mechanical cleaning is best done with a hard brush, like the one used for washing dishes with a narrow neck. A wide variety of materials are suitable for the manufacture of such a tool:
- steel rope;
- plastic bottles;
- pieces of steel wire;
- thick fishing line or plastic rods;
- springs;
- thick rubber;
- metal chain or strong rope;
- various weights and sinkers.
The choice of a particular material for making a brush for cleaning chimneys depends on how persistent soot deposits will have to be removed.
For regularly maintained chimneys made of steel or asbestos-cement pipes, a tool with soft bristles is suitable, while brick flues with many years of soot deposits can only be cleaned with a metal wire brush.
It is best to have in your arsenal several devices of varying degrees of rigidity or make one combined tool.
How to make a stove maker's tool
Before you start making a device for removing soot deposits, you need to consider its design and dimensions. In this case, it is necessary to take into account:
- length of the chimney;
- flue diameter;
- quantity and persistence of deposits.
Based on the input data, conclusions are drawn about the length of the cable, the mass of the load, the size of the brush and its rigidity.
Design of a device for removing soot mechanically
The length of the rope or cable used to hold the brush is taken with a margin of 2–2.5 meters.
This will allow you to hold the device more firmly in your hands, and, if necessary, make a loop around the chimney so as not to drop the tool into the chimney.
Any weight can be used as a weight - from a specially cast lead blank to some heavy nut or a worn-out automobile part.
Making a plastic brush
A budget brush for removing soot from a chimney can easily be made from available materials. To make a plastic brush you will need:
- broom made of polypropylene rods;
- plumbing cable of the required length;
- metal pin with a diameter of 8 mm with an eye;
- nut with a diameter of 8 mm with an eye;
- washer with a diameter of at least 50 mm with a hole of 8 mm;
- 2 carbines;
- load 0.5–2 kg.
If you can't find a stud and lug nut, don't despair - a regular bolt will do. Loops for attaching the cable and load can be made of steel wire.
Materials needed to make a plastic chimney brush
The work is performed in the following order:
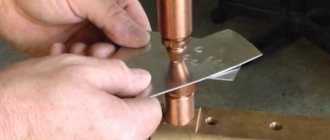
- Cut off or unscrew the stem from a synthetic broom; it will not be needed in the future. To make it more convenient to work, the remaining part is clamped in a vice.
- The bristles of the round broom are bent to the sides.
To make the material more pliable, the brush is dipped in boiling water or heated with a hair dryer. The rods of the plastic broom must be straightened - If there is no hole inside the holder, then drilling with a diameter of 8 mm should be made.
- On the side where the handle is attached, a steel pin with an eye is inserted into the hole.
The hairpin allows you to fix the bristles in the desired position - From the side of the rods, install a washer on the stud and press it with an eyelet nut.
The eyelet nut allows you not only to fix the rods of the brush, but also to attach a load and a cable to it - The rods are cut based on the diameter of the chimney.
Excessively long rods should be trimmed - A loop is made on one side of the cable, securing the metal edge with a knitting wire.
- Using carabiners, a cable is attached to one eye and a load to the other.
You can make a chimney brush yourself
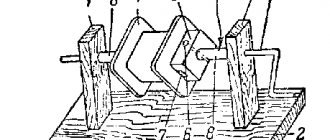
In addition to a synthetic broom, plastic soda water containers are a good material for making a soft brush. To make a “lush” brush, you will need 5-6 such vessels and a sharp knife. It is necessary to cut off the bottom of all bottles and dissolve the walls into strips ranging from 3 to 10 mm wide.
After this, the neck of all containers, except one, is cut off, leaving a hole slightly larger than the diameter of the neck. Assembly into a single structure is carried out by pushing the parts onto the remaining threaded part and securing them with a lid.
After this, drilling is done for the pin and the brush is attached to the cable and weight in the manner described above.
How to make a metal brush
To make a cleaning tool from metal, you can use pieces of steel wire (cable) or use a wire brush for an angle grinder.
In the latter case, the angle grinder device is simply mounted on a cable with a load and secured with wire.
If using a working tool for purposes other than its intended purpose is unacceptable to you, then you can make a metal brush with your own hands. For this you will need:
- a coil of steel wire Ø1–2 mm or a cable with a diameter of up to 5 mm;
- M8 pin or bolt 6–8 cm long;
- M8 lug nuts;
- washers with a diameter of at least 50 mm with an internal hole of Ø8 mm;
- pliers;
- hammer;
- chisel;
- wrenches. Steel wire is the basis of a homemade wire brush
The technology for making a metal brush is not complicated:
- The metal wire is cut into pieces whose diameter is at least 80% of the chimney cross-section.
The easiest way to do this is with pliers. If a steel cable is used, then instead of wire cutters it is better to use a hammer and chisel, with which the material can be easily cut into pieces of the required length. The length of individual rods of the device should be up to 80% of the chimney diameter - The rod is wrapped around the bolt in such a way as to obtain parts of the same length on both sides.
The cable is installed on a pin, making an opening of the required size in the middle of each segment. The metal bristles should be evenly distributed along the contour of the future brush. - The wire elements are wound along the entire length of the bolt, after which they are secured with a washer and nut - the metal brush for cleaning the chimney is ready.
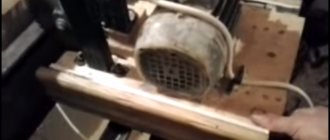
The simplicity of this method makes it extremely popular among home craftsmen. And at the same time, there is another very interesting tool that combines both a brush for removing soot and a weight. In addition to the tools and materials described above, for its manufacture you will need:
- steel pipe with a diameter of more than 50 mm;
- electric drill;
- high carbon steel core;
- a metal drill whose diameter corresponds to the cross-section of the wire or cable;
- sand-cement mortar.
To make a brush, exactly the same as in the previous case, prepare the required number of flexible elements. Then proceed like this:
- Through holes are made in the walls of the steel pipe. The density and uniformity of the bristles depends on the accuracy of this work and the step between drillings, so this stage should be treated as responsibly as possible.
- Wire elements are threaded into the holes, placing their edges symmetrically with respect to the pipe.
- A steel bar is installed in the center, to which the holding cable will later be attached.
- The inner surface of the pipe is filled with mortar, which will ensure fixation of the flexible elements and make the device quite heavy.
The tool can be used only after the cement-sand mixture has set and acquired the necessary strength.
What you need to know before lowering the tool down the chimney
The chimney should be cleaned not at the end of the heating season, but at the very beginning . This will allow you to have complete confidence that there is no bird's nest, cobwebs, leaves or other debris in the chimney. The best time for this is one of the warm and windless days in early autumn.
When cleaning a chimney, you should take care of the appropriate equipment and insurance.
Before you change into a chimney sweep suit and begin chimney maintenance, you must close all stove dampers and doors.
Soot is tiny particles that can seep into any cracks and pollute the room and objects that are in it.
If you have to service the chimney of a fireplace with an open firebox, then it is sealed using plastic film and tape.
The process of cleaning a chimney is not difficult. The brush is lowered repeatedly into the smoke channel, knocking deposits off the walls. To enhance the effect, alternate reciprocating movements with twisting the cable in different directions. The soot falls down. You can remove it through the inspection hatch using a dustpan, poker and broom.
There are situations when a device encounters an insurmountable obstacle halfway through its journey.
This can be any voluminous object - some kind of rag, a bird's nest, or a piece of brick that has fallen out of the masonry.
In this case, the brush is unfastened and the resulting jam is knocked out with just a weight, in the expectation that the cork will fall into the stove. After this, the brush is returned to its place and cleaning activities are resumed.
Regular soot removal will be required even where the latest, high-tech solid fuel equipment is used.
The brush, which you can make with your own hands, will cope with even the most stubborn deposits with dignity.
It’s just important not to put off cleaning the chimney for too long - not only the thermal efficiency and economics of the stove depend on it, but also the safety of your family.
Brush for cleaning the chimney - do it yourself
Solid fuel stoves and fireplaces are as popular sources of heat as they were hundreds of years ago. Some people like live fire and the crackle of burning logs, others are tempted by the use of cheap fuel, and still others are simply forced to heat their house with wood due to the lack of alternatives.
Homemade attachments / cutters / consumables for engravers, drills and drills
The article will touch upon the topic of how to make consumables with your own hands. It's no secret that Chinese nozzles are of very low quality, while branded ones are overpriced. So in some cases it will be more profitable to do it yourself. Under the cut you will see my homemade attachments and also interesting solutions from the Internet .
Abrasive attachments
Petal circle for engraver
Original sandpaper on a rubber drum does not last long, so you need to find an alternative solution. Cut out a circle of small diameter from plywood:
Let's give it a more even shape:
Making cuts with a hacksaw for metal:
We glue sandpaper into the resulting slots using epoxy resin:
Flap wheel for drill
The nozzle has a larger diameter. To prevent a “spread” as in the previous version, when gluing, the sandpaper must be tightened with an elastic band. This occurs because the base of the fabric absorbs the resin from the cut and becomes rough.
The advantage of flap wheels is that they last an order of magnitude longer than regular sandpaper on a drum of the same diameter.
Emery for a drill from rollers from a tape recorder
Older reel-to-reel tape recorders have large rubber rollers with a metal sleeve. We place a bolt on the bushing and glue sandpaper onto the rubber:
Cutting wheels for engraver
The topic is quite common, but I’ll still tell you for the sake of completeness.
We take a thin cutting disc for an angle grinder, a compass with two needles, an awl, and unnecessary scissors:
1) We draw circles with a compass (you shouldn’t make too large circles, it’s inconvenient to work with them. The optimal size is slightly smaller than a standard circle) Make sure that the center of the circle is in the middle of one of the squares of the reinforcing mesh.
2) Use scissors to cut the disk into sectors, and then cut out the circles themselves located in the sectors. Metal scissors are suitable for this work, but ordinary stationery scissors can also be used, but this makes them more dull, so we take those scissors that we don’t mind.
3) Using light rotational movements of the awl, we begin to make a hole alternately on both sides. The diameter of the hole must be equal to the diameter of the screw. If the hole is any larger, it will break.
4) Grind the circle at low speed on an unnecessary sharpening stone:
And we get reinforced cutting wheels:
Making such circles is much cheaper than buying them. They also last longer than purchased non-reinforced circles.
Decorative sanding attachment
A self-tapping screw without a head is screwed into the cork, and a washer is glued to the base. The chuck's jaws will rest against the washer and prevent the screw from being screwed in deeper.
It is most convenient to use this attachment on a drilling machine. Instead of a self-tapping screw, you can screw a felt attachment into the cork:
Drill polishing attachment
Another fairly common topic. The felt from the felt boot is clamped with a bolt with wide washers. Polishing paste, such as GOI paste, is applied to the felt.
The following are a few examples of abrasive attachments taken from the Internet.
Sanding drum for drill
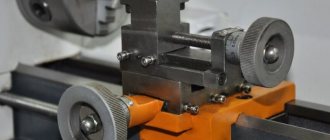
Sanding drum for engraver
On a lathe, a metal drum is turned with a slot into which the edge of the najak is tucked, and it is wrapped around the drum. Fixation occurs with an elastic band. The same structure can be made from plywood, as shown in the previous version.
Grinding cylinders for engraver
Comrade Marshall suggests making cylinders this way, I quote:
In order to make this type of consumable, we will need: a durable, but as thin as possible fabric (preferably cotton), sandpaper of the required grain size, and most importantly, a tube of suitable diameter, on which the cylinders will be placed during gluing.
So, we take the fabric and cut it into long strips 12 mm wide. Then we cut these strips to the size of the diameter of the tube with an overlap of about 1-1.5 cm, pull them tightly onto the tube (so that they do not dangle) and glue our pieces directly on the tube using regular PVA. The next task is a little more complicated: you need to correctly make a stencil, according to which the skins themselves will be cut out in the future. The stencil is shown in the picture on the right under the tube. We do this: take and cut off a piece of skin the same width as the fabric, but 1 cm longer. We apply it on top of the glued fabric and mark the place where the two ends of the skins should meet. After this, we carry out the necessary geometric actions: from the point of the proper junction we draw a line across the skin, from the other end of the skin, at the same distance, we do the same, after which we draw diagonals in the resulting rectangles and cut off pieces of skin along these diagonals. Now, when you place your stencil on top of the fabric glued to the tube, you get an accurate diagonal connection of the ends of the sandpaper. Now you have a stencil that you can trace with a pen along the outline on the back of the sandpaper.
The next step is quite simple: we glue strips of fabric until there is no more space on the tube. Next, we cut out pieces of skin using a stencil and glue them on top of the fabric with the same PVA or, better yet, “Moment.” To prevent the skin from unfolding before it sticks, you need to press it with a rubber band or a strip of electrical tape. After drying, it may turn out that your craft is stuck to the tube, so after applying the glue, you need to rotate the workpieces around its axis a couple of times at different times. Also, to avoid gluing the workpiece to the tube, you cannot use super glue and the tube should not be made of wood.
Milling cutters
A cutter made from a lighter wheel for a drill or engraver
If the attachment will be used in a drill, then place the wheel on the bolt; if in an engraver, instead of a cutting wheel:
This cutter easily cuts wood, plastic and soft metal.
Dowel cutter for drill
We grind off all the unnecessary irregularities from the cap. Using the engraver's cutting wheel, we make cuts at an angle and get a cutter:
Center cutter
A type of drill and cutter. A center cutter is convenient for cutting holes in thin materials. In a metal block, you first need to drill holes for the drill and cutter, then for the clamping screws and cut threads into them.
If the center cutter will be used in a drill, then instead of a drill you need to install a metal rod. The cutter is made from the shank of a broken drill.
You can also use it to cut washers, for example from fiberglass from soldered circuit boards:
Cork cutter
One book suggests making a cutter from cork. I can’t download how good this idea is, since I haven’t tried to process anything with such a cutter myself. I think it will be suitable for very soft materials.
A couple of cutter designs from the Internet
Electric razor blade cutter
Comrades on the forum suggest using the knife of an electric razor as a cutter. But there is one problem - the direction of rotation of the knife is reversed, so you need a drill with reverse.
Hacksaw blade cutter
Add your tips and suitable options from the Internet in the comments.
How to make a brush with your own hands - Metalworker's Guide
According to the recommendations of dentists, brushes for oral hygiene should be changed every 2-3 months.
Therefore, they are often sent to trash containers, without thinking that with the help of this device you can not only facilitate and speed up housework by using brushes inappropriately, but also use them as a material for making useful household items and crafts for children.
Using brushes inappropriately
The main purpose of used old brushes prepared for disposal is to clean various surfaces. The toothbrush is used:
- For washing dishes with a narrow neck, where a brush cannot fit.
- For washing small parts of appliances that cannot be reached with a rag or sponge (coffee grinders, teapots).
- For cleaning small hands on the gas stove, kitchen furniture and their internal surfaces.
- For cleaning ribbed surfaces.
- For cleaning strainers in juicers, colanders, tea strainers, etc.
- When cleaning soft parts (headphone membranes, phone speakers) from dust and dirt.
- For removing red deposits from taps and shower heads.
- A dry old brush can easily remove dust from the computer keyboard, especially the spaces between the keys, where not only dust, but also food crumbs settle.
- Two old toothbrushes are connected at the bottom with tape with their heads facing each other. This device cleans blinds and bicycle chains from dirt, passing along the surfaces on both sides simultaneously.
- The bristles easily remove dirt from the mosquito net. The mesh is placed in the bathtub, the shower is drained, and detergent is applied to the bristles. Wash its surface and corners from dust, dirt, and stuck insects.
- To remove urinary stone deposits, limescale and germs under the toilet rim, heat the plastic handle of the brush with a gas lighter and bend it.
- The bristles remove heels from carpets and upholstered furniture in combination with stain removers.
- Soft bristles with a drop of detergent will easily remove fresh stains from clothing.
- When cleaning the white soles of sneakers. Toothpaste is squeezed onto the brush, applied to the dirty side and sole surfaces of the shoes and cleaned. Then rinse with water and wipe dry.
- The bristles easily clean the surface of the corn from hairs or skins on new potatoes.
- Cleaning surfaces of jewelry and costume jewelry. Place gold and silver jewelry in a container with a drop of detergent and 1.2 drops of ammonia. Leave for 20-30 minutes. Then rinse under running water and clean the surfaces with a toothbrush.
- Fine bristles are indispensable when cleaning an aquarium, especially if there are models of sunken ships and castles there.
Attention!
The bristles of the brush do not scratch surfaces, so you can use it without fear for cleaning.
For beauty
Old toothbrushes are used for beauty purposes. This:
- Applying hair dye when coloring at home.
- Applying care products to hair.
- Eyebrow tinting and gel application so that the hairs do not stand out from the general row.
- Removing a clump of mascara from eyelashes.
- Applying castor oil to the eyebrows and eyelashes, which is beneficial for growth and contains vitamins.
- Light facial scrub. Before the procedure, the brush is washed, for example, in a chlorhexidine solution. A scrubbing composition is applied to the steamed face and gently massaged with bristles. Next, wash your face and apply nourishing cream.
- Lip massage.
- Cleaning your nails after working in the garden. To do this, prepare a solution from several crystals of citric acid and 1 tsp. water. The bristles are dipped into the solution and cleaned. You can also clean your heels in the same way.
Unusual use
Old used toothbrushes are often used for:
- Removing a splinter. Apply soda to the brush and hold it in place where the splinter is located. After a while she comes out on her own.
- Brushing dogs.
- Cleaning headlights and mirrors on cars.
- Drawing or splashing paint on a surface. The bristles are dipped into paint and petals are drawn on flowers or lines of different colors are applied randomly.
- Making a wobbler for fishing.
DIY brush crafts
Over the course of a year, a family of several people accumulates from 8 to 12 used brushes. Many people throw them away, considering them garbage, while others use them for crafts with children, developing in the younger generation the ability to fantasize and adapt unnecessary and used household items at unexpected moments in life, giving them a second life.
Romantic craft
Watch a very useful video on what to do with old toothbrushes. For this craft you will need:
- 2 toothbrushes;
- glue (you can use transparent ceiling “Titanium”);
- cotton buds;
- a small plastic cup (you can use a yogurt cup).
Stages of work:
- A drop of glue is applied to the side surfaces of the handles (the side opposite the bristles) and the tips.
- Place them in a glass opposite each other and wait for the glue to set.
- Cut off the wrapped ends of 2 cotton swabs and fold them in half.
- Then, 2 small cuts are made at one end of each stick opposite each other.
- The sticks are inserted with cuts into each other.
- The other sides are glued to the brushes, slightly lower than the heads.
- On the other hand, they do the same manipulations.
- They receive an impromptu sculpture of two lovers holding hands.
Brush hook
You can use old brushes to make bag hooks. Subsequently, such hooks can be attached to the walls of garages, sheds, home extensions, and basements for hanging bags. Brushes with ready-made holes at the top for hanging are ideal for making hooks:
- Heat the surface of the handle evenly with a gas burner from all sides.
- When the handle becomes pliable, it is bent into a horseshoe shape and left in this position until it cools completely.
- Then use side cutters to bite off the top with bristles.
- Burrs are smoothed out using hard sandpaper or heating the cut area with a gas burner.
- If there is no hole in the hook handle, drill it using a drill.
- The hook is attached to a permanent place and used for its intended purpose.
Types of cord brushes for metal and wood
Modifications of brushes for drills are very diverse. There are nozzles that differ in shape, size, material and type of pile. In addition to brushes for drills, attachments for grinders, as well as hand brushes, are also popular.
It is the configuration of the nozzle that is one of the main criteria for classifying brushes. There are several types of devices, but despite the variety available, all brushes are round in shape. Moreover, this statement also applies to attachments for the grinder. Only manual cord brushes have other configurations.
Radial
Radial brushes are flat brushes suitable for treating surfaces in hard-to-reach areas . Cord brushes of this shape are also used for working with round products . A drill with an attachment is placed, for example, in a pipe, and thus the internal surface is processed.
Radial brush for drill TM Praktika. Photo 220 volt
Cylindrical
Cylindrical brushes have a shape that is elongated in length and narrow in diameter. Such nozzles are used for processing surfaces in narrow places. Also, cord brushes of this type are designed to work with small and medium-sized areas.
Cylindrical brush for drill. Photo VseInstruments.ru
Disc nozzles are often called oval or circular. Cord brushes of this type are suitable for processing large surfaces in hard-to-reach places, welding seams and joints. Read more about them here.
Disc brush for drill with brass bristles. Photo Dremel
Cup-shaped brushes are used to remove various contaminants , to prepare the surface before applying varnish and/or paint, sanding, and are used when carrying out labor-intensive work with large areas of flat products.
Cup brush for drill TM DEXX. Photo InstrumLend.ru
Conical
Conical cord brushes are designed for cleaning surfaces in places where other types of attachments are difficult to reach. The unique configuration of the brushes allows you to perform complex tasks.
Pile material
The pile of drill bits is made from different materials. Each type of bristle is designed to perform specific tasks and work with specific products.
Steel, metal, iron
Metal wire brushes are the most common type of attachments. This type includes brushes with bristles made from:
Flat brush for drill with metal twisted bristles. Photo Matrix
Nozzles with brass-plated steel bristles are in demand among performers .
Devices of this type are suitable for almost all functions , with the exception of wood processing.
Often, metal and steel brushes are divided into separate categories of consumables for power tools.
Nylon
Nylon bristles are soft and delicate , so these brushes do an excellent job of texturing, polishing, removing dirt, brushing wooden products, working with soft metals (copper, aluminum and others), and plastic. They should be used in cases where the aesthetic appearance of the surface is of great importance .
End brush with nylon bristles. Photo Dremel
The bristles of the brush can have different types and shapes, similar to the body of the device.
Such attachments are devices whose pile is twisted and twisted into strands. This shape ensures increased hardness of the working part of the cord brush.
Cup wire brush for drill. Photo Matrix
Corrugated
Corrugated fibers have parallel wavy curves . Such bristles have springy properties, which reduces vibration of the drill.
Soft cup brush for drill with bristles made of corrugated steel wire. Photo Practice
Dimensions: 26 mm, 50 mm. and others
There are a large number of modifications of cord brushes. Drill attachments are more compact in size compared to grinder brushes. Devices with a diameter of up to 100 mm. should be called standard. Manufacturers offer craftsmen nozzles with a diameter of 25; 50; 60; 75 mm. and others. Large brushes have a larger diameter.
Disc brush for drill with bristles made of twisted steel brass-plated wire, diameter 100 m. Trademark DEXX. Photo Instrumentomania
Brands: Dexter, Dremel and others
Disc brush for drill. Photo Anchor
Craftsmen have the opportunity to purchase cord brushes for drills of various brands and manufactured by Russian and foreign enterprises:
When choosing a cord brush, it is worth remembering that attachments from different manufacturers may have slight differences both from each other and from the standard.
What you can make from old toothbrushes with your own hands: useful tips on how to use
According to the recommendations of dentists, brushes for oral hygiene should be changed every 2-3 months.
Therefore, they are often sent to trash containers, without thinking that with the help of this device you can not only facilitate and speed up housework by using brushes inappropriately, but also use them as a material for making useful household items and crafts for children.
Handle for hook or tool
If the plastic handle of your favorite crochet hook is broken or is missing altogether, you can make a handle from an old toothbrush with your own hands. For this:
- cut off the head with bristles with a metal file or bite it off with side cutters, clean the surface from burrs;
- secure the handle vertically;
- select a drill of the required diameter;
- a vertical hole is drilled in the middle with a drill;
- Use glue to secure the hook in the handle.
Attention!
In the same way, you can make handles for needle files and other tools, replacing store-bought handles that have become unusable and thereby extending their service life.
Sharp knife
To cut out fur products or to cut hard cardboard for needlework without burrs, you need a thin knife with a sharp blade. When you don't have a utility knife at hand, you can make it yourself using a toothbrush and a razor blade. Stages of work:
- All the bristles of the toothbrush are cut off.
- A cut is made in the middle with a knife.
- Drop a little glue and insert the blade.
- Allow to harden and use as intended.
Beautiful bracelet
To make this craft you will need brushes with transparent handles in bright colors, a pan of boiling water, a towel, and tongs. Stages of work:
- The bristles of future bracelets are removed using pliers.
- Immerse in boiling water for 1.2 minutes.
- Take it out with tongs, place it on a towel and bend it along your arm.
- If necessary, dip one edge or the other into boiling water.
- To obtain a twisted decoration, after bathing in hot water, twist the handle in a spiral without removing it from the towel.
Devices for cleaning surfaces from dirt
You can speed up the cleaning of various surfaces from dirt if you adapt a drill for this:
- The top of the old brush with bristles is cut off.
- A hole is drilled in the middle of the head with bristles and a self-tapping screw is inserted there.
- The self-tapping screw is inserted into the drill chuck.
- The drill is plugged in and quickly cleans contaminated surfaces.
To clean vertical surfaces, craftsmen have invented a new device. To do this you will need a champagne cork and 4 cut heads from used brushes:
- A self-tapping screw is screwed into the drink stopper.
- The tops with bristles are glued on four sides.
- Clamp the drill in the chuck, plug it in and clean dirty vertical surfaces.
Attention!
These automatic devices make it easy to clean dirty grout lines between tiles in the bathroom.
Using toothbrushes after they have been expelled from the bathroom allows you to give them a second life: when putting things in order, their use makes cleaning easier and faster, and replaces many different devices for caring for the face and hands. When working with a child, it helps to develop creative thinking and show ingenuity in situations where it is not possible to buy what is needed.
Types of cord brushes for metal and wood
Modifications of brushes for drills are very diverse. There are nozzles that differ in shape, size, material and type of pile. In addition to brushes for drills, attachments for grinders, as well as hand brushes, are also popular.
It is the configuration of the nozzle that is one of the main criteria for classifying brushes. There are several types of devices, but despite the variety available, all brushes are round in shape. Moreover, this statement also applies to attachments for the grinder. Only manual cord brushes have other configurations.
Radial
Radial brushes are flat brushes suitable for treating surfaces in hard-to-reach areas . Cord brushes of this shape are also used for working with round products . A drill with an attachment is placed, for example, in a pipe, and thus the internal surface is processed.
Radial brush for drill TM Praktika. Photo 220 volt
Cylindrical
Cylindrical brushes have a shape that is elongated in length and narrow in diameter. Such nozzles are used for processing surfaces in narrow places. Also, cord brushes of this type are designed to work with small and medium-sized areas.
Cylindrical brush for drill. Photo VseInstruments.ru
Disc nozzles are often called oval or circular. Cord brushes of this type are suitable for processing large surfaces in hard-to-reach places, welding seams and joints. Read more about them here.
Disc brush for drill with brass bristles. Photo Dremel
Cup-shaped brushes are used to remove various contaminants , to prepare the surface before applying varnish and/or paint, sanding, and are used when carrying out labor-intensive work with large areas of flat products.
Cup brush for drill TM DEXX. Photo InstrumLend.ru
Conical
Conical cord brushes are designed for cleaning surfaces in places where other types of attachments are difficult to reach. The unique configuration of the brushes allows you to perform complex tasks.
Pile material
The pile of drill bits is made from different materials. Each type of bristle is designed to perform specific tasks and work with specific products.
Steel, metal, iron
Metal wire brushes are the most common type of attachments. This type includes brushes with bristles made from:
Flat brush for drill with metal twisted bristles. Photo Matrix
Nozzles with brass-plated steel bristles are in demand among performers .
Devices of this type are suitable for almost all functions , with the exception of wood processing.
Often, metal and steel brushes are divided into separate categories of consumables for power tools.
Nylon
Nylon bristles are soft and delicate , so these brushes do an excellent job of texturing, polishing, removing dirt, brushing wooden products, working with soft metals (copper, aluminum and others), and plastic. They should be used in cases where the aesthetic appearance of the surface is of great importance .
End brush with nylon bristles. Photo Dremel
The bristles of the brush can have different types and shapes, similar to the body of the device.
Such attachments are devices whose pile is twisted and twisted into strands. This shape ensures increased hardness of the working part of the cord brush.
Cup wire brush for drill. Photo Matrix
How to make a toothbrush soft: recommendations
People who respect themselves and others are raised from childhood to constantly monitor and care for their teeth and mouth. They know that beautiful white teeth and pleasant breath affect health, personal life, and help build a successful career.
And in order for everything to always be in order in your mouth, you need to brush your teeth regularly - this has been known since childhood. The most popular item for oral care is an ordinary toothbrush.
Parents teach them to use it from a very early age. However, even they do not always know the criteria for choosing a much-needed tool.
They often do not know how to care for it and how often to change it.
Those who do not know the answers to these simple and important questions are very likely to risk damaging both their tooth enamel and gums. There is a high risk of getting a bunch of incurable diseases, and not only the mouth, but also other organs will be affected. To prevent this from happening, you should pay attention to some nuances when buying a toothbrush.
Brush selection methods
Typically, toothbrushes are purchased in modern perfume stores or pharmacies. When choosing, many people look at price and appearance and focus only on them, but these are by no means the main indicators. What should you pay attention to, how to choose correctly?
The first factor that you should take a close look at is the material used to make the bristles. There is an opinion that natural bristles are the best option. But this is far from true. Bacteria accumulate on it, leading to oral diseases. The best one is artificial: it has harder fibers, and the tips do not scratch the enamel, destroying it.
Information about the stiffness of the bristles is written on the packaging or the brush itself. According to the degree of hardness, brushes can be
- Very soft. Recommended for little ones or those with extremely sensitive teeth.
- Soft. Designed for older children 6–13 years old, recommended for adults with oral health problems
- Average. Good for teenagers.
- Tough. These brushes are used by adults with absolutely healthy teeth. Before use, it is recommended to consult a dentist, otherwise there is a risk of damage to the gums and enamel.
Using water
How to make a toothbrush soft? Often people purchase a brush with the required parameters, but after some time it becomes too hard, rubs the gums and causes discomfort. What can you do in this case, without running back to the store for a new copy? There are several tools that can make your toothbrush soft and brushing your teeth a pleasant and comfortable experience.
The easiest and most affordable way to soften a brush is with ordinary tap water. How to do it? Follow the instructions below:
- Under running hot water - there is absolutely no need for it to be boiling water. Otherwise, the plastic bristles will simply melt. You need to hold it with the bristles up for several (2-3) minutes.
- Then put hot water in a glass or jar and leave the brush there for 5–7 hours. The best thing is to do this in the evening after brushing your teeth before going to bed.
- In the morning, when you start brushing your teeth, you may find that the bristles have become soft.
Another way to soften your toothbrush is to use hydrogen peroxide. It is best to take a three percent solution. This is usually present in the first aid kit of anyone who takes care of their health.
Peroxide is poured into a glass or mug one third full, and a brush is placed in it for about 5–7 minutes. Then it is thoroughly washed. That's it, now you can use it.
Rinse aid
Surely a considerable number of people use mouthwash. It can also be a good option for softening your toothbrush.
This is done as follows:
Half a glass of rinse aid is poured - this amount is enough for the brush head to be completely immersed in it. After which a brush is placed in the solution. Depending on the stiffness of the bristles, the duration of the event ranges from two to three minutes to half an hour. The effectiveness of this technique has long been tested and proven - the villi will become soft and pleasant to the teeth.
Vinegar
Many people soften their paint brushes by soaking them in vinegar. If this method softens paint brushes, then it will work for toothbrushes. Another method to make your toothbrush soft is to soak it in a vinegar solution or pure vinegar. Any will do - table, apple or wine. But, as a rule, most people have a regular dining room in their kitchen.
How to do it?
- Vinegar is poured into a vessel (preferably transparent). You don't need a lot - just enough to completely hide the stubble.
- The dishes are placed in the microwave and heated - it is not necessary to boil, just make the liquid warm.
- Dip a brush into vinegar and leave for half an hour.
- After the appointed time, the brush is pulled out and rinsed under running water.
- To achieve a better effect, the bristles can be kneaded with your hands.
Aloe vera
Another way to make your toothbrush soft is to use aloe vera extract. It is usually used to moisturize and soften the skin. It will also quite successfully soften the bristles of the brush.
The procedure is carried out in three stages:
- The glass is filled one third with extract.
- Place the brush in the dish so that the head is completely hidden.
- After fifteen minutes, the brush is pulled out and rinsed.
That's it, she's ready to brush her teeth again.
Common salt
How to make a toothbrush soft at home? There is another very accessible and simple way. In order to try it, you will need simple table salt:
- A thick saline solution is made - the more salt, the better.
- A brush is dipped into the solution and left for several hours. You can leave it overnight.
- In the morning, the brush is washed and used for its intended purpose. After such a “bath” she will become soft and pleasant.