Bending technology - basic information
Metal bending is performed without welding seams, which avoids corrosion in the future and produces a product of increased strength. Deformation does not require significant effort and is usually performed in a cold state.
The exception is hard materials such as duralumin or carbon steels. Sheet metal bending technology is developed according to the assigned tasks in such options as:
A special case is flexion with stretching. This technology is used in the manufacture of parts with large bending radii and small diameters. When making parts with your own hands, the process is combined with operations such as cutting or punching.
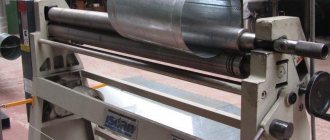
Soft types of metals and alloys, such as brass, copper, and aluminum, are well suited for home processing. The production of products by bending is carried out on rolling or rolling machines, or manually.
The last procedure is quite labor-intensive. Bending is done using pliers and a rubber hammer. If the sheet is thin, use a mallet.
How to bend at right angles
To bend a bracket from a metal sheet, you will need a set of tools and accessories, consisting of:
- vice,
- hammer,
- power saws,
- bar,
- frames
The length of the strip is made according to the scheme, with the calculation that there should be a margin of 0.5 mm for each bend, plus another millimeter for folds on both sides. The workpiece is placed in a vice with squares. Clamping it along the fold line, process it with a hammer.
After this, the future bracket is unfolded in a vice, clamped with a frame and a block, and the other side is formed. The workpiece is pulled out, the required length of the sides is measured, making bends along the bottom.
Use a triangle to check the correctness of the angle, correcting inaccuracies with a hammer. When performing both operations, the workpiece is pressed with a block and a frame. The finished staple is filed to the desired size.
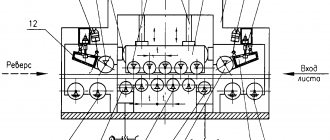
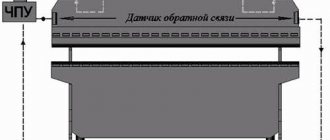
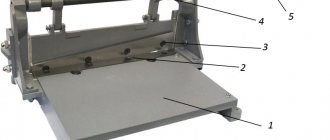
How to make a sheet bending machine yourself
To give the metal the desired configuration, tinsmiths use a sheet bending machine. But what should a master do if he doesn’t have special equipment at hand?
In fact, the question of how to bend sheet metal at home is easily resolved. It is enough to use your own ingenuity and basic equipment to make a simple machine.
To make a bender for a metal profile, you will need:
- I-beam 80 mm,
- fasteners (bolts),
- loops,
- corner 80 mm,
- clamps,
- a pair of handles.
You will also need a welding machine and a stable table on which the finished machine is mounted.
The basis of the device is an I-beam, to which a corner is screwed with two bolts, holding the workpiece during the bending process. Three door hinges are attached under it by welding. Their second part is welded directly to the corner.
In order for the machine to easily turn while bending sheet metal, handles are attached to it on both sides. The finished machine is secured to the table with clamps. Before laying the workpiece, the corner is unscrewed or lifted. The sheet is pressed, aligned along the edge and folded, turning the machine by the handles. The homemade device is only suitable for processing workpieces of small thickness.
Bending a metal sheet with a hammer
In order to bend a sheet up to 1.2 mm thick at a right angle, use the simplest tools - pliers (clamps) and a rubber hammer.
The processing is carried out on a flat wooden block. The fold line is drawn using a pencil and ruler. Then the sheet is clamped with pliers so that their ends fall exactly on the marking line.
The edge is gradually bent upward, moving along the fold. Once the angle approaches 90 degrees, the sheet is placed on the block and finally leveled using a hammer.
Narrow parts, such as tin edges, are made in this way.
Tip: Use a rubber or wooden hammer to prevent dents from forming on the metal. If bending is performed with a conventional tool, you need to take a textolite plate as a gasket.
It is convenient to bend sheets up to 2 mm thick on a desktop. The metal is positioned so that the marking line falls on the edge. A steel corner is placed under the material being processed.
The sheet is clamped in a vice using two wooden blocks. Bending is done using a hammer, tapping the metal from one end to the other. At the same time, the edge of the sheet is directed downward so that it ultimately lies completely on the corner fixed along the edge of the table. This method can be used to make products of any width, including boxes or barbecues.
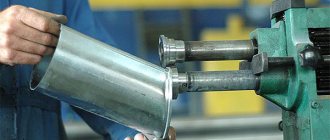
Making pipes without using a machine
Home craftsmen have invented a lot of ways to bend a metal sheet into a pipe without using a machine.
We propose to consider the simplest option using a blank of suitable size. It is made from an old pipe of suitable diameter.
A sheet of metal is laid out on the floor and a piece of the required length is cut from it. To determine the required size, the required pipe diameter is multiplied by 3.14 and added 30 mm for the seam.
A pair of tubes are welded to the blank on both sides, perpendicular to one another. The crowbar should be freely inserted into their holes.
Master's recommendation: by bending a metal sheet using a blank, it is convenient to make pipes no more than a meter in length.
To use the device, the effort of three people is required. The blank is placed on the edge of the sheet. One person stands on top, two others screw the metal onto the blank, turning the crowbar 90 degrees.
The entire length of the sheet is rolled in this way, the remaining edge is hammered. The seam is secured by welding.
It must be taken into account that the bend radius of sheet metal depends on its thickness and manufacturing method. Hot rolled steel is more suitable for pipes; profile products are made from cold rolled steel.
How to make a chimney - protection for a pipe?
To prevent precipitation from getting into the chimney and to prevent it from being destroyed by ice, it must be protected with a chimney. Master tinsmiths can make a chimney of the most bizarre shapes; sometimes a weather vane is installed on the chimney, indicating the direction of the wind. But you can make a chimney of a simple design on a chimney pipe made of metal or brick with your own hands. Since ancient times, chimneys have protected the chimneys of houses, and they have not lost their relevance today. If wood-burning stoves are rare in homes today, then almost every country house has a fireplace, the exhaust pipe of which must be protected from precipitation, birds, autumn leaves and other foreign objects. All other pipes facing the roof: ventilation and chimneys of gas heating appliances. In addition to their protective and decorative function, chimneys can perform another function: they improve the circulation of hot air in fireplaces and stoves. Let's figure out how to make a chimney with your own hands.
Types of chimneys
Chimneys may differ from each other in roof shape, material of manufacture, and the presence of additional structural elements. Therefore, before you start doing the work yourself, it’s worth getting acquainted with their varieties.
Chimney roof shapes
It is enough to look carefully at the roofs of houses in some village or suburban settlement to be convinced that human imagination is inexhaustible in various inventions. Chimneys are decorated with chimneys of various shapes, and some craftsmen use instead of them holey cast iron pots, teapots, buckets and even milk flasks. If you want to make a real beautiful chimney with your own hands, you will be interested to know what shape you can give it. The following forms of chimney roofs are distinguished:
- Tent.
- Vaulted (semi-cylindrical).
- Gable.
- Four-slope (hip).
- Four-pincer.
- Spire-shaped.
- Flat, etc.
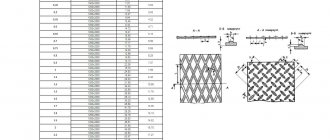
In the photographs below you can see some of the listed options. Chimney with a hip roof Chimney with a four-gable roof The materials for the manufacture of chimneys are most often galvanized or stainless steel, copper sheets. They can have a polymer coating of various shades to protect against corrosion.
Let's take the vertical and horizontal projections of the cone (Fig. 1, a). The vertical projection of the cone will have the form of a triangle, the base of which is equal to the diameter of the circle, and the sides are equal to the generatrix of the cone. The horizontal projection of the cone will be represented by a circle. If the height of the cone H is given, then the length of the generatrix is determined by the formula:
Bending technology - basic information
Metal bending is performed without welding seams, which avoids corrosion in the future and produces a product of increased strength. Deformation does not require significant effort and is usually performed in a cold state.
The exception is hard materials such as duralumin or carbon steels. Sheet metal bending technology is developed according to the assigned tasks in such options as:
A special case is flexion with stretching. This technology is used in the manufacture of parts with large bending radii and small diameters. When making parts with your own hands, the process is combined with operations such as cutting or punching.
Soft types of metals and alloys, such as brass, copper, and aluminum, are well suited for home processing. The production of products by bending is carried out on rolling or rolling machines, or manually.
The last procedure is quite labor-intensive. Bending is done using pliers and a rubber hammer. If the sheet is thin, use a mallet.
How to bend at right angles
To bend a bracket from a metal sheet, you will need a set of tools and accessories, consisting of:
- vice,
- hammer,
- power saws,
- bar,
- frames
The length of the strip is made according to the scheme, with the calculation that there should be a margin of 0.5 mm for each bend, plus another millimeter for folds on both sides. The workpiece is placed in a vice with squares. Clamping it along the fold line, process it with a hammer.
After this, the future bracket is unfolded in a vice, clamped with a frame and a block, and the other side is formed. The workpiece is pulled out, the required length of the sides is measured, making bends along the bottom.
Use a triangle to check the correctness of the angle, correcting inaccuracies with a hammer. When performing both operations, the workpiece is pressed with a block and a frame. The finished staple is filed to the desired size.
How to make a sheet bending machine yourself
To give the metal the desired configuration, tinsmiths use a sheet bending machine. But what should a master do if he doesn’t have special equipment at hand?
In fact, the question of how to bend sheet metal at home is easily resolved. It is enough to use your own ingenuity and basic equipment to make a simple machine.
To make a bender for a metal profile, you will need:
- I-beam 80 mm,
- fasteners (bolts),
- loops,
- corner 80 mm,
- clamps,
- a pair of handles.
You will also need a welding machine and a stable table on which the finished machine is mounted.
The basis of the device is an I-beam, to which a corner is screwed with two bolts, holding the workpiece during the bending process. Three door hinges are attached under it by welding. Their second part is welded directly to the corner.
In order for the machine to easily turn while bending sheet metal, handles are attached to it on both sides. The finished machine is secured to the table with clamps. Before laying the workpiece, the corner is unscrewed or lifted. The sheet is pressed, aligned along the edge and folded, turning the machine by the handles. The homemade device is only suitable for processing workpieces of small thickness.
Bending a metal sheet with a hammer
In order to bend a sheet up to 1.2 mm thick at a right angle, use the simplest tools - pliers (clamps) and a rubber hammer.
The processing is carried out on a flat wooden block. The fold line is drawn using a pencil and ruler. Then the sheet is clamped with pliers so that their ends fall exactly on the marking line.
The edge is gradually bent upward, moving along the fold. Once the angle approaches 90 degrees, the sheet is placed on the block and finally leveled using a hammer.
Narrow parts, such as tin edges, are made in this way.
Tip: Use a rubber or wooden hammer to prevent dents from forming on the metal. If bending is performed with a conventional tool, you need to take a textolite plate as a gasket.
It is convenient to bend sheets up to 2 mm thick on a desktop. The metal is positioned so that the marking line falls on the edge. A steel corner is placed under the material being processed.
The sheet is clamped in a vice using two wooden blocks. Bending is done using a hammer, tapping the metal from one end to the other. At the same time, the edge of the sheet is directed downward so that it ultimately lies completely on the corner fixed along the edge of the table. This method can be used to make products of any width, including boxes or barbecues.
Making pipes without using a machine
Home craftsmen have invented a lot of ways to bend a metal sheet into a pipe without using a machine.
We propose to consider the simplest option using a blank of suitable size. It is made from an old pipe of suitable diameter.
A sheet of metal is laid out on the floor and a piece of the required length is cut from it. To determine the required size, the required pipe diameter is multiplied by 3.14 and added 30 mm for the seam.
A pair of tubes are welded to the blank on both sides, perpendicular to one another. The crowbar should be freely inserted into their holes.
Master's recommendation: by bending a metal sheet using a blank, it is convenient to make pipes no more than a meter in length.
To use the device, the effort of three people is required. The blank is placed on the edge of the sheet. One person stands on top, two others screw the metal onto the blank, turning the crowbar 90 degrees.
The entire length of the sheet is rolled in this way, the remaining edge is hammered. The seam is secured by welding.
It must be taken into account that the bend radius of sheet metal depends on its thickness and manufacturing method. Hot rolled steel is more suitable for pipes; profile products are made from cold rolled steel.
How to bend a metal cone with your own hands - Metals, equipment, instructions
To prevent precipitation from getting into the chimney and to prevent it from being destroyed by ice, it must be protected with a chimney. Master tinsmiths can make a chimney of the most bizarre shapes; sometimes a weather vane is installed on the chimney, indicating the direction of the wind. But you can make a chimney of a simple design on a chimney pipe made of metal or brick with your own hands. Since ancient times, chimneys have protected the chimneys of houses, and they have not lost their relevance today. If wood-burning stoves are rare in homes today, then almost every country house has a fireplace, the exhaust pipe of which must be protected from precipitation, birds, autumn leaves and other foreign objects. All other pipes facing the roof: ventilation and chimneys of gas heating appliances. In addition to their protective and decorative function, chimneys can perform another function: they improve the circulation of hot air in fireplaces and stoves. Let's figure out how to make a chimney with your own hands.
Tent chimney
A chimney with a hip roof is a pyramid consisting of four identical isosceles triangles; it is easy to make with your own hands. The steepness of the roof slopes depends on the size of the base of the triangles - the smaller they are, the steeper the slopes will be. Attention! To do everything correctly, first make a drawing of the chimney (scan) on a large sheet of cardboard or paper. Cut out the model, bend it diagonally (OK, OL, OM) and try it on the chimney. Based on the fitting data, increase or decrease the size of the base of the triangle (CL). Diagram for manufacturing a chimney with a hip roof
- Transfer the finished reamer to the sheet of metal, not forgetting to leave edges along the edges.
- Cut the workpiece with metal scissors.
- Place the reamer on the workbench and hammer the ribs OK, OL and OM with a mallet.
- Bend the edges along the edges of the workpiece and hammer them. To make the structure more durable and rigid, you can roll wire into the edge (see picture).
- Connect the edges of the development with a simple fold. The picture shows how to do this: first bend the edges so that they are perpendicular to the main plane and parallel to each other. Then fold the higher edge ( 12mm ) onto the shorter edge ( 6mm ). Forge the fold so that it is in the same plane with one of the faces of the chimney.
- Prepare four metal posts and rivet them to each roof slope of the chimney.
- Secure the chimney in the pipe with metal pins.
Now all that remains is to calculate the angle of the sector that needs to be cut.
Round straight cone
In general, a cone is a figure constructed as a result of the movement of a segment along a certain curve on a plane, while the second end of the segment is fixed at a certain point in space. The segment itself is called a generatrix, or generator, and the curve is called a directrix, or guide.
According to the above definition, the curve that limits the figure can be of absolutely any type. The most famous of them are the parabola, hyperbola, ellipse and circle. In the latter case they speak of a round cone.
A round cone can be inclined or straight. Both figures are shown below in the figure.
Here r is the radius of the circle that bounds the base of the figure. The letter h denotes the height, which represents the perpendicular lowered to the base from the top of the cone. The letter a denotes the axis of the cone. It can be seen that in the case of a straight figure, its height coincides with the axis, that is, it intersects the circle at its center.
In addition to the radius r and height h, an important linear parameter of the cone is the length of its generatrix g. As was said, the generator is a segment connecting the directrix with the height. For a right round cone, all generators are equal to each other.
Further in the article, revealing the question of how to find the diameter of a cone, only a round and straight cone will be considered.
Features and benefits of the service
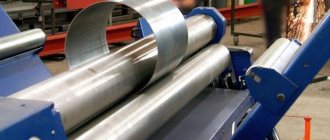
Metal rolling ensures uniform deformation. The formation of scratches, gouges and dents on the surface of the sheet is excluded. High manufacturing precision is achieved. The mechanical loads of the rollers are evenly distributed over the entire friction zone.
The final product of rolling is open cylindrical elements or spatial conical products. This method has many other advantages:
- you can process steel of different thicknesses (the maximum radius of curvature directly depends on this indicator);
- work is performed without large expenditures of energy;
- it is possible to achieve a uniform gloss;
- You can deform stainless, galvanized and aluminum materials.
Sheet metal rolling can be done at different speeds. The higher they are, the less force is exerted on the contact surface of the product.
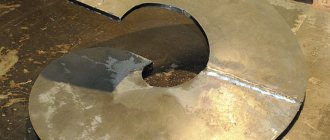
Development of a truncated cone
As we have seen, the figure in question is formed by three surfaces. Two of them represent the bases, and the third is the side. The sum of the areas of these surfaces is the total surface of the truncated cone. In three-dimensional space, it is inconvenient to calculate its area, since the quantity itself is two-dimensional. In this regard, when the problem of determining the surface area of spatial figures arises, it is customary to represent them on a plane.
In our case, the scan is quite easy to obtain. To do this, you should mentally cut off the base from the figure along the corresponding circles. Then, you need to cut along the generatrix and reveal the side surface. The end result will be the one shown in the photo.
It consists of two different circles and part of a circular sector, the center of which is cut out.
Calculators for calculating cone development sizes
A few words about the calculated parameters
It will not be difficult to understand the calculation principle by understanding the following diagram:
A truncated cone with defining dimensions and its development. A truncated cone is shown, but with a full one - the principle does not change, and calculations and construction become even simpler.
So, the cone itself is determined by the radii of the bases (lower and upper circles) R1 and R2, and the height H. It is clear that if the cone is not truncated, then R2 is simply equal to zero.
The letter L indicates the length of the side (generator) of the cone. In some cases, it is already known - for example, you need to make a cone according to a sample or cut out material to cover an existing frame. But if it is unknown, it doesn’t matter, it’s easy to calculate.
The scan is shown on the right. For a truncated cone, it is limited by the sector of the ring formed by two arcs, external and internal, with radii Rb and Rs. For a full cone, Rs will also be zero. It is clearly seen that Rb = Rs + L
The angular length of the sector is determined by the central angle f, which in any case must be calculated.
All calculations will take literally a minute if you use the offered calculators:
History of the definition of a cone
Geometry as a science emerged from the practical requirements of construction and observations of nature.
Gradually, experimental knowledge was generalized, and the properties of some bodies were proven through others. The ancient Greeks introduced the concept of axioms and proofs. An axiom is a statement obtained through practical means and does not require proof. In his book, Euclid gave a definition of a cone as a figure that is obtained by rotating a right triangle around one of its legs. He also owns the main theorem that determines the volume of a cone. This theorem was proven by the ancient Greek mathematician Eudoxus of Cnidus.
Another mathematician of ancient Greece, Apollonius of Perga, who was a student of Euclid, developed and expounded the theory of conic surfaces in his books. He owns the definition of a conical surface and a secant to it. Schoolchildren today study Euclidean geometry, which has preserved the basic theorems and definitions from ancient times.
Designation of taper in the drawing
When developing technical documentation, all established standards must be provided for, since otherwise it will not be used in the future.
When analyzing the taper designation in the drawings, you need to pay attention to the following points:
- The diameter of the large base is displayed. The figure under consideration is formed by a body of rotation, which is characterized by a diametrical criterion. In the case of a cone, there may be several of them, and the change in the criterion occurs slowly, not stepwise. Basically, a similar figure has a larger diameter, and also a transitional one in the case of a step.
- Apply the diameter of the smaller base. The smaller base is responsible for forming the required angle.
- The length of the cone is calculated. The distance between the smaller and larger Base is considered a criterion for length.
- Based on the constructed image, the angle is set. Basically, the necessary calculations are carried out for this. In the case of determining the size from a printed image using a specialized measuring device, the accuracy is significantly reduced. The second method is used in the case of creating a drawing for the manufacture of non-critical parts.
The simplest notation of taper also takes into account displays of additional dimensions, for example, reference. In most cases, the taper symbol is used, which makes it possible to immediately understand the difference in diameters.
There are quite a lot of different parameters that affect the definition of taper. The properties include the following:
- The angle can be specified in degrees as a fraction or as a percentage. The choice depends on the area of use of the drawing. An example is that in the mechanical engineering field the value of a degree is indicated.
- In the mechanical engineering field, the concept of normal taper is included in a special group. It varies in a specific range and can be 30, 45, 60, 75, 90, 120°. Similar criteria are typical for most products that are used during the assembly of a wide variety of mechanisms. At the same time, maintaining similar values is much easier when using turning equipment. However, if necessary, inaccurate angles can be maintained, everything will depend on the specific case.
- When drawing key dimensions, a drawing font is used. It is distinguished by an unlimited number of properties that must be provided. For correct display, tabular information is used.
- To begin with, the taper icon is indicated from which the arrow is drawn and the value is displayed. The display characteristics in most cases depend on the drawing. In most cases, there are a lot of different sizes applied, which makes taper application much more difficult. This is why it is possible to use several different methods for displaying similar information.
In the drawing, the criterion in question is marked in the form of a triangle. This requires a digital value that can be calculated using a variety of formulas.