Owners of summer cottages are often faced with the need to mow their lawns, and performing this manipulation manually is quite difficult.
The high price of lawn mowers available in stores, as well as the difficulty of finding a model that meets certain requirements, often forces you to make such a device yourself.
At the same time, this is a good way to get rid of old appliances such as a vacuum cleaner or a chainsaw from the USSR era.
A homemade device has many advantages:
- it is cheaper than a purchased analogue;
- better corresponds to the goals and objectives that the owner sets for it;
- much easier to maintain and repair.
Procedure
To make a device that will suit you and will best suit the tasks facing it, adhere to the following algorithm :
- draw up technical specifications;
- select materials;
- draw a drawing;
- make or buy missing parts;
- assemble the device according to the drawing.
Drawing up technical specifications
At this point, determine what you need the lawn mower for and what features it should have. For example, a device for a small house plot with an area of a couple of hundred square meters (one hundred square meters is 100 m2) can be made with a small cutting width (cutting width), which will reduce its weight and make it easier to move even without wheel drive.
In addition, it is important to take into account the parameters of the grass - the taller and tougher it is, the more powerful the engine will have to be installed on the mower.
It is also necessary to determine other characteristics, that is:
- the size of the wheels (the larger they are, the higher the maneuverability and the easier it is to roll the device around the site);
- possibility of installation and design of the grass catcher;
- mulching function and its effectiveness;
- engine type;
- wheel drive (needed or not);
- adjustable cutting height (needed or not).
Selection of material
There are no strict criteria for the material used, with the exception of what is used to make a knife.
The mower body can be made from:
- steel or aluminum corner;
- sheet metal;
- thick textolite or getinax;
- boards;
- thick plywood or OSB;
- an old door from a cabinet or bedside table;
- cut pan (if the body also doubles as a soundboard).
The deck can be made from:
- trimmed pan or bucket;
- roofing iron;
- sheet aluminum or galvanized steel;
- fiberglass and epoxy resin.
Wheels can be selected from:
- baby stroller;
- scooter;
- children's tricycle;
- heavy toys;
- carts from a store or warehouse.
The knife can be made from a steel strip 3–5 mm thick, and pulleys from old equipment and a passenger car generator belt are suitable for the gearbox and wheel drive.
The motor can be removed from old gasoline or electric equipment , for example, a chainsaw or some kind of machine.
It is quite difficult to obtain a battery motor of suitable power (0.5 kW or more), unless broken equipment with such a motor turns up. Or you can buy it and a suitable power source separately, but then the cost will be comparable to the price of a new cordless mower.
Drafting
Having decided on the parameters of the lawn mower and the available materials, start creating a project , that is, a drawing and sketch.
At this stage, try to think through not only the overall design of the mower, but also the design of each of its elements, as well as the fastening of individual parts to each other.
The more carefully you think through all the details, the easier it will be to assemble the device according to the drawing. Draw the drawing and sketch on a large scale so that you can actually draw all the details and their position relative to each other. Be sure to consider the properties of the materials you use.
For example, if the body is made from an aluminum corner, and the deck is made from scraps of a bucket, then the upper part of the deck is made of plywood or metal, which will prevent the cut grass from flying out through the space between the corners.
Use elements of drawings and photos that can be found on various forums or websites , because if someone has found a successful technical solution to a particular issue, then why reinvent it again?
Manufacturing or purchasing parts
When the drawing is ready, determine what you can do yourself and what you will have to order or buy.
For example, to make an attachment on the motor shaft to which the knife is attached, you need a lathe; if you have one, then you can make the part yourself, but if not, then you will have to order it from a turner.
Do you have an old Druzhba or Ural chainsaw?
Here is an example of people's ingenuity. The beautiful frame from the corner was thrown out of the warehouse as scrap metal as unnecessary. Special wheel units with a rotation of 180 0 on the hinge were found there. Without such a frame, the platform could have been welded. The remote working unit is independently driven from the chainsaw via a belt drive. Torque is transmitted to discs, where metal chains 25 cm long serve as cutting tools. A DIY chainsaw lawn mower has been used effectively for several years. An improved version has been made with a rotary cutter and a two-wheeled frame. It works more efficiently, but is difficult to manufacture.
Each master is proud of his ingenuity and the performance of the tool. However, it should be understood that the collective mind of designers creates tools that are no less functional, but safer.
The advantages of homemade tools include:
- saving money on purchasing tools;
- the ability to use parts that have lost their commercial value but are usable;
- thorough knowledge of your instrument and the ability to improve and repair it.
The height of grass mowing is not adjustable, and the clearing is not always cut evenly. The absence of a grass catcher increases the share of manual labor. A heavy tool with narrow wheels sometimes spoils the appearance of the lawn - this is an objective answer to why it is better to use a factory-made tool.
Video about one of the options for a lawn mower from a washing machine
Where can I get drawings, diagrams and photos?
Despite the fact that all lawn mowers are made according to the same principle, there are many ideas and technical solutions that make it easier to independently manufacture such equipment or increase its efficiency.
We have prepared links to forums where users discuss the independent production of such devices, as well as share their ideas or successful technical solutions.
These are the links:
- forumhouse.ru.
- chipmaker.ru.
- electrotransport.ru.
- woodcraftsman.ru.
- miracle-ogorod.ru.
- blogotshelnika.ru.
- krainamaystriv.com.
- samodel.pro.
Gasoline lawn mower
In practice, another model that runs on gasoline is popular. For self-assembly, you will also need a frame or housing, holding handles, a gas tank of sufficient volume, and a knife.
When assembling a gasoline lawn mower with your own hands, you should carefully consider the issue of safety, given the flammability of gasoline. All models in this series have greater power, allowing you to care for large areas of natural lawn.
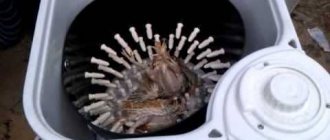
How to make a mower from an old vacuum cleaner?
In this section we will talk about how to make a homemade lawn mower from what you have at hand, and can also be found at the nearest landfill or collection point for ferrous/non-ferrous metals. The basis of the mower is any baby stroller, which will serve as a chassis. To simplify the design, we abandoned the cutting height adjustment and also replaced the metal blade with a fishing line.
In addition, you will need:
corners for making a frame on which the engine and gearbox will be mounted;- unnecessary pan with a volume of 5–10 liters;
- bearings;
- shaft with fastening for installing a knife or fishing line;
- pulleys with a diameter ratio of 1:3;
- suitable belt;
- roller or pulley for belt tension;
- long screw/bolt and nuts for making a belt tensioning mechanism;
- knife or fishing line.
Then do this:
- Remove the front casing and impeller from the motor, then put a small pulley on the shaft and some small impeller that will cool the electric motor.
- Make a gear shaft with two bearings spaced apart and a large pulley installed between them. Attach an adapter for installing a knife or fishing line to the lower end of the gear shaft.
- Weld the frame with places for installing the engine and gearbox shaft, as well as the corresponding fasteners. The engine should rise above the gearbox, and the motor and gearbox pulleys should be in the same plane.
- Install the motor and gearbox shaft, secure, then make sure that everything is securely fixed, and that the pulleys are in the same plane and their height is the same.
- Mount the belt tensioning mechanism, then put on the belt, tension and connect the motor to the network. Leave it running for one minute, then 5, 10 and 30 minutes, checking the motor heating each time after turning it off. If it is cold or barely warm, everything is fine, but if it is very warm or hot, you did something wrong.
- After making sure that everything is working properly, drill a hole in the cut bottom of the pan for the gearbox shaft and cut a piece of the skirt to 1/3 or ¼ of the circumference. Weld or rivet an extension to the deck to make it look like a snail and provide better grass release. Remember, the extension cord must be placed so that the air flow coming from the knife exits along it. If you want to make a mulching mower, then such a slot is not needed.
- Secure the deck to the frame with the ejection port facing to the side.
- Install knife or fishing line.
- Install a button on the handle of the stroller to turn on the engine.
- Plug in the mower via an extension cord, then test it out on your lawn or lawn.
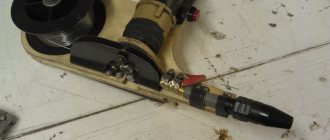
From the Bulgarian
The grinder is perfect for setting up a lawn mower, because it is an almost universal tool that can even be turned into an electric saw, drilling or milling machine. To conveniently and firmly attach an angle grinder to the base of a future homemade lawn mower, you need to take thick metal or cut a car wheel disc in half. If a welded box made of thick metal will be used, it is better to also provide protection on the sides so that the cut grass does not fly on all sides.
Lawn mower body with safety sides Source svoimirukami.lesstroy.net
When the frame is ready, you need to weld a handle to it. One of the options for its manufacture is to use a thin metal pipe, which is attached to the base in the middle, closer to the edge. For ease of control, it should be located next to the side closest to the mower. The grinder needs to be improved by screwing an elongated threaded nut onto the working part. After this, the power tool will need to be strengthened so that it “looks” down into the ground. Before this, you need to cut a hole in the middle of the body so that the rotating part of the angle grinder can fit into it up to the enclosing casing. The last step will be attaching the cutting part (knife) to the bottom of the grinder and installing the wheels. You can weld one or two on each side.
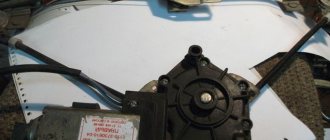
Lawn mower made from a washing machine engine
The general procedure and necessary materials are the same as in the previous section, the only difference is that you need not a reduction gearbox, but a step-up gearbox .
After all, the motor shaft from a vacuum cleaner rotates at a speed of 10–13 thousand revolutions per minute, but has extremely low torque, and the rotation speed of the motor shaft from a washing machine is 800–3000 rpm with much greater torque.
In addition, to make a homemade mower with an electric motor from a washing machine, you do not have to remove the front casing. Select the gearbox transmission ratio so that the shaft rotation speed is in the range of 2.8–3.3 thousand rpm.
Advantages of a homemade lawn mower
The selection of ready-made lawn mowing devices is quite large, and the range is constantly updated thanks to the efforts of developers. However, building a machine yourself has a lot of obvious advantages:
- Cheapness. The financial costs of manufacturing a lawn mower are significantly less than purchasing a factory model. Real craftsmen can assemble a convenient clipper from very familiar materials at hand.
- The ability to independently prepare a drawing according to which the assembly will be carried out.
- Availability of consumables and parts. For example, to make a homemade lawn mower with your own hands, you will need the simplest set of tools and materials.
- A large collection of educational video lessons on how to make a lawn mower with your own hands.
Most of the plans for assembling the structure are freely available, which means that every garden owner has the opportunity to use ready-made diagrams.
Making from an electric drill
The basis of the mower is the same as in the previous sections, the difference is that the drill does not have standard fastenings, so you will have to come up with some kind of fixation method .
In addition, if the rotation speed of the chuck is at least 2.8 thousand rpm, then you can do without a gearbox and fix the knife shaft with a chuck, which greatly simplifies the entire design.
Having attached the drill to the frame, set the required rotation speed on the regulator and lock the button in the on state, and lead the power cord to the handle of the stroller, then install the switch there.
Description of the assembly process
The electric lawn mower consists of:
- Frame on which all functional elements are installed;
- Engine , which ensures rotation of the working part of the mower;
- Knives for mowing grass;
- A casing protecting the operator's feet;
- Wheels that allow you to move the lawn mower around the area during operation;
- Control knob , giving control over the device;
- Fragments of the power system , which include an RCD (residual current device) and a cord with a plug.
The electric lawn mower consists of unnecessary parts that are stored in the garage or shed.
Step No. 1: making a frame
To make a lawn mower with your own hands, you will first need a frame:
| Image | Description |
| We select the material . An ideal option as a raw material for creating a frame would be a metal sheet 2-3 mm thick. | |
| We cut metal . If the sheet is too large, then it should be cut using a grinder. For the undertaking under consideration, a square with a side of 500 mm is quite suitable. | |
| Making a hole. In the middle of the resulting section you will need a through hole for the motor shaft. You can do it in two ways:
|
Step No. 2: select and install the engine
Homemade electric lawn mowers can be equipped with motors that can be found in households:
| Image | Comments |
| Vacuum cleaner . An electromechanical lawn mower is the second life of an old vacuum cleaner. | |
| Bulgarian . An angle grinder attached to the frame can also become the driving force for the blades of a homemade lawn mower. | |
| Drill . And even drills are adapted for mowing grass. | |
| Chainsaw . In this case, you will get a gasoline lawn mower, which will free you from wires and sockets, but will tie you to the purchase of gasoline. | |
| Washing machine . Another representative of household appliances, which is very often used by home craftsmen. As can be seen from the photo, no drawings were used during assembly, the cost of the parts is insignificant. |
I recommend using an asynchronous motor from a washing machine. It is able to work for a long time without interruption, and at the same time produces a very low noise level.
The design of the asynchronous type motor allows it to operate for a long time and relatively silently
The power and number of revolutions should be selected in accordance with the length of the knives to be installed. So, for example, to capture 400-500 mm, the following parameters will be sufficient:
- Engine power – 1 kW;
- RPM – 1500.
If the knives are shorter, then the motor will need a more powerful one and with a greater number of revolutions per minute.
It’s also worth paying attention to the fastening:
| Image | Comments |
Flanged motor.
| |
Conventional engine.
|
The mounting system of a conventional engine can be improved. To do this, just drill several holes in the corners at different heights. Then, if necessary, the motor can be raised or lowered, thereby changing the height of the mowed grass.
Step No. 3: making and securing knives
For a knife, if you make a lawn mower with your own hands, a 2 mm thick wood hacksaw blade is perfect.
The hacksaw blade for wood is hard enough so as not to dull quickly, and not fragile so as not to fly apart at the slightest contact with possible debris.
I want to dwell separately on the thickness:
- thin knife cuts grass better;
- A thick knife withstands impacts on stones better.
Therefore, take into account the characteristics of your site when choosing this option.
To improve a well-groomed lawn, where the presence of debris is excluded, thinner knives can be made
The instructions for turning a hacksaw into the working part of a lawn mower look like this:
- We cut the canvas according to the dimensions of the frame. In our case it is 400 mm;
- In the middle we drill or punch a hole for the motor shaft with a punch;
- We sharpen the edges on opposite sides in accordance with the rotation of the motor;
If you bend the sides of each half of the knife along the cutting edge, as is done in factory models, then while the device is operating, the cut grass will be blown out from under the lawn mower.
The principle of operation of factory knives, due to their curved edges, resembles the rotation of helicopter blades
- We screw the resulting knife to the motor shaft from the bottom side of the frame.
For fastening, be sure to use a lock washer and a lock nut, otherwise the vibration will cause the blades to unscrew and fly off the shaft.
To protect the shaft and bearing from debris, you can install the simplest tin can
Step No. 4: attach a protective casing
The protective casing is a metal strip rolled into a ring and installed under the frame around the knives. Thanks to it, the operator’s feet are not threatened by either debris flying out from under the lawn mower or knives accidentally unscrewing and jumping off the shaft.
The steel casing will reliably protect your feet while operating the lawn mower.
Manufacturing process:
- We cut a strip 150-200 mm wide from a metal sheet. If you have an old cylindrical washing machine on your household, then to obtain the required steel ring you can cut off part of its body;
The body of a cylindrical washing machine can be cut into a huge number of almost ready-made protective covers
- We bend it into a ring. In this case, it is necessary that there is a hole left on the side through which the mowed grass will be thrown out. Here you can even adapt a grass catcher for a lawn mower, which is supplied with factory models.
Step No. 5: select and install wheels
As for wheels, it is important to decide on two main points:
- Quantity . Two wheels provide maximum maneuverability to the lawn mower. Three or four set a more precise distance to the ground, thereby allowing you to cut the grass more evenly;
Four wheels ensure the same cutting angle across the entire lawn
- Height . Calculate so that the knives end up at a height of 50-60 mm above the ground. By placing them higher, you will simply bend the grass rather than mow it, and lower, you risk the working part crashing into the ground on uneven terrain.
If you don’t have a suitable pair of wheels on your farm, you can make them yourself from wood and bearings, as shown in the photo
Step No. 6: select and install handles
There is absolute freedom for your imagination. The main thing is to follow two rules:
- Acceptable height . The handles should be at a level that allows you to hold them without bending over. Otherwise, you'll end up with back pain before you even finish tidying up your lawn;
The height of the handles should allow you to operate the device with a straight back, otherwise you will get tired very quickly
- Correct location . If you are assembling a lawn mower with three wheels, then the handles must be installed on the side of two. Then you can easily turn the unit by simply lifting the front wheel.
A handle from an old wheelbarrow or baby stroller can solve this problem.
The 23 mm thick handle from the stroller can continue its service on the lawn mower
Step No. 7: install the power system elements
When making a lawnmower, be careful when it comes to arranging the power supply responsibly, since electrical damage is the second greatest danger during its operation after the possibility of the blades flying out.
Adhere to the following rules:
- Raise the cord . Secure it with electrical tape along the handle - this will protect it from debris flying out from under the unit;
The higher the wire, the less danger it will be damaged by flying debris or wheels.
- Install the trigger button on the handle;
I recommend using a switch that closes the contacts when pressed and opens as soon as you release it. This will eliminate the possibility of the device operating without your participation.
- Carefully insulate all wire connections. This is especially true for the connection point of the RCD.
How to make a homemade gasoline machine?
The easiest way to make such a device is from an unnecessary chainsaw.
Here's the procedure:
- Remove the bar with chain and clutch mechanism, and attach an adapter for a knife or fishing line to the shaft.
- Place the resulting device on a wooden or steel panel, then attach it to the stroller at the desired height.
- Duplicate the control of the carburetor damper (gas button) and move it to the handle of the stroller.
- Attach the knife or fishing line to the adapter.
- If necessary, install the deck.
Mechanical lawn mowers
There are also the safest models, which do not require a motor or gasoline to operate. The advantages of assembling a mechanical lawn mower with your own hands include lower costs and ease of installation of the structure.
However, the quality of lawn mowing may suffer if it is not assembled correctly (for example, the grass will not be cut to the same level).
Like previous models, these devices have a body, holding handles, and sharply sharpened knives or disks.
Homemade manual mechanical grass mower
Making a manual mechanical grass mower at home is pointless due to the high requirements for the accuracy and weight of the cutting mechanism parts, which we described in detail here.
If you make a heavy drum, the wheel will not be able to spin it , which means the device will not mow the grass at all.
The permissible deviation in the dimensions of any of the parts, as well as the maximum deviation from each other, is 0.005 mm, which is unattainable at home.
If the deviations are greater, then its efficiency will sharply decrease, which is why all homemade mowers are not mechanical, but motorized, that is, equipped with various types of engines, including electric.
The design and principle of operation of a lawn mower
An electric grass mower has a fairly simple design. The design consists of the main technological units:
- power plant - electric motor;
- frames for fixing all working mechanisms and components;
- knives and protective frames;
- wheels that allow movement of the device;
- handles for control.
The engine is mounted on a platform with wheels. A cutting deck is installed at the bottom of the frame, and a control handle is attached to the side of the platform.
Unlike homemade lawn mowers, factory-made models are safer and more convenient. Many designs include: a grass catcher, a mulching kit, an additional system for protecting against blade breakage, and the ability to adjust the cutting height and handle.
Electric mowers operate on the same principle. The engine drives the output shaft (feed arm), which in turn begins to rotate the cutting tool at high speed.
DIY grass catcher
A grass catcher is a container made of plastic, metal or fabric into which mowed grass is collected. It is attached to the back of the lawn mower and does not interfere with work.
To equip a homemade lawn mower with a grass catcher, you will need a ready-made container or material for making it yourself. Can be used:
- plastic canister or bottle;
- plastic fruit box;
- tarpaulin;
- sheet metal.
Grass catcher made from a canister: choose a canister that fits the dimensions of your mower. Laying it on its side, cut off the side and end walls with a knife. Attach the resulting container to the frame using thick wire, tie it with a rope or chain to the handle of the lawn mower.
The grass catcher made from a box is a more durable design. One side wall of the box is cut off on the side where the collection will be attached to the mower. To add rigidity, it is necessary to secure the walls of the box with a chain. Attachments for the grass catcher can be made from wire or nails in the form of hooks, or use carabiners.
A grass catcher made of tarpaulin can be made in the form of a bag or box with soft walls. For the second option, you first need to make a frame from wooden blocks, metal-plastic or aluminum pipes. Make walls from pieces of tarpaulin and secure the fabric to the frame with rivets, a stapler, or sew with a needle and thread. Attach to the lawnmower with latches.
A metal grass catcher is perfect for a homemade mower with a steel frame. It can be made from the same sheet metal, according to individually selected parameters. Make holes or slits on the sides of the container for ventilation. Without them, the power of the air flow will decrease, and there will be problems with the ejection of cut grass into the grass catcher.
Have you already figured out what you will use to build a lawn mower? Share your ideas and tips.