As the owner of a large garden, during the season you have to think about where to put the harvest. After all, it will not be possible to eat everything in a short time, and if the fruits are ripe, then they will not last long on the tree - they will begin to fall and spoil. However, there is a way out of the situation and it lies in a homemade device. Let's look at how to make an apple press from a washing machine and improvised materials with your own hands. Using such a device, you can squeeze juice out of apples and other fruit crops, which will be much easier to process.
Advantages of a homemade juicer
If you have an old unused washing machine, automatic or activator, you can turn it into a useful device for extracting juice. The idea is to install a grater inside the machine. The raw material is poured through a large hole, after which it is crushed and the juice is extracted. The advantage of this design is the ability to make juice in large volumes, which most household juicers cannot provide.
In addition, the homemade device has a much larger capacity for loading raw materials. Equipping such a juicer with a powerful motor will allow you to get about 20 liters of juice per hour. This indicator is quite enough to process apples from your own garden and also help your neighbor.
Juicer from an activator washing machine
To make such a juicer, you will need an Oka or Sibir machine. You can use other options equipped with a spin device and an activator at the bottom of the tank. Let's look at the step-by-step manufacturing of the device:
- Remove the activator and shaft from the washer.
- We mount another or the same shaft with a threaded thread.
- We cut out three knives from stainless steel, which we secure to the shaft with nuts. The knives must be rotated 60°.
- Insert a plug into the hole for draining water.
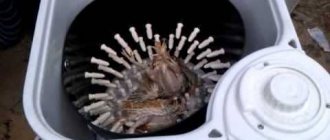
- We place a wire mesh 0.25 mm thick with a cell size of 1.5 mm in the centrifuge so that it extends 4-5 cm beyond the sides of the drum.
- We close the hole in the rubber cover with the plug that comes with the kit, and then place it on the bottom of the centrifuge.
- Using a baking soda solution, wash the inside of the machine and all elements that will have direct contact with the juice.
To ensure that the operation of a garden juicer made with your own hands from a washing machine is not limited by the relay time, the latter must simply be disconnected.
How to squeeze juice
The process of extracting juice is quite simple. To do this, you will need to wash apples or other fruits and load them in a small volume into the washing machine tub. The device turns on and the product is crushed using knives. The duration of processing depends on the specific apple variety and ripeness. After grinding, we obtain the mixture in the form of a puree and load it into a centrifuge in approximately 3 liters. Turn on the device and squeeze out the juice. After a few minutes, you can remove the mesh and shake out the cake.
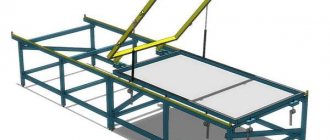
Device testing
To carry out the tests, two more auxiliary devices will be required.
- Guide dishes, cylindrical in shape without bases, slightly tapering towards the bottom. It is installed above the grater with support on the tank body so as not to touch the rotating parts of the drum. Fruits to be crushed and squeezed will be loaded into this cylinder.
- A wooden handle or cue for pushing raw materials into the grinder.
Now everything is ready to start testing. Plug in the unit. Place the guide container, load the product, and use a wooden pusher to compact it until it is completely crushed. Turn off the engine and remove the cylinder.
The raw material is in the drum in the form of a slurry. Restart the drum. Under the influence of centrifugal force, the juice will exit through the walls of the drum into the drain hole of the tank and fall into the container for the finished product.
Summer and autumn delight gardeners with abundant harvests. Unfortunately, it is impossible to store crops at home for a long time. To process it, you will need a juicer. You can buy it, or you can make it yourself from a used washing machine. To do this, you need to have metalworking and welding skills.
Juicer from front washing machine
Making a juicer from a front washer is somewhat more complicated and will take more time. To construct the device you will need:
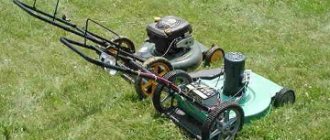
- belt-driven, front-loading machine;
- a pair of metal meshes measuring 300x60 mm;
- fasteners made of bolts and nuts with a diameter of 3 mm;
- juice container;
- rubber plugs;
- drain pipe;
- set of screwdrivers and socket wrenches;
- metal scissors;
- Bulgarian;
- electric drill;
- hammer and pliers.
Preparatory work
All unnecessary elements are removed from the washing machine (pump, sensors, filter, valve, control device), after which it is placed with its back side on the bars and fixed well. Then perform the following steps:
- Remove the drive belt from the pulley.
- Open the hatch and bend the rubber band, dismantle the clamp and seal.
- Unscrew the fasteners and remove the shock-absorbing elements.
- Remove all parts that prevent the tank from being removed.
- They take out and disassemble the tank, for which they unscrew the bolts and release the latches. If the tank is made of plastic, it is cut in half.
- Clean the tank from various contaminants.
- All holes are plugged with rubber plugs, except for the drain.
- Mount the tank and other elements in the reverse order.
Manufacturing process
After the preparatory activities, the following remains to be done:
- The mesh is fixed inside the drum using screws. It can be easily dismantled for cleaning.
- In order for the raw materials to be crushed, the ribs need to be sharpened.
- A pipe is attached to the drain hole.
- Mount the electric motor.
How the juicer works
Before launching the assembled structure, you need to make sure that it is stable, as well as that the drum rotates evenly without jamming. After this, the fruits are washed and loaded inside the machine.
There is no need to fill the device to the top with fruit. Otherwise, the machine will not grind and may break.
If loading hard apples, the drum should be half full. Soft raw materials can be placed in larger quantities. Place a bucket or pan for juice under the drain pipe. All that remains is to start the motor in spin mode. As the drum rotates, the apples will beat and juice will flow out of the resulting mixture. As with the previous design, there is no need to cut the raw material into pieces. The performance of such a juicer is approximately the same as in the version described above.
How to make a centrifuge with your own hands - Metalist's Guide
Every lover of fresh fruit juice probably wants to have his own juicer, but not everyone has the opportunity to buy one.
A juicer is a very useful and necessary device. During its use, after processing healthy fruits, we receive a large amount of useful vitamins and microelements. But you don’t even have to buy it, but make it at home. Moreover, you will get much more juice in a home juicer than if you made it on a purchased machine. It is enough to show your imagination, find unnecessary things, sometimes they can come in handy and do it yourself with your own hands.
The juicer you make will be much stronger and will last much longer. Many people didn’t even think that it’s actually very easy to make a juicer using available materials.
And your juice will turn out even better and will cost much less than store-bought juice.
Preparatory work
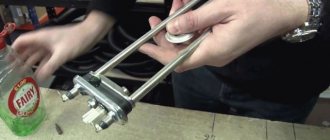
The hardest thing is to make a mixer. Many people face this problem. It's simple: we buy a mixer and put it on a regular drill. Next you will need a large iron bucket.
You need to make a lot of holes on the sides so that the juice can flow out. You need to place a basin under it, which will gradually fill with juice.
After you have crushed certain fruits with a mixer, you will need very heavy material.
This could be a huge round wooden block 6-7 centimeters long, a bag with some object, preferably something large and hard.
After all, with this object you will have to press the crushed fruit very hard. After that, fruit juice will flow from the holes you made in the bucket. You can pour it into a large jar or into your mug and enjoy the fresh product.
An example of a homemade juicer is shown in this video. We recommend viewing!
There is another way, but it takes longer. The base of this structure is cut out of a thick wooden block. We make a small hole in it, maybe a couple of holes. Juice will drain from them.
Next, we attach two racks to the wooden base, it can be made from any available material, be it wooden or metal. After that, between the racks we place a crossbar with a large nut, and a movable screw will be attached to it.
You need to attach it so that it doesn’t cling to anything, otherwise the whole process will stall. If the movable screw is larger and thicker, it will work better.
Also, the length of the screw should be long, not small. If, of course, you want a lot of servings of juice and you can say that the main part of the juicer is ready. All that remains is to take a large saucepan, a large basin into which the juice from fresh berries will flow.
An example of a DIY juicer
We place fruit in a wooden block and turn the movable screw by the handle. It will rest against the block, thereby crushing the berries. Juice will flow out through the holes cut in the block. True, the second method is better used for small berries.
You can put raspberries, strawberries, wild strawberries there, although if you finely chop the apples and remove the seeds, then this method will also work. If you decide to make juice from cherries, then it is better to get the seeds in advance, they can slightly interfere with the cooking process. Or slip out of the block and end up in the container along with the squeezed juice.
To make apple juice, you can use the first option; of course, many apples won’t fit there. But if you have time and an old automatic machine, then you can still come up with an interesting option. And in such a juicer, a whole bucket of apples is converted into fresh juice in 10 minutes.
You will need a washing machine drum, drum mount and casing. It’s quite easy to get such things in modern times, since models are quickly updated. It is imperative to wash everything very well and remove scale and powder.
We throw out all the other unnecessary parts from the casing, the temperature sensor, etc. We inspect the holes in the drum and carefully seal them. Anything, but better with a thin rubber band. Leave only one hole, as juice will drain from there.
We clamp the thin elastic band with stainless steel plates on the bolts. It is better to take nuts and bolts made of stainless steel. Next, for a large hole you need to find a tube with a suitable diameter. You will need it to load apples into the drum.
Another example of an apple juicer
The tube is attached to the drum on four sides. The bolts must be secured from inside the casing. Further chopping of apples will depend on this. Then we make a grater. The grater is made on a stainless steel machine. Cut a circle 3 mm thick and 230 mm long.
The grater itself is attached to it and secured with five screws. Next, drill holes along the entire diameter. We make ten-millimeter markings around the entire circle; there you will have to fill in sharp teeth.
The grater should be in the center of the drum. Therefore, we mark everything accurately. In this video, they will show you how to make a very ordinary press for extracting juice from fruits and berries.
Now all that remains is to make an apple pusher. Cut out a small circle with a diameter of 80 mm, you can take plywood. And a thick stick from under a shovel. Install a small stop to prevent the pusher from falling towards the grater.
And finally, the engine, preferably with a power of 1.1 kW, will only give in at 1500 rpm. The final touch is to stretch a small hose to the hole at the bottom of the drum that we left. Juice will flow down it.
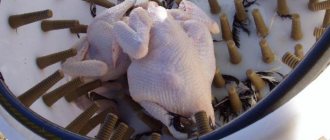
You also need to take a saucepan so that the juice is collected there. Before adding apples, you must wash them, select the rotten ones, remove the seeds, and then throw 3-4 apples into the resulting juicer.
Of course, this option is quite heavy, but it is more convenient. You can process several buckets in just half an hour. But then there will be a large supply of apple juice.
When creating this juicer, follow safety precautions. Do not plug in the device until it is completely finished. Also make sure that you have assembled all the parts correctly and that the voltage is appropriate for your use.
Twin screw juicer. Features of this type, operating principle, as well as other useful information, you can find on our website.
How to make a simple car antenna with your own hands is described in detail in this article. We advise you to read and listen to the advice!
If you do not know how to repair a Termex water heater, here you will find all the necessary information.
Adviсe
You can process not only fruits, but sometimes vegetables as well. But not all fruits are suitable. Before you immerse the fruits in the juicer you made, you need to sort them out.
If they are dirty, then they should be washed, if they are rotten, then it is better to throw them away. Even if they haven’t completely deteriorated yet, but already have small dents and stains, it’s still better not to put such a fruit. Otherwise, you will end up not with juice, but with porridge, and not very pleasant to the taste.
It is also strongly recommended not to load fruits with seeds. They will interfere with the squeezing process and worsen the taste, imparting bitterness. Your juicer, unlike a store-bought one, will of course not break, but it will not be very pleasant to drink juice with seeds.
If you want the juicer you made yourself to serve for a long time, then you should fulfill these requirements. To extend the life of a homemade unit, you should take the issue of care seriously.
Each part must be thoroughly washed, especially if you have an automatic juicer. After you have washed all the parts, let them dry thoroughly.
And store it in a place convenient for you until the next use.
Your self-made juicer will last much longer than a purchased one.
We also recommend watching
How to make a juicer from a washing machine with your own hands
Thinking about purchasing a juicer? You can make a juicer from a washing machine with your own hands - we will tell you how to do it. You will receive a device for processing fruits and vegetables into homemade juices almost free of charge, and you will also find a use for your old washing machine.
Design advantages
If you have an old, unwanted washing machine with a working spinner, consider yourself putting it to good use.
The essence of a standard juicer is that fruits and vegetables are thrown into a special hole. It should be wide enough for a whole apple, pear and other fruits. The fruit then goes into a centrifuge, at the bottom of which there is a grater. After grinding, the juice is squeezed out.
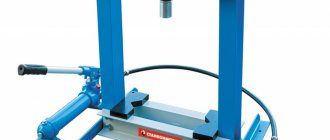
Washing machine drum press
From a washing machine you can make not only a juicer, but also a press, using separate parts from it. The design is quite simple since there is no electric motor, no electricity required, and no complex structural components. For the washing machine, we only need a centrifuge made of stainless steel. Since the part has holes, this allows it to be used for the purposes in question. The manufacturing process consists of the following steps:
- The centrifuge is removed from the tank and cleaned of contaminants, after which the inner edge is cut off.
- A frame and a stand for the structure are welded from a metal profile or corner. A hole is drilled in the frame for the screw and a nut is welded to rotate it.
- To drain the juice, a suitable tray is made or found.
- A circle is cut out of metal with a diameter equal to the inner diameter of the centrifuge and welded to the screw.