How to make a good smokehouse from a washing machine drum
The icing on the cake in our matter is the smokehouse.
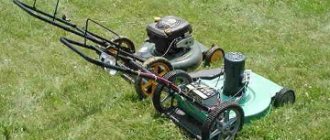
Fragrant smoked meat, lard and fish - what could be better for the table? If you have a tank from a top-loading machine lying around in your shed or garage, consider it a done deal. It is necessary to cut a hole in the bottom of the tank for the firebox, and weld fasteners inside for hanging food. All that remains is to install the tank on the fireplace, hang the fish or lard, cover the top of the tank with a lid and light the sawdust.
Products need to be smoked for several hours until cooked
It is important that the fuel under the smokehouse smolders and does not burn. It is better to place such a device away from home.
We hope we have convinced you that you should not scrap your old washing machine.
Save time: selected articles delivered to your inbox every week
Circular grinder
This power tool is in the arsenal of any self-respecting master. Instead of a cutting or grinding disc, you can install a toothed saw blade.
The grinder must be securely attached to the edge of the table, ensuring that the axis is parallel to the tabletop. Only after this is it possible to install a steel toothed disk on the angle grinder.
Circular grinder
Just as in the case of a circular saw, it is necessary to consider an external starting device. If the grinder is equipped with protection against power loss in the network, you will have to make changes to the design of the switch.
If the design is simple, it is enough to install a socket with a switch, and fix the start button of the angle grinder in the “ON” position.
All of the above refers to simple methods of processing wooden blanks, that is, “parallel” and “perpendicular”. If it is necessary to perform complex carpentry work, the circular saw requires modification.
Moving parts
After the motor is connected, you can proceed to creating the circular. The next step is the assembly of the moving elements, since it is they that bear the load, namely:
- Motor shaft.
- Saw shaft.
- Drive belt.
- Motor pulley from the washing machine.
- Circular saw pulley.
The design itself is simple, but there are a lot of points that are important to consider, for example:
- It is recommended to sharpen the small pulley by making 4 transverse grooves, this is necessary so that the belt clings and does not slip.
- It is not necessary to use a drive belt from a washing machine; you can take any suitable one, as long as it has transverse serrations.
- The saw mounting shaft must be as reliable as possible, which also applies to the nut and washer. Otherwise, the saw may become deformed, or even jump out and injure the person working.
[custom_ads_shortcode1]
How to make a circular saw drive
What engine does it need? It depends on what kind of automatic washing machine you have gathering dust in your storage room. It is better to take an engine, of course, with more power.
Although for a mini-circular, which is assembled in a similar way, a less strong one will do. Its difference is its light weight and the installation of the mechanism not on a stationary base, but on a wooden box. It serves as both a bed and a chip storage.
Preparing the motor
The collector motors of washing machines have several outputs. How to determine and connect the ones you need? We use an ohmmeter to test the second coil, selecting the one with the highest resistance.
We check other connections at the commutator and brush outputs.
We also find, measure and mark the speed sensor wires. They may be located inside the case, then disassemble it.
We connect the first output of the collector and one from the coil. The second one, with the remaining coil contact, is connected to the network. We are doing a test run.
To enable reverse rotation, the contacts are swapped.
Adjusting the speed
In order for a circular saw to process materials of different sizes, a device is needed to add or reduce the number of revolutions.
In the device from which we removed the motor, this function is performed by a tachometer operating through an electronic module. The latter will not work with our device.
The simplest thing is to use a dimmer or trigger from a hand-held electrical appliance to control the voltage supply and, accordingly, the shaft rotation speed. The connection goes like this:
- one coil terminal is terminated with the armature terminal;
- the second - for mains power;
- the remaining armature output through the dimmer is the same;
- Having checked the connection, we test it.
A more complicated option is using a tachometer. It will allow you not to lose electric drive power during operation. It must be connected through a microcircuit, which will equalize the power as the load on the shaft increases. If it is impossible to buy a ready-made one, using the TDA 1085 board diagram and the list of necessary parts, you can assemble it yourself.
Motion module
It consists of:
- Shaft for attaching the cutting disc.
- Motor shaft.
- Transmission belt.
- Motor pulley.
- Saw pulley.
To simplify things, you can assemble the device without bearings.
Through a drive belt placed on a pressed-in smaller pulley, the shaft transmits rotation to the saw blade. The pulley must have notches so that the serpentine belt does not slip on it.
A small protrusion is welded onto the edge of the larger pulley to prevent the drive loop from slipping.
The disk must be securely fastened to the shaft, otherwise it will come off and cause injury.
Bore the holes for fixing the engine to adjust the belt tension.
Starting device
You can choose a switch for a household electrical appliance for it. It’s better to install a push-button one from a Soviet washing machine.
Its connection diagram is as follows:
- At the input it is powered by two contacts, and inside one wire bifurcates.
- Of the three outputs, one will be phase, the second zero.
- The third, through a capacitor, will give a shifted phase.
This connection will provide better launch. But after it it is necessary to disconnect the capacitor.
bed
For a welded frame, a rectangular twenty-millimeter profile is suitable.
The drive and motion module are securely attached at the bottom. This design leaves the upper platform free.
According to the testimony of the craftsmen who made such machines, they spent about six months on it. But we are quite satisfied with the equipment. So go for it too!
Video:
Badly
Interesting 8
Super
How to make a homemade circular saw?
In order for a circular saw to easily cut huge logs, you need to equip it with a truly massive electric drive. In addition, for this purpose, a belt drive, a shaft and an engine with the highest traction force are installed on it. All hand-made circular saws consist of two parts: upper and lower.
The lower part always houses various electrical equipment, namely:
See:
Circular saw design .
- saw motor;
- transformer;
- device that starts the circular machine.
At the top of the circular saw install:
Miniature machine made from a washing machine engine
The circular is distinguished by its extreme simplicity and availability of materials for its manufacture. Perhaps its only expensive part is the electric motor. Stationary machines are equipped with a powerful asynchronous motor, which ensures cutting of thick wood of any species, but in a home workshop you can limit yourself to less power.
This design has a number of advantages. An engine from an old washing machine is inexpensive; moreover, a similar unit can probably be found in a home craftsman’s household. Connecting this motor is not particularly difficult; there is no need to look for circuit diagrams or do soldering. With all this, the power of such a unit is quite sufficient for most types of work.
The machine diagram can be simplified as much as possible by eliminating the belt drive. In this embodiment, the cutting tool will be mounted directly on the motor shaft. The base of the desktop mini-machine will be a frame assembled from a block with a cross-section of 40 x 40 mm. If desired, it can be welded from a corner or profile pipe.
Part of the body of an old TV, coated chipboard, is ideal as a stand (tabletop) for a circular table. As practice shows, this part is quite durable, and thanks to the varnish coating, it does not prevent the workpiece from sliding.
Using a jigsaw, two parallel cuts are made in the tabletop perpendicular to the cutout for the disk. A movable square will slide along them, playing the role of a side stop. It will help you make an even cut, if necessary, at a given angle.
Connecting (checking) the motor
Naturally, before you start assembling something, the electric motor must first be connected and tested. In old washing machines, there are two versions of motors: an older and high-quality one, which has a closed housing with an impeller, with two supply terminals, and a newer one - four terminals, no impeller, cooling occurs through holes in the front and rear, through which the windings are visible.
The old version does not require any capacitors for starting - the starting winding is cleverly connected and disconnected inside the engine using a special mechanism. Thanks to this, no connection difficulties should arise: both outputs are connected to a 220 volt network. The disadvantage of such a motor is that the direction of rotation of the shaft is preset by an internal connection and cannot be changed. Typically the direction is clockwise and therefore it will be necessary to use a left hand thread to attach the stone.
The newer version has four terminals of two windings: working and starting. You can distinguish them using a multimeter: the resistance of the working winding is about 10 Ohms, the starting winding is about 40 Ohms. Perhaps the resistances will differ from those indicated, but only slightly. The starting winding must be connected through a 4-5 µF capacitor for a voltage of at least 400 V. I have come across composite capacitors for similar motors: two connected in series, 10 µF each at 300 V. That is, in this way the maximum permissible operating voltage of the finished capacitor was raised. Using a composite capacitor of two with low voltages (at least 300 V) is possible, but not advisable. Capacitors should be non-polar!
If you believe the manufacturing date on the case “59g” - this paper capacitor is 60 years old! And it works great. According to Soviet radio amateurs, paper capacitors tend to recover after a breakdown.
You can check the engine without capacitors and starting winding at all: voltage 220 V. supplied directly to the working winding. With this connection, the motor will start without load in any direction. To set the direction of shaft rotation, you need to connect the starting winding and capacitor. For emery, you need to set the direction counterclockwise
. The connection diagram is shown below, if the shaft rotates clockwise, you need to change the connection of the starting winding.
In many publications on the network I have seen a statement that the starting windings do not need to be connected at all, and the direction of rotation must be set manually when starting. Allegedly, if the starting circuit is used, the engine will burn out. I can only explain these speculations in one way - one wrote nonsense, and the rest were copied from the first. I can say with confidence: the starting winding can and should be connected through a 4-5 uF capacitor, the starting circuit should always be connected, without any additional buttons. And if the motor is working properly, such a connection is safe and completely harmless for it.
Design requirements
The duration and safety of working with homemade equipment depends on the types of loads, operating modes and strength of the unit. Knowledge of the features of woodworking devices will make it possible to produce a mechanism that is reliable, but simple and durable.
High disk speeds. Without this condition, high-quality cutting of wood is impossible, but for the master it is more important to guarantee the safety of a homemade circular saw, so the protective devices that are usually equipped with purchased models are a role model
If the future author believes that it is quite possible to do without some of them, then this opinion is erroneous, since one careless movement often leads to injury. Strength of absolutely all components. Not only the ability to withstand large static loads is important, since the table may begin to vibrate due to multidirectional dynamic influences
They are not dangerous for the master, but they affect the quality of the cut: marks from the teeth remain on the surface of the lumber, and difficulties arise in maintaining linear dimensions. Fire safety is the main requirement when working with wood, so compliance with the rules when installing all electrical appliances is a must.
How to make a circular saw drive
This axis is installed on a circular table. You can fix it on the back of the tabletop with a wide bracket cut from sheet metal. If there is welding, then you can weld mounting tabs for the bolts onto the bushing. The motor is then secured under the table and a belt is pulled between their pulleys.
What engine does it need? It depends on what kind of automatic washing machine you have gathering dust in your storage room. It is better to take an engine, of course, with more power.
Although for a mini-circular, which is assembled in a similar way, a less strong one will do. Its difference is its light weight and the installation of the mechanism not on a stationary base, but on a wooden box. It serves as both a bed and a chip storage.
Preparing the motor
The collector motors of washing machines have several outputs. How to determine and connect the ones you need? We use an ohmmeter to test the second coil, selecting the one with the highest resistance.
We check other connections at the commutator and brush outputs.
We connect the first output of the collector and one from the coil. The second one, with the remaining coil contact, is connected to the network. We are doing a test run.
To enable reverse rotation, the contacts are swapped.
Adjusting the speed
In order for a circular saw to process materials of different sizes, a device is needed to add or reduce the number of revolutions.
In the device from which we removed the motor, this function is performed by a tachometer operating through an electronic module. The latter will not work with our device.
The simplest thing is to use a dimmer or trigger from a hand-held electrical appliance to control the voltage supply and, accordingly, the shaft rotation speed. The connection goes like this:
- one coil terminal is terminated with the armature terminal;
- the second - for mains power;
- the remaining armature output through the dimmer is the same;
- Having checked the connection, we test it.
A more complicated option is using a tachometer. It will allow you not to lose electric drive power during operation. It must be connected through a microcircuit, which will equalize the power as the load on the shaft increases. If it is impossible to buy a ready-made one, using the TDA 1085 board diagram and the list of necessary parts, you can assemble it yourself.
Motion module
- Shaft for attaching the cutting disc.
- Motor shaft.
- Transmission belt.
- Motor pulley.
- Saw pulley.
Through a drive belt placed on a pressed-in smaller pulley, the shaft transmits rotation to the saw blade. The pulley must have notches so that the serpentine belt does not slip on it.
A small protrusion is welded onto the edge of the larger pulley to prevent the drive loop from slipping.
The disk must be securely fastened to the shaft, otherwise it will come off and cause injury.
Bore the holes for fixing the engine to adjust the belt tension.
Its connection diagram is as follows:
- At the input it is powered by two contacts, and inside one wire bifurcates.
- Of the three outputs, one will be phase, the second zero.
- The third, through a capacitor, will give a shifted phase.
This connection will provide better launch. But after it it is necessary to disconnect the capacitor.
bed
For a welded frame, a rectangular twenty-millimeter profile is suitable.
According to the testimony of the craftsmen who made such machines, they spent about six months on it. But we are quite satisfied with the equipment. So go for it too!
Conversion of the grinder
Tools and materials:
- Bulgarian;
- drill;
- clamps;
- screws or bolts;
- gearbox
The device of a homemade circular saw.
The easiest option is to remake the grinder yourself, but you need to remember that this tool has fairly high power ratings, which can make the work more difficult. An option with a 150 or 180 mm disc is used, and the speed must be low (4000-5000 rpm), because otherwise, the cutter will become dull at an unprecedented speed. 3-flute cutters are usually used for such modifications.
Options for attaching the grinder to the tabletop:
- On the clamps. Everything is simple here - 2 clamps tightly attract the tool to the selected working surface. It is quite easy to install and just as easy to dismantle, moreover, this is the only option when, after dismantling, you can continue to use the tool for its intended purpose.
- Self-tapping screws. Using a drill, 3 holes are made in the body and additional handle, into which self-tapping screws are then screwed and attached to the working surface. A similar option is also possible with bolts and nuts, which is much more reliable.
- Using an additional part. You'll have to contact a mechanic to grind out the connecting piece between the countertop and the grinder. To attach it, you will have to remove the protective casing, but after attaching it, the tool will not move anywhere. This option is the most reliable, although the most inconvenient.
Layout diagram of the elements of a homemade circular saw.
It often happens that you don’t have a low-speed grinder at hand, so you can use a reduction gearbox. To fasten working tools, screws or bolts are used, depending on the desire to maintain the quality of the tools.
Only in the first indicated case, after achieving the goal, can you dismantle the tool and use it for its intended purpose, and then only if it was used as a circular saw for a very short time. In all other cases, this option is not even worth considering, because The chance of getting injured during further work is 9 to 10.
Situations are different, so the protective casing is often removed. There is no need to install it back, but as a replacement it is better to use a steel angle welded to the working surface. This move will be much more reliable than factory plastic.
Do-it-yourself circular saw on a 775 electric motor
Hello to all DIYers. In today’s article we will look at making a useful homemade product for every craftsman, namely, we will assemble a compact circular saw from improvised means on a 775 class commutator motor. This homemade product will perfectly cope with all its assigned tasks, just like its factory analogues, but only this homemade product will cost you much less than any factory analogue. I recommend assembling it for those who do not yet have a normal circular saw; this homemade product can make your life much easier. But you should not regard this homemade product as a serious tool for work. The homemade product will consist of the simplest available materials, and anyone can certainly afford to assemble it. Well, well, I think there’s no need to delay with a long preface, let’s go.
You can find links to some of the design components at the end of the article.
For this compact circular saw you will need the following, namely:
— 775 class commutator motor — Cutting blade for a circular saw — Adapter for the cutting blade to the shaft of the electric motor of your choice — Plywood sheets — Bolts — Nuts — Metal washers — Wooden blocks — Self-tapping screws — Metal door hinges — Wires — Power supply — Round metal rods
From You will also need the following tools:
- Hacksaw - Drill with drills (but a beam drilling machine) - Grinder - Wrenches - Screwdrivers - Marker - Ruler - Construction angle - Clamps
Making a compact circular saw:
Making a circular saw must start from the table itself, in which and the structure itself will be built. To do this, you need to take several wooden blocks and connect them into one rectangular structure exactly the same as in the photo below. We connect all wooden components together using self-tapping screws; it is important that the screws fit flush into the wood, that is, their heads should not protrude beyond the wood.
Next, you need to screw a couple of walls to the newly made structure. We will cut out the walls from ordinary plywood, the height of the walls should be approximately 25-35 cm, this height will be more than enough. We fasten the embedded plywood walls opposite each other, exactly parallel or exactly perpendicular to the base (to make everything smooth and clear, use a construction corner). But please note that the second wall must consist of two parts! The distance between these parts should be the same as the wooden blocks you selected.
Now we’re just moving on to making the block for which we left a gap between the walls. Your electric motor will be attached to this block and move up and down. The block should be such a length that, when installed on the inside, it protrudes slightly beyond the body; holding on to this protruding part, we will adjust the reach of the cutting disk.
Having selected a suitable block and cut off a piece of the length we need from it, we need to make a hole in it for installing the electric motor. First, we do not make a through hole, but approximately to the middle of the block; the diameter of the hole should be such that the commutator motor you have chosen fits tightly into it. Next, we make a through hole in the center of the recess, with a diameter equal to the diameter of the protruding part on the front panel of the electric motor, and then several through holes for mounting the electric motor.
Next, in our block it is necessary to make another through hole at the very edge. We will insert a bolt into this hole, which will serve as an axis on which the block will move (up and down). It is also necessary to make a through hole on the reverse side for the fixing bolt; clamping it will fix the position of our bar in space.
After which, to attach our block, it is necessary to make a pair of mounting lugs. We will cut these ears from the same board or sheet of plywood. After cutting them out, you need to make one through hole in them, the same diameter as the outer hole on the block. It is important that the holes are parallel, otherwise you will not be able to use these same ears.
Let's move on to installing the ears and the bar. First, we need to securely fasten one of the lugs, so that when we apply the block, it is located exactly opposite the gap left specially for it, on a parallel wall. Then we apply this very block to its seat, push the bolt through the mounting holes, put on the second eye, then a washer and screw on a couple of nuts. We tighten the first nut so that the block can move, but not without excess play. Only after this we finally fix the second block to this wall (using self-tapping screws).
Then we need to carry out the work of the same locking mechanism that I mentioned earlier. For it we need to cut a rectangle from a small sheet of plywood. Make a semicircular groove in this rectangle; the width of the groove should be the same as the specially made hole in the block. And when installing the rectangle, the groove itself must coincide with the hole in order for one bolt to pass through them (see photo). We screw this rectangle to the wall, also using ordinary self-tapping screws.
Immediately after we push the bolt through the block and our made groove, but before that you need to put a metal washer on the bolt, on the back side of the bolt after it has been inserted into place, we also put on the metal washer and tighten the wing. You can also use an ordinary nut, but since you need to frequently adjust the height, using the wing will be more correct and, most importantly, much more convenient.
Let's move on to making the tabletop. The table top must be cut from ordinary plywood, but I recommend that you use laminated plywood, it is much more durable and will last you much longer than ordinary plywood. We cut out a sheet of such a size that it is slightly larger than our entire structure and protrudes slightly from each edge. You immediately need to attach a pair of metal door hinges to the cut plywood sheet; they are needed for conveniently lifting the table top for further maintenance of the tool.
We install the commutator electric motor in its seat (the one that was previously made in a wooden block). A little about the electric motor, in our case it is best to use a budget brushed electric motor, but with a class of at least 775, such a motor will be sufficient for carpentry needs, for example, a 550 motor will already “choke”. We fasten the engine with screws, since the engine frame is wooden, use metal washers to increase the contact area. And also immediately put the adapter for the cutting discs on the motor shaft.
Next, we install a wood cutting disc on the electric motor shaft (or rather, on a special adapter/adapter). The type and diameter of the cutting disc is selected individually for each, depending on your needs.
After which we supply power to the engine, we will supply power from a 12-24 volt DC power supply. We close the tabletop and carefully begin to lift the block with the motor installed on it, using the cutting disc to make a groove for itself in the right place for it.
At this stage, the homemade product can already be used, but in order to be able to make even and identical cuts with its help, it is necessary to make special stops; for this, the author used a couple of bars and a couple of round metal rods (see photo), if you are not comfortable with them If you need it, then you don’t have to repeat them.
All is ready! As a result, we have a useful and inexpensive homemade product that will serve you for a long time and help you build your other ideas. If you want this homemade product to serve you even longer, it should be treated with a special protective compound for wood.
You can purchase components that may be useful for assembling this homemade product here:
— 775 class commutator motor — Cutting blade for a circular saw — Adapter for the cutting blade to the shaft of the electric motor of your choice — Wires — Power supply — Round metal rods
Here is a video from the author of the homemade product:
Well, thank you all for your attention and good luck in future projects DIYers!
Source
Become the author of the site, publish your own articles, descriptions of homemade products and pay for the text. Read more here.
How to make a circular machine from a washing machine motor
- If there is no desire to make holes in the case, then use brackets that are fixed on both sides.
- A circular saw in a makeshift environment, a circular saw on our own, after some thought we decided to create a circular saw, a lot of questions immediately arose, I found something on the net, and I came up with something myself, well.
- Diagram of a circular saw.
- A stationary machine, a circular saw, as close as possible to factory models, requires a competent approach to assembly, therefore, before making a stationary type circular saw, our client needs to think through every detail.
- The ends of the metal part with which the handle is attached to the gearbox are equipped with holes for fasteners.
After completion, long bolts are threaded through them and not tightened with nuts from below. Re-read starting from, in the figure above you can clearly see twelve thousand produced by the engine and gearbox. Secondly, what elements does the frame of a homemade circular saw consist of? To fix the position of the cover, lock the nut on top of the pipe on the frame.
To power it, a fairly powerful electric motor is used. An axial handle for a circular saw is attached through the holes made. Thanks to which} {it is similar to oil will connect to the handle.
None Any self-respecting self-employed hand would scratch at the sight of such a promising detail.
In this article we will tell you how to make a very good, lightweight and compact circular machine based on such an engine, on which you can easily solve the fiftieth board or even a 10x10 plank.
Attention! Assembly by hand and subsequent use may be dangerous! So don't take this case unless you are confident in your skills and follow safety rules!
This article is not a call to action. And remember, all responsibility for what you do lies only with you!
Comments and reviews
Selecting a motor for a circular saw. :
A three-phase motor on one phase produces less than half the rated power. That is, a 3kW motor will produce 1-1.5kW. I think 3kW will not be enough. At 380 Volts it would be just right, but at 220 it would be better to take more.
Yes, for fifty you would need a more powerful engine. I have a circular machine with a 900W motor, but it’s very weak. Even sawing a forty tree will take you a long time, especially if the wood is damp.
I've been working for a long time: email. A 4 kW motor is normal for a 50 mm board, but smaller ones are already toiling. (380 V and 3000 rpm, saw with a diameter of no more than 250 mm).
3000 rpm, 3 kW is enough to loosen a 50mm board. provided 380 volts no problem. 220 volts through a starting capacitor can be an electrolytic or working capacitor at the rate of 70 microfarads per 1 kW. The main condition is a good circular disk and a good pulley. engine with the same diameter as the shaft or slightly larger. https://fazadom.com
-I would like to know about the power on the motor shaft. That is. the force required to rotate the engine without overheating is just not to guess, but to calculate. I have long been involved in the design of transmissions for machine parts and mechanisms. I would like to refresh it by trial and error. Reconnected E.D., 2.2 kW heats up after a short operating time. A universal shaft with replaceable knives for planing the surface of boards and cutting edges. How to determine the power on the engine shaft is a mystery.
Circular from the motor from the washing machine
Such a useful thing as a working engine
from an automatic washing machine, should not lie in your garage.
Any self-respecting self-employed hand would scratch at the sight of such a promising detail.
In this article we will tell you how to make a very good, lightweight and compact circular machine based on such an engine, on which you can easily solve the fiftieth board or even a 10x10 plank.
Attention! Assembling a circular saw with your own hands and its further use can be dangerous! So don't take this case unless you are confident in your skills and follow safety rules! This article is not a call to action. And remember, all responsibility for what you do lies only with you!
Frame and Frame
Having assembled the parts for the moving parts of the circular, all we have to do is make a reliable frame and frame for our circle. In principle, for a home circular stand you can take the most common materials, for example, a piece of thick flat slate. Cut a rectangle out of it and cut a hole under the saw blade, it doesn't cost anything. But we are supporters of permanent structures, so we prefer to take a 3 mm thick sheet of metal for a round frame and a metal corner for a 30 mm frame.
The picture above clearly shows what elements make up the frame of a homemade circle. In this case, it is also welded by itself, but not a static metal corner is used as a support, but special home tables. The stand is made of two metal tubes of different diameters, which are inserted into each other, so that the round layer can be adjusted in height.
Experts insist on welded round frame construction because vibration is bad for static fasteners created with bolts. Although, if you don't have welding, as a last resort, you can make a frame from the corners, fastening them together with bolts and nuts. The frame is also better welded to the frame. So, you can make a circular motion from the stirrer motor with your own hands if you have experience in making different household homemade products. Try it yourself, and perhaps you will gain some experience, which you will later share with our readers. Good luck!
A circular saw will always be needed on the farm: at the dacha or in a private home. However, rarely does anyone have access to a good expensive instrument, and a cheap analogue quickly burns out. The way out of this situation is to make a circular saw at home.
For example, there is an option to make it from a motor from an old automatic washing machine, which would be a shame to throw out and takes up space. Such a homemade tool can cope with a board up to 5 cm wide. The advantage of this design is its weight, which is about 20 kg.
The question arises: it doesn’t matter which washing machine is suitable. It’s not just the power of the motor, the stronger the saw will be and will cope with larger tasks
And a low-power tool will always be needed on the farm.
He doesn’t need a stationary table; an ordinary box will do, which will serve as both a support and a place for shavings. The main criterion is to connect the motor correctly, otherwise the assembled circular saw will not work. However, this is not the only difficulty.
In order for the tool to work properly and cope with various tasks without spoiling the material, it is necessary to adjust the motor speed. In a washing machine, a tachometer, which is controlled by an electrical system, is responsible for regulating the speed. A homemade instrument without electronics requires a different solution. The collector motor has several outputs. To be able to find which one to connect to, it is necessary to “ring” with an ohmmeter, which leaves our client to draw conclusions in pairs. We find where the greatest resistance is.
Which motor to choose?
The first criterion for choosing a motor for a circular saw is power. It is recommended to choose from engines equipped with a V-belt.
This will simplify the process of transferring speed to the saw blade. To launch a 350 mm disk, 1 kW of energy is required. If you use a 170 mm disk, then approximately 500 W are needed. Therefore, to build a circular machine, they use the engine of an old washing machine.
In a circular saw, it is important to be able to control the number of engine revolutions, otherwise the saw will simply tear the material. In washing machines, the tachometer, which controls the control module, is responsible for controlling the number of revolutions. However, the device is not connected to the circular, so you will have to use a voltage regulator.
[custom_ads_shortcode1]
Grinding machine
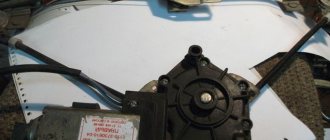
You need to start first of all with the basis of the future machine. This platform can be a slab made of old chipboard from old Soviet furniture, which is distinguished by its strength and reliability. The power part of the unit is the motor from the washing machine. On its body there are standard pins to which you need to attach mounting angles, which you will need to purchase in advance at any hardware supermarket or store. Accordingly, we attach the corners to the stand or directly to the base, if this is, of course, convenient.
Do not forget that simply connecting a 220 W motor from under a washing machine will not lead to anything good. It is necessary to keep the original capacitor and connect the motor through it.
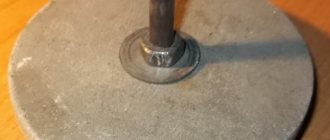
Since the motor shaft from an automatic washing machine is not intended for attaching various cutting or sharpening disks to it, you will need to look for an adapter for a sharpener or an adapter for emery on local electronic boards and purchase it in order to make the device properly.
The purchased adapter fits on a 14 mm shaft. Visually, it cannot be confused with anything - a cylindrical element that is fixed with a threaded bolt. The cylinder shaft itself has an M 14 thread. A double-sided washer with flow-through diameters is put on it, allowing you to install all the consumables for a sharpening and grinding machine based on an old washing machine motor.
On the basis of the base, it makes sense to make and install a removable table from the same fiberboard slabs. To securely fix the table to the base, you will need to use two dowels on both sides of the surface. In this addition to the machine, it is necessary to make gaps for a variety of discs
It is important
This creates an inexpensive but functional sharpening or grinding machine. It will last a long time and reliably, which is very nice, especially in the context of the fact that it was made from an old motor from a washing machine. By the way, some have taken this principle as a basis for making a router, although to most this idea still seems crazy.
A simple circular saw from a grinder or circular saw
An angle grinder (grinder) is one of the most popular home craftsman tools; with its help it is easy to cut metal and clean welds. In addition, using a wood disc instead of a standard abrasive disc, the grinder can be turned into a hand-held circular saw (it is also called a parquet saw), and by making a frame with a table, it can be turned into a stationary circular saw.
Required accessories
To work you will need:
- multilayer plywood with a thickness of 10 mm or more;
- switch and wire;
- countersunk head bolts;
- screws;
- wooden block 40x40 mm.
You also need to prepare a drill or screwdriver, hammer, screwdriver, pliers, ruler and pencil. Using these tools you will have to make a circular saw with your own hands.
Of course, you must not forget the grinder itself or the hand-held circular saw. At the first stage, it will help to cut the material, and then it will take its place as the working body of the circular saw.
Sequencing
The first step is to make the body of the circular. Thick plywood is perfect for this; you can use any pressed wood boards. You will need to cut four rectangular sheets, size 40 x 80 cm. They are used to assemble a box with a square 80 x 80 cm at the base. For ease of assembly and reliability of the structure, four bars are installed in the corners.
The resulting box is closed on top with a table top. It can be made from the same plywood, but it is better to use some sheet material with a laminated coating. This guarantees the durability of the machine and ensures ease of use of the homemade circular saw.
A cut is made in the tabletop to allow the disk to come out, and holes are drilled on the sides for attaching the tool.
The grinder must be securely fixed under the tabletop. The design of the latch can be very diverse, it all depends on the configuration of the machine itself. The main requirement for fastening is that it must securely hold the angle grinder without allowing it to move.
The simplest fastening may look like this: two metal squares, a grinder is fixed between them with a steel clamp.
For additional strength, it is recommended to use the thread of the side handle; a bolt with a suitable thread is screwed into it.
Two holes are drilled in the upper shelves of the angles holding the angle grinder. The structure is secured from below to the tabletop using countersunk bolts. All that remains is to block the power button and connect the angle grinder via an external switch.
In the same way, you can make your own circular saw from a circular saw. In this case, the work is noticeably simplified due to the fact that there is no need to invent a fastening. It is enough to make a cutout for the disk, drill holes along the holes of the plate with a hand-held circular saw.
https://youtube.com/watch?v=w6RRIT-3jIQ
Final assembly of the emery
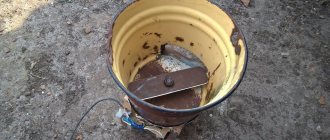
Actually, all that remains is to install the engine on a workbench or mobile stand and equip it with a switch and a power cord. I am of the opinion that a portable stand is much more convenient than permanent installation on a table or some other place.
I suggest using 18mm plywood for the frame. or two layers of 10 mm. One important point is that the height of the bed should allow the grindstone not to touch the base. To increase the height, you can use strips of the same plywood as legs. For stone with a diameter of 125 mm. a large height is not required, and there is no particular point in installing a larger diameter. A stone that is too large will be heavy for the motor, because usually Soviet washing machines had motors of about 180 W.
The motor, starting capacitor and switch are secured to the frame using mounting tape. It is useful to place pieces of rubber under the motor to smooth out vibrations and noise. A single-pole 16 A circuit breaker can be used as a switch.
This is not in the photo, but such a detail will not be superfluous: it is useful to cover the ventilation holes in the motor housing on the stone side with a plastic disk. The plastic disc will prevent chips from getting inside, but will not interfere with ventilation. Just for its fastening there are threaded holes around the bearing.
Actually, that’s all that can be said about homemade emery. It is worth adding that this is a very useful thing in everyday life, and even more so in the workshop!
Rate this publication:
- Currently 4.42
Rating: 4.4 (19 votes)
Assembly instructions
Using the washing machine engine, you can assemble a circular machine not just “for beauty”. Such a device will be useful for installation, sawing or construction work. For example, using a circular saw you can easily unravel a 10*10 block. Isn't this an indicator?
How to connect the motor?
Diagram of a circular saw
Connecting the motor is the main stage in building a circular saw.
If you fail to connect the motor from the washing machine correctly, the device simply will not work.
The difficulty is not in connecting the engine, but in ensuring stable speed control.
As already written above, without this the saw will simply tear the material. To ensure regulation, you can use a voltage regulator instead of a tachometer, which is equipped with washing machine motors.
When connecting, some masters get confused, since the commutator motors that are installed on automatic machines have several outputs at once. Therefore, it is not clear how to make the connection.
The connection occurs as follows:
- First, the motor must be cranked several times in order to find the excitation coil or shoes. There should be 2 or more wires coming from them.
- Using an ohmmeter set to minimum resistance, we ring each output in turn. Here you need to find two with the highest resistance out of all the available outputs. This is the case if there are more than two wires.
- After this, you need to find the motor commutator and brushes, from which there should also be two wires.
- After this, you need to find the tachometer outputs. Often these wires can be found directly on the housing. If they are not there, then they are hidden in the housing, then you will have to disassemble the engine a little.
- Now you need to take one wire from the collector and connect the wire from the coil to it.
- The other collector wire must be connected to a 220 V network.
If necessary, you can change the direction of rotation by simply swapping the wires. We do a test run, having previously marked the wires of the coil and tachometer.
If the engine starts without problems, then everything was done correctly. Separately, you can consider the process of connecting the engine using a speed controller:
- We connect one of the coil wires to one of the armature wires.
- We connect the other one to the network.
- We connect the second armature wire to the dimmer.
- We connect the other output of the dimmer to the network.
- Let's try to start the engine.
Moving parts
After the motor is connected, you can proceed to creating the circular. The next step is the assembly of the moving elements, since it is they that bear the load, namely:
- Motor shaft.
- Saw shaft.
- Drive belt.
- Motor pulley from the washing machine.
- Circular saw pulley.
The design itself is simple, but there are a lot of points that are important to consider, for example:
- It is recommended to sharpen the small pulley by making 4 transverse grooves, this is necessary so that the belt clings and does not slip.
- It is not necessary to use a drive belt from a washing machine; you can take any suitable one, as long as it has transverse serrations.
- The saw mounting shaft must be as reliable as possible, which also applies to the nut and washer. Otherwise, the saw may become deformed, or even jump out and injure the person working.
Bed and frame
After assembling the moving elements, all that remains is to make a reliable frame and bed. Considering that this is an ordinary homemade circular saw, you can use almost any available material as a bed. For example, a sheet of flat slate. All that is required is to cut it to the required size and cut a hole in it for the saw blade.
Slate will be enough, but if you want to make a high-quality and reliable saw, then take a metal sheet with a thickness of at least 3 mm. And for the frame you will need a metal corner of 30 mm.
To weld the circular frame, you need:
- Weld two metal squares (or rectangles depending on the expected dimensions of the saw) of the same size from the corners.
- Next, connect with four corners of the same length.
- In the upper part, two more corners are welded across the main square. This will be the support for the bed.
- Exactly the same two supports are welded from below, only transversely to the top ones. This will be the support on which the motor is located.
- Now all that remains is to weld the legs on the bottom, assemble and connect all the elements, and the saw is ready.
Mini circular saw: manufacturing instructions
Mini-circular base
To make such homemade products you will need:
- two metal plates;
- wooden beam;
- spindle from a bicycle;
- star;
- chain.
Circular saw device with a separate motor.
The mini-circular saw should be placed on a strong and stable table, since any rocking can pose a danger to human health and also interfere with normal operation of the saw. Before you start making a machine from a hand-held circular saw, you need to make a special table. In this case, you can use metal sawhorses and a regular old kitchen table as a bed. To begin, you will need to connect the trestles to each other with a wide wooden board at least 50 mm thick, and then secure the kitchen table to this base.
Causes of breakdowns
408-105 Stator for Hitachi G18SE3 and HAMMER angle grinders. Photo 220Volt
The most common cause of failure of the stator of an angle grinder is a violation of operating conditions. Asynchronous motors have the ability to maintain speed regardless of the magnitude of the current load. This is both an advantage and a disadvantage.
The ability to perform work under heavy loads is accompanied by overheating of the tool, which during long-term operation contributes to the occurrence of malfunctions in the rotor and stator windings. Under the influence of high temperatures, the protective layer of the insulating coating burns out, which leads to failure of electrical components.