There is no equipment that does not fail, and water supply pumping stations for a private home, even if they are produced by the most popular brand, are no exception. You can quickly solve the water supply problem by repairing the pumping station yourself.
Pumping system components
What to do if the pump does not work? First of all, find out which part has failed. The reasons preceding the breakdown are very different. The problem usually lies not in the pump, but in external factors: lack of water filtration, instability of the network voltage. Most often, pump repairs are not required. You can diagnose and fix such faults at home, without resorting to the services of service providers.
Below we will provide short instructions and tips for fixing some pump breakdowns.
How a water pump and reservoir work together
Water pressure is the factor that supplies pressure to the shower, sink, and taps. For centralized water supply, water pressure is mainly controlled by industrial equipment, although there are several internal reasons requiring repair of the water supply system, which can reduce the pressure.
The well, water pump and pressure tank work together to pull water from the well into the house, so if the system malfunctions, repairs must be made to each element. The pump pulls or pushes—depending on the type—water from the well, sending it to a pressure tank that holds it under pressure until something in the water supply turns on. A pressure tank creates pressure with a portion of the tank filled with compressed air.
When a water valve opens in a home, the tank pushes water through the pipeline and then fills again when the pressure in the tank drops below a certain value. With a tank, the pressure holds a significant amount of water, which results in less wear and tear on the pump since it does not have to be turned on and off frequently. The presence of a pressure tank in the system reduces the number and scope of repairs. The correct size of the pressure tank is essential to the longevity of the equipment.
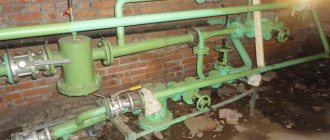
Pumping station
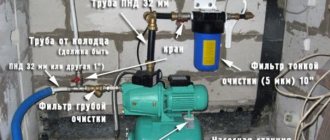
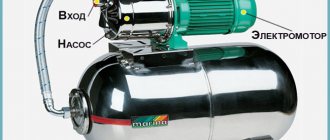
A water supply system is necessary to supply water from a source to the house. It works well when sufficient pressure is provided. In places without a centralized water supply, this problem can be quite easily solved using a household water pump. The device is simple and consists of basic functional elements:
- submersible pump;
- storage tank;
- auto control unit.
The borehole pumping unit supplies water to the tank. At maximum pressure, the unit automatically turns off when the pressure switch of the pumping station is activated. As needed, water is supplied and the pressure in the system decreases. At minimum pressure, the deep unit restarts and the tank is refilled. Working according to this cycle, the pump provides water to the maximum for household needs and irrigation of personal land.
It is mandatory to install a check valve on the water supply system - this is an element of the non-pressure pipeline fittings that prevents the reverse flow of water. The protective part is installed at the end of the pipeline.
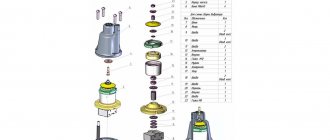
Pump structure: 1 – housing, 2 – cover, 3 – impeller, 4 – drive shaft, 5 – mechanical seal, 6 – bearings, 7 – capacitor, 8 – electric motor
Having studied the principle of operation, you can independently find the cause of the breakdown.
Important to remember! Following the recommendations from the operating instructions when installing the pipeline will save you from unnecessary problems. You must always follow the recommendations for the care, repair and maintenance of pumping stations specified in the manufacturer's instructions.
Reasons and frequency of repairs
Pump repair, frequency of maintenance and durability depend on the principle of operation of the device and its materials. The type of pump that supplies/drains water in a home is a jet or submersible device. Pumps can be shallow or deep borehole devices with the ability to lift water from a height of 25 or 100 meters. Submersible pumps are installed deep inside the well and can push water hundreds of meters.
With proper care, a submersible pump can have a long service life of up to 15 years without repair. Aboveground jet pumps, which are more often used with shallow wells, have an average lifespan of 10 years.
Main characteristics indicating that the pump requires repair:
- No water flow from taps
- Poor weak pressure
- Constantly working device
Now that you know the signs of a breakdown, check out our detailed troubleshooting and repair guide.
Pumping station malfunctions
Breakdowns and shutdowns can occur for several reasons:
- de-energizing the system;
- wear of pump parts;
- damage to the storage tank;
- failure of the automatic unit.
Installation of warm water floors in a private house
The structure of the pumps is quite simple, which allows you to perform some types of repairs on your own. It is important to understand why the pump stopped working. It may be enough to seal the crack in the tank or make sure there is power supply. If finding a solution is problematic, you should call a specialist.
For information. Leading manufacturers sell pumping stations that have a self-diagnosis function. As a rule, the control unit monitors the current state of the unit and can determine that the submersible pump in the well is operating in a dry state, the bearings are worn out, or there are other defects.
Troubleshooting
Diagnostics is the best way to prevent repairs
Conducting an annual water inspection may seem unnecessary if there are no problems with the water supply, but it will prevent the expense of repairing all equipment. Regular inspection by a professional is a time to ask questions, gain insight into the system, and hear recommendations for use.
Despite the trouble-free operation of the device, from time to time the water pump will need to be repaired or replaced. With the right knowledge, you can do everything you can to extend the life of your water technology and keep it in good working order—and even make some minor fixes yourself. If the problems cannot be solved on your own, you need to contact professionals who can repair and inspect plumbing and sewer systems on site.
How to disassemble correctly
First, turn off the power, then dismantle, disconnect the pressure pipeline and disassemble it:
- remove the coarse filter;
- disconnect the motor part from the hydraulic part.
Disassembling the hydraulic unit:
- the hydraulic part is clamped with a vice onto the pressure pipe;
- the housing is unscrewed;
- All parts are removed from the shaft;
- if necessary, replace worn or broken ones;
- the parts are washed and then assembled onto the shaft.
Important: in order not to confuse the parts, they must be placed in the order of disassembly or put on any axis/rod without changing position.
Motor disassembly:
- it is installed with the lid facing up;
- unscrew the lid and remove the sealing gasket;
- oil is drained;
- using a press, the lower motor cover is pushed down, the locking ring is released, and then removed;
- with light blows of a mallet on the end of the shaft, the bottom cover with the rotor is knocked out;
- the engine rotor with bearings is removed;
- if replacement is necessary, remove the bearings from the shaft and the oil seal from the top cover of the motor;
- windings are checked; if necessary, the stator is sent for repair. Assembly is carried out in the reverse order.
How to Repair Common Pump Problems
Take a little time to check the functionality of the pump and all the parts that bring water from the ground into the house. You'll likely eliminate unnecessary repairs and replacements when you notice items that aren't working, and prevent hassles that could become significant expenses.
Renovating can be a challenging task. This is because the pumps are usually located 200 meters below ground level. If the pump is not moving water from a deep well into the house, you should try to fix any problems as soon as possible:
- Electrical Device Repair
The hydraulic pump may experience a problem related to its electrical system: it stops working. Check the switches and wires connected to the device. Turn off the power by flipping the breakers. If you notice that there is a burnt fuse, the repair is simple - remove it and install a new one.
Now test the pump to make sure it is working. If water flows, then the problem was a broken fuse. If there is no flow, check the wires and cables that come from the fuse box down into the well. The reason for the repair may be a damaged wire. When you are sure that the problem is not electrical, check the device itself.
- Troubleshooting the engine
If the water pump is not working, the cause of the problem is likely engine related, and it could also be a faulty starter. Now turn off the power supply and clean the pressure switch contacts using a piece of paper because they may be dirty or clogged. Repair: replacing the starter with a new one.
- No water supply
Another common problem that can occur is that the pump does not deliver water even if the motor and all other parts are working properly. In this case, the device may encounter many different problems that require repair.
Turn off the power and remove the fill plug to check whether it contains water. If no water is found in the pipe, then it is possible that the sample was lost and will need to be refilled.
The cause of the problem may also be a burned out circuit breaker. In this case, the repair consists of replacing the damaged circuit breaker with a new one.
The next check is the pressure tank. Check the pressure gauge to see if the reading is above 1.8 bar. Depending on the type of pressure tank, this may indicate a higher figure. But if the pressure gauge shows normal pressure, then the problem is most likely in the house, and not a problem with the pump. No pressure? Then it is necessary to repair the well pump, pressure tank or switch.
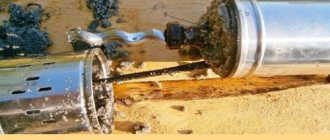
Other problems that may cause repairs include clogged supply system components: pipe, pedal valve and strainer. If these parts are clogged, the pumping unit will pump out dirt or sand instead of water. You may find that the check valve is damaged and will need to be replaced with a new one. Spare parts are available for almost all popular brands of equipment.
Problems with the appliance may depend on where you live. The cold climate has frozen the pipes if you live in the northern region. On the other hand, if the area is very dry, then the water may have dried out to the point that the pump cannot reach it. Pump repair will not be required if you do not turn it on in harsh climatic conditions.
If you are inclined to do the repairs yourself and inspection indicates that there may be a problem with the pressure tank or switch, follow the section below on servicing and replacing the pressure switch.
Rules of operation and maintenance
In order not to encounter situations in which the circulation pump installed in the heating system will require repair, it is necessary to strictly follow the operating rules for such equipment, which are as follows.
- If there is no water in the pipeline, the circulation pump cannot be started.
- The amount of water pressure generated must be within the characteristics specified in the technical data sheet of the circulation pump. If the device produces a reduced or, conversely, increased water pressure, this can lead to its rapid wear and, accordingly, failure.
- During the period when the heating system is not in use, the pump must be turned on for circulation at least once a month for a quarter of an hour, which will prevent oxidation and blocking of its moving parts.
- It is very important to ensure that the water temperature in the heating system does not exceed 65°. In water heated to a higher temperature, sediment begins to actively fall out, which, interacting with the moving parts of the hydraulic machine, contributes to their active wear and, accordingly, failure of the entire device.
The circulation pump should be inspected and checked for correct operation monthly. Such measures make it possible to identify malfunctions in the operation of equipment at an early stage and promptly take appropriate measures.
Periodic checking of the circulation pump will significantly reduce the likelihood of its failure during the heating season
Checking the circulation pump for correct operation includes actions such as:
- turning on the hydraulic machine to operating mode and checking the level of noise and vibration it creates;
- checking the pressure (pressure level) of the coolant created in the discharge pipe (as mentioned above, the liquid pressure must be within the values given in the technical data sheet);
- control of the degree of engine heating, which should not be too high;
- checking the presence of lubricant on the threaded connecting elements of the pump and applying it if it is missing;
- checking the presence and correct grounding of the hydraulic machine body;
- checking for leaks both on the pump body and in the places where it is connected to the pipeline (if there are leaks in such places, it is necessary to tighten the threaded connections and check the integrity of the installed gaskets);
- inspecting the terminal box and checking that the wire is fixed in it (in addition, it is necessary to check whether moisture is getting into the terminal box, which is unacceptable).
The main reason for the rapid wear of friction bearings in pumps is considered to be increased contamination of the coolant.
Pressure switch repair
The pressure switch is located at the bottom of the pressure tank, requires periodic maintenance and is the most common reason for water supply related repairs. The best place to start troubleshooting problems is with the pressure switch. The most difficult part of the renovation is putting everything back into place after disassembly.
Before starting repairs, you must turn off the breaker in the electrical box in the pressure tank and the well pump.
Remove the plastic or metal cover from the pressure switch - there may be a few screws to remove.
If the pump hasn't worked at all, pull the switch relay contacts apart and check for current or burning contacts - repair will require replacing the entire pressure switch. If not, clean the contacts with fine-grit sandpaper until you find shiny metal on all contacts.
Locate the pressure adjustment nut, which should be located in front of the compartment that contains the switch relay contacts. Using a wrench, adjust the nut according to the manufacturer's repair instructions, which are usually printed inside the switch cover.
This repair should be done on a bi-annual basis, especially if the pressure pump is located in a high-humidity area, such as a basement. If repairing the relay does not return water to your home, you may need a new pressure sensor.
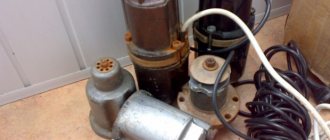
Drainage pump device
The following are installed in the device body:
- Protective mesh on the bottom of the device. Prevents debris and large parts from getting into the impeller.
- Impeller (impeller). Rotating, it creates a rarefied environment around itself, due to which liquid is absorbed.
- Bearing shield. Protects the electric motor, rotor and shaft from moisture.
- The rotor sets the rotational energy for the impeller.
- The shaft is considered an element of the engine, passing through the entire cavity of the unit and attached to the rotor.
- The capacitor serves as a switch.
- Float. Located outside the device, when lowered it prevents the engine from starting, preventing overheating from dry running.
- Cable. Designed to supply electricity.
The design of the unit is sealed. In each compartment, including the engine, there are sealing rubber gaskets between the partitions.
Repair of drainage installations
Drainage water pumps are designed to function in difficult conditions, where a large load is placed on the working units. Signs of a malfunction are a complete stop of the unit or a lack of pressure when the engine hums.
In the first situation, there may be the following causes of failure:
- the electric motor capacitor is burnt out;
- the float mechanism caught on the wall, being below the extreme switching point;
- the winding burned out due to voltage surges;
- the wheel blades are clogged with abrasive.
The second problem is explained by the following:
- a section of the cable is burnt out or frayed;
- the rod has broken off or become loose;
- check valve is damaged.
Many of these faults can be corrected yourself, for example by cleaning the impeller or replacing the cable.
Causes of pump malfunction
What are the possible causes of pump failure? This question interests not only beginners, but also quite experienced car enthusiasts. The following are the main reasons, from the most common and frequently occurring to the “exotic”. Among them:
- Faulty bearing . This unit wears out for natural reasons as it is used. However, accelerated wear is possible due to additional negative factors. This, for example, is an incorrect (stronger) belt tension, which causes more force to be exerted on the bearing. Another reason for significant wear is the ingress of antifreeze onto the rubbing vapors due to depressurization of the gasket and leaks of coolant.
- Seal failure . The pump has two seals - an oil seal and a rubber cuff. And it is the oil seal (gasket) that most often fails. This happens for two reasons - natural wear and tear (tanning of rubber) and the use of low-quality cheap antifreeze without appropriate gentle additives, or even water. In the long term, these liquids “eat up” the gasket, it begins to leak, which leads, firstly, to a decrease in the level of coolant in the system, and secondly, antifreeze or water gets into the bearing, washing out the lubricant from it and the troubles described above.
- Mounting misalignment . This is possible for two reasons - incorrect installation and manufacturing defects. However, incorrect installation is a fairly rare occurrence, since the case has ready-made mounting holes, which are very difficult to miss. Another reason is uneven fit to the engine block (due to dirty, rusty or warped mating surfaces). But, unfortunately, factory defects, especially with budget pumps, are not such a rare phenomenon. Misalignment leads to the pulley rotating misaligned, which, in turn, leads to accelerated wear of the loaded part of the belt, as well as wear of the bearing. In the most critical cases, the belt may break and a collision of valves and pistons may occur. Sometimes misalignment occurs as a result of the car being involved in an accident, which resulted in the displacement of individual elements of the body and/or engine.
Often, a decrease in pump performance, and, accordingly, a decrease in pressure in the cooling system is observed after applying sealantused to eliminate radiator leaks. So, its composition mixes with the coolant and clogs the honeycombs (channels) of the radiator, and also sticks to the pump impeller. If such a situation occurs, then it is necessary to drain the antifreeze, dismantle the pump, and then flush the cooling system using special or improvised means.