You can read about welding a car body here.
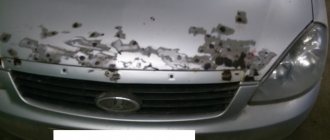
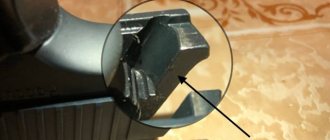
Frame cracked
reduce to zero, apply a diamond/triangle with an indent and boil it around the perimeter.
I didn’t understand about the holes, I googled it on the metal forum:
1. The repair connection must be cleaned. split the cracks. 2. Prepare a reinforcement pad with a size larger than the defect location. 3. Weld all cracks with UONII 13/55 electrodes in gentle conditions, i.e. use electrodes with a diameter of 3 mm. A multi-pass (multi-layer) seam is preferable. After each pass, clean the seam from slag crust. 4. After welding, remove the reinforcements, apply a reinforcement pad and weld. 5. It is advisable to exclude transverse seams (about 90 degrees to the frame axis). Transverse seams should be oblique (about 45 degrees to the frame axis). 6. If the design allows, weld an additional stiffener. 7. Seams should not have large reinforcements or various defects.
As a welder, I’ll say right away - weld with a semi-automatic machine in several passes. The fact is that the weld seam with an electrode itself turns out to be slightly hardened, but with a semi-automatic machine, the seam is more elastic and better accepts vibration. If you don’t have a semi-automatic device, then SSNI, change, boil the crack at low currents and apply a patch. If it is not possible to apply a patch, then you must first weld the crack at low currents using electrode 3. And then at high currents weld the crack in a zigzag pattern with electrode 4. Well, that is, of course, if you know how to cook. If not, then it’s better to let a welder do it, otherwise you can end up with such snot that no one wants to put a patch on them.
Last edited by burcly; 13.05. at 12:36.
well, or for rivets. In general, WELDING IS IMPOSSIBLE.
Again, don't make this up. There are well-known principles that must be followed. You cannot: weld with a continuous seam across the frame (i.e. vertically), in general try to avoid continuous seams! Using a dotted line means it tightens less, creates less stress, and is less susceptible to subsequent breakdowns. As Jokorn correctly noted, use the so-called as often as possible. mortgages - i.e. electric rivets, through pre-drilled holes in the plate, significantly distribute the load on the joint. The only thing is that 2 mm is not enough :). It is necessary that the penetration to the frame is good, so that the arc is not pulled towards the edge of the hole of the amplifier plate. And this is at least 8 mm in diameter with a thickness of the amplifier plate of 2-3 mm.
I will answer on the topic. We need a good welder and a professional semi/automatic 380V 400-500 Amp.
I agree with the first one, but I killed him about the welder. ))) But won’t the usual PDG205 semi-automatic 220V up to 300A be enough? Wire 0.8mm copper-plated. ))
You can easily melt a crack without applying scarves and various corners)
In this place and on this car, it is unrealistic to properly seal a crack so that it does not tear nearby or in the same place. Now about the crack. The problem is not so much in itself, but in whether there is a crack on the engine side, as well as on top of the frame. Because if the crack is semi-encircling, you will have to remove the engine in order to weld it correctly and reliably. But then make your own decision. So. Raise the muzzle with the jack so that the crack comes together. Use a brush to clean the welding area and the area where the amplifier will be welded. Use a short dotted line (1-1.5 cm) at the top to secure it from diverging. Place an electric rivet at the root of the crack.
In the center of the length of the crack too. The difficulty is to clear the welding area. But in your case, if the welder is competent, he will simply apply an electric rivet with a high current. Using a roughing or grinding wheel, sand the seams flush with the main plane of the frame. Make a plate as shown in the picture. We drilled holes in it. It’s arbitrary, but the main principle is to distribute them evenly over the surface to minimize parasitic voltages.
Apply, boil along the holes, and dotted lines 3-4 cm every 2 cm.
Coat with polyurethane sealant, primer, enamel, anti-gravel, enamel. also anti-gravel. still enamel. )))))
And never (.) allow anyone to pull your car with a steel cable, just as don’t do it yourself. And it’s not a problem if the car breaks in half; it’s worse if someone is killed or maimed when the cable breaks.
Read also: What kind of oil to pour into a worn engine
Preparation takes more time than the welding process itself.
Repair and straightening of automobile frames. The car will be like new
cars, SUVs and trucks up to 5 tons
On most cars, the frame is a numbered unit! We will restore the original frame
car on the slipway, and we will save you
up to 50%
of money. Replacement - only as a last resort!
At the same time, the frame after repair will have the same properties
in terms of cross-country ability, stability and safety, as the new one!
Frame SUVs are currently the most suitable for any road surface and off-road.
But even such almost invulnerable cars get into accidents. And if the supporting frame is damaged, the car owner is faced with the question of what to do next...
After all, the cost and replacement of a new frame for such a car can reach up to 30% of the total cost of the SUV.
Body repair of frame cars is considered one of the most difficult for several reasons.
The frame is the main strength element of a car. It is not only made of heavy-duty steel, but also additionally reinforced in 17 places.
Therefore, repairing a car frame is extremely difficult and requires special equipment. The most important condition is the master’s ability to think three-dimensionally.
Typically, upon impact, the frame twists in three planes. It is precisely because of the complexity of restoration that most car services write it off as a replacement.
And this entails a whole range of financial losses and additional problems:
- Any frame costs from 130,000 to 380,000 rubles. And usually it is out of stock (and ordering and delivery takes from 1 month, because it is an oversized cargo).
- Frame replacement work is very expensive and time-consuming.
- On most cars, the frame is a numbered unit. If it is replaced with another, it will no longer be possible to sell such a car at a high price; the buyer will immediately have fair questions. It is almost impossible to hide the fact of replacing the frame from the future buyer, and therefore you have to tell the truth about the nature of the accident. According to statistics, having learned the truth, 70% of customers immediately refuse to buy this car, and the rest try to reduce the price by at least 30-40%.
The price of a new frame depends on the make of the car, and to the cost of replacing it you also need to add the cost of removal and subsequent installation of the body and all other components.
Our service center will allow you to reduce your costs significantly by restoring the damaged frame of your SUV.
Despite the fact that SUV frames are made of high-strength steel with reinforced stiffening ribs in all planes, our craftsmen using special equipment will literally “unfold” and straighten the damaged areas, restoring the original geometry of the frame with all its inherent rigidity properties.
Benefits of frame restoration
- Big savings - compared to buying and installing a new frame on the car
- Time saving: no need to wait for the frame to be delivered from abroad; repairs will cost us from 2 to 6 weeks
- The vehicle received after repair will have the same properties in terms of cross-country ability, stability and safety as with a new frame!
The most common damages:
- the frame was led - curvatures, distortions, torsion
- frame displacement - lateral, diagonal
- frame defects and deformations, cracks
- twisting and vertical bending
- the frame is burst, cracked, or requires welding
- the frame is bent or part of it is bent
For an assessment, send photographs of the damage to the workshop's email address.
Cosmetics and body protection
Don't hesitate to write to us! Or call the number:
+7
Mon-Fri — 10-20 Sat — 10-16
Welding an SUV frame.
I'll contribute my 5 kopecks. WHEN WELDING THE FRAME, MINIMIZE THE TRANSVERSE SEAMS. I inserted the patch, welded it in a circle, and the overlay on top along the length, so that it overlaps with a good margin and weld only longitudinal seams, and not continuous ones - in a run-up, do not cook across. Do not cook everything with smoke breaks overheating the frame - there are different sequences depending on the situation. The bullet machine, of course, rules. If you’re an MMA pro, you can do the same.
AMP Posted 17 February 2010 — 23:34
I'll contribute my 5 kopecks. WHEN WELDING THE FRAME, MINIMIZE THE TRANSVERSE SEAMS. I inserted the patch, welded it in a circle, and the overlay on top along the length, so that it overlaps with a good margin and weld only longitudinal seams, and not continuous ones - in a run-up, do not cook across. Do not cook everything with smoke breaks overheating the frame - there are different sequences depending on the situation. The bullet machine, of course, rules. If you’re an MMA pro, you can do the same.
I completely agree. You have to deal with this at work - either repairs or strengthening. I’ll add on my own behalf: I consider patches a half-measure, overlays are much more reliable. Welding, preferably semi-automatic. It is necessary to thoroughly clean the metal until it shines and not try to stick the reinforcement to the half-living rot. The easiest way: a strip that is adjusted to the location. So far, there are no complaints about this method, but I think there are options that are simpler and with a greater margin of safety. And the main thing is not to rush#33;
Natey-Golenko Posted 18 February 2010 — 10:44
The bullet machine, of course, rules.
Welding, preferably semi-automatic.
From what point of view is PA better?
hihkook Posted 18 February 2010 — 11:44
From what point of view is PA better?
Less heating of the frame, hence less deformation. I’m not comparing it with TIG, only with MMA. But if you take the frame of something more serious (a truck, where the thickness is 8-10 mm or more), then MMA welding is quite acceptable.
Natey-Golenko Posted 18 February 2010 — 11:49
Less heating of the frame, therefore reducing deformation.
What about impact strength? If we compare Sv08G2S wires and UONII 13/55 electrodes?
But if you take the frame of something more serious (a truck, where the thickness is 8-10 mm or more.)
You can take PA more seriously.
hihkook Posted 18 February 2010 — 12:16
You can take PA more seriously.
Undoubtedly, but if not, it’s more serious, and if the ceiling is cooked with cutting. I only approach serious frames with UONI or LB-52; I can’t lift my hand to take other electrodes.
Natey-Golenko Posted 18 February 2010 — 18:39
I only approach serious frames with UONI or LB-52; I can’t lift my hand to take other electrodes.
Those. PA rules only for frivolous frames.
How to straighten the frame?
Most of the energy during a crash is absorbed by the frame.
Depending on the nature of the accidents, the following types of defects may occur:
- Displacement in horizontal and/or vertical plane
- Twisting the frame
- Frame curvature
- Curvature of crossbars
Often, during an accident, several types of damage occur simultaneously. Part of the frame can move both to the side and down at the same time.
If the damage is minor, the frame can be straightened. If the damage is too serious to be repaired, then the damaged metal is cut out and a new one is welded, taking into account the size of the distances between the control points. Welding joints are reinforced with special pads. We will look at how to properly cut, weld and strengthen the frame in this article below.
A damaged frame can cause the body to tilt to one side and cause increased wear on suspension components and tires. The two most common frame injuries are torsion and downward bending (sometimes sideways at the same time). The difference between these two damages is subtle, but important from a repair point of view. Unfortunately, repairing a bend as a twist, or vice versa, can cause additional damage that may be difficult or impossible to repair.
Frame twisting can occur if the car gets into a trench while accelerating. One of the main symptoms of a rolled frame is when the car leans down on one side. In the photo below you can see the severe frame twist seen from the rear of the car. One side of the frame moves down and the other moves up. If this damage occurs, the vehicle may become unstable, especially when cornering and at high speeds. Frame twisting usually occurs only in its central section. In this case, damage can appear throughout the body. After the repair, the edges of the frame will snap back into place as the twisted center section was keeping them in the wrong position. If you do not correctly diagnose the twisting of the frame and correct its incorrectly located individual parts, then you can only aggravate the damage.
The pickup has a noticeable tilt in one part of the body due to changes in the frame geometry.
Another type of deformation is when one of the longitudinal beams is displaced, this also affects the central section. The frame takes the shape of a parallelogram. Such damage can affect the suspension and, when driving, the car will ride at an angle (the front axle may not be in line with the rear).
Frame misalignment can change the position of the suspension.
Measuring the “geometry” of the frame should reveal the extent of its damage. Once the direction and degree of movement of the frame elements is understood, the frame is secured and special stretching equipment is used to return it to its original shape. Hydraulics and chains are used. It is necessary to avoid concentrated impact at one point, placing wooden blocks to distribute the force over a larger area.
The frame has a so-called memory. The metal tends to return to its original position. It is important to correctly “help” it take its original shape and position using pulling devices. Incorrect repair actions cause additional deformation of the frame and complicate the repair.
The main rule when pulling in body repair, which also applies to the frame, is to pull in the opposite direction and sequence to the impact. The deformation must be pulled out gradually, with intermediate measurements of the distances between control points. The sequence is as follows: pull, hold taut and continue pulling again. Do the tightening a little further than the original parameters, since the metal returns a little after the pulling force is weakened.
If the frame has not been heat treated at the factory, it is possible to heat the damaged element to facilitate the straightening process. When using heat, the metal must cool naturally.
Features of MAZ frame repair
A serviceable MAZ frame is a guarantee of the safety of the driver and passengers of a heavy-duty vehicle.
However, bad roads and increased loads lead to part failures.
Over time, the frame of your truck can crack or burst. Then there is the question of how to straighten the truck frame.
AvtoResurs Group of Companies LLC will help solve problems with truck frame repair.
We will tell you about the structure of the “skeleton” of a heavy-duty vehicle, the most common breakdowns and how to fix them.
MAZ FRAME DESIGN FEATURES
The frame of truck tractors has several differences from similar designs of passenger cars.
Firstly, all the power elements (cross members, spring brackets, etc.) are transferred to the vertical walls of the longitudinal beams.
Secondly, durable low-alloy steel is used in the manufacture of MAZ frames .
Thirdly, the elements do not have rivet connections on the flanges of the longitudinal beams. All this made it possible to more effectively distribute increased loads while the vehicle is moving. Thus, even greater strength and durability of MAZ frames is achieved.
study the structure of the truck frame in this figure.
Let's talk in more detail about the design of element 555142-2800010, 555142-2801002-002, 555142-28000010-010.
Basically, most frames for MAZ trucks have the following device:
- 1 and 2 MAZ spars (right and left);
- MAZ frame brackets (3,4, 5, 7, 11,12,13, 14, 15, 16, 17, 18, 20, 27);
- Right support (6), MAZ hydraulic cylinder support (24);
- Crossbar (8, 22, 25, 26);
- Towing fork pin (9) and fork with spring (10, 21);
- Amplifier (28) and bolts (33-37, 41, 46);
- Nuts (38, 39, 43), screws (40), washers (42,44).
Read also: How far does a plane rise into the sky?
REASONS FOR MAZ FRAME FAILURE
Despite the fairly robust design, the element periodically fails.
The most common frame failures are:
- The appearance of cracks in inserts or linings welded to the longitudinal beams of the truck;
- The appearance of small cracks along the holes for most rivets;
- Loosening of rivet connections;
- Concavity of beams (longitudinal).
Naturally, straightening a truck frame on your own is difficult. Therefore, do not allow negligence in the components of your car.
Mostly, malfunctions appear due to increased loads on the truck frame structure. However, if you notice even small chips or cracks on the element, proceed with repairs.
A faulty MAZ frame can cause more serious problems.
MAZ frame repair
Have cracks formed between the spar and the cross members or beams? We recommend welding them using electric arc welding.
However, before this you need to disassemble the frame. To do this, remove the rivets in the cross members that connect the elements to the longitudinal beams.
When repairing a truck frame, use a pneumatic chisel or hydraulic pliers.
If you notice damaged linings on the longitudinal beams that you welded earlier, we recommend restoring the elements as follows.
Cut off a small portion of the frame beam that has welded parts.
Next, attach the additional part, fitting it end-to-end to the MAZ frame beam. Then tack the element by welding at 3-4 points.
Do not forget to place a copper gasket under the joint of the MAZ spare parts.
Then carefully secure it. Next, weld the parts using conventional welding using electrodes with a diameter of 4 mm (before repairing the MAZ frame, study this table).
After finishing the work, remove the slag and protect the seam. Remember that the elevation of the seam above the surface of the truck frame should be no more than two millimeters.
In addition, before welding, dry the electrodes for at least 1 hour at 140-160 degrees Celsius.
For cracks near the brackets or wear of holes, also use an electrode reference.
At the same time, when welding the holes, do not forget to adjust the copper gasket.
We recommend sealing the areas of welded seams with work hardening. At the same time, do not forget that the striker prints should not be solid, since each print must have distinct contours.
After repairing the MAZ frame, the part must meet these requirements:
- The curvature of the top shelf does not exceed 2 millimeters (length no more than 1,000 mm), and over the entire length - no more than five mm.
- The curvature of the vertical wall is no more than two mm (length 1000 mm), and over the entire length of the MAZ frame is no more than 10 mm.
The repair of the MAZ frame is completed.
To do this, inspect the condition of the catch, wash the elements, and tint. Carefully monitor the connections of the crossbars, side members and, of course, the MAZ frame beams.
If MAZ spare parts wear out, you can always contact our online store.
We will provide you with the best parts. Also, if you don’t know where the MAZ frame number is, call the company’s office.
Thanks to a free consultation, the selection of units will be carried out in the shortest possible time.
You can read about welding a car body here.
How to weld a frame on a Kamaz
The frame is the main unit of the car. All components of the machine are attached to it. The frame assembly with suspension and axles on wheels makes up the chassis of the car. The suspension includes springs, shock absorbers and rubber compression buffers.
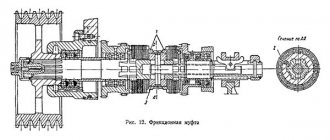
The KamAZ vehicle frame shown in Fig. 69, consists of two longitudinal beams of a channel section, connected to each other by seven cross members using rivets and called spars. Longitudinal beams and cross members are made by stamping from strip low-alloy steel 8 mm thick.
The frame may have the following defects: bent longitudinal beams and cross members, damage to brackets, loose fitting of rivets in holes, wear of rivet holes, cracks passing through rivet holes and in solid metal. The tightness of the rivet joints is checked by tapping the rivet heads with a hammer. If the rivets have lost their press fit, they move in the holes.
If it is impossible to eliminate the defect, the frame is rejected.
The curvature of the longitudinal beams is determined by the curvature of the upper flange. It should be no more than 2 mm over a length of 1000 mm and 5 mm over the entire length of the beam. Bent beams and cross members are eliminated by straightening without heating on a press using a special device. Damaged frame brackets are replaced.
Cracks in the longitudinal beams and cross members at the ends are drilled with a drill with a diameter of 5 mm, cut and welded. Welding is carried out using electrodes OZCH-6 or UONI 13/55 with a diameter of 4 mm with a direct current of 200 A. The welding seam and the surface at a distance of 3-4 mm on both sides of it to increase the endurance limit of the connection are strengthened; they are hardened. Hardening is carried out with a pneumatic hammer.
General information
The frame in a car is the power frame that serves as the basis for attaching all body parts, engine, gearbox, drives, etc. You should usually resort to a technology such as frame welding when there is minor deformation of this part. For example, if cracks, chips, or folds have formed, then in this case, it would be advisable to weld the frame. However, you should strictly follow the welding technology, because not only the quality of the frame, but also the future safety of using the car will depend on this.
Preparing the frame for welding
When preparing to repair truck frames, you need to make the following preparations:
An additional step before repairing cargo frames is to machine both edges of the frame so that they have a symmetrical bevel. A grinder or plasma cutter is used here.
Carrying out repairs and welding process of a truck frame
Very often, trucks, such as Kamaz, transporting large loads, can break down right on the highway. To prevent such an unpleasant situation from occurring, you should constantly monitor the condition of the frame and carry out timely repairs to this part.
In order to ensure a strong and reliable connection during the welding process of a truck frame, a number of rules and requirements must be observed.
- The first thing worth noting is the need to ensure that the metal does not overheat in the area where the seam is formed. The seam should be welded in small sections, the length of which does not exceed 5 mm.
Be sure to wait some time until the welding area has cooled down.
- Next you need to process the edges. This is done using a plasma cutter or grinder, because This is the most suitable option for cutting metal.
- When welding the frame, make sure that the transitions from the additional metal to the main metal are as smooth as possible. Be careful not to create undercuts, as It is this defect that will lead to cracking of the frame. In addition, the root must be boiled along its entire length, otherwise the whole process will be pointless.
Read also: Battery for Sanyeng Aktion diesel
- Considering the fact that many trucks that are not very large in size are quite difficult to work with and the frame is very often prone to breakage, regardless of the quality of the seam, there is only one way out - you need to strengthen the point of failure. A channel and a bolted connection are suitable for this.
Truck Frame Repair: What to Look For
The condition of trucks is most affected by operating conditions: road surface, compliance with operating requirements, especially compliance with maximum load capacity. The level of service during maintenance and repairs, the professionalism of service center employees, the qualifications of drivers, as well as the quality of spare parts play a certain role.
The supporting frame is the main element of the chassis. Most often, during use, frames bend, twist or crack.
The requirements for this element are strict. The permissible skew of the frame shelves should not exceed: 7 mm for the entire length and 2 mm for 1 m. The change in the perpendicular position of the side members and cross members should not exceed 2 mm per 1 m.
Repair of the frame structure consists of its complete or partial disassembly. Incomplete disassembly is carried out only if one riveted connection in each joint has weakened, minor cracks have been identified, and there are slight deflections of the shelves. All other cases of malfunction require complete disassembly.
The rivets are removed with a pneumatic chisel or a gas torch. Beam deflections are corrected using a cold hydraulic press. Straightening should be checked with templates or rulers. To eliminate cracks, determine their size. If it is short, then the crack is cut, cut with a hand grinder and the slot is fused with electrodes.
Important: do not allow the area being repaired to overheat when welding, otherwise the frame will “lead”
After removing the rivets, the “broken” holes are welded, placing a copper plate underneath. Next, the surface is cleaned and new holes are made. They need to be drilled 1 mm smaller in diameter than necessary. Then, using a press with a force of 200-400 kN with a mandrel (special tool), “crush” them to the required diameter.
How to weld a car frame with your own hands
Before proceeding directly to the welding process, the part should be well prepared. It is important to correctly identify the damage; to do this, you need to remove all body parts and inspect the affected area. The place where the crack ends must be drilled. This will help prevent damage from developing.
Advice! Use drills with a diameter of 5 mm.
Such welding work is performed semi-automatically.
Learn more about the welding process. As already noted, the welding process is carried out in several passes.
During the first pass of the burner, the root is boiled. Welding is carried out using electrodes, which are 1.2 mm thick wire with index Sv08. Welding work is carried out under the influence of a current of 100 A. On the second and third pass, the current indicator should be 110 A with the same welding wire, while the beads should be as thin as possible and overlap each other. On the fourth pass, the current increases to 120 A.
It is important that welding is carried out without interrupting the arc. This is the only way you can get the most even and high-quality seam.
Frame reinforcement
After welding, the seam on the frame must be strengthened.
p, blockquote 29,0,0,0,0 —>
There are two types of reinforcements - inserting a profile reinforcement inside (or outside) or a reinforcing pad. Each type of amplifier offers a different degree of strength. The choice of reinforcement method should be based on what is best suited for the specific frame and location of the repair site.
p, blockquote 30,0,0,1,0 —>
All amplifiers must be made of the same metal, the same thickness as the frame. If the frame is made of high-strength steel, then the amplifier should be made of high-strength steel.
p, blockquote 31,0,0,0,0 —>
Factory reinforcement pad
Reinforcing linings are most often used on frames. They distribute the stress (from the load) over a large area. There is no point in using a thicker metal trim as it will not bend as well as the rest of the frame and could cause a crack.
p, blockquote 32,0,0,0,0 —>
Reinforcing plates and profile reinforcements should not have sides that run across the frame beams. When welding the reinforcement, the seams should run diagonally and along the frame beams.
p, blockquote 33,0,0,0,0 —>
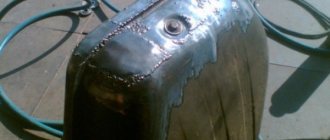
When making reinforcing pads, it is better to make their shape closer to oval or with beveled rounded corners. This form will minimize the appearance of stress concentration zones in the seams, which cause cracks. If the reinforcing plate has beveled corners, then there is no need to weld its side ends completely, since these places are most susceptible to stress concentration. It is better to continue the seam longitudinally away from the end of the attachment for about 5 cm before stopping the seam (see photo). This will prevent cracks from appearing in these places. To prevent water from getting into this gap under the overlay, you need to seal it with joint sealant.
p, blockquote 34,0,0,0,0 —>
An example of reinforcing pads welded to the weld area.
Drilling holes in the pads provides additional surface area for welding. You can drill one large hole in the middle.
p, blockquote 35,0,0,0,0 —>
A good rule of thumb for the size of the reinforcing pad is length = 2 times the height of the frame.
p, blockquote 36,0,0,0,0 —>
Profile frame reinforcements. The cut in the middle in the figure is made to visualize the structure of the structure.
Basic types of profile amplifiers:
p, blockquote 37,0,0,0,0 —>
- The "L" shaped reinforcement should be used in the highest load areas, at the bottom of the frame beam, where flexing of the top of the frame is not a problem. They can be placed inside or outside the frame longitudinal member. This is a fairly versatile amplifier. However, installation of such an amplifier may be limited by frame configuration.
- The inverted "L" reinforcement can also be used inside or outside the frame beam. Its installation is recommended where the maximum load is transferred to the upper part of the frame beam (for example, in a raised dump truck). This type of reinforcement can be installed in areas where the previous "L" reinforcement is prohibited, where the top flange is subject to deflection.
Each edge of the profile amplifier should be beveled at a 45 degree angle to distribute the concentrated stress.
p, blockquote 38,0,0,0,0 —>
Profile reinforcements can be used full length or locally and can be installed inside or outside the frame beams. The two main disadvantages of such amplifiers are the added weight and additional installation time. It can also be difficult to place such reinforcements inside or on top of an existing beam due to manufacturing tolerances, cross members or brackets on the frame.
p, blockquote 39,0,0,0,0 —>
p, blockquote 40,0,0,0,0 —> p, blockquote 41,0,0,0,1 —>
Seam treatment after welding
All seams must be properly processed after completion of welding work. Metal must be protected from the negative effects of the environment. The connection area must be washed, then sandblasted, degreased, primed and painted.
In conclusion, it is worth noting that welding a truck frame is a process that requires concentration and care. In order for the weld to be as strong and high-quality as possible, the welder must have some experience. Because the frame is an important part on which the safety of driving a car depends. Do not forget about safety and when welding, be sure to wear special protective clothing. If you follow all the rules and requirements, then in the end you will get the highest quality connection.
I had to weld the KamAZ frame. After some time, a crack appeared near the seam. I decided to strengthen the structure with a diamond overlay, cut the edges and welded it in two passes. Six months later, the same problem - the frame cracked. What is the technology for repairing a truck frame? A similar question regarding welding the axles of semi-trailers of foreign cars.
The manufacturer claims that the frame cannot be restored, but nevertheless, workshops often successfully cope with this difficult task. Here are some secrets of welding a frame:
The importance of timely repair of a damaged frame
The formation of damage to the supporting structure requires prompt repair of the truck frame. Using vehicles with such defects can cause the following undesirable consequences:
- displacement of truck axles;
- malfunctions or failure of power units;
- distortion of cabin geometry and deformation of seats;
- rapid wear of truck tires;
- increased fuel consumption;
- the formation of various hidden defects and malfunctions of the frame and the structure as a whole.
In any of the above cases, the costs not only increase for the use and maintenance of freight transport. Repairs that will have to be carried out one way or another will cost much more than repairing minor damage to the frame in a timely manner.
Sequencing
1. One of the main features of frame welding is cutting the edges using a plasma cutting machine. 2. It is necessary to reliably weld the root of the seam (if for some reason you cannot complete this stage, it is better not to undertake repairs) 3. Use filler material (welding wire) 08G2S (depending on the frame material), 1.2 mm. Protective medium: argon+carbon dioxide mixture (20%). 4. Pass No. 1: welding current 100A. Welding of the root of the seam is performed with short rollers across the groove from left to right to form a reverse roller. It is important to avoid overheating the steel. 5. Pass No. 2 and 3: welding current 110A. It is performed as in step 4, but the rollers are thin and overlap one another. 6. Passage No. 4: increase the welding current to 120A. Roller across the entire cutting width with an overlap of 1-2 mm on the base metal. A few rollers and the arc breaks. It is important not to overheat the base metal. 7. Final pass No. 5: the roller is welded without breaking the arc, interception on the base metal is 5 mm. 8. Vertical seams are welded from top to bottom. 9. An individual approach in each specific case is important. 10. The seam is smooth, convex.
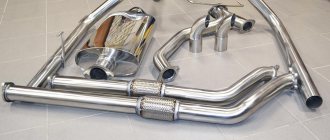
air plasma cutting installation
Add a comment Cancel reply
You must be logged in to post a comment.
Types of frame damage
All defects in such metal structures are natural or artificial. In the first case, we are usually talking about metal “fatigue” or violations of operating conditions when the load on the chassis exceeds permissible standards. In the second, the breakdown is caused by an extreme situation, for example, an accident.
If we talk about specifics, the following damage is typical for truck frames:
- Twisting of axial beams;
- Diagonal displacement of side members;
- Transverse tears;
- Bends in a vertical or horizontal plane;
- Cracks.
As mentioned above, almost any defect in the frame structure can be eliminated, but only if it is beneficial to the client. In other situations, the frame is usually replaced.
How to repair a Kamaz frame
KAMA3-4310 (43101). FRAME REPAIR INSTRUCTIONS
1. Bent side members and cross members.
2. Cracks in the side members along the holes for the rivets securing the rear engine mount brackets (Fig. 366, a).
3. Cracks along the holes for the rivets fastening the cross member bracket number 3 to the spar (Fig. 366, b).
4. Cracks in the rear cross member along the holes for the towbar mounting bolts (Fig. 366, c).
5. Fatigue cracks.
'6. Loosening of rivet joints.
7. Violation of frame geometry.
EDITING THE FRAME, SPARMS AND CROSS BEAM
1. Deflections and distortions of the frame are determined by the outer
inspection, as well as using a ruler, feeler gauge and various templates made in the form of a square according to the frame design.
2. Straighten the frame in a cold state using hydraulic jacks or clamps; as an exception, straightening can be done with a sledgehammer using mandrels and supports. The support should be massive and fit tightly
to the surface in the editing zone.
3. If the defect cannot be corrected on the assembled frame, remove the part and correct it separately. REPAIR OF SPARMS AND CROSS BEAM WITH CRACKS
Fill cracks in the following order:
1. Clean the places on the frame parts that have cracks and need to be welded from paint, dirt, oil and other contaminants to a metallic shine.
2. Determine the visible end of the crack using a 4x magnifying glass.
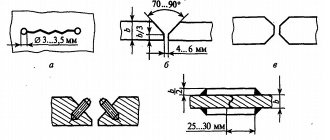
3. Cut the edges for the weld to the depth of the crack and to a length exceeding the length of the crack
no less than 20-30 mm on each side. If a part breaks through the full thickness of the metal, cut with
one side to a depth of 3/4 of the metal crack. Drill the cracks along the edges with a 0 5-6 mm drill. Carry out the cutting using an electric grinder.
4. The discrepancy between the surfaces of the welded edges is allowed no more than 0.5 mm.
5. Fill the crack. Maintain the shapes and dimensions of the seam in accordance with the requirements of GOST 5264-80. Use electrodes of type E46A GOST 9467-75 with coating UONI 13/45 or 13/55. In case of a through crack, weld on both sides on copper lining I (Fig. 367). After checking, clean the seam, the reinforcement of the seam after welding should be !-1.5 mm, in the place where the reinforcing lining is installed, clean the seam flush with the base metal.
6. Strengthen the heat-affected zones with peening using a hammer until small scales appear, cover with primer type FL and GF twice.
7. Apply a reinforcing pad to the weld seam.
8. Make the reinforcing lining from the metal used for the manufacture of side members, steel 15 G10T TU 14-1-2366-73 and 22G2T10 TU 14-1-2092-77. Cut the linings from parts of rejected KamAZ vehicle frames. Clean the contours and fit them tightly into place.
9. The thickness of the lining should be equal to the thickness of the part being repaired and 20-30 mm longer than the crack on each side. The width of the overlay should cover the crack by at least 70-80 mm on each side.
10. Use rectangular (Fig. 368, a), triangular (Fig. 368, b) and diamond-shaped (Fig. 368, c) overlays.
11. The seams of rectangular reinforcing overlays should only be longitudinal; for triangular and diamond-shaped overlays, apply the seams along the contour of the overlay, starting from the vertical wall towards the shelves (Fig. 369).
12. Install the overlay from the inside of the part being repaired; if such installation is not possible, it is permissible to install the overlay from the outside. When installing a cover on a crack that extends to the edge of a part, make it longer than the part by the thickness of the metal.
13. Install an overlay on the crack running from the hole to the edge of the part, overlap the edge of the hole by 20-30 mm.
14. After completing the welding work, clean the seam from slag.
Source
repair of body frame and subframe of Kamaz Sovok
A huge hello to all welders, I respect this profession, those who work deserve a monument during their lifetime. and now closer to the topic. Kalym’s relative brought it up, he tells the boss to weld the Kamaz, I’ve been working as a welder for a long time, but I haven’t dealt with frames and bodies. I wanted to ask experienced craftsmen, guys, tell me what you can come up with with this frame, I’ll post pictures, take a look, for now it’s just words. Interested in: 1. what electrodes to cook with 2. current (constant pyremenka, reverse direct polarity) 3. device (semi-automatic, inventory) 4. kerchiefs, corners, plates (diamonds in books) - which is best to use where 5. what is the price for such to determine the work. I am interested in all the information you can give me, because it needs to be done well, but I have no experience in welding frames. I found a book from 1976 on frame repair, but the quality is terrible, otherwise I would have re-read it. Guys, please help me, I can’t do anything bad - (my father taught me that there is no need to do something bad. It will turn out bad on its own). My father is no longer here, but he was a good welder, arc welding with 4-barrel electrodes, he cooked for grain so that no water was allowed through, and he didn’t even burn through the metal.
Worked as a welder for 10 years. How would I cook: 1. Constantly 2. The device, of course, is permanent. 3. Polarity does not matter in this case. 4. I wouldn’t change the headscarves (tweak them, etc.). I would add new ones in cases where visual support is needed somewhere. 5. As for the cost - talk to a relative about what the customer is willing to do. The work front is not completely visible here. If the photo shows everything that needs to be done, then in my opinion, there is no more than three pieces of work here.
svarka-master.ru/ – my welding website. I would be grateful for questions, ideas and comments. Write, we’ll discuss it directly in the forum.
The administrator prohibited guests from publishing posts.
Repair of body frame and subframe of Kamaz Sovok 2 years 1 month. back #341
Based on your advice and the advice of other forums, as well as reading the book Frame Repair 1976, it was decided to weld with a constant Uoni 13.55 3rd weld end-to-end cracks cut at an angle of 45 breasts with a shoe, clean the underside and make the linings diamond-shaped, the size of which will exceed the width of the frame 1: 2, where the subframe burst at the places where it was fixed to the frame, this is what I decided to do
2 places are badly torn, but if you strengthen it, I think all 4 platforms for pillows, they advised adding 2 more pillows, as shown in the photo, do this on all pillows so that the height is the same, and it seems to me that it will be stronger. They said the rear beam needs to be opened and an 80 mm square welded inside, then welded. I was thinking of first washing the frame, subframe and body with a Karcher so as not to miss any cracks, remove the body and boil it all with gussets and corners. I think three rubles for this work is not enough. There are also opinions about how and for how much.
Frame Ural 4320: features, maintenance and repair
The car frame is of the spar type. It consists of two large spars, which are connected by a special buffer (1 piece) and cross members (6 pieces). The spars are made of stamped sheet steel. There are special hooks installed on the front of the frame that can be used for towing. A device with a double-sided spring is installed on the rear of the frame; when driving with a trailer, the spring acts as a shock absorber.
Also note that some subtypes of the Ural 4320 frame have some design differences from the standard layout:
- Frames on tractor-trailer models - the rear parts of the car are shortened; there are tow hooks on the rear (instead of a towing device); There are platforms on the frame that protect the machine from dirt and dust.
- Frames Ural-377C and Ural-375H/SN - the height of the platform is reduced by 4.5 cm by reducing the height of the balancing brackets.
- Ural-375A - chassis length increased by 33.5 cm.
Frame maintenance
The service looks like this:
- To assess the condition of the rivets, you need to tap them with a hammer. If the rivet is poorly secured, it must be replaced either with a new rivet or with bolts. Replacing holes is done like this: weld the old holes and drill new ones next to them.
- Deflections are assessed visually, as well as using special rulers and templates. The geometric conformity of the frame is checked using a series of measurements on some diagonal sections (normally, the difference between two diagonal measurements of the same section should not exceed 5 millimeters). Also, to assess deflections, measurements are taken of the rear and front ends of the frame (the difference should be no more than 4 millimeters).
- The towing device must be periodically cleaned of dirt and lubricated with protective materials. You also need to periodically check the bolts securing the tugboat to the frame (if necessary, the bolts need to be tightened or loosened). When checking, you need to pay special attention to the towing hook nut - it must be tightened in such a way that the hook cannot move along its axis.
Frame repair Ural 4320
If cracks are detected, it is necessary to weld the damage to restore the integrity of the side members. Please note that welding is only a temporary measure - after welding, it is recommended to contact a repair organization that will replace the damaged frame from the old one to a new frame. Repair and weld cracks as follows:
- At the end of the crack, drill a small hole (4-5 millimeters in diameter). Along the crack on both sides, make small grooves for welding (the optimal depth is 3-4 millimeters). After this, use a welding machine to apply a seam from the hole along the crack. At the end, clean the seam and weld a reinforcing lining on the inside (the optimal material for the lining is low-carbon sheet steel, thickness - about 7 millimeters).
- Old cars (1972 and earlier) have a characteristic feature - the upper and lower parts of one of the cross members of such cars are connected using special rivets. If you find a crack on the bottom of the cross member next to the rivet, then next to the crack you need to drill a hole (3-5 millimeters in diameter) and install the cover with a bolt type fastening. Such linings need to be fastened into holes for rivets; the linings can also be installed in special holes with a diameter of about 10-11 millimeters (bolts must be selected with diameters of 9-10 millimeters, respectively). Low-carbon sheet steel, the thickness of which is 6-8 millimeters, is suitable as a lining.
- Cracks in the shoes of older models of cars must be welded according to a special algorithm. First you need to remove the outer rivets (usually there are 8 of them installed). Then, at a distance of 3-5 millimeters from the rivets, you need to make a series of holes with a diameter of about 1.5 cm. At the ends of the cracks you need to make holes with a diameter of 4-5 millimeters. Now you need to do the welding. Finally, you need to attach the cross member using bolts and nuts. The optimal material for crossbars is sheet steel 6-8 millimeters thick.
Please note that it is recommended to weld the frame and side members using special electrodes of class E42A, E46A or E50A (the optimal rod diameter is about 4 millimeters). Finally, after all necessary repairs have been completed, it is recommended to repaint the frame.
Source: https://uralmob.com/clients/information/articles/instrukcii-po-obsluzhivaniyu-am-ural/rama-ural-4320-osobennosti-obsluzhivanie-i-remont
avtorep.ru
Frame repair is a fairly common task. Damage can be different, depending on the nature, these include cracks (a fairly common occurrence), folds and deformation.
Often in case of serious accidents, the damaged frame is very difficult to restore and impractical. But in most cases, damage results in cracks or the frame bursts. Such damage can be safely repaired. But it is important to follow the repair technology, since the frame structure operates in difficult conditions, with very strong torsional loads.
Frame repair process
Important:
- you need to cook semi-automatically,
- avoid overheating,
- be sure to cut the seams,
- boil the root of the seam.
Before starting repairs, you need to carefully inspect the frame for cracks. A video endoscope is suitable for internal examination. If you don’t have a specialized one, you can purchase a USB endoscope that works with a laptop or smartphone.
For repairs, it is necessary to provide access to the place of damage, and if necessary, dismantle parts that interfere with the work process. The best method is to free the frame from all attachments and elements to reduce the load. If the cracks have spread, they must first be reduced using jacks and be sure to measure the diagonal control points of the car. The difference in distances should not exceed 5 mm. If there are deviations, then you need to pull the frame on the slipway.
Straightening of the frame, including in places of cracks, is done in a cold state with a sledgehammer and hammers, using mandrels and supports.
On trucks and semi-trailers, the frame is straightened using pneumatic or hydraulic equipment.
Cracks are eliminated by welding and riveting reinforcing linings.
The main feature in preparation for welding:
- determination of the visible end of the crack (using a magnifying glass);
- drilling the end of the crack (before drilling, punch the center under the hole at a distance of 5 - 10 mm from the visible border of the crack along the line of its direction; drill with a drill with a diameter of 5-6 mm);
- cutting edges at a 90 degree angle to a depth of 2/3 of the thickness of the metal of the part, with a plasma cutter; if not, you can use a grinder, but it will take longer.
- cleaning the edges of cracks 20 mm wide (steel brush or electric grinder).
Frame diagnostics
- If there is a suspicion of frame distortion, then you need to take diagonal measurements between control points (see “Measuring body geometry”) to determine exactly where the displacement occurred.
- For long frame vehicles, there are several methods of measuring the frame to determine distortion. All methods use a straight line as a reference coordinate and compare the frame to that line to determine the straightness of the frame. Methods for determining a straight baseline include using a laser beam, pulling a cord.
- Using a laser is a precise method. The laser is aligned to one end of the frame, approximately 5 cm from the edge of the frame, and directed along the frame to the other end, the same distance from the edge of the frame. A piece of flat material, such as cardboard, is held against the frame. This is done at several points along the frame. The measurements are recorded and, ideally, should be consistent at all points. Deviation will mean the frame is bent. You can also check the height. If it deviates up or down, this means there is a bend in the frame.
- The cord method is a similar method to the laser, except that the laser is replaced by a cord.
- The plumb line test does not require special equipment and is suitable if there are too many obstacles along the frame that interfere with the measurement and are difficult to dismantle. The method uses a plumb bob to mark points on the workshop floor and a string to connect these points. Symmetrical points are selected on the bottom of the frame beams. A plumb line is lowered from the outside of the symmetrical points to make chalk marks on the floor. The dots are connected. All diagonals should intersect the center line if the frame is level. The tolerance for each test depends on the frame size, but 6mm is generally considered the maximum.