Methods of fastening and connection to the sewer
Methods of fastening and installation of the washbasin depend on the chosen model and the material from which it is made.
- The first method of fastening is standard and is done using studs. This method is used for washbasins made of lightweight materials. Having prepared the place, the locations for the holes are marked and then drilled. Next, the dowels with studs are screwed in and the bowl is mounted. Afterwards, a connection is made to the sewerage system using a siphon and adjacent parts. If the plumbing fixture has an overflow, an additional tube is installed to the siphon. Installation using this method can be done with your own hands;
- The next mounting method is the same standard, only a bracket is used instead of screws. After drilling the holes, plugs are hammered in, then the bracket is screwed on. The bracket is the most reliable and high-quality fastening method. Having finished screwing the brackets, you can attach the sink to them and connect the siphon to the sewer system. The sink bracket can be made of different materials, which is why the bracket and its rigidity differ. Their selection must be made depending on the selected sink model, taking into account the load on them.
Sink brackets
Studs for fastening the washbasin
Types of brackets:
- The cast iron bracket is a T-shaped post with a special platform for fastening. The cast iron bracket is reliable and of high quality;
- welded steel brackets, shaped like the letter T or L;
- brackets, the shape of which resembles a frame. This method is as simple as the previous one and you can do the fastening yourself;
- The cabinet sink method is used when choosing a washbasin that is built into a piece of furniture, a countertop, or into a specific, specially purchased cabinet. This method is suitable for a small bathroom.
Steel
Cast iron
Frame
What to consider when choosing
- Features of connected plumbing equipment.
- Location of sewer pipe.
- Availability and volume of free space for installation of drain fittings, dimensions of the siphon and outlet.
- Choose a high-quality siphon for a cast iron pipe or plastic outlet that complies with GOST 23289–94.
- Characteristics of materials. Thus, plastic is lightweight, not subject to corrosion or rotting, but less durable than metal. Cast iron is reliable and durable, but has more weight. Copper alloys are universal, but expensive and become covered with a thin layer of oxides over time.
Determining the height of the sink mounting
Determining the height of the sink. If it does not have additional accessories, then the standard mounting height is 85 cm, even for a small bathroom. Having noted this height, a line is drawn along which the upper level of the washbasin will be attached. In the case of using a tulip sink or a washbasin mounted into a countertop, there is no need to determine the height of the fixture of the plumbing fixture, since it depends on the height of the pedestal or countertop.
Mounting markings
Marking the mounting locations on the wall is done as follows: to accurately drill the necessary holes for making fastenings, you need to attach the sink to the wall, aligning the upper level of the sink with the marked line and mark them on the wall through the mounting holes located in the bowl. It is better to carry out the steps to mark the mounting holes with your own hands together. It’s another matter if you use a sink, a tulip, or one installed in a countertop; by placing the bowl on a footrest and moving it towards the wall, you can easily make a mark.
Preparing the mounting site
Checking the level
Installation of fasteners
The next stage is the installation of fasteners, the choice of which depends on the method of installing the sink:
- According to the markings of the mounting holes, they are drilled;
- dowels are driven into these holes;
- Special pins are screwed into the dowel. It is screwed to a depth such that its protruding edge allows you to secure the sink and tighten the fixing nut. The length of this edge of the stud should not be small, but slightly more than the thickness of the bowl, plus the distance for the nut.
Making holes
Screw in the dowels
Screw in the mounting pins
Purpose of a siphon under the sink
During the operation of the sewer system, a deposit of waste forms on its walls. It emits a persistent stench that does not disappear even despite communication with the atmosphere through the drain pipe.
Sinks and other sanitary fixtures are connected to the sewer system.
This means that between them and the system there must be a device that simultaneously performs 2 functions:
- Prevents sewer odors from entering your home.
- Ensuring unimpeded flow of water from plumbing fixtures.
Such a device is a siphon.
Connecting the sink to the water supply
The third stage is connecting the washbasin with your own hands to the water supply system. This stage begins with connecting the mixer. It can be attached after the installation of the washbasin is completed, but it is recommended to do this first, since all connections are made at the bottom of the bowl. Also, depending on the type of sink, the faucet may be mounted on a wall or countertop.
Washbasin mixer
Connecting the toilet to the sewer
The toilet outlet can be positioned vertically, horizontally or at an angle of 45 degrees. In the first case, a direct connection to the sewer using a rubber cuff is sufficient. With a horizontal outlet, the simplest and most economical solution would be to install plastic pipes. The connection to the sewer can be strengthened with cement mortar.
If the drain is located at an angle, the siphon is connected using a corrugated pipe. With the help of an internal membrane, it is fixed on the pipe of a plumbing fixture, and with the help of an external membrane, it is fixed in the opening of the drainage system. It is recommended to use a reinforced version of a corrugated pipe or an eccentric type cuff.
Mixer installation
The mixer mounting diagram is as follows:
- special fastening pins are screwed in;
- Next, a hose is installed, through which the water supply is supplied. They need to be tightened using an open-end wrench; moderate efforts should be made when tightening them;
- hoses are now installed to supply water through the holes in the washbasin;
- Next, sealing rubber bands, a washer for pressing are put on the studs for fastening on their reverse side and a nut is attached;
- The last step is to tighten the fastening nuts.
We mount the studs
Screw in the hose
We fix all the nuts and screws
Water supply to the mixer
Workshop for the bathroom
It is better to connect the sewerage system to the device using an overflow device. It consists of a siphon itself, from which a flexible hose extends, ending in an overflow grid.
- Let's start the assembly by installing the elbow that goes to the sewer. On the main part of the structure we put a union nut and a cone gasket (blue). After this, insert the elbow into the main part of the product and tighten the nut;
- Next, we install the drain. The union nut is usually already installed at this location. Therefore, we supplement the pipe with a sealing gasket, insert a drain inside the channel and tighten the union nut;
- On the end side there is a hole for cleaning the structure. It must be closed with a special plug. To do this, we put a black O-ring over the pipe and tightly screw the plug to the siphon. If you need to clean the sewer, you just need to unscrew the lid;
- Next, you need to connect the corrugation. To do this, we put a blue conical gasket on its end and prepare a union nut. The cone of the elastic should be directed towards the main product;
- Now you can connect the drain to the bathtub. To do this, unscrew the drain grate (it is attached to the main structure with a screw. The lower part of the siphon is fixed under the bathtub bowl with a sealing rubber band, and the drain is screwed to it from above, directly in the thicket. Do not forget about the sealing gaskets;
- After removing the neck, you need to install an overflow. It is fixed to the bathtub in a similar way using a screw and gasket.
In general, the system is ready, all that remains is to connect the small corrugation with the overflow and the pipe. This can be done using a cone gasket and a union nut. The end of the pipe is inserted into the large corrugation.
Sink installation
Having connected the plumbing fixture to the water supply with your own hands, you can proceed to the next stage, which is installing the washbasin:
- this stage is the easiest, you need to put the sink on the studs, insert plastic spacers and tighten the nuts;
- When using a tulip sink or a sink built into the countertop, it is fastened to supporting elements.
Mounting the sink on the brackets
Installing a tulip sink
Eliminate minor inaccuracies
Any defects during the installation of the siphon must be corrected immediately. If leaks are detected, it is necessary to check the reliability of the gaskets and the presence of cracks on them. It is also recommended to probe the pipe for delamination or damage. Leaks often occur when the nuts are too tightly or loosely tightened.
The smell of sewage in an apartment occurs for several reasons.
- No water lock. Often occurs when using corrugated pipes and not bending them sufficiently. Also, the water from the water seal could simply evaporate if no one lived in the apartment for a long time.
- Siphon malfunction. If you hear a squelching sound during drainage, this indicates a sharp jump in the drained water. The only solution is replacement.
- Small diameter of the sewer riser, faulty ventilation of the sewage system. The solution to such a problem must be entrusted to specialists.
Connection to sewerage
Having completed the installation work and connecting to the water supply, you need to connect the sink with your own hands to the sewer. This process begins with the installation of a siphon. When installing it, you need to consider whether the sink has an overflow or not. If yes, then the siphon must be equipped with an additional tube to transfer water into the sewer system.
Siphon
How to determine a poor siphon connection?
If the siphon connection is poor, you may experience an unpleasant odor from the sink. There may also be increased humidity in the pipe leading to the siphon and the appearance of puddles under the sink.
When connecting the sink to the sewer system, experts do not recommend over-tightening the connections with a wrench, as this may damage the rubber sealing gasket.
connecting the overflow and drain from the sink
If during the process of checking the tightness a stream of water flows between the pipe and the rubber cuff, then the second element must be removed and the connection area dried. Next, the dried cuff needs to be treated with sealant and put in place.
Special Notes
Before connecting the sink to the sewer, you need to take into account some notes, namely:
- When connecting the kitchen sink to the sewer, there is no need to over-tighten the connecting elements with a wrench. If you do not take this feature into account, the rubber sealing gasket may be damaged, then it will need to be changed and tightened again;
- When checking the tightness of the connection in the area between the pipe and the cuff, a trickle of water may leak out. If this happens, then you need to remove the cuff and dry the surface of the connection area. Next, the dry cuff is lubricated with sealant and the elements are reconnected;
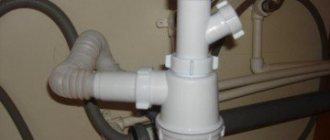
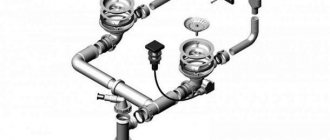
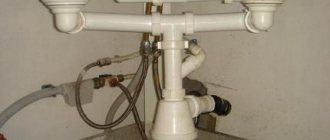
- if you plan to connect two sinks to the sewer system at once, it is recommended to buy a special siphon equipped with two outlets for sewer pipes.
By following simple rules during the installation process, you can quickly and easily connect the sink to the sewer with your own hands without the help of a plumber. It is also easy to connect the water supply to the plumbing fixture.
Types of siphons and material for their manufacture
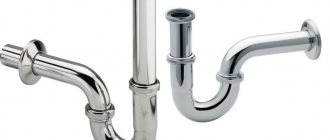
A siphon is a design reminiscent of the English letter S, the location of which is located immediately under the sink. Its purpose is to connect to the sewerage system to remove water. Siphons come in different types:
- bottle type siphons. The advantages are the presence of a water seal, the ability to connect the water drain from the washing machine, and independent regular cleaning. This type is often used with an overflow;
- Tubular siphons, which resemble a curved pipe. A seal is formed in the bend of this pipe, preventing the appearance of specific odors;
- siphons are corrugated, reminiscent of tubular siphons, only with the difference that, due to their plasticity, they can take any shape, becoming more compact;
- Siphons with overflow are all of the above varieties with an additional branch of the pipe leading from the siphon to the top point of the sink to prevent water from overflowing from it.
Corrugated
Bottle
Double siphon
Siphon with overflow
Tubular siphon
Siphons are made from different materials:
- cast iron siphon, its advantages are corrosion resistant, strength. The cast iron siphon also has disadvantages, such as poor cleaning and a complex dismantling process. The cast iron siphon is used only in bathrooms;
- brass siphons, its advantages are durability, strength, corrosion resistance, easy dismantling;
- siphons made of plastic, the most common type, are quite durable due to their affordable price, ease of installation and dismantling.
Purpose and design features
The drain-overflow is necessary so that the sink does not overflow with liquid, and the excess goes into the drain.
Similar devices are used for metal or ceramic sinks. The devices practically repeat the design of a bath siphon. The overflow in a sink is a hole in its upper part. When the owner does not close the tap, the liquid drains through this hole. A tube is connected to the overflow, through which the liquid flows. Most often the hole is made under the tap, but there are models in which it is located under the sink.
Siphon for the kitchen.
The washbasin waste and overflow includes 2 main parts:
- Curved siphon (like the Latin letter U). Its bend creates a water seal, which prevents unpleasant odors from spreading throughout the room.
- A drain pipe. It is a piece of rigid plastic construction or a section of corrugated pipe. The task is to redirect wastewater into the sewer system.
Thanks to the bending, the liquid does not leave the structure completely. If clogged, the sink siphon can be easily removed and cleaned using mechanical and chemical methods.
In addition to the classic models, there are overflows with an additional tube. It is needed so that you can connect the overflow hole with those structural parts that are located in front of the sink. There are models with a bottom valve, but they also operate on the principle of communicating vessels.
A grate is installed on the outside of the drain. It provides protection against clogs as it traps even hairs and smaller particles of debris.
Siphon installation
- it is necessary to place the siphon outlet in the bowl and secure it. If the sink has an overflow, an additional tube is installed;
- the pipe is screwed on;
- the end of the pipe must be inserted into the sewer outlet. If the pipe size is small and does not correspond to the sewer hole, an adapter called a cuff is used;
- Upon completion of installation work, you need to check all connections to ensure there are no leaks.
Siphon installation
The instructions for installing and connecting a sink discussed above are used mainly for wall-mounted sinks or if you need to hang a corner sink that is installed in a small bathroom. When installing a tulip sink, or using a countertop, the fastening method is slightly different. A sink that is mounted into a countertop or cabinet has the advantage of good stability and fastening occurs without drilling the surface of the walls.
Which siphon is better to install on a bathroom sink?
The product is selected taking into account several criteria:
- Prices. Expensive models are made with precise dimensions and are equipped with high-quality gaskets. When installing cheap analogues, difficulties may arise.
- Aesthetic qualities. If the product is on display, it should look attractive and match the style of the sink. For example, a stone or copper washbasin should be equipped with a steel siphon; a plastic one will not work here.
- The diameter of the drain hole of the plumbing fixture. It must match the dimensions of the grill.
- Free space under the plumbing fixture. The dimensions of the siphon depend on this parameter.
- Orientation of the plumbing fixture relative to the inlet of the sewer pipe. If the product is installed sideways or rotated, a corrugated water seal or flexible adapter will be required.
- Plumbing thicknesses. A siphon designed for a steel bathtub may not have enough threads when trying to attach it to, for example, a granite washbasin.
Semi-automatic models are more difficult to install than automatic ones, but have 2 advantages over them:
- You do not need to dip your hand in water to open the bottom valve.
- The plug can be easily removed so that it does not interfere with, for example, taking a shower. The part is simply removed from the seat. In automatic models it must be unscrewed.
The most popular bottle siphons are made of plastic.
Plastic siphon.
Rules for attaching a tulip shell
When attaching a tulip shell, there are certain rules:
- as with standard mounting, the tulip must be placed against the wall to determine the location of the mounting holes;
- Next, a cast iron bracket is attached, with which the tulip sink is attached. Its fastening is carried out according to the same principle as a dowel with a hairpin;
- The bowl is attached to a screwed bracket, while simultaneously moving the foot of the structure. It should be noted that the tulip can be monolithic, separate, with a shortened footrest, which is used in a small bathroom;
- then the siphon is installed and then the mixer;
- The final stage is the installation of the footrest, which will hide all communications.
Tulip sink installation steps
So, installing a bathroom sink yourself does not require the help of specialists. Its quality and reliability depend on the materials used, DIY fastening methods, and sink models, thanks to which some types of washbasins can be placed in a small bathroom due to their compactness.
Important Notes
Notes to consider before starting work:
- To connect the kitchen sink to the sewer system, it is not recommended to tightly tighten all connections using a wrench, as this can damage the rubber sealing gaskets and waste time and effort.
- If, when checking the tightness of the connections between the cuff and the sewer pipe, a stream of water oozes out, then you need to remove the cuff, dry the surfaces that are to be connected, and then lubricate the dry cuff with sealant and make the connection again.
- When connecting a double sink, you must use a special siphon with an outlet to two pipes.
Double sink connection diagram
Following simple rules will undoubtedly help every interested owner install a kitchen sink or bathroom sink in their home without calling a plumber. You can either connect the sink to the sewer system or connect the water supply to it with the installation of the mixer absolutely independently.