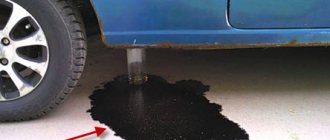
An unexpected drop in the gasoline level and the appearance of a strong smell in the cabin while driving are signs that the fuel supply system to the engine is damaged and the fuel tank is most likely to be welded.
To make sure of this completely, it is necessary to carefully examine the gas tank itself and, after detecting a leak, begin preparations for welding the hole.
How to weld a fuel tank
A leak in the gas tank occurs as a result of physical wear or due to damage with collapse of the housing. Fuel vapor accumulates in an empty tank, so welding and heating can cause an explosion. Many motorists ask how to properly seal a gas tank. There are several repair methods: argon arc and cold welding, soldering. Let's look at each of them in more detail.
General rules for repairing a gas tank
The presence of a leak is indicated by increased fuel consumption and a specific smell in the cabin. Even a minor crack is dangerous for the life of the driver and passengers. The leak area ignites when struck by a spark. Damage occurs as a result of cracking of the body during driving and exposure to corrosion. Defects occur when there is a malfunction in the vehicle's fuel system. The discharged pressure contributes to the gradual cracking of the walls. Microcracks gradually increase, causing leaks. Before welding the gas tank, you must follow the safety rules:
Washing the tank allows you to completely remove explosive vapors. The repair method is selected based on the material from which the tank is made. Argon arc welding of a fuel tank is only suitable for metal containers; it is recommended to repair plastic products using cold welding; hot soldering is a universal method. Let's take a closer look at how to seal the gas tank yourself.
Causes of gas tank damage
Manufacturers usually place the gas tank in the rear of the car, and depending on the car model, it can be located on the right, left or in the middle. This solution allows you to maximize the safety of people in the cabin. In addition, placing the fuel tank at the rear of the car improves its handling. At the same time, this arrangement of the gas tank exposes it to external influences (mechanical, chemical, natural), which can lead to the appearance of cracks and holes.
This element of the fuel system can be made of metal or composite material, conventionally called plastic. Regardless of the type of material used, holes, cracks or microcracks may appear on the tank body through which fuel will leak. If the damage is significant, fuel spills out copiously and a stain forms under the car.
The fuel tank can be made of metal or composite material
When microcracks form in the passenger compartment or trunk, a fuel smell appears, and a wet spot appears around the damage. Another sign of failure of this element of the power system is increased fuel consumption. In any case, you need to look for the location of the leak and determine the cause of its occurrence, and only then begin to eliminate it.
There are several reasons leading to fuel tank malfunctions:
- Mechanical damage. Given the location of this element and the condition of our roads, there is a high probability of a gas tank being hit, resulting in a hole or crack.
- Corrosion. Although high-quality metal is used to create the gas tank, it can become damaged by corrosion over time. Usually old cars are susceptible to this, but if the tank in a new car is made of low-quality metal, then it also quickly rusts. External corrosion of the tank occurs due to exposure to moisture, as well as aggressive substances that enter its walls. Low-quality fuel may contain water and this causes corrosion to develop from the inside.
- Power system malfunctions. As the amount of fuel in the tank decreases, a faulty power system creates a rarefied pressure in it. This leads to the appearance of microcracks on the walls, which can subsequently cause damage.
If a gas tank leak is detected, such a vehicle cannot be operated and the problem must be repaired immediately.
Cold welding gas tank repair
Cold welding is suitable for containers with hard plastic walls or for metal tanks. Glue does not adhere well to thin-walled tanks, so such repairs will be ineffective. The adhesive composition is selected in accordance with the type of container material. It is recommended to wear gloves when repairing a gas tank using cold welding. The crack is cleaned of contaminants and degreased with nefras.
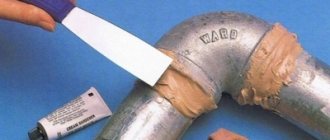
Two-component mixtures are combined in the proportion specified by the manufacturer. The prepared solution must be used within 10-20 minutes depending on the brand name. The glue is applied to the damaged area in layers and smoothed, pressing it to the surface. 2-3 hours after repair, the tank is ready for use. The glue in the form of a bar is thoroughly kneaded with a damp hand and the crack is covered.
Cold Welding Selection
When choosing a cold weld, it is necessary to take into account that it must be resistant to gasoline. Only minor damage can be sealed with it. Moment superglue or similar special compounds from other manufacturers are perfect for eliminating leaks on the road. The rags are cut into patches, soaked in glue and attached to the hole in several layers. This repair method is temporary; it allows you to get home or to a service station and completely solder the holes.
To repair minor damage on your own, you can use epoxy resin with a hardener and fiberglass. The defect area is treated with sandpaper to increase adhesion. After the surface has dried, a glass cloth impregnated with resin is applied to the crack. Each subsequent layer is laid after the previous one has dried. After the last layer has hardened, the patch is treated with an anti-corrosion compound.
Checking the repaired gas tank for leaks
After repair work is completed, the tank is checked for leaks. To do this, close all the holes and use a manual or electric pump to create a pressure in the gas tank, 7–15 kPa is enough. Then cover the tank with soapy water and carefully inspect it. It is possible to place the tank completely in water, but this will not be easy. If air does not pass anywhere, then the work has been done efficiently and the tank can be installed on the car.
Close all the holes, pump air into the tank and use soapy water to check the quality of the repairs performed.
If damage to the fuel tank occurs, you can fix such a malfunction yourself, without the involvement of specialists. Depending on whether this happened on the road or was discovered on site, one of the available restoration methods is used. In any case, you can do everything yourself; this does not require special equipment or professional skills. To perform the work efficiently, you must follow the developed repair technologies and follow the recommendations of specialists.
Soldering
Compared to cold welding, fuel tank soldering is more resistant to mechanical stress and external factors. To eliminate a leak, prepare a patch 4-5 cm larger than the area of damage. Repair of plastic products is carried out on the outer part of the walls of the gas tank with a 250-watt soldering iron. When sealing, you need to select a patch from the same material. The type of plastic is indicated on each part. Most often, gas tanks are made of ABS, polypropylene or polyamide.
For high-quality adhesion, a substrate of fine reinforcing mesh made of metal or copper is required. The substrate is fused into the wall of the gas tank, evenly distributing liquid plastic over the entire surface of the defect until a new uniform coating appears. The procedure is performed quickly so that the plastic does not harden, otherwise sagging will form.
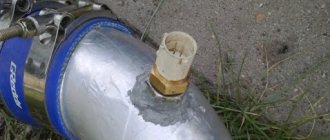
In metal containers, you can seal the hole with a thin metal or copper patch. You can heat the case using a blowtorch or iron. The patch is attached with low-melting solder along the entire perimeter using a 500-watt soldering iron, having previously treated the joints with soldering acid. After soldering, you need to let the body cool, then cover the patched area with bitumen mastic or paint. The coating will protect the patch from corrosion.
Repair using electric welding
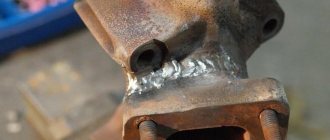
Welding a fuel tank using a argon arc welding machine and tungsten electrodes is considered the most reliable method. It reliably connects non-ferrous metal with alloy steel. Most gas tanks are made of aluminum, so inverter welding is not suitable for repairs. The repair area is cleaned of oils and dirt. The patch is welded around the entire perimeter, trying to maintain a homogeneous gas environment. The seam is smooth and durable. After cooling, the repaired area is painted or covered with bitumen mastic.
Repair by argon arc welding
Water in the gas tank. what to do? signs, removal, prevention
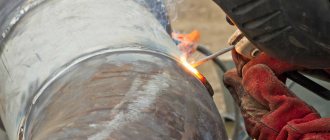
Tig welding process.
Argon arc welding differs from conventional welding in that it is produced in an argon gas environment. Tungsten electrodes are most often used for it. It can be carried out either manually or automatically. Ideal for repairing fuel tanks as its technology has been specially developed for joining non-ferrous metals and alloy steels. It perfectly withstands the depth of penetration, accuracy, and neatness of seams. All this allows you to perform reliable and high-quality repairs of the tank, after which it will become like new (and will be able to continue to serve). The tank cannot be repaired by conventional welding, since in 90% of cases it is made of aluminum, which does not allow welding with an inverter.
To perform argon arc welding, you must have a special welding machine (or rent one - this is now practiced). Before starting work, it is necessary to drain the fuel and ventilate gasoline vapors (as in the case of cold welding); if this is not done, then with 100% probability it can be said that the tank will explode
In this case, the surfaces do not need to be cleaned of rust (if any) (if the area is not large and will be completely welded), however, it is important to clean the area of the future seam from dirt and oil. The welding process itself is not much different from a conventional arc, it is only important to constantly maintain a gas environment
The resulting seam is rubbed down and a protective coating (varnish or paint) is applied.
Both cold welding and argon arc welding will allow you to restore the fuel tank after a breakdown, while the seam will be reliable and will last a very long time. However, such work requires certain conditions (a garage or a house), as well as some preliminary work.
https://youtube.com/watch?v=veUJvNJWYf8
Therefore, it is impossible to repair a crack in the road using these methods.
Plastic gas tank repair
Repair using epoxy glue is the fastest. This is a temporary measure to fix a leak along the way. You can patch the hole using a plastic welder - an extruder. Welding tanks using this method requires certain experience and knowledge of technology. It is recommended to practice on a small piece of plastic before welding. To correctly calculate the productivity of an extruder, you need to know the size of the cross-section of the crack. Welding begins from the edge of the fracture, laying the molten plastic welding wire evenly across the entire width of the hole with a small margin. For thorough welding, movements are made across the crack, completely filling the hole. In order for the seam to lie evenly, it is necessary that the hot air gun and the shoe of the device are evenly heated.
Causes of cracks
Most modern cars have a front-engine layout.
Space for the fuel tank remains only in the rear of the body. This arrangement has a number of advantages, in particular, it increases the safety of the driver and passengers. However, the location features expose the tank to negative external influences, which shorten the service life of the unit. The most common causes of defects are:
The use of plastic made it possible to completely solve the problem of corrosion. Nowadays, a metal tank can only be seen on trucks or special vehicles. The only disadvantage of plastic is its low resistance to mechanical damage.
What to do if your tank leaks
The appearance of holes in the tank can cause serious trouble. We are talking not only about natural leaks of fuel, which can ignite from the slightest spark. Through the hole, road dust and debris enter the fuel, settling at the bottom. While driving, foreign elements will penetrate the fuel lines. In the worst case, the car owner will face major engine repairs.
Therefore, if a defect is detected, the tightness of the tank should be restored as soon as possible.
Repair
Let's consider the procedure for performing the work, possible difficulties and ways to solve them.
How to remove?
The specifics of dismantling work depend on the make of the car.
Having a medium-sized tool kit is enough to remove almost any tank. The procedure is as follows :
Once these steps are completed, the tank can be removed from the vehicle.
Cleaning
As stated above, it is necessary to carry out external and internal cleaning with complete removal of all contaminants, including petroleum products. After this, they decide how to weld the gas tank using electric welding, or choose other methods of solving the problem, which will be discussed below.
How to solder?
According to safety requirements, before using the welding machine, it is necessary to fill the tank with water to avoid detonation of fuel vapors. The preparatory stage includes cleaning the area of paint and rust.
An affordable way to repair minor damage. The algorithm of actions is quite simple:
How to brew with a semi-automatic machine?
In addition to the semi-automatic machine, the use of argon arc welding is acceptable for the restoration of metal containers.
Cold welding repair
Novice car enthusiasts often ask the question: “Is it possible to seal a gas tank using cold welding?” This repair method is applicable to any type of material .
If there is free access to the crack, the tank does not need to be removed. Information on the list of materials to be joined and the degree of surface preparation can be obtained from the instructions for the product. Cold welding for a gas tank can be purchased not only at an automotive supply store, but also at any construction supermarket. Availability is one of the advantages of this product.
When performing work, do not forget about safety precautions - do not work without glasses and protective gloves.
[stextbox on our website you can find an article on how to repair a muffler using cold welding
Sealing a crack with epoxy resin
A good method for repairing leaks in the field. Epoxy resin should be used in combination with reinforcing mesh - this will increase the strength of the connection . Along with cold welding, this method can rightly be called a “quick repair”, because the different properties of the material and weak bending strength will force you to turn to specialists after some time.
How to repair a metal gas tank
Let's also consider ways to repair a metal gas tank.
Cold welding repair is also the most popular method for car enthusiasts. To repair a metal gas tank yourself, you need to use cold metal welding. Today, automotive chemical stores offer a wide range of such products.
Before starting work, as when repairing plastic gas tanks, you need to clean the surface, degrease it and dry it. Cut off the piece needed for repair from the cold welding rod and knead it thoroughly with your hands. After 5-6 minutes it will turn into a monotonous plasticine mass. Apply the resulting mixture to the damaged area and carefully level it over the damaged surface. Using a spatula dipped in water, carefully smooth the surface, removing excess. Let dry for 10-15 minutes.
If the repair rules are followed, such a patch is quite reliable and will last for several years.
The most reliable and high-quality method of repair remains welding the damaged area with a welding machine. It is better to carry out such work if you have the skills or contact a service station specialist.
Well, and of course, the most radical way is to completely replace the gas tank. A new fuel tank can be purchased for about 4,500 rubles. A used one, but in good condition, will cost much less.
And the choice, as always, is yours: to repair or replace the gas tank yourself or entrust it to service station specialists.
Repairing a cracked plastic gas tank
Manufacturers of modern transport use plastic everywhere . As a basis for a gas tank, it has several advantages:
Naturally, there are also negative properties that affect service life.
The main problem is considered to be high elasticity , since the slightest pressure fluctuations change the geometry of the tank, narrowing and expanding it. This property contributes to the appearance of cracks, which, under the influence of external factors, grow into full-fledged breakdowns.
How to prepare
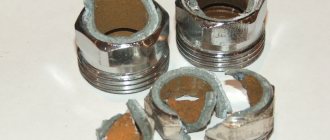
The process of preparing a plastic container is no different from its metal counterpart. The only difference is in the use of detergents that will be used for cleaning. During the inspection, pay special attention to the area where the two halves of the tank connect - this is the weakest point of the structure.
How to seal a crack
This method will not help repair the tank for a long time , but it will work as a temporary measure. Work is carried out on a clean, grease-free surface, otherwise there will be no effect. The crack should be sealed with Moment or its analogues. The technology of the work is simple - a piece of fabric is impregnated with glue and applied to the damaged area. The action is repeated several times until the required patch density is achieved. Instead of glue, epoxy resin with a plasticizer using the same technology is sometimes used.
Soldering
In terms of the physical characteristics of plastic, soldering is the right solution . This technology is used in the case of eliminating extensive damage. There are two ways to seal holes:
Repair with a screw or rivet
You can screw a self-tapping screw into a small hole by first placing a rubber seal under it. In some situations, aluminum rivets are used as a plug. Despite its simplicity, the service life of a screw or rivet will be very long.
General rules for repairing a gas tank
If you discover a malfunction in the fuel tank, immediately turn off the car and turn off the ignition - high temperatures and electrical sparks can easily lead to the ignition of not only liquid fuel, but also its vapors. Armed with a flashlight, a soft brush and a rag, go look for a leak. Please note: brushes with metal bristles are strictly prohibited for any type of work near flammable materials. The further algorithm of actions is simple:
In all cases, except for extensive corrosion and long through cracks, repairs will cost less than installing a new fuel tank. Some simple breakdowns can be repaired immediately, which self-hardening composite materials help well with. We will talk about one of them today.
How to get your gas cap back on track
You can pay attention to a malfunction of the gas tank cap if, when opening it, you notice a noise effect associated with air being sucked into the container.
Repairing the gas tank cap is often associated with malfunctions of the plastic lead. You can replace it with ties that hold the wires together. To work you will need three clamps. You should insert one of them into the eye of the fuel tank cap and tighten the loop tightly. Already connect the second clamp to it. Make a small hole in the gas tank flap hinge and attach a loop knot to it. The second end of the clamp, located on the gas tank cap, will be tied to it.
Knowledge of the specifics of repairing a fuel tank is extremely useful for the driver. By understanding repair issues, not a single motorist will be taken by surprise, even far from civilization.
Cold welding gas tank repair
Expensive repairs of a fuel tank at a service station are not always justified, and sometimes even impossible. For example, what to do if fuel starts leaking on a country road far from large populated areas? In such a case, it is better to always carry with you at least one package of cold welding, which, although it will not provide the same reliability as professional soldering of the part, can easily cope with both small leaks and relatively large rust areas. The main thing is to choose the right material and know how to use it.
Selecting a Cold Welding Brand
If cold welding is used to restore the seal of a gas tank, it must have high performance characteristics, among which a special role is played by:
The last point is the most important, because gasoline and additives included in the composition can quickly destroy the structure of some epoxy compounds. Therefore, the cold welding packaging you choose must be marked “Gasoline-resistant” or “Resistant to aggressive environments.”
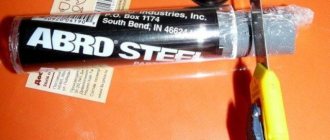
The saying “the miser pays twice” is also true when choosing cold welding for a gas tank. It is better to purchase a high-quality composition of domestic or Western production than cheap Chinese products that can negate all efforts to restore the part. Good choices would be:
It is better to purchase all of the listed cold welding products in the form of two separate bars or tubes, the contents of which are mixed immediately before performing the work. Rod materials are less effective, although they are an order of magnitude cheaper.
Preparatory work
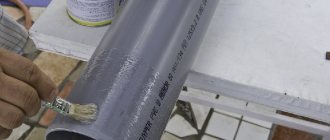
Before restoring the fuel tank by cold welding, damaged surfaces are protected to the base material, except for areas in which the natural layer of paint and varnish materials has been preserved. The use of stiff brushes, sandpaper and power tools is only permissible when all remaining fuel has been drained from the tank and explosive vapors have been removed. If there are traces on the prepared surface, they are removed with a special inhibitor. Leaky areas are removed, and the edges of cracks and chips are carefully cut inward.
The next stage is giving the material the necessary roughness . No cold welding will provide proper adhesion on highly polished metal or plastic, so an abundance of small scratches will only have a positive effect on the quality of the repair.
At the final stage of preparation, that is, immediately before applying epoxy compounds, the surface is degreased with chemicals . The use of gasoline, kerosene and other petroleum products is unacceptable, as they leave thin oil films. Alcohol or thinner works well.
Cold welding technology for gas tank
The simplest solution is to cover the leak generously in several layers. This technique is only permissible for small local repairs of minor damage; it is extremely short-lived, but will still allow you to get to the service station. A better result can be achieved using fiberglass or even thick, clean rags. In this case, you must do the following:
Welding at random
The cost of the rules of such welding work is human lives. Therefore, they should be taken literally, without interpretation as a lucky coincidence, thanks to which the explosion did not occur. This “finger of fate” could be:
- mixture concentration. For gasoline vapors it ranges from 0.8 to 8.0%, aviation kerosene: 1.2 - 7.1%, diesel fuel: 2.1 - 12.0%. For oils, the indicator varies over a very wide range. Explosive concentrations in heavy petroleum products occur as a result of their sublimation under the influence of high temperatures. The same electric arc. At what stage of concentration the explosion will occur, “gasoline, kerosene or diesel”, it will not matter to the worker;
- temperature limit of explosion of vapors . For gasoline it ranges from -10°C to -50°C, kerosene: from -28 to 57°C. Diesel fuel, oils, oil at subzero temperatures create dangerous concentrations during boiling;
- preservation of fuels and lubricants in solid inclusions. We are talking about silting of fuel fractions. If dirt is not removed from the tank, various manipulations will cause destruction of the hard shell and mixing of vapors;
- formation of gas bubbles on the inner surface of the container . This is possible when filling the fuel tank with water. They adhere firmly to the walls. They have explosive concentrations. The success of the welder depends on hitting them with the electrode.
You shouldn't play Russian roulette with fate. The rules for safe welding of fuel tanks are simple, and their implementation does not require excessive costs.
Fuel 500l without steaming, injection of CO2, welding of polypropylene in the mixture.
How to weld a fuel tank
A leak in the gas tank occurs as a result of physical wear or due to damage with collapse of the housing. Fuel vapor accumulates in an empty tank, so welding and heating can cause an explosion. Many motorists ask how to properly seal a gas tank. There are several repair methods: argon arc and cold welding, soldering. Let's look at each of them in more detail.
General rules for repairing a gas tank
The presence of a leak is indicated by increased fuel consumption and a specific smell in the cabin. Even a minor crack is dangerous for the life of the driver and passengers. The leak area ignites when struck by a spark. Damage occurs as a result of cracking of the body during driving and exposure to corrosion. Defects occur when there is a malfunction in the vehicle's fuel system. The discharged pressure contributes to the gradual cracking of the walls. Microcracks gradually increase, causing leaks. Before welding the gas tank, you must follow the safety rules:
Washing the tank allows you to completely remove explosive vapors. The repair method is selected based on the material from which the tank is made. Argon arc welding of a fuel tank is only suitable for metal containers; it is recommended to repair plastic products using cold welding; hot soldering is a universal method. Let's take a closer look at how to seal the gas tank yourself.
Cold welding gas tank repair
Cold welding is suitable for containers with hard plastic walls or for metal tanks. Glue does not adhere well to thin-walled tanks, so such repairs will be ineffective. The adhesive composition is selected in accordance with the type of container material. It is recommended to wear gloves when repairing a gas tank using cold welding. The crack is cleaned of contaminants and degreased with nefras.
Two-component mixtures are combined in the proportion specified by the manufacturer. The prepared solution must be used within 10-20 minutes depending on the brand name. The glue is applied to the damaged area in layers and smoothed, pressing it to the surface. 2-3 hours after repair, the tank is ready for use. The glue in the form of a bar is thoroughly kneaded with a damp hand and the crack is covered.
Cold Welding Selection
When choosing a cold weld, it is necessary to take into account that it must be resistant to gasoline. Only minor damage can be sealed with it. Moment superglue or similar special compounds from other manufacturers are perfect for eliminating leaks on the road. The rags are cut into patches, soaked in glue and attached to the hole in several layers. This repair method is temporary; it allows you to get home or to a service station and completely solder the holes.
To repair minor damage on your own, you can use epoxy resin with a hardener and fiberglass. The defect area is treated with sandpaper to increase adhesion. After the surface has dried, a glass cloth impregnated with resin is applied to the crack. Each subsequent layer is laid after the previous one has dried. After the last layer has hardened, the patch is treated with an anti-corrosion compound.
Soldering
Compared to cold welding, fuel tank soldering is more resistant to mechanical stress and external factors. To eliminate a leak, prepare a patch 4-5 cm larger than the area of damage. Repair of plastic products is carried out on the outer part of the walls of the gas tank with a 250-watt soldering iron. When sealing, you need to select a patch from the same material. The type of plastic is indicated on each part. Most often, gas tanks are made of ABS, polypropylene or polyamide.
For high-quality adhesion, a substrate of fine reinforcing mesh made of metal or copper is required. The substrate is fused into the wall of the gas tank, evenly distributing liquid plastic over the entire surface of the defect until a new uniform coating appears. The procedure is performed quickly so that the plastic does not harden, otherwise sagging will form.
In metal containers, you can seal the hole with a thin metal or copper patch. You can heat the case using a blowtorch or iron. The patch is attached with low-melting solder along the entire perimeter using a 500-watt soldering iron, having previously treated the joints with soldering acid. After soldering, you need to let the body cool, then cover the patched area with bitumen mastic or paint. The coating will protect the patch from corrosion.
Repair using electric welding
Welding a fuel tank using a argon arc welding machine and tungsten electrodes is considered the most reliable method. It reliably connects non-ferrous metal with alloy steel. Most gas tanks are made of aluminum, so inverter welding is not suitable for repairs. The repair area is cleaned of oils and dirt. The patch is welded around the entire perimeter, trying to maintain a homogeneous gas environment. The seam is smooth and durable. After cooling, the repaired area is painted or covered with bitumen mastic.
Plastic gas tank repair
Repair using epoxy glue is the fastest. This is a temporary measure to fix a leak along the way. You can patch the hole using a plastic welder - an extruder. Welding tanks using this method requires certain experience and knowledge of technology. It is recommended to practice on a small piece of plastic before welding. To correctly calculate the productivity of an extruder, you need to know the size of the cross-section of the crack. Welding begins from the edge of the fracture, laying the molten plastic welding wire evenly across the entire width of the hole with a small margin. For thorough welding, movements are made across the crack, completely filling the hole. In order for the seam to lie evenly, it is necessary that the hot air gun and the shoe of the device are evenly heated.
If you find an error, please select a piece of text and press Ctrl+Enter.
Source
How to repair a crack in a metal gas tank
The cause of depressurization of the gas tank may be a crack or corrosion in the steel casing. Cracks are common in plastic and aluminum tanks. The reason for their appearance may be an impact in a collision or a deep pothole. The metal tank rusts after mechanical damage from road surface components.
The steel fuel tank is restored by cold welding or using epoxy resin and fiberglass. In both cases, it is necessary to prepare the container for repair work.
To determine the location of the leak, the car is placed on an inspection hole or overpass, where you can gain access to inspect the gas tank. The damage is marked with chalk or a marker. It is important to drain the remaining fuel and remove the tank.
The outer surface of the container should be thoroughly cleaned of dirt:
- wash with warm water and dishwashing detergent;
- rinse with water;
- dry;
- treat the damage with sandpaper;
- wipe with a rag in acetone.
Upon completion of the preparatory work, begin gluing.
Cold welding
Cold welding is a plastic adhesive based on epoxy resin (one- or two-component). To repair automobile parts, a composition with metal dust is used. Based on the form of release, a distinction is made between cold welding, resembling plasticine, or liquid.
In the first case, the block is kneaded in your hands until soft and applied to a crack or hole. In liquid form, cold welding for metal is epoxy resin with a hardener. When mixing the components, heating and rapid polymerization occur.
In both cases, the adhesive must be applied within 2-3 minutes. The disadvantage of this method is the inability to repair significant damage. The adhesion of the composition with this method is not sufficient for long-term operation of the car.
Epoxy adhesive
Repairing a gas tank involves sealing the damage with epoxy glue and fiberglass. The glue must have good fluidity in order to properly saturate the pad. 2-3 patches are cut out of fiberglass, depending on the size of the crack or hole. The first patch, the smallest one, should cover the damage by 2-3 centimeters at the edges. The second is 2-3 centimeters larger in size than the first, the third is 2-3 centimeters larger than the second.
The first layer is soaked in epoxy glue and tightly applied to the gas tank. After 10-15 minutes, the next layer is glued in the same way. There should be no air bubbles in the seam that reduce its quality. The last piece of fiberglass with glue is sprinkled on top with aluminum powder to create a strong crust. Final hardening is after 24 hours.