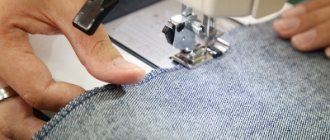
Many people learn basic handmade stitches in childhood, during labor lessons, or through their parents’ help in everyday life. Knowing the technique of making stitches solves small tasks for which a sewing machine is not suitable. Sew, hem, mend, sew on a button and even create a new outfit - experienced housewives know that it is difficult to do without hand stitches. This is where the mastery of sewing skills begins. However, the variety of stitches can seem daunting. Let's look at the types, names and features of the main handmade seams.
Types of basic hand stitches
Hand stitches are divided into straight and oblique, simple and complex types.
Simple options are:
- Estimating
- Overcasting
- Assembly
- Copying
- Spacers
The complex category is divided into:
- Looped
- Hemmed
- Curly
- Darning
- Fur
- Plastering
Important: When sewing stitches, the thread tension must be uniform.
Basics
Counted seams
With counted embroidery, the types of seams are not so varied. The main type of embroidery when counting is a cross, hence the types of seams:
- vertical cross;
- cross diagonally;
- horizontal cross.
The formation of these embroidery stitches is carried out during the embroidery process and depends on the direction of movement of the crosses.
Vertical cross stitch
Diagonal cross stitch Horizontal cross stitch
The same type includes square and painted seams. Both are performed with elements forward of the needle, while the pattern is formed after a double pass over one place.
Types of straight hand stitches with pictures
- The simplest option or seam with a needle
It looks the same from the front and back sides, the distance of stitches and skips is the same, it is done from right to left. Used for marking cutouts and manual assembly. Based on it, the following options are built.
Seam 1
- The most popular is the running stitch.
The execution is similar to the previous version, but on the front side the length of the stitches is longer than on the back side, and the distance between them is shorter. Stitch length is from 0.5 mm to 3 cm, depending on the type and thickness of the fabric, between gaps 5-7 mm. It is used to connect parts, mark the contour, places where parts join, the line of the middle of the back and front.
There are two types: for temporarily basting two parts along the contour (Fig. a) and for basting the hem at the bottom of the product, for example, for sleeves and the bottom of clothes (Fig. b). There is also a subtype of basting stitch - basting stitch. It is used more often to connect two small parts, such as a patch pocket, or when connecting shelves with a side lining.
Rice. A
Rice. b
- Copy or transfer stitches
Their purpose is to transfer a line from one part to another, or copy joint marks. It is performed with a “forward needle” stitch, but at the first stitch the thread does not reach by 1.5-2 cm, then two straight stitches, etc. according to the scheme. The distance is from 5 mm to 1 cm. Then the fabrics are moved apart and the stretched threads are carefully cut.
Copy seam
- Manual assembly or double seam “forward needle”
The work requires smooth and strong threads. The second line runs at a distance of 0.5-1 cm from the previous one, completely identical to it. Move “forward with a needle.” Used to assemble folds to the required length.
For assemblies
- Line stitch or “over the needle”
Performed from right to left, the needle is inserted at the puncture site and removed at a distance of one stitch. On the reverse side, such stitches are twice as large as on the front side. Creates an imitation of a machine stitch for durable stitching of two parts. Depending on the type of fabric, the distance between stitches and their length may be different.
- Needle stitch with fabric gaps
It is completely identical to a simple line stitch, but at the same time the needle is removed at a distance of two stitches, while taking less time to complete. That is, from the inside out, the distance between the stitches is 3 times greater. This method is used for sewing on zippers and linings.
Line stitches
What types of stitches are there for embroidery?
Seam “forward needle”
The “forward needle” seam is the simplest seam in its execution. When finished, the seam on both sides of the fabric looks the same. Used for embroidering clear boundaries and contours of a design, for example, when embroidering with satin stitch or cross stitch, patterns on blouses and bags. A seam is made along the outlined lines of the pattern, a “forward needle” is made from right to left, moving forward all the time, while picking up one or several stitches at once. During execution, you need to monitor the distances between the stitches - they should be the same and uniform.
Back stitch
This seam is also called “over the needle” or “stitch”, “backstitch”, it is also very simple to perform, and the stitches also need to be done in the direction from right to left. The “stitch” is very similar to a seam made by a sewing machine. On the front side, the “stitch” seam looks very neat, all the finished stitches fit tightly to each other, and on the wrong side the stitch can be compared to the length of two stitches from the front of the fabric.
The stitches of this seam should all be the same. The seam is done in two different ways, you can choose the one that is easier for you.
How to do it:
- In the first case, the needle and thread are brought to the front side, the next needle puncture on the fabric is made to the right of the first puncture site at a distance equal to the length of the stitch. This will be your first knit stitch. Next, the needle and thread are pulled along the wrong side of the fabric and brought to the front side to the left of the 1st puncture at the same distance. This is your first purl stitch.
When performing the second stitch, the needle and thread are led from left to right and injected into the puncture site that ended the first front stitch. Pass the needle again on the wrong side of the fabric and bring it to the right side to the left of the second stitch. Then you reinsert the needle into the puncture that completed your previous stitch. On the front side, this seam appears as a continuous line of stitches, much like a stitch from a sewing machine.
- In the second case of making a stitch, after bringing the needle and thread to the front side, make a puncture to the right of the exit of the working thread to the distance that you want to see at the stitch. Then they pull it along the wrong side of the fabric and bring it to the left of the first puncture at a distance slightly greater than the length of your first stitch. In this case, using such a seam on the front side produces a dotted line with an equal distance between the stitches.
Fern stitch
This type of stitch is used to create beautiful rounded lace stitches on the surface. Mostly they are used to embroider tree branches, leaves, seaweed or ferns. These stitches are mainly used for embroidering natural and floral motifs. The seam itself is a section of three straight stitches (needle forward) and they all come from a single hole in the fabric.
This fern stitch is easy to make:
- Make a diagonal stitch from the upper left corner to the lower right corner (in the figure from point 1 to point 2)
- We make the second stitch from the same puncture, going straight. To do this, bring the needle from the wrong side to point 3 (in the figure from point 2 to point 3)
- The third stitch is made diagonally from the lower left to the upper right. It ends again at point 2 (in the figure from point 4 to point 2).
That's all. Continue stitching in these sections until you reach the end of the row.
Seam into split
This stitch is the basic one among the types of hand stitches for embroidery. It can be performed as an independent element of the motif, or as an outline, which is used in some types of embroidery.
The embroidery technique for this stitch is a bit similar to doing a chain stitch. It is very simple to do, but it is necessary that the needle always has an even number of threads.
- We bring the needle and thread to the front side of our fabric and make a straight stitch as in the “forward needle” technique (Fig. A).
- Now we bring the needle to the front side close to the previous needle entry point and pierce the stitch thread in the middle (therefore, an even number of threads is desirable to make the seam look beautiful). (Fig.B)
- Next, repeat the entire previous procedure with the next stitch. We should get such a beautiful “split” seam (Fig. B).
Chain stitch
Classic chain stitch
A chain stitch is a simple seam that is made using a hook with a sharp end or a needle along a finished pattern on linen, cotton, silk or other fabric. The seam is most often made with silk, cotton or linen threads. The seam is used for neat embroidery along the contour of a product, for tapestry and satin stitch, in counted seams, for fixing the edge of a product, as well as for even stitching and openwork embroidery of a product.
To make sewing easier, it is recommended to sew the chain stitch from top to bottom. The needle and thread are brought to the front side, a loop is made and brought to the same point or near where it started. All this time, the loop is not tightened completely, and the needle is brought to the surface of the fabric at a point approximately 0.5 cm below the starting point. Next, you need to tighten the thread so that the loop lies neatly on the fabric. When the next loop is made, the needle is brought to the last point where it was finished and again brought to the front side inside this loop. You can see that the seam is neat, loop in loop, and on the wrong side there is a line stitch.
Zigzag chain stitch
The chain stitch can be made zigzag. For this seam, the needle and thread for the next stitch of the chain are pierced into the fabric not strictly down vertically, but with an inclination either to the right or to the left. You set the tilt yourself as desired. It may be small, or it may deviate significantly to the sides. A zigzag chain is formed. This type of seam can be used for embroidering small details, leaves and petals.
Loop with attachment
This stitch is a variation of the chain stitch. The only difference is that when making a loop, the needle is not inserted into the same puncture from which it originally came out. She comes in very close to him, but not next to him. The needle with the working thread is brought to the front side, but not in the middle of the loop, but at the top of the arc and this loop is secured. These stitches are used when embroidering flowers with petals, such as daisies or daisies. The buttonhole stitch is also used in ribbon embroidery.
Stem seam
A stem stitch is a simple stitch made when embroidering with satin stitch on linen or cotton fabric. When embroidered, it looks like a pair of horizontal stitches adjacent to each other. Such seams are used for embroidering patterns along the contour and for processing the smallest details of the motif. Embroidery is done on a well-fixed fabric, washed and ironed in advance. The thread for work should not be too long to avoid possible twisting and tangling.
The technique involves embroidering from left to right. The thread is attached on the wrong side without a knot - with two consecutive stitches along the very edge of the pattern. Then the first stitch is embroidered on the right side. Then, under the wrong side, the needle returns to the left and is brought out to the front side in the middle of the first stitch. This is the start of your second stitch.
The thread should not be too tight, as the pattern may become skewed. It is important to ensure that the thread is always above the needle when performing the next stitch. Not under the needle, and always on one side of the needle - right or left.
Holbein seam
The Holbein stitch is a simple stitch that looks the same when embroidered on the front and back sides. Holbein stitch embroidery looks like forward stitches. But then the needle comes back, filling the remaining empty spaces between the stitches. Experienced embroiderers turn the fabric over and embroider in the opposite direction to the very first stitch.
The fabric suitable for Holbein stitch embroidery is cotton or linen with a uniform weave. A thin tapestry needle with a blunt tip is suitable; such a needle will not separate the fabric into threads. The working thread must match the thickness of the fabric threads, usually single.
Loop or overcast seam
A loop stitch or slip stitch is a simple stitch. Such embroidery stitches are used to create patterns on fabric, as well as for sewing loops and neatly trimming the edges of the product.
Always sew with an overlock stitch from left to right. While embroidering, you need to watch the thread, it should always be in front of the needle, making a loop. You need to pull the needle and working thread from the wrong side to the right side. Bring the thread down and make a loop. Then stitch from the wrong side so that the thread is under the point of the needle. After this, pull the needle through to form a loop.
The width, height and direction of the seam are always determined independently. The distance between the stitches varies depending on what kind of seam you want to get - tight (Fig. a) or not (Fig. b).
Herringbone seam
The herringbone stitch is a simple stitch for finishing items. Externally, the seam is similar to a loop stitch or an open chain stitch.
The herringbone stitch is performed in two steps. After securing the thread, the needle pierces the front side to the back side and is brought out to the front side. The working thread must be under the needle point. One side of the seam has formed. The next stitch is done the same way, but on the other side of the seam and below.
Cross stitches for embroidery
Half-cross or seam painting
The “half-cross” or “painted” seam is a simple double-sided seam, performed first forward, then back (Fig. a). In fact, this is the first stick of a standard cross. The seam begins from the left side to the right along the contour of the pattern, laying stitches “forward with the needle.” After this, on the contrary, they move from the right side to the left. At the same time, the remaining distances from the previous row are filled. Stitches made twice do not overlap. The ideal line is obtained by correctly inserting the needle into the previous injection.
Cross stitch
A “cross” seam is a simple seam made by crossing two stitches. Various patterns on linen are usually embroidered with this stitch along a designated outline or along a contour with certain points.
Tapestry seam
It resembles a half-cross seam, made diagonally (oblique tapestry sewing) or vertically.
The tapestry seam is always embroidered in one direction - from left to right. Oblique tapestry sewing is done with a diagonal stitch from bottom to top, i.e. from the lower left corner to the upper right. The tapestry stitch on the front side is laid in the same way as a half-cross, and on the back side long diagonal stitches are formed that occupy two squares of canvas.
Oblique surface
The bias stitch is used to fill in a pattern where the shape itself, such as small flowers, is not designed to create stitches equally. The seam begins with basting a contour seam “forward with the needle.” Next, the entire area is filled with small oblique stitches. Stitches are made from top left to right.
“Pyshechka”
The “Pyshechka” or “Polka Dot” seam is made on a two-layer flooring, so the seam on the product has a convex surface. The outline of the pattern is basted with a “forward needle” stitch. The flooring is laid along the form, then double-sided satin stitch is embroidered along the contour flooring.
Hungarian seam
If you are interested in counted stitches for embroidery, then the Hungarian stitch is one of them. This is a pattern consisting of straight seams of different lengths. It is quite easy to do and can be used to fill large areas in drawings. This seam looks very impressive if it is made with threads of contrasting colors.
How to do it
- The needle must be brought to the front side from the upper left corner of your drawing. The direction of embroidery is from left to right. Next, stitch a block of 3 vertical stitches in a diamond shape. Stitch lengths are 2, 4 and 2 strands of canvas. You've got a diamond. Continue embroidering a row at intervals of 2 strands of canvas. You will then fill them with other diamonds. The direction of movement is not important. You can start embroidering from the side that is most comfortable for you.
- To stitch the next row, reverse the needle at the end of the row. Continue embroidery in the opposite direction, from right to left. This way, your first stitch of the second row will be located under the first stitch of the top block. Embroider the next row with the same blocks using stitches of the same length (2-4-2). They need to be placed close to the previously embroidered blocks.
- To fill out your design, simply repeat rows.
Types of oblique hand stitches
They are available for permanent and temporary purposes, as well as for overcasting edges and hemming fabric. Lay from left to right, stitch length 0.7-2 cm. The needle is brought out through all layers from the bottom, a few millimeters from the edge. The needle enters perpendicular to the cut of the fabric, but the stitch lines are at an angle.
Oblique hand stitches are:
- Basting – for basting collars, hems, etc. To connect the parts together as much as possible and prevent their displacement;
- Basting – for patch pockets with or without lining, collars, sides, etc. Such a seam is necessary to create a neat front stitch of already sewn parts in order to hide the seam and cuts inside;
- Quilting - needed to connect several layers of fabric. They are often used so that the lining material holds its shape well or so that the product fits better on the figure. The wrong side is stitched completely, only slightly capturing the main part. The seams on the front side should not be visible!
Varieties
Oblique stitches are used for hemming and overcasting seams. We'll look at them below.
Types of overlock hand stitches
- Seam “over the edge” or the main overlock
It goes from right to left. These are parallel and identical stitches located obliquely to the cut of the fabric. They are identical on both sides. There are 2-3 stitches per 1 cm. This seam is necessary for manually fastening fabrics that are fraying.
Overlock stitch
- Cross stitch by hand
This is a double oblique seam - goes from left to right and in the opposite direction. The needle enters the holes already created from the previous move.
- Loop or edge stitch
Similar to the first option, but the needle goes perpendicular to the tissue section, passing over the thread. Move the needle towards you, frequency of stitches is 2-3 per 1 cm. The loop at the bottom of the needle is slightly tightened when done. Most often used for finishing frayed fabrics, processing loops and as a decorative element.
Loop processing
- Twist seam
Complex seam for processing very loose and light fabrics. Straight overlock stitches are made as close to each other as possible, with your other hand folding the edge of the fabric. Such a seam can be made with gaps - to do this, grab 1-2 mm of the main fabric and 2-3 mm strictly at the top of the folded section. The stitch frequency is no more than 5 mm. Threads are used thin (possibly silk) to match the color of the fabric.
The stitch frequency is small, but arbitrary
Types of hemming hand stitches
There are open, hidden and figured.
- Open seam
Used for non-flowing fabrics and hemming the bottom of trousers, skirts, etc. The needle comes out from the fold of the folded part, grabs 2-3 mm of the main fabric, again we return to the folded part (at a distance of 3-7 mm) and grab 2-3 mm. 2-3 stitches per 1 cm. The principle of oblique hand stitching is used - the needle enters perpendicularly, but the stitches are made at an angle parallel to each other.
- Blind hand hemming stitch
Similar to the previous method, but the stitches are very short on the right side. On the main fabric we grab 1-2 threads, on the folded side - 2-3 mm. The color of the thread must match the color of the fabric. Used for hemming blouses, items made of thin fabric, or when the seam is not noticeable.
Hemming seams
- Goat stitch
Used for thick fabrics or for decoration purposes. The stitches are laid from left to right in the form of a cross, the needle goes strictly parallel to the cut! The length of the stitches is from 4 to 7 mm, their density depends on the type of fabric - the denser the fabric, the rarer the stitches.
Algorithm
General classification of seams
In accordance with their functional purpose, they are presented in three classes:
Working seams are the main seams that make it possible to obtain a strong, durable, functional product. They are characterized by precise thread tension and ideal stitch configuration. Of course, their quality greatly depends on the specific model of the sewing machine; when choosing a device, you need to pay special attention to this at this point.
Decorative seams are used much less frequently than workers; their task is to decorate the product and create an unusual ornament. Practice shows that in everyday life a large number of decorative seams is not needed; a device with several different designs is sufficient.
Specialized. Each seam is designed to perform a specific task. For example, it may be designed to work with a specific type of fabric, forming a blind stitch or zigzag.
How to make complex hand stitches: description with diagrams
- Fur hand stitch
Used for through fastening and processing the edges of sides, gates, etc. And in the case when the line should not be visible! Sometimes a fur stitch replaces machine decorative stitching, ensuring the durability of the product. We pierce the bottom layer completely, we capture only 2-3 mm of the top layer. For 1 cm up to 3 stitches.
- Tricky or hidden seam
Used when repairing clothing or when creating a hidden seam. The needle is inserted from the left along one part of the fabric, making a stitch to capture 1-1.5 mm of fabric on the other side. We repeat this algorithm, capturing only a little of the canvas. For 1 cm up to 3 stitches. We stretch the thread - the seam is not visible, all the stitches are hidden on the wrong side.
Execution schemes
- Plaster seam
It's also a butt seam. Used for joining wool and other thick fabrics that do not fray. Can be done with straight, oblique and even loop stitches. Their length is 2-3 mm, frequency - 6-7 stitches per 1 cm.
- Darning stitch
At the moment it is used very rarely. Previously used for repairing damaged items and for decorative embroidery. It is laid with perpendicular straight or oblique stitches with high frequency. The threads should create a weave.
Execution schemes
How to tie a knot correctly
In order for surgical sutures to provide reliable fastening, you must be able to tie a surgical knot.
The technique can be manual or instrumental. The manual method is used for many operations. Instrumental is used in microsurgery (for example, during surgery on the organs of vision), when performing specialized operations, as well as with difficult access to the surgical wound. Often the instrumental method of tying knots is used when performing operations on blood vessels.
Surgical nodes are:
- consisting of 1 loop;
- consisting of 2 loops;
- consisting of 3 loops.
A single-loop surgical knot is used for short-term tissue fixation. Other types of knots are used for long-term or permanent fixation of tissues.
Each of these types has its own characteristics and tying techniques.
Features of the surgical unit:
- The 1st knot is carefully tightened to the limit;
- The 2nd one fixes the first node;
- The 3rd is used for additional fixation.
Some surgical procedures require one additional turn of the knot.
Method of tying a surgical suture:
- fixing the end of the thread with your fingers;
- cross the surgical material (grab the right one with your left hand, place the left part in your right hand);
- the place where the threads cross is grasped with the thumb and index finger of the left hand;
- the ends of the ligature in the right hand are pulled up as much as possible and brought together under the index finger of the left hand;
- turn the left hand, with a nodding movement of the index finger, the ligature is passed into the gap and securely fixed.
After the manipulation, long pieces of suture material may remain. They need to be shortened as much as possible, since the presence of foreign parts in the area of the surgical wound can lead to the formation of inflammation.
In order to make the suture as safe as possible for the patient, you must adhere to the following rules:
- the threads of suture material must always be in the surgeon’s hand;
- the tension of the threads should be optimal, that is, excessive overtension should be avoided;
- sew the edges of the wound as carefully as possible to avoid cutting through them (to avoid the formation of bedsores in the suture area);
- If there is any doubt about the correctness of the suture, you need to remove it and apply a new one.
Modern methods of wound suturing make it possible to avoid the appearance of scar changes in the tissue area.
Types of decorative hand stitches for embroidery
- Chain stitch or buttonhole stitch
The loops come out of each other, there are open, closed and oblique types. The stroke is from top to bottom, the needle enters the fabric towards itself. After insertion, a loop is created from the thread (hold with your thumb), the needle is removed at a distance of a stitch over the thread. Gently pull the thread through to close the link.
Important: The needle enters and exits at the same point or on the same line!
3 options
- Decorative hand-stitched herringbone stitch
The needle is pierced either on the left or on the right. Also hold the thread with your finger to create a loop under the needle. The length of the stitch depends on the thickness and looseness of the fabric, but they are always the same.
- Stem seam
Move from bottom to top, left to right. The stitch begins in the middle of the length of the previous stitch, the thread is always located on one side. It is important that the stitch lengths are the same. The stitch is used to embroider the outlines of patterns or to highlight an element.
Execution diagram
- Cross stitch
This is done in two ways. 1 – move from left to right, the needle is inserted perpendicular to the suture line, then in the opposite direction. 2 – the fabric is grabbed by the needle either from above or from below. The first stitch from the bottom/left is the move up/to the right; second stitch from bottom/right – move up/left.
First option
Second embodiment
Surface
For satin stitch, decorative stitches are most characteristic and many looped stitches can also be considered elements of satin stitch embroidery.
A simple double-sided satin stitch, where the needle constantly goes to the front side on one side of the design. With this type of embroidery, the same pattern is formed on both the front and back sides.
When using satin stitch with flooring, the outline is first embroidered, after that it is filled with stitches and only then the outline is filled in. The bottom and top layers should be perpendicular.
Filling embroidery figures with satin stitch can be done with long and short stitches, while they lie in the same direction. If you change the length of the stitches in the rows and embroider different rows with different colors, you will get a stitch with an infusion of colors.
The stem and chain stitch can serve to fill the figure formed by them, first the outline is closed. It looks like a solid, bright element.
Scallops and satin beads are made in the same way as a buttonhole stitch with flooring. For scallops, first the base is embroidered with an intermittent seam forward of the needle in the form of semicircles. For the roller, take 2 loose threads and lay them out according to the pattern. In both cases, the top layer is made with loops fastened to each other. Such decorative seams are often used to decorate tablecloths and napkins.
The most common method of satin stitch embroidery is darning. A series of parallel stitches is made, then the direction changes to perpendicular and each of them is woven between existing ones, as in fabric.
Double-sided stitch
Surface with flooring
Scallop seam
Satin roller
Darning seam
Decorative filling seams when embroidering with satin stitch
This includes the following types of seams:
- fish bone;
- Cretan;
- half-loop.
The half-loop stitch for satin stitch differs only in the frequency of the arcs. If quite large distances between them were allowed for embroidery stitches, then when embroidering with satin stitch there should be no such distance at all.
Fish bone can be of two types. In the first case, these are 2 parts of a simple double-sided satin stitch, joined together. In each part the satin stitch is embroidered in its own direction. A zigzag is formed at the junction of the stitches. They are performed alternately - in one direction and the other. The fishbone embossed seam is made in the same way, with the only difference being that the stitches on different sides do not touch, but are laid on top of each other.
The Cretan stitch is made in the same way as the fishbone stitch, only at the end of each stitch it is not just inserting a needle, but securing a loop. A combination of double-sided satin stitch and loop stitch.
Half-loop stitch in satin stitch Fishbone stitch
Chinese seam
Welted surface
Welted surface
This satin stitch creates incredibly delicate and beautiful embroidery patterns used as trim for bedding, accessories and clothing. The inside of the pattern is cut out and the edges are finished with loops. English slotted satin stitch and more complex execution of intricate designs - cutwork are performed with a gladian roller and a picot roller.
It is advisable not to complete the cut pattern until the holes are finished. Along the edge of the future slot, a needle is stitched using the forward method. Then a loop stitch is applied over it with a roller.
All seams require attention, patience and experience. For everything to work out, you just need to want it.