How to make a knife from Damascus steel
Damascus steel is a very versatile material, allowing the blacksmith many opportunities to realize his plans.
Modern steels used to make Damascus make it possible to achieve any desired properties of the future blade, but in the modern context of understanding Damascus steel, it is no less important to obtain a beautiful pattern on the metal, and here there is much more scope for realizing desires. The heights that many famous modern masters have achieved are worthy of admiration.
But there is another direction in the development of Damascus steel - the use of secondary materials, which I would like to dwell on in more detail. It should be noted that these materials do not allow you to achieve beyond the properties of the blade, they are more pretentious materials, but many really like the concept that their blade is the degeneration of another material.
Suitable materials
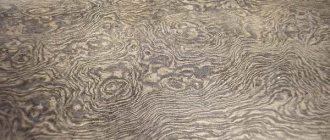
The clear favorite here is damascus made from cables, the metal from which the cables are made makes it possible to obtain a good blade material, but due to the large pattern it does not provide an increase in cutting (Damascus) properties
Fig. 1. (damask made of cable with a large pattern)
Figure 2. (damask made of cable with a small pattern)
But there are also cables that will not allow you to obtain good cutting properties (due to the small amount of carbon), in which case a cutting edge made of blade metal or damascus is welded to the body of the blade, or a laminate is made - where the blade material is in the center, and the lining is made of decorative cable damascus.
Fig. 3. (end welding: cutting edge wx15, Damascus body made of cable).
It should also be noted that although the material does not have good cutting properties in implementation, both in the laminate and in the end version, the cable, due to its elasticity, allows the use of very hard but brittle metal on the cutting edge, the strength deficiencies of which are compensated elastic cable Such a blade will bend faster and break faster.
Recycled materials such as chains are also widely used; most often they use either chainsaw chains or motor chains of gasoline engines.
Fig. 4. (damascus from the motor chain).
Meshes are more rarely used; their properties are basically similar to the cables described above.
Fig. 5. (laminate: in the center wx15, damascus mesh lining, against which the blade is removed)
Figure 5.1. (laminate: in the center wx15, Damascus mesh lining, mesh texture left on the blade)
Fig. 6. (laminate: in the center wx15, Damascus lining using stainless mesh).
It should be noted that there are quite a few such materials suitable for making bladed damascus; in this article I want to introduce you to the process of making a blade from a coil of wire. The essence of this experiment is to obtain a new pattern on the finished blade.
Fig. 7. (roll of wire).
Chemical composition of wire
Before making a knife, we try to find out the approximate chemical composition of the wire, this is necessary in order to find out whether it is possible to weld it with forge welding and the approximate amount of carbon - this is necessary to find out whether the finished blade will be hardened. We carry out this complex analysis quite simply - by checking for a spark.
Fig. 8. (checking for spark).
From the spark we see that the metal is not alloyed, which tells us that it can be welded using a forge and that the amount of carbon is 0.8-1%, which allows us to assume that the metal will take a decent hardening. There is also the possibility of carbon burning out during forge welding, but we can only check this after welding.
Annealing
Next, for the convenience of further processing, it is necessary to perform annealing; we carry out this operation in a muffle furnace
Figure 9. (annealing).
We heat until the austinite transformation and let it cool with the furnace. After this, the wire becomes soft.
Formation of a package for forge welding
Since the wire has become soft enough, we can bend it into a shape convenient for us, after which we wrap one end of it with soft iron and weld it with electric arc welding.
A strip of iron is necessary to be able to use electric welding, because the wire is very thin and it would simply burn out.
Then we weld a handle made of reinforcement for ease of holding during forge welding and further forging.
Fig. 10. (blank).
Now we heat our workpiece to about eight hundred degrees. I use a gas forge, it has a number of advantages, such as a constant reducing atmosphere and everything is clearly visible in it what is happening.
Fig11. gas horn
Then sprinkle generously with borax. Borax is needed to dissolve scale and protect the metal from oxygen - this is important for high-quality forge (forge) welding. Then we carry out the welding itself.
Fig. 12. (sprinkling with borax).
We carry out welding on a block of wood, this is necessary to protect the workpiece from oxygen; the fire that appears from the contact of the workpiece and wood burns out oxygen and creates a reducing environment outside the forge. And also for less heat transfer to the workpiece - that is, the wire is very thin and cools quickly upon contact with the anvil.
Figure 13. (welding).
After forge welding, we forge the workpiece to the required dimensions; in this case, we are going to torso (twist) the workpiece - so we forge it into a square with a side of twenty mm. We measure with a crank, which will be used to twist the workpiece.
Fig. 14. (unforging).
Fig. 15. (preparation for torsion).
Now that we have prepared the workpiece, it is important to figure out how the pattern will be opened; at this stage, the fibers are located along the workpiece and the final product will not be very impressive. You can twist it - but then you get the same metal pattern as a regular cable, so in this case we twist it in different directions in increments of about one and a half to two centimeters
Fig. 16. (torso).
Fig. 17. (torso).
After which we trim the workpiece to the required size, in this case the square size is approximately twenty millimeters.
Fig. 18. (workpiece after torsion).
Fig. 19. (workpiece after torsion).
When the blank is ready, it's time to forge the blade
We pull off the body, the nose of the future blade and the shank. You can also forge descents, but in this case the metal pattern will be poorly revealed.
Fig. 20. (blade after forging).
Fig. 21. (blade after forging).
We polish the future blade and trim the ends
Figure 22 (blank).
Then we put a mark, weld the shank and mark future descents
Fig. 23. (blank).
Figure 24. (blank).
After that, on the grinder, we roughly form the descents.
Fig. 25. (blade before hardening).
It's heat treatment time
We do normalization in order to remove stress from forging and refine the grain of the metal. Next is quenching: heat it in a quenching forge to the quenching temperature and lower it into a container with oil heated to seventy degrees. After which we conduct a vacation - heating to a temperature of two hundred degrees and holding for two hours.
Figure 26. (quenching forge).
Fig. 27. (hardening the knife).
Fig. 28. (blade after hardening).
Now we grind the knife clean and etch it in a five percent solution of ferric chloride - this is necessary to reveal the design. As a result, we get such a blade
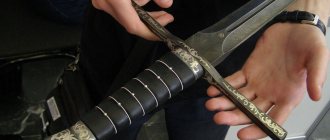
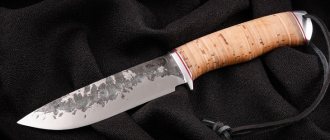
Fig. 29. (finished blade) - which my friend dubbed “Element”.
How to make Damascus steel at home?
Translated by SaorY for mozgochiny.ru
Greetings to all brain crafters ! After almost a year of “communication” with a hammer and an anvil, I finally acquired the necessary experience and tools to create forged crafts , such as the small “Damascus” knife from this brain article .
And I started, by the way, with a small sledgehammer as an anvil, which I hit with a small hammer.
Now we will talk about creating a small, forged, not carved, knife with your own hands using a homemade forge, anvil, hammer and determination. I don’t pretend to be a professional, and this is certainly not the only way to obtain welded Damascus; this is the story of how I managed to make it.
Damascus steel today is called welded Damascus, obtained from welded metal plates of various brainsteels , subsequently forged and twisted. It's like molding different colors of plasticine together and twisting it to create a wavy pattern.
After forging, such a workpiece is subjected to etching, in which the dissimilar metals of the workpiece are eroded unevenly, thereby creating a beautiful contrast.
The original Damascus steel is obtained in a different, very specific way (although it looks similar to modern Damascus), and few people know how to create it; this fact has given Damascus a reputation as a metal supposedly endowed with magical powers.
And the reason for this “power”, similar to samurai swords, is a process that makes it possible to obtain a more homogeneous, and therefore with the desired qualities, steel, which cannot be achieved in other ways, and makes it possible to include low-quality and high/low carbon steel in the workpiece. Which results in a much better quality blade.
!!! ATTENTION!! A knife can be dangerous, please do not give it to people with mental disorders!!!
Step 1: Materials and Tools
- steel plates of two or more grades (preferably high carbon content) that will contrast with each other, I took high carbon 1095 steel and 15n20 steel, with a small nickel content, which will add brightness and contrast after etching - flux (borax, which can be purchase at a hardware store) - a piece of reinforcement, a long rod (will be welded to the workpiece as a handle) - wood of your choice for the knife handle - epoxy resin (hardening in 5 minutes is the best) - brass rivets - composition for processing the wood of the handle, I I used linseed oil - metal hardening oil (vegetable)
- ferric chloride
- an anvil (preferably a real steel anvil, although if you don’t have one, some other durable objects will do: a piece of rail, a sledgehammer, a large metal blank, an old bollard mooring post, or just a large strong, hard and flat surface.
Remember how it all started with hitting a large stone with a stone - a hammer (I used a weight of 1.
3 kg, with a cross striker) - pliers - welding (optional, but desirable for welding the plates to each other and welding the handle, if you do not have welding, you can tightly wrap the plates with wire) - forge (capable of heating the workpiece to the temperatures required for forging , which is very important for high-quality fusion of the plates with each other, more on this later) - a belt sander or file with a lot of patience - an oven or another hardening method - a drill or drilling machine
- vice (very useful thing)
Step 2: Assembling the workpiece
Steel plates are cut to the required brain dimensions , mine, for example, are 7.6x1.2cm; Moreover, the larger the workpiece, the more difficult it is to shape it with a hammer.
Before welding them in a stack, the plates are cleaned from all sides of rust and scale.
Next, the plates are stacked, alternating steel grades, so my workpiece consisted of 7 plates, three of which were grade 15n20, and four of which were grade 1095.
The plates, aligned relative to each other, are welded together (don't pay too much attention to my seam), and then a handle is welded to the stack to make it easier to handle the workpiece during forging. There is nothing wrong, especially after the stack of plates have been welded, in using only pliers. I forged my own anyway.
Step 3: First Forging of the Stack
A little about my forge: I made it with my own hands from an empty (I bought a new one on purpose as a precaution) gas cylinder, lined inside with a 5cm layer of kaolin wool and fireproof cement. It is heated by a Ron-Reil type burner, about which there are many good brainstorming articles . The forge itself is not particularly large and can be heated to the required temperature without any problems.
So, the workpiece from the plates is heated to a cherry-red color; the heat for this does not need to be very strong.
The heated
homemade is sprinkled with borax, which immediately begins to melt and must be allowed to seep between the plates.
This will remove scale and prevent oxidation by preventing oxygen from contacting the metal. This action will ensure the purity of the workpiece metal.
Then the workpiece is heated again in the forge and the procedure is repeated a couple more times, not forgetting to clean the scale if necessary.
And after this, the workpiece is heated to forging temperature, I can’t say exactly how much, but I believe it’s somewhere in the region of 1260-1315 degrees Celsius.
At this temperature, the workpiece will have a very bright yellow-orange color, similar to moderate daylight.
To avoid wasting time, make sure that the anvil and hammer are at hand and there is enough free working space.
Then the workpiece is quickly placed on the anvil and with light, soft blows, evenly over the entire area, the forging of the plates begins. Next, the workpiece is again placed in the forge and heated to forging temperature, and then forged with blows of medium force.
And after this, the workpiece is stretched so that it can be bent.
Step 4: Folding the workpiece
It's time to increase the number of brain layers in the workpiece. To do this, the workpiece is forged to a length twice the original length, but it is important to stretch it evenly and not just stretch it.
In the middle of the stretched workpiece, a transverse recess of 3/4 or 4/5 thickness is made using a notch, chisel or other suitable method, along which the workpiece is then folded in half on the edge of the anvil, turned over and forged along the entire length, making sure that the halves do not moved relative to each other along the lateral edges.
Then the heating/forging process from the previous step is repeated: flux, heat, cool, heat, forge, forge.
The procedure for increasing the number of layers is repeated until the required number of these layers, so I folded it 4 times and got 112 layers. (If you want more layers, please, the pattern will then be smaller.
The formula for calculating layers is: initial quantity * 2 to the power of the number of folds, that is, 7 * 24 = 112).
homemade workpiece, heated to forging temperature, is placed in the groove of the anvil, twisted thoroughly, and then it is again given a rectangular shape.
But before twisting, the workpiece is punched in the corners so that its shape becomes more rounded, because when twisting and reverse forging into a rectangular workpiece, inclusions and impurities can form from the resulting folds if the temperature of the workpiece is lower than the forging temperature.
After this, the brain blank is forged again (I repeated it several times), and cooled, and to make sure that the forging is uniform, I cleaned one of the ends of the blank.
During the forging itself, especially at the first stage, it is important to keep the temperature of the workpiece high and be careful, otherwise you can tear the layers away from each other (this is also called delamination, which is not at all good).
Step 5: Model and Rough Profiling
Now you need to imagine the profile of the future knife and roughly forge it from the blank. The more accurately you can forge the profile and bevel, the less you will have to bother with grinding (on a machine or with a file).
There are many brain articles from more experienced blacksmiths, so I will not go into detail.
The bottom line is that the workpiece behaves approximately like plasticine; when it is heated, it is necessary to punch it in the desired direction.
Step 6: Sanding the Profile
The final shaping of the profile is carried out with a grinder and a file. Stock up on tea, because most likely this will take a lot of time, unless of course you have a brain grinding machine .
Step 8: Finished profile
After the profile of the craft is formed, it still needs to be finalized with a file with a finer grain, I used 400s.
The edge of the blade is sharpened almost, but not completely; it is necessary to leave it slightly unsharpened so that during hardening the edge material does not deform.
After this, holes for rivets are drilled in the knife handle and wooden dies for this handle are prepared.
Step 9: Exciting Moment
Hardening. It will either “make” your blade or destroy it. It is important to concentrate and be careful, otherwise you can deform and destroy the blade. The method I used is not the most thorough brain-hardening , but it was the only one available to me with the tools I had, and the oil was the best I could get.
Before hardening, the blade must be normalized. This will relieve stresses built up during forging and twisting and reduce the likelihood of warping during hardening. This normalization is done by heating the blade above its critical temperature (when it is no longer magnetized, so it is useful to have a magnet on hand) and cooling it in air.
How to make a knife from Damascus steel with your own hands - complete instructions
Damascus steel knives have always been valued among hunters. This is a unique material with excellent technical characteristics, durable, and has excellent sharpening. But finding inexpensive products on sale is problematic; knives usually have a high price. There is a solution: you can make such a knife yourself at home.
Damascus knife: product features
Damascus steel is distinguished by a number of properties that are unique to this metal. Knives made from this material have the highest cutting qualities and enormous strength, surpassing their analogues several times over. The surface of the product is also original - it is visually heterogeneous due to the patterns that are formed during manufacturing.
There are two types of Damascus steel that are used to create knives:
- welding - obtained by repeated forging of a steel package;
- refined - during smelting, harmful impurities are evaporated from it.
Every housewife dreams of getting a knife made of this metal: it is ideal for the kitchen as a cutting knife. There are also hunting, fishing, and camping knives on sale, which are valued by professionals. Expensive designer handmade products are usually bought as gifts; many of them are made to order, complemented by handles made of precious wood.
You can't buy Damascus knives cheaply. For example, Japanese Yaxell brand knives cost 12,000-22,000 rubles. A folding knife Samura can be purchased for 3000-5000 rubles, a folding knife from the workshop of Sergei Marychev - for 2500-5000.
Yakut knives or simply “Yakuts” (Russia) are very popular. They have a characteristic feature - the asymmetry of the blade. In combination with a birch handle, such products do not sink in water due to their special design.
If you buy a knife from the manufacturer, you can find it for 3,000-10,000 rubles.
According to reviews, Kizlyar knives with a straight blade are also good. Their advantage is in the applied grooves, which make the “kizlyar” lighter. For hunting and fishing, they often buy knives with a hook blade, which are very convenient for gutting animal carcasses and large fish. How much does such a thing cost? The price can reach 6,000-30,000 rubles depending on the brand.
Damascus steel products have their pros and cons. They need to be properly cared for: due to the presence of carbon steel in the composition, rust may appear on the surface. The simplest preventive measures will help you avoid such trouble.
Making a knife from Damascus steel
You can make a Damascus knife with your own hands. To do this, you need to familiarize yourself with thematic photos, videos of how such blanks are made, and also select all the necessary devices and consumables.
Materials and tools
To create a knife, you need to prepare the following materials:
- plates made of carbon steel of two grades (the higher the carbon content, the better the blades);
- borax (sold in hardware departments);
- rod for welding a knife blank;
- quick-drying epoxy glue;
- brass rivets;
- ferric chloride;
- vegetable oil for steel hardening;
- wood for the handle.
You will also need a number of tools for the job. First of all, you need an anvil. It is better to equip a real anvil, but a piece of rail or a large metal sledgehammer will do. You also need a heavy hammer (1-1.5 kg in weight) and a forge capable of maintaining a high temperature. Other required equipment:
- welding for welding plates, securing reinforcement (wire can be used);
- a belt-type grinder (if you don’t have one, a file will do, but the work will take a long time);
- oven, other heating device;
- drill or drilling machine;
- vice.
Assembling the knife blank
First, you need to create blanks and cut steel plates to the required length. Beginners are advised to make small blanks, since it will be more difficult to create a knife from large ones. Welding areas must be cleaned of scale and corrosion, and plates must be laid with alternating metals by grade. There can be 3-7 or more plates in total. Then the following actions are performed:
- align the plates;
- grab them by welding;
- weld a piece of reinforcement to the workpieces as a handle;
- Instead of such a handle, you can use ordinary pliers.
First forging of a knife stack
In addition to a real forge, you can use a homemade one made from an empty gas cylinder. The inside of the cylinder should be lined with a layer of kaolin wool and fire-resistant cement. You can heat up any forge using a gas burner. If it is small, then heating occurs quickly. Afterwards the actions will be as follows:
- put the knife blank into the forge;
- heat the future knife until red-cherry color (at moderate heat);
- sprinkle the workpiece with borax so that it melts and “saturates” the plates (this is required to remove rust, prevent oxidation, and improve the cleanliness of the steel);
- clean the protruding scale, repeat heating again after a while;
- if necessary, duplicate all actions.
Next, the workpiece is heated to a higher temperature - forging (about 1300 degrees), and the metal becomes bright yellow. They begin to forge the plates together with blows of medium power. Afterwards, the knife blank is pulled out for bending.
Bending the workpiece
A stack of plates must be forged to a length equal to two lengths of the future knife. It must be stretched evenly so that the thickness remains approximately the same over the entire area of the product.
Using a chisel, a transverse recess is made in the center, slightly not reaching the bottom edge (not the entire thickness). Then the knife blank must be bent in half along the mark made, turned over, and forged along the length.
The halves should match well at the edges.
After bending, heat up the future knife again, forge it, sprinkle with borax, and let cool. Then stretch and bend again. The goal is to get more layers to create an original drawing. To calculate the number of layers sufficient for a particular knife, you can use the formula:
initial number of steel sheets * 2 * number of bends (usually 3-4).
At the end of the work, place the knife blank in the groove of the anvil, twist it, then forge it again to a rectangular shape. Before twisting, it should be pierced in the corners to give it some roundness and to prevent the appearance of impurities and inclusions from folds. The temperature in the forge must be consistently high, otherwise the quality of the steel will decrease and the layers will not be firmly bonded to each other.
Model and rough profile formation
The appearance of the knife must be imagined in advance. Which profile is best to choose can be found on the Internet. According to the drawing, you need to start forging from the workpiece; at first it will be rough.
It is important to try and make the work finer so that sanding is less difficult. When heated, metal can be “sculpted” like plasticine, so you need to give the product a beautiful appearance.
Profile grinding
If you don’t have a grinder or a special machine, use a file and a grinder. The product must be smooth, even, and shiny. Then you should drill a hole for the handle, and also sharpen the knife a little (not completely, otherwise it will warp when heated).
Ready profile
Finish the workpiece with a 400-grit file. Using a fine grain will help give the workpiece a finally smooth look. Also at this stage you need to prepare wooden strips for the handle (2 pieces) and rivets for attaching them.
Last hardening
This point in knife making is considered the most dangerous and difficult. Tempering will either make the blade perfect or warp it. You need to work very carefully so as not to deform the blade.
Before starting all actions, the product is normalized to eliminate excessive stress on the steel and reduce the risk of warping. To do this, you need to heat the blade more than its critical temperature.
A magnet will be needed to determine the time when the metal stops being magnetized - this will be the point at which the desired temperature is reached.
After heating, the workpiece must be cooled in air. You will have to repeat the procedure 3-5 times. As it cools, it will be possible to evaluate the resulting steel pattern. Next you need to proceed with the most responsible actions:
- once again heat the workpiece above the critical temperature;
- remove the blade from the forge, quickly place it, tip first, into warm vegetable oil (it must be evenly heated in advance);
- water cannot be used, it will ruin high-carbon steel;
- Carefully place the product on a flat surface (it will be fragile, like glass).
The tempering process hardens the knife blade to increase service life. This is done by heating the blade in the oven at a temperature of about +205 degrees for 1-1.5 hours.
Etching
At this stage you will need ferric chloride. It is made according to the manufacturer's instructions, then the finished blade is placed in the solution. Usually 3 parts of water are taken, 1 part of ferric chloride, the exposure time is 3-5 minutes.
Handle and sharpening
For the handle, you can take any wood - from the simplest birch to expensive types of wood. Cherry and alder work well. The workpiece is ground and attached to the handle with epoxy glue and brass rivets. At the end of the work, the wood is sanded and impregnated with linseed oil or special stains.
It is better to sharpen the knife right away. It is worth learning in advance how to sharpen a product correctly so that problems do not arise in the future.
Since soft layers alternate with hard ones, bending one layer onto another must be avoided during the sharpening process. First, inspect the blade for chips and nicks: they will need to be cut down.
Then you can use abrasive materials to evenly remove layers. First, coarser grains are used, then finer grains.
Tips for sharpening the product:
- the knife cannot be sharpened using the transverse method, it may be damaged;
- sharpening is done diagonally, starting movements by hand;
- processing is carried out with minimal pressure;
- At the end of the work, wipe the base with a napkin (you can also apply lemon zest to extend the life of the knife).
Knife care
For a knife to serve for a long time, it must be properly cared for. Be sure to clean the product after each use. After washing it should always be wiped dry! The blade should be lubricated with castor oil after cleansing, but there is no need to apply it too much. Castor oil dries quickly, so it must be left on the blade with active air access until it dries completely.
It is better to store the knife outside the sheath, preventing the ingress of water. In order for the design to remain beautiful for a long time, do not allow acids or alkalis to come into contact with the blade.
Tips and tricks
Despite the strength of the steel, the knife can be damaged and the sharpening can be ruined. To avoid such consequences, the following prohibitions must be observed:
- do not chop animal bones (carefully cut the carcass at the joints);
- do not cut metal or other too hard products;
- do not open cans with a knife;
- do not throw a knife at trees or other targets;
- do not replace a screwdriver, hammer, or other tools with a knife;
- try not to bend the blade.
How to Remove Rust from Damascus Steel Surface
It happens that corrosion appears on the surface. It should be removed immediately after detection. This is done using fine-grain sandpaper, while simultaneously wetting the product with kerosene.
The use of castor oil and polishing paste with abrasive additives is allowed.
After rubbing off the stains, you need to pay closer attention to caring for the product so that rust no longer appears on it.
Damascus knife: product features
The surface of the product is also original - it is visually heterogeneous due to the patterns that are formed during manufacturing. There are two types of Damascus steel that are used to create knives:
- welding - obtained by repeated forging of a steel package;
- refined - during smelting, harmful impurities are evaporated from it.
Every housewife dreams of getting a knife made of this metal: it is ideal for the kitchen as a cutting knife. There are also hunting, fishing, and camping knives on sale, which are valued by professionals. Expensive designer handmade products are usually bought as gifts; many of them are made to order, complemented by handles made of precious wood.
You can't buy Damascus knives cheaply. For example, Japanese Yaxell brand knives cost 12,000-22,000 rubles. A folding knife Samura can be purchased for 3000-5000 rubles, a folding knife from the workshop of Sergei Marychev - for 2500-5000.
Yakut knives or simply “Yakuts” (Russia) are very popular. They have a characteristic feature - the asymmetry of the blade. In combination with a birch handle, such products do not sink in water due to their special design. If you buy a knife from the manufacturer, you can find it for 3,000-10,000 rubles.
According to reviews, Kizlyar knives with a straight blade are also good. Their advantage is in the applied grooves, which make the “kizlyar” lighter. For hunting and fishing, they often buy knives with a hook blade, which are very convenient for gutting animal carcasses and large fish. How much does such a thing cost? The price can reach 6,000-30,000 rubles depending on the brand.
Damascus steel products have their pros and cons. They need to be properly cared for: due to the presence of carbon steel in the composition, rust may appear on the surface. The simplest preventive measures will help you avoid such trouble.
Making a knife from Damascus steel
You can make a Damascus knife with your own hands. To do this, you need to familiarize yourself with thematic photos, videos of how such blanks are made, and also select all the necessary devices and consumables.
Materials and tools
To create a knife, you need to prepare the following materials:
- plates made of carbon steel of two grades (the higher the carbon content, the better the blades);
- borax (sold in hardware departments);
- rod for welding a knife blank;
- quick-drying epoxy glue;
- brass rivets;
- ferric chloride;
- vegetable oil for steel hardening;
- wood for the handle.
You will also need a number of tools for the job. First of all, you need an anvil. It is better to equip a real anvil, but a piece of rail or a large metal sledgehammer will do. You also need a heavy hammer (1-1.5 kg in weight) and a forge capable of maintaining a high temperature. Other required equipment:
- welding for welding plates, securing reinforcement (wire can be used);
- a belt-type grinder (if you don’t have one, a file will do, but the work will take a long time);
- oven, other heating device;
- drill or drilling machine;
- vice.
Assembling the knife blank
First, you need to create blanks and cut steel plates to the required length. Beginners are advised to make small blanks, since it will be more difficult to create a knife from large ones. Welding areas must be cleaned of scale and corrosion, and plates must be laid with alternating metals by grade. There can be 3-7 or more plates in total. Then the following actions are performed:
- align the plates;
- grab them by welding;
- weld a piece of reinforcement to the workpieces as a handle;
- Instead of such a handle, you can use ordinary pliers.
First forging of a knife stack
In addition to a real forge, you can use a homemade one made from an empty gas cylinder. The inside of the cylinder should be lined with a layer of kaolin wool and fire-resistant cement. You can heat up any forge using a gas burner. If it is small, then heating occurs quickly. Afterwards the actions will be as follows:
- put the knife blank into the forge;
- heat the future knife until red-cherry color (at moderate heat);
- sprinkle the workpiece with borax so that it melts and “saturates” the plates (this is required to remove rust, prevent oxidation, and improve the cleanliness of the steel);
- clean the protruding scale, repeat heating again after a while;
- if necessary, duplicate all actions.
Next, the workpiece is heated to a higher temperature - forging (about 1300 degrees), and the metal becomes bright yellow. They begin to forge the plates together with blows of medium power. Afterwards, the knife blank is pulled out for bending.
Bending the workpiece
A stack of plates must be forged to a length equal to two lengths of the future knife. It must be stretched evenly so that the thickness remains approximately the same over the entire area of the product.
Using a chisel, a transverse recess is made in the center, slightly not reaching the bottom edge (not the entire thickness). Then the knife blank must be bent in half along the mark made, turned over, and forged along the length. The halves should match well at the edges.
After bending, heat up the future knife again, forge it, sprinkle with borax, and let cool. Then stretch and bend again. The goal is to get more layers to create an original drawing. To calculate the number of layers sufficient for a particular knife, you can use the formula:
initial number of steel sheets * 2 * number of bends (usually 3-4). At the end of the work, place the knife blank in the groove of the anvil, twist it, then forge it again to a rectangular shape.
How to make a small knife from Damascus steel (without a mechanical hammer)
Translated by SaorY for mozgochiny.ru
Greetings to all brain crafters ! After almost a year of “communication” with a hammer and an anvil, I finally acquired the necessary experience and tools to create forged crafts , such as the small “Damascus” knife from this brain article .
And I started, by the way, with a small sledgehammer as an anvil, which I hit with a small hammer.
Now we will talk about creating a small, forged, not carved, knife with your own hands using a homemade forge, anvil, hammer and determination. I don’t pretend to be a professional, and this is certainly not the only way to obtain welded Damascus; this is the story of how I managed to make it.
Damascus steel today is called welded Damascus, obtained from welded metal plates of various brainsteels , subsequently forged and twisted. It's like molding different colors of plasticine together and twisting it to create a wavy pattern.
After forging, such a workpiece is subjected to etching, in which the dissimilar metals of the workpiece are eroded unevenly, thereby creating a beautiful contrast.
The original Damascus steel is obtained in a different, very specific way (although it looks similar to modern Damascus), and few people know how to create it; this fact has given Damascus a reputation as a metal supposedly endowed with magical powers.
And the reason for this “power”, similar to samurai swords, is a process that makes it possible to obtain a more homogeneous, and therefore with the desired qualities, steel, which cannot be achieved in other ways, and makes it possible to include low-quality and high/low carbon steel in the workpiece. Which results in a much better quality blade.
!!! ATTENTION!! A knife can be dangerous, please do not give it to people with mental disorders!!!
Step 10: Tempering the Metal
Tempering is the process of imparting some hardness to a blade to increase its life and strength. This is achieved by heating the blade at a certain controlled temperature. my brainwork in the oven for an hour at a temperature of 205 degrees Celsius. “Bake” until “ready” appears on the display.
Step 11: Etching
I apologize in advance for the lack of photos of this and the next steps, but the process is quite simple.
the instructions supplied with it , and then the blade is kept in it for as long as indicated in the same instructions.
In my case, it's 3 parts water to 1 part ferric chloride, and let it sit for 3-5 minutes. The process is truly exciting, and the result looks like Batman's knife.
Step 12: Handle and Sharpening
Again, there are many techniques and instructions on how to make a knife handle and sharpen it, so I’ll do without the brainy details .
Let me just say that for my craft I chose cherry dies, which I glued to the handle of the knife using epoxy glue and secured with two brass rivets.
I sanded it with 400 grit and coated it with linseed oil.
For sharpening, I do not use any special, labor-intensive method, but mostly use a regular whetstone.
KnifeHelp / Etching damask steel
Damask steel pickling by Greg T. Obach
Taken from knife2002
This article is about how to identify the pattern of damask steel. Without etching, damask steel looks like ordinary steel. Only through etching can the inner beauty of this steel be revealed. Damask steel is in two phases in the blade, it is very important that the etching carefully shows the boundaries. Often the etching is chosen incorrectly and eats up too much, blurring the boundaries and making the drawing appear cloudy. The acid concentration must be matched to the steel so that it selectively eats away the steel matrix and leaves the carbides clearly visible and neat. However, of course, ideal etching only reveals the structure of the metal and the pattern ultimately depends on the damask steel itself, that is, a poor quality pattern is not guaranteed only by correct etching, the damask steel itself must be good. Well, let's start by preparing the surface of the blade.
Surface preparation
After the blade has been hardened, it must be well polished before actually cutting. The blade is polished with aluminum oxide sandpaper numbers 320, 400, 600. To sand, use an oak flat block and first rub it at 45 degrees in one direction, then at 45 degrees in the other, and finally along the blade. It is necessary to moisten the blade with oil so as not to burn the blade - I use corn oil, changing it as it turns black.
Solution
It is extremely important to choose the correct etching compound that produces the best possible design. I use a compound called Nital. My version of this is dilute nitric acid, distilled water, and some rubbing alcohol from the drug store as a drying agent. The acid concentration is very small and I determine it on a small amount of the mixture and a damask steel test strip. I watch the test strip - the pattern should appear within 10 seconds and after 30 seconds it should be clearly visible. A common mistake is the assumption that the longer you keep the blade in the solution, the better - overexposed damask steel will be cloudy with tiny but noticeable pits scorched by acid.
Etching
The first step is to degrease the blade - the surface should be perfectly clean. If even a little oil or fat remains, stripes and stains will appear on the blade - the whole design will go to waste. The blade should be rinsed under running water with dishwasher detergent and immersed in a bath of TSP (trisodium phosphate) then rinsed under running water one last time with dishwasher, but without touching the surface with your fingers... rinse again under running water without touching with your fingers and allow to air dry.
Chemicals used in the process and blades prepared for pickling
A clean blade is observed in solution.
The blade is placed in the solution; the etching process must be carefully observed. You need to remove it after about 30 seconds, or sometimes for problematic blades, until a satisfactory pattern appears. But you should not wait until the blade becomes completely black, otherwise both phases of the blade will become equally etched. The blade removed from the acid should be immediately placed in a jar of TSP and stirred vigorously, then immediately rinsed under running water to remove the TSP.
Have a light paper towel ready, soak it in rubbing alcohol, and quickly but lightly rub it over the blade. This is a drying agent and it is very important to immediately rub the blade with the drying agent under running water! Rust will form on the blade very quickly if this is not done quickly enough. If the drawing turns out weak, you can try to re-etch it immediately.
Here are the results:
The third knife showed some problems during the etching process. On one side of the blade, the pattern formed was not contrasting enough, and I believe this is due to the fact that this side overheated during sanding. The blade will be reground and I hope that the drawing will be normal.
Note that my acid solution has depleted and turned orange. If you continue to etch with this solution, it will still work but will give the matrix the same orange tint, which is unacceptable, the solution must be changed. Perhaps there is a way to get rid of this orange color, but I don’t know such a method yet.
All the best, Greg T. Obach