Self-production technology
Making tiles from broken glass will not be difficult once you have the right ingredients.
This manufacturing technology is considered easy compared to conventional tile production, where the material is cast in large sheet molds and cut into small segments. The process can be divided into the following stages:
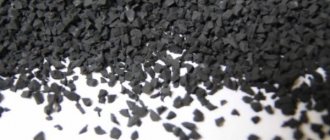
Processing of broken glass - at this stage it is necessary to place the existing broken glass into the apparatus, or, in the case of a small amount of material, break it manually with a hammer
Don't forget: the finer the glass powder, the easier it is to color. Mixing components - when producing glass tiles yourself, it is important to maintain the correct proportions. Experienced craftsmen recommend adding about 50–70 grams of resin to 1 kg of glass.
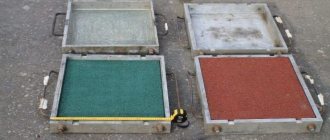
In addition, at this stage, dye is added and everything is thoroughly mixed. Placing the mass into molds - the finished mixture of glass and adhesive component is poured into clean tile molds. Glass tiles cure over a certain amount of time, depending on the manufacturer of the polyester resin.
Production technology
The production of glass tiles is a completely simple matter if you have the necessary equipment and the right raw materials. The entire technological process consists of the following stages:
- Glass waste processing. At this stage, the existing glass waste is placed in a crusher and thoroughly crushed.
- Mixing components for raw materials. At this stage, it is extremely important to maintain the correct proportions of the mixed components. It is recommended to mix: 1 kg of cullet; 50 grams of polyester resin; 30 grams of hardener for the binder; The dye is added individually, depending on the desired final color of the tile.
- The stage of removing air bubbles is also important. This can be done by heating and subsequent vibration of the molds, but, as mentioned above, it is better to use a vacuum unit. The mixture is treated with a vacuum before pouring into molds.
- Pouring the resulting mixture into molds. Before pouring the mixture, the molds must be washed to remove residues from previous production.
- Freezing. The tile hardens within 1-2 hours, which depends on the brand of resin and the strength of the hardener.
Important! The smaller the fraction of crushed cullet, the better the color of the tile and the better its appearance.
Glass tiles (cullet fraction 1 mm)
How to start your own glass tile business
Tiles made from glass waste have high aesthetic properties, and this appeals to many users. Satisfied customers will definitely recommend the purchase of such tiles to all their friends, which will be excellent and free advertising (word of mouth). You should also carefully think through your marketing strategy so that there are no problems with selling your products.
How to develop your own business and start selling finished products
Thanks to the work done, you can count on attracting your first clients. Organizations and private individuals who are interested in tiles will probably want to buy a trial batch. In view of this, it will be necessary to make tiles to order, and production volumes will gradually increase.
In addition, you should definitely do economic calculations:
When developing a marketing strategy in order to promote tiles made of broken glass and resin on the market, you first need to focus on the following categories of consumers - lovers of hand-made goods who want to add originality to their homes and apartments, as well as buyers-wholesalers who can be found through profile sites. Very often, Italian tiles are used to create original paintings and patterns of varying complexity. Due to the fact that such tiles do not have a back, unpresentable side, they are often used as a material for creating stained glass windows and interior decoration. This will also help expand the consumer audience.
Is it worth it to produce Italian tiles for sale?
Italian tiles of good quality will always enjoy steadily increasing consumer demand. Products made to order with non-standard sizes, shapes, and the presence of unique patterns on the surface can be priced higher. If you choose this line of business, then after a while you can receive large and stable profits.
Consumers are always excited about unusual and new products, so you can expect to receive a large number of orders. The use of this technology makes it possible to produce glass hollow blocks, facing bricks, original and incredibly beautiful stained glass windows, lamp shades, souvenirs, advertising products, frames and other things. You can implement the most unusual projects, the implementation of which will be an excellent guarantee for receiving good income in the future.
Mosaic glass as a material for the creative process with your own hands
- Needlework
- Mosaic glass as a material for the creative process with your own hands
Among the various creative trends, the top ten has recently been supplemented by the composition of mosaic glass. Modern methods and materials make it possible to create mosaic canvases that are durable, colorful and practical.
It’s worth turning your attention to mosaic glass, which is used to create panels of varying complexity at home.
As a result of a fascinating creative process, a waterproof coating will be created that can be safely used for interior or exterior decoration.
The history of mosaic
Mosaic as a form of creativity dates back more than 6,000 years.
This fact is confirmed by fragments of the floor and walls discovered during excavations of Sumerian temples.
In Ancient Greece, mosaics were laid using river pebbles . Despite the meager range of colors, craftsmen created beautiful patterns on the floors of homes even from gray stones.
Ancient Rome had a special love for mosaic tiles. It was in this country that people began to willingly create bright paintings from broken glass, which were durable, matte and colorful. The name of this mineral is smalt .
Description of mosaic glass
When the term “mosaic” is mentioned, many people imagine beautiful stained glass windows of foreign cathedrals. But we hasten to immediately dissuade readers that the technique of creating stained glass and colored glass mosaics are significantly different.
Colored glass for mosaics can be of two types:
- glass modules;
- smalt.
The appearance of smalt is disc-shaped. Immediately before the creative process, the disc is split into pieces.
Smalt is used mostly by professionals to create high-end mosaics. It does not have a transparent, but rather a matte structure.
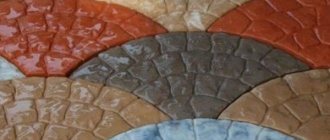
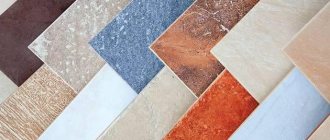
Broken glass tiles have quite a decorative and colorful look to fit into a modern bathroom interior.
For those who are just getting involved in this creativity, it is worth turning their attention to the modules. These are colored fragments glued to a paper base or packaged in plastic containers. Glass fragments can be of various geometric shapes and sizes. It is more convenient and safer to work with such modules.
What materials are used to make glass tiles with your own hands?
To make glass tiles with your own hands, you will need:
- Glass (bottles, window glass, broken cans)
- Polyester resin - for bonding all particles without heating and burning, it is inexpensive
- Paints with adhesion – for the production of different colors of tiles
- Hardener - add if you want the tile to harden within 1-2 hours
- Concrete mixer or crusher - for crushing glass pieces
- The form into which we will pour the liquid mixture will then turn into a tile, maybe made of plastic, metal or plaster, store-bought or home-made
The main raw material for DIY glass tiles is glass
Glass tile production: industrial equipment and do-it-yourself manufacturing technology
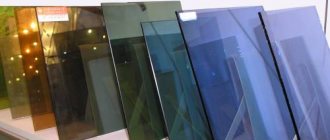
Glass tiles are a stylish solution for modern interior design .
The facing material is low cost.
The raw material for the manufacture of products is glass waste, and the organization of tile production itself will not require significant investments, and the technology is quite simple.
Let's take a closer look at how to set up the production of glass tiles for commercial purposes and for your own needs.
We analyze the “Positive” version of glass mosaic in MK
During “positive work”, the pieces of glass are immediately installed where they will be located. It is most convenient to use this method when decorating the floor.
First, prepare the surface and all the necessary materials.
If the mosaic will occupy a very large surface, then it will be plastered in parts.
Particular attention is required when laying mosaics on still fresh plaster. The work is very painstaking and long, requiring patience and attention. With all this, you will have to try to hurry, because when the plaster dries, it loses its adhesive ability and hardens. Sometimes it is worth adding a retarder to the plaster solution to delay the setting time of the composition.
Pieces of glass or mosaic are placed in a fresh cement or plaster bed while maintaining the positivity of the image. High-quality work should demonstrate a perfectly flat surface. You can seal the seams using the same methods as with “negative work”.
Important: Of course, mosaics can be made not only from glass. For example, a do-it-yourself eggshell mosaic will perfectly decorate the interior of almost any room.
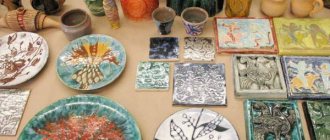
Look at the photo - what amazing panels you can create yourself from shards of broken glass:
How to make tiles from glass waste
The technology for making glass tiles is simple, so you can make a similar material at home. The so-called “cold” production method means that no components need to be heated or melted. Glass waste is useful for making tiles, which means the finished product will be economically profitable. Briefly, the whole process can be divided into several stages:
- First, molds are prepared for the production of tiles from broken glass, the glass itself and the binding component are prepared.
- Glass waste is crushed into small fragments and mixed with a binder.
- Dye is added to the mass and also mixed with the other ingredients.
- This mixture is poured into molds where it finally hardens.
- Then the material can be divided into parts that are more convenient in size.
Glass tiles made by yourself will be unique and inimitable, and in quality they will be able to compete with Italian analogues. At the same time, it will cost you much less, because its cost is relatively low, and you will not incur any additional expenses.
Let's consider what materials may be needed to produce glass tiles:
- Waste glass, the main component of the material, can be obtained free of charge, for example, from glass workshops or window manufacturing companies. In extreme cases, if the waste is not given to you for free, it will be sold for a symbolic price.
- It is convenient to use polyester resin as a binding component, the price of which is also very reasonable. For 1 kg of broken glass it will take approximately 50 g of resin.
- Those who decide to produce tiles in large quantities, for example, for sale, will have to acquire an electric glass crusher. You can either make the device yourself or buy it in a specialized store.
- To tint the material, you will need appropriate dyes. They will help to color the tile even at the stage of mixing the components, so its entire thickness will have a certain tone that will not fade in the sun.
To produce tiles for sale, it would be advisable to find suppliers of raw materials. Working with polyester resin also has its own subtleties. It is known that the material hardens quite quickly - within an hour, and during this time you need to have time to mix the components and pour them into molds.
During the work process, small air bubbles often form in the thickness of the material. If you want the tiles to be free of them and the structure to be uniform, purchase a vacuum unit. The molds with the mixture are placed in such an installation for 2 hours, after which the high-quality material with a homogeneous dense structure is ready.
According to rough estimates, equipment for the production of tiles costs more than 3,000 rubles; for reusable molds you will also have to pay from 200 rubles per 1 m². But the tile manufacturing process itself is quite fast, as is the payback of such a business.
Raw materials
There shouldn’t be any difficulties in collecting raw materials. You can either find broken glass for free or organize a small collection point. Over time, even regular customers will appear for the delivery of glass for a small fee, who will uninterruptedly supply you with the material. There is also a third option, if you don’t want to work with a certain contingent who will be ready to collect glass for you. Contact companies that manufacture windows. Usually such organizations are ready to give away broken glass even for free, because you will also remove it yourself.
The basis of the binder composition in most cases is polyester resin. The material itself is inexpensive. And in terms of quality it fits perfectly. It is also used in the production of porcelain stoneware products.
Thanks to this composition, the resulting tile will be resistant to impacts (within reason, of course) and is perfect for, for example, tiling kitchens, bathrooms, and even for external use. And glass chips will allow the material to look advantageous and shine beautifully in the sun.
Why recycle glass?
It is necessary to hand over glass bottles and cullet to collection points for further processing for a number of reasons:
Glass is not biodegradable. A simple glass soda bottle has a decomposition time of 1,000 years or more. It is clear that without the disposal and recycling of glass, our entire planet would be completely filled with glass waste in a short period of time. Glass products are fragile; broken glass released into the environment poses a threat to both animals and people. Glass-contaminated soil is unfavorable for vegetation growth. Reusing glass containers and cullet allows you to save natural (exhaustible and non-renewable) resources. For example, using 10% broken glass helps save gas by 3%. If a person engaged in the production of glass products uses only broken glass in his enterprise, he will thereby reduce gas consumption by 30%. In Russia, a relatively small proportion of glass waste is recycled
But even this amount of recycled waste ensures the conservation of about 10,000 hectares of land that could turn into huge landfills. Glass containers and cullet are completely recyclable materials, that is, glass recycling is waste-free, which is extremely important for protecting the environment from the negative influence of industrial and other enterprises. In addition to natural gas, the reuse of this type of waste allows saving more than 1 ton of materials used in production such as limestone, soda, sand. People who hand over glass containers to collection points receive money for it.
Important! Glass recycling is necessary, first of all, to protect our environment, to save natural resources and to produce glass products and materials cheaper
Business idea: making money on glass
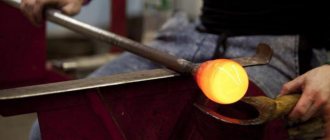
When the conversation turns to the production of glass products , many people immediately think of fusing. This technology is presented as something innovative and simple at the same time. With its help you can get cute trinkets almost at home. At the same time, there are many other methods and ideas for working with glass. Moreover, we are not necessarily talking about melting glass in special furnaces where high temperatures are reached.
“Glass has more advantages than plastic, which they wanted to replace this material with a history of thousands of years,” says business angel, startup community expert K.E. n. Associate Professor Igor Malyugin. “In my opinion, the following technologies that can be implemented in a small business are of interest: the production of mirrors, the processing of glass to look like crystal, the protection of glass from mechanical destruction, the production of glass tiles and much more.”
Glass paintings
The easiest way is to use specialized printers, for example, Italian Praktika or VitRex, to print any digital image on glass.
The whole highlight lies in the ink, which, when hardened, becomes resistant to high and low temperatures and moisture, fading under the influence of ultraviolet radiation, and, most importantly, to mechanical stress.
Such equipment is not cheap, so a DreamJet 329 Miracle can be purchased for 275,000 rubles including VAT. The format of the resulting glass paintings has dimensions of 329×600 mm, which makes it possible to print triptych paintings.
Manufacturers are concerned about speeding up ink drying and making it easier to fix the glass. For this purpose, the printers are equipped with integrated heating and vacuum clamping. As practice shows, these innovations are very convenient to use.
And, importantly, to work on this equipment you can use almost all graphics programs, including such popular software as PhotoShop, CorelDraw, Illustrator. “The quality of such a picture turns out to be decent,” says cameraman Andrei Gorshkov.
Sequence of work
Having prepared everything you need and selected a glass object to apply the image, you can get to work. First of all, you need to measure the stencil and mark its future location (for example, using masking tape or a washable felt-tip pen). After all, when glue is applied to the film, it will be much more difficult to proportionally place the design on the glass.
Having marked the surface, it should be wiped dry and treated with alcohol.
After degreasing, fingerprints must not be left on the glass surface. This will result in defects appearing on the decorated surface or distortion of the matte design.
At the next stage, the stencil is placed face down on a clean sheet of paper and covered with glue. If the stencil has a self-adhesive base, then this procedure should not be performed.
The glue is applied in a thin layer - in accordance with the instructions. Then the stencil is placed on a pre-marked area of the glass surface, covered with a clean sheet of paper and carefully smoothed with a napkin or rag. The paper will help maintain the integrity of the stencil and ensure its reusability.
The key point of the presented sequence is the application of matting paste to the stencil.
Once on the glass surface, the matting paste instantly enters into a chemical reaction with it.
Therefore, it is important to protect from small drops those areas of the glass that are not covered with a stencil.
The paste is applied to the drawing in a continuous and even layer. The thickness of the layer is not particularly important, but, as a rule, it is 4...5 mm.
The duration of matting should correspond to the recommendations of the matting paste manufacturer (usually the process lasts 15 minutes). After waiting the recommended time, you can begin removing the stencil. The action is carried out in several stages:
- We collect excess paste from the surface of the stencil back into the container. Considering that the paste is reusable, you will still need them.
- Wipe off the remaining paste with a dry cloth.
- Without removing the stencil, wash off the remaining matting composition with plenty of water. The most effective way to wash off the remaining paste is with a stream of running water, but in extreme cases, a filled five-liter bottle will do.
That's all. You can remove the stencil. After completing the above steps, the image will be permanently imprinted on the surface of the glass.
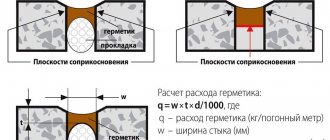
Grouting joints
The design of mosaic seams requires step-by-step work, since the durability of the decorative grout directly depends on the depth of the installation layer:
- make a mixture of liquid consistency from the adhesive solution used during the installation process and water;
- treat all gaps and joints with the solution using a rubber spatula;
- after the surface has dried, apply decorative grout with the desired color pigment;
- after 2-3 hours, carefully remove excess material from the cladding with a damp sponge.
Tile mortar
A solution for working with ceramic and tiles is available in every hardware store. Give preference to light shades - this makes it easier to evaluate preliminary results.
For cullet, use a light or transparent solution; it will be visible under the fragments. In some cases, a little foil is placed under each piece of colored glass to make the mosaic sparkle like precious stones.
The finished solution is applied to the wall with a small spatula from a corner or central area, where it is more convenient to lay out the panels. Each fragment is pressed a little into the solution so that it adheres well.
Preparatory work
Before painting the cladding, you need to remove the remaining cement adhesive and excess grout from the surface with abrasive materials. The fallen tiles are glued to cement glue or liquid nails and left to dry completely. If they are lost, you can replace them with tiles of a different color. Chip tiles also need to be replaced.
Glue the old tiles in place and grout the seams
See also the article: how to update old tile joints.
Try to maintain an even distance between seams by inserting plastic crosses or matches into the seams.
The surface is degreased using acetone, alcohol or solvent.
Apply Tikkurila Otex primer with a short-haired roller and leave it to dry for 12 hours. It is white in color, so it will partially help hide the old color of the texture.
Tikkurila Otex primer
A little history
The truly ancient Sumerians were the first to reveal their mosaic patterns to the world. They laid out ornaments from baked clay pyramids on an unfired clay base.
Their initiative was intercepted by the ancient Greeks: they invented smalt - dense and viscous glass that could be chipped in a frozen form without cracking. The Greeks laid out their mosaics from its fragments, sintering multi-colored fragments around the perimeter and into layers along the thickness.
As for the name, the Romans gave it to the mosaic, having adopted the art of folding fragments from their Greek neighbors. It was they who gave the glass masterpieces the name “opus musivum,” which translated means “a work dedicated to all the muses at once.”
Then Byzantium took over the baton of development of mosaic art. Its masters made a significant addition to the layout technique: the background and large images began to be designed with intersecting arcs. At the same time, the drawing lost its “pixel quality” if you looked at it from a certain distance, and became similar to an ordinary one, only more voluminous and “live” a picture.
During the Renaissance, mosaics began to be actively studied again in Italy. And the craftsmen of this country achieved the highest results in its production. In Florence, a new installation technique was invented, thanks to which mosaic images gained perspective. And here a unique binder was developed that holds the mosaic parts incredibly tightly.
During the Rococo period, mosaics became Frenchized. And it was the French who began to lay out panels of shells, beads (porcelain, earthenware), beads, using the “reverse laying” technique, in which the elements were first placed on wax paper and only then transferred to the prepared base. The works “a la francaise” turned out soft, precise, with tints of halftones. Using this technique, it was possible to decorate curved and/or small surfaces with mosaics.
In Islamic countries, masters who laid mosaics could not depict something living in their works (like artists working in other techniques), but they brought mosaic patterns to perfection and began to use new materials to create them: ceramics (tiles), eggshells, etc.
As for the “Russian mosaic”, it is inextricably linked with the name of the great scientist M.V. Lomonosov (although many experts are confident in the existence of ancient Russian mosaics, destroyed during the Mongol-Tatar yoke). Mikhail Vasilyevich was not only a brilliant scientist, but also an extraordinary artist. He was seriously interested in mosaics: he developed new technologies for smalt smelting and founded a mosaic manufactory.
Production of glass cullet coating
Equipment for the production of broken glass tiles
Broken glass tiles are a budget option. To start the production process, it is enough to purchase:
- broken glass;
- glass crusher;
- polyester resins;
- polymer dyes;
- molding matrices.
What is the technology for making tiles from broken glass? First of all, it is necessary to produce a casting mass for molding. To do this you should:
- Mix 1 kg of cullet processed in a glass crusher with 50-70 g of polyester resins;
- To prevent the formation of bubbles in the mixture, use a vacuum unit;
- The finished composition is poured into matrices and left for some time until completely solidified.
Self-production of broken glass tiles
In the production of building materials, more and more types of raw materials are gradually used, not with the exception of steel and waste generated during the production process.
Making tiles from broken glass is not an innovation; this technique has long been used in Europe.
It is worth considering the basics of the technology, as well as the intricacies of independent production at home, this will help to understand the principles of the process.
The production is based on the principle of mixing finely crushed glass with special binders. The latter is polyester resin, which reliably glues the smallest particles of material.
Polyester resin is one of the main components in the production of tiles
Broken glass is obtained from waste that remains at large industrial enterprises after the production of other products.
Relevance of glass recycling in Russia
Glass recycling in Russia is a very pressing problem today. The amount of waste is constantly increasing, and the development of glass processing industries is poor. Therefore, a glass waste recycling business can be a solution to this difficult environmental and economic challenge.
Thus, recycling glass containers and cullet is not only an activity aimed at protecting our environment, but also a promising business, the development of which requires, among other things, government support. As a business, glass recycling is profitable and sustainable when properly managed.
Custom glass is an indispensable material in the production of tableware, building materials, furniture and interior items. However, glass has one big drawback - it is very fragile and crumbles easily. Large and small fragments have sharp edges that are easy to cut on. Once inside the human body, glass shards can cause bleeding, and glass dust that settles in the lungs remains there forever and leads to serious illnesses. Due to the great danger to human health, the disposal of glass fragments has certain difficulties.
Glass tiles: Revenues from production waste | Business Monitoring Agency
Among the options for creating a business with minimal initial investment, the production of glass tiles occupies a special place. Today in Russia more than 5 thousand entrepreneurs have successfully mastered this business. We are, of course, not talking about large glass factories, but about relatively small workshops operating under the guise of “IP” or “LLC”. As it turns out, such semi-handicraft production can bring its owner a very good income.
Market prospects
The growth of the Russian glass market today is estimated at 10-15%. It is no coincidence that foreign investors are increasing their production of glass and glass products in Russia every year. A striking example of this is the expansion of production facilities at Borsky Turkish. The demand for glass, including glass tiles, is stable. And coupled with the growth of the construction market (more than 20-25%), the prospects for this business look very rosy.
Of course, it is not easy for small manufacturers to compete with large players who have the opportunity to invest substantial sums in business development and promote products through established sales channels. “On the other hand, the risk of a small enterprise producing glass tiles is virtually minimal,” says Vasily Kurnakov, owner.
“Production costs here are negligible, the main thing is to find orders.” The owner of Dzerzhinskaya, who also opened a similar business “from scratch,” Ivan Smylnitsky, assures that “this business is available to everyone who has hands.” “I, in fact, developed the technology myself, after reading a couple of specialized magazines, and the quality of my products is no worse than the factory ones,” he assures.
Business registration
Running an unregistered business is a serious violation. The reason is that when making tiles from cullet, the raw materials are recycled, which means you need to have a license from the Ministry of Environment. It is usually issued for the entire life of the enterprise.
According to practice, it can take from 1 to 4 months to collect the necessary documents. You can get around these restrictions by a simple method - seek help from agencies specializing in this area.
Choice of legal form
In most cases, entrepreneurs form an LLC or individual entrepreneur. If you have a free amount of money to create production, then the best option would be to open an individual entrepreneur. When opening it, the costs will be significantly lower. You will need to pay a state fee - 800 rubles, and also have a personal stamp made to order - about 1,500 rubles.
When there are few “start-up” funds, it is better to open an LLC. The process of its creation is somewhat more complicated than that of an individual entrepreneur, but there is a plus - you can attract investors from outside.
OKVED codes
Regarding this type of business, such as the production of glass tiles, only two OKVED codes can be applied:
- OKVED code 38.11 - permission to collect glass waste.
- OKVED code 23.19.2 – production of pressed and shaped glass products permitted for use in construction.
Required documents
So, before you start making glass tiles, you need to collect a package of documents required for this. They will allow you to carry out your activities legally.
The following documentation will be needed (for both LLC and individual entrepreneur):
- Premises rental agreement.
- Certificate confirming the quality of manufacturing equipment.
- Permission from government services, such as the SES and the fire department, to carry out work that may cause harm to human health.
Areas of use
Making mirror glass tiles
The useful qualities of the material dictate the possibilities of using glass tiles in the decor of residential, office, and other premises. It is also extremely important that the material has a low cost, while being able to withstand large changes in temperature and humidity and is easy to maintain. That is why cladding is often found in areas where there are especially strict requirements for cleanliness: toilets, kitchens, medical institutions, preschools, schools, food outlets, restaurant kitchens and other rooms.
The variety of decorative options also expands the possibilities of using tiles. For example, in rooms with a lack of light and space, you can lay out material not only on the walls, but also on the ceiling, this will visually increase the volume of the room and fill it with light. Glass tiles with or without a pattern are successfully used in the kitchen (splashbacks); the material is suitable for tiling work areas, cabinets, as well as bar counters and, in general, any surfaces that you want to decorate and give individuality.
Pros and cons of glass tiles
As for the positive qualities of cladding, there are many of them:
- The ability not to “conceal” space, visually expanding it. Glass transmits light well, so even a dark room will be visually more spacious and brighter.
- The cladding visually “pulls” the room upward. This is true for rooms with low ceilings.
- The tiles are not afraid of moisture, therefore, if installed correctly, the material is recommended for rooms with high levels of humidity: bathrooms, kitchens.
- Glass tiles are not afraid of chemical and alkaline detergents; they can only be damaged by abrasives.
- Stability of shape and appearance - glass tiles are not afraid of sunlight, practically do not fade or deteriorate over time, so this coating can be considered almost eternal.
- Thanks to a wide range of colors, textures and textures, the decorative qualities of the material are also quite high.
Glass tiles are a unique material with which you can create any patterns, mosaic layouts and other decorative decorations on walls and other surfaces. The strength and practicality of the cladding is not inferior to the indicators that characterize tiles and artificial stone. But the material also has disadvantages:
- Fragility. The material tolerates minor impacts well, but with strong pressure or impact, the elements split and crumble.
- The need for a durable and high-quality frame for cladding is also due to the fragility of the material; moreover, if you choose tiles of thicker sizes, the overall structure will have a serious mass.
A minimum of disadvantages and a lot of advantages, to which you can add simplicity and low maintenance requirements, make glass tiles one of the materials in demand today for decorating wall panels.
Where are glass tiles used?
The scope of application of glass tiles is very wide. It can be found both in residential buildings and apartments, and in public premises. Very often it is used in rooms with “unfavorable” environmental conditions: in kitchens, toilets, bathrooms, that is, where there is high humidity and frequent temperature changes.
Glass tiles are a real salvation for tight spaces. For example, to add at least visual light and space to the room, the tiles can be laid diagonally and also used to decorate the ceiling. For a similar purpose, the material is also used in narrow corridors where there is not enough natural light.
A decorative strip of glass tiles looks beautiful in the kitchen; the material is also used to create kitchen backsplashes or complete wall or ceiling decoration. A design with such tiles will be stylish, elegant, and sophisticated. The material is also very relevant for those kitchens where there is a bar counter. Glass tiles can be used as the main facing material, or you can make them an elegant addition to the interior by laying out a stylish panel or mosaic pattern.
Design options with “glass”
Since there are no restrictions on the flight of fancy when creating a glass picture, using transparent film you can come up with and bring to life a huge number of ideas.
Color spectrum
Different shades are suitable for “broken glass” manicure. It looks good on both pastel colors and dark and bright nails. The use of light shades allows you to create a delicate look that can be recommended to brides. Dark colors look good in the cooler months, while bright colors are suitable for summer.
Photo gallery: “broken glass” on different backgrounds
Dark shades highlight the “shards” especially clearly. The combination of “cat’s eye” and “broken glass” looks original and attractive. In the summer, bright shades look harmonious. On light shades of varnish, “broken glass” looks gentle
Combination of different colors
For those for whom one shade is not enough, experts offer a combination of different colors on one hand or even on one nail. These can be related tones or, on the contrary, openly contrasting (for example, black and white).
Photo gallery: using several colors in “broken glass” manicure
The combination of cold and warm shades is also used in glass manicure. For those who like to attract attention, you can use sharp color contrasts. The use of several colors on nails emphasizes the originality of “broken glass.”
Geometric designs
If a woman prefers correct shapes, then for the “broken glass” design it is recommended to use pieces of film of a certain geometric configuration. You can cut triangles, squares, and diamonds yourself, or you can buy them ready-made.
Gallery: geometric nail art options with “broken glass”
You can create the most bizarre geometric patterns on your nails You can decorate only part of the nail plate with a transparent film You can lay out regular geometric shapes from the “shards”
Lunar manicure and French manicure have held their leading positions among designs for many years. For lovers of this type of nail art, masters offer to decorate a smile line or nail hole by applying “broken fragments.”
Safety precautions when working with homemade mosaics
Ceramic shards are very sharp and can cause injury, so safety precautions are the first thing you need to think about when starting to work with mosaics. To prevent pieces of tile from scattering in all directions, split it inside a large cardboard box.
Another proven method is to wrap the tiles in scrap fabric and hit them with a hammer several times. The tile should be held with your free hand.
After finishing work, you need to thoroughly vacuum the room to remove microscopic debris and dust.
By the way, dry mixtures are very dusty.
.
If you work with them, a protective mask will be useful. Before laying the mosaic, soak the tiles in water for several hours. Otherwise, the dry pieces will very quickly draw out all the moisture from the solution, making the adhesion fragile.
Crafts from broken glass
Let's consider two types of products: photo frame and panel.
To create a frame, prepare a fiberboard sheet of the required size, broken glass, paints (gouache/acrylic/ink), and glue. Prepare the background by painting the fiberboard, and once dry, insert it into the frame. Then draw the outline of the future design on the frame and stick the fragments along it.
A glass panel is made with your own hands in the same way as a mosaic. You also need to prepare a template and base, prepare the pieces of glass and stick them on as planned.
Using a similar technique you can decorate mirrors, boxes, tabletops, etc. The main thing is to carefully calculate the number of fragments needed.
How to make tiles from glass, cullet? Production of glass tiles: what technology?
Tiles made from broken glass are similar to Italian ones (the design is entirely up to you as the manufacturer), has good characteristics, is distinguished by good strength, resistance to mechanical stress and easy maintenance. But most importantly, such tiles have a very low cost.
As for the technological process for producing such tiles, it is much simpler than when producing tiles by cutting sheet materials and then applying decorative patterns. The algorithm for producing tiles from broken glass is as follows:
1 process the glass in a glass crusher,
2 mix the resulting raw material with polyester resin (per 1 kg of cullet - 50-70 g of polyester resin),
3 form with the mass is placed in a vacuum installation (to prevent the formation of bubbles),
4 the composition is poured into matrices and hardens after some time;
That is, to produce tiles from broken glass you will need:
- glass breaker,
- glass crusher (if desired, you can make it yourself, but for home needs a mechanical option will be sufficient),
- polyester resins (inexpensive material used in the production of porcelain tiles),
- polymer dyes,
- molding dies
the moderator chose this answer as the best
Technologically, the process is not complicated, it all depends on the volume of production (for yourself, or industrial production) and on the desired quality of the tiles.
In general the process looks like this:
A crusher in which glass cullet is crushed.
Polyester resin and dyes are added to the crushed glass cullet, the mixture is mixed and poured into pre-prepared molds (for example, plaster).
Everything is absolutely simple, but there are nuances, these are proportions and the search for the right color and the problem of “bubbles” in the mixture of broken glass and polyester resin with dyes.
That is, if you are interested in the quality of the final product, you need to purchase a vacuum installation.
Forms with the composition poured into them (see above) are placed in the same vacuum installation, bubbles are removed from the mixture under the influence (with the help) of vacuum, and then the finished product is packaged.
There are also ready-made lines for the production of glass tiles from combat.
Well, for yourself you can use a mechanical crusher and do without a vacuum installation.
You can make a glass crusher with your own hands,
it will be even cheaper.
Materials and equipment
Before you begin the process of producing glass tiles, it is important to prepare all the necessary components of this procedure. This includes a special binding resin, paint, a tool for crushing large particles of material, the glass itself and molds for casting tiles. Experts include the following materials as components of the working composition:
- Resin - polyester material is necessary for strong adhesion of broken glass pieces to each other. It is thanks to this component that the manufacturer will not have to burn the finished product - the entire fastening procedure will be performed by the resin. The cladding production technology must be under constant control: it is not recommended to allow the formation of bubbles during casting. Polyester resin has a low cost - 300 rubles per 1 liter. For home production you do not need a large amount of the substance.
- Dyes - compositions with a high level of adhesion are selected. When mixing paint with polyester and the glass itself, it is important to achieve the desired color: the finer the details of the material, the greater the chance of painting it more thoroughly. The production of glass tiles in industrial enterprises often involves the use of glass powder, which, when mixed with dyes, evenly acquires color. At home, it is difficult to achieve such a fine dispersion, so it is worth making sure that the filler covers all the particles.
- Glass crusher - a special unit is used in production, into which glass cullet is placed, after which the internal crushing elements rotate and the glass is crushed. Making tiles at home does not require such an industrial apparatus, so it is worth considering the option of constructing such a tool yourself. In addition, you should purchase a household shredder. It is made on the basis of a hammer mechanism.
- Cullet - getting this material is not difficult. To do this, you need to contact factories and workshops for the production of windows, glassware or other products. Manufacturing waste can be given away free of charge or for a nominal fee. An option that involves breaking glass with your own hands, for example, from used bottles, will not bring quick results.
- Casting molds - made independently or ready-made solutions made of plaster or plastic are taken. There is no need to worry about the material of the containers, because casting occurs in a cold way, therefore, there will be no heating and the mold will not react with binders.
Glass cullet processing lines
The simplest, from the point of view of the technological cycle, is a mini-plant for the production of cullet. This is the best option if you have a limited budget. The mini-plant consists of the following units:
Operating principle of the cullet line
- station for placement and temporary storage of broken glass and defective products:
- loading and unloading machines;
- conveyor belt for transportation;
- electronic equipment for sorting raw materials by color;
- water installations for cleaning the culls from contaminants;
- electromagnetic equipment for determining metal particles in broken glass;
- crushers for grinding broken glass into a fine powder;
- packaging machines.
The cost of equipment for processing cullet produced domestically starts at 300 thousand rubles. Any set of equipment can be supplemented with elements that help expand the range of products, increase productivity and reduce the share of manual labor. Accordingly, along with the improvement, the cost will also increase.
On average, a mini-processing plant can process up to 500 tons of raw materials per hour. It is noteworthy that this is a waste-free production - absolutely the entire volume of raw materials is processed into powder. This is another advantage of such an enterprise.
Making mosaics
Now let's look at how to make a glass mosaic with your own hands. To do this you will need some tools:
- Glass cutter. The most common glass cutter is suitable when you need to cut a mosaic into square or rectangular pieces in a straight line. To cut out shaped parts you will need an oil glass cutter with a rotating head.
- Disc cutters. You can’t do without this tool, because with its help you can chop glass into small pieces at right angles.
- Breaker. This device will help you break off a piece of glass exactly along the line marked by the glass cutter. If the tiles have the correct shape, then you can purchase a breaker for straight lines, but there are types of tools designed for making curved splits.
Broken glass
The process of making tiles from a piece of glass cannot be called difficult, but it is an unsafe activity, so precautions must be taken, since small and sharp fragments may fly apart upon impact
A piece of glass needs to be wrapped in thick cloth, placed on the floor or table, and hit in the center with a hammer to break it. In this way, ray-shaped fragments are obtained, from which you need to select suitable ones, or adjust them to size using wire cutters.
Please note: Broken glass for mosaics is very sharp, so it is necessary to work with parts using rough construction gloves. When adjusting the tiles to size using nippers or a breaker, take care to protect your eyes from flying shards of broken glass.
Materials for creating “broken glass”
Finding homemade equivalents of shiny shards instead of those used for professional use is not so easy. Ordinary foil or mica for windows will not be suitable for manicure due to its large thickness, and glass manicure cannot be made from pieces of other similar textures. In specialized boutiques you can purchase suitable decorative elements to make the “glass” design look as realistic as possible.
Using foil
Particularly thin foil, more similar to gold leaf, does not thicken the nail plate and covers well with topcoat. Also, manicure foil follows the curves of the nail well and does not bulge when laying out the design. It is purchased in small rolls, so before you imitate broken glass on your nails, you will have to tinker with cutting out the “shards” for the applique.
Nail foil
The color range of rolls with foil is more than varied: additional prints, patterns, etc. For the effect of broken glass, it is better to choose foil options with iridescence without any patterns.
Film, polyethylene and cellophane
Extra-thin film for manicure has nothing in common with shopping bags, which are made from similar raw materials. Like foil, manicure films, cellophane or polyethylene are easily placed on the nail and repeat its shape. There are many shades among films. For the effect of broken glass, a transparent film with holography and shimmer is suitable.
Films for manicure
Among the materials chosen for “glass” manicure, the most popular is colored polyethylene (cellophane) with iridescent or pearlescent tints. It is easy to give it any shape, and it will also create a realistic effect of broken glass.
Gel polish application
To reproduce the shine of glass, ordinary gel polish will not work. As a basis, they take a single-color coating and paint on it the shards characteristic of broken glass with coatings with “cat’s eye” effects, holography, and lunar shimmer.
Varnish option for the “broken glass” effect
To ensure that the design of the glass pieces has clear contours, it is better to use stencils or auxiliary templates.
Holographic stickers
These nail design devices are very convenient to use. They literally stick to the nail, so you can quickly place the elements and correct their position if necessary. Holographic stickers can be shaped into any shape and then used for manicure. Among the color variety, it is better to choose options that match the tone of the main shade of the coating.
Holographic stickers for manicure
Stickers are convenient to use for the effect of large fragments on nails; small scattering is difficult to form. To do this, it is better to use other decorative elements.
Glass shards and mica
The most popular technique for nail design in the “broken glass” style is mica. It is available in convenient pieces of different shapes and sizes for instant application in nail art. This form of release is called fragments. After application, it really creates the effect that the nail is dotted with glass shards. Mica in its entirety can be successfully used for applications with large particles, having previously cut them out.
"Splinters" of mica
DIY clear glass tiles
To start producing glass tiles at home, you don’t need to buy expensive equipment at all. Manufacturing is possible with a minimal set of available tools:
- template for cutting;
- diamond glass cutter;
- awl;
- a piece of foam rubber;
- sandpaper with fine grain;
- a sheet of transparent glass;
- painting paints;
- nitro enamels of different colors;
- coarse sand is clean.
Now the production technology:
- Cover the prepared workplace (flat table) with woven material so that the glass does not slip on the surface.
- Prepare a template of the required shape.
- Install a stopper on the left side of the table to prevent slipping. The thickness of the limiter must be greater than the thickness of the glass sheet.
- Place the template on a glass sheet and cut out fragments to shape.
- Nail sandpaper to the block and sand the edges of the elements, then wash the tiles and dry.
- Now the tile blanks can be painted. The dye must be durable, adhere well and dry quickly, so it is recommended to use nitro-enamel type compounds used for painting road signs.
- There should be enough dye for all the workpieces, so you need to select a shade with a reserve. A liter can of paint is enough for about a batch of 30 tiles measuring 200*200 mm.
- The composition is applied with a foam sponge to the glass using the padding method. The layer is even, without gaps. Re-application is possible only after the first layer of paint has dried.
- Patterns can be applied to the painted facing material using a template or with a brush (it is better to apply the pattern with gouache, and then after drying you can scratch the image with an awl).
- After applying the pattern, the tiles are washed, and first they need to be placed in water for 20 minutes, then carefully remove the scratched paint and dry.
- The next step is to apply oil paint to the reverse side.
- Cover fresh oil paint with clean sand, position the elements vertically so that the drying sand falls off on its own, and the residue creates the desired surface roughness, which will provide better adhesion to the surface on which the tiles will be glued.
All you have to do is wait for the cladding to dry for 2-3 days and you can use glass decor to decorate any walls. Like tiles, glass cladding is placed on an adhesive composition.
Before you start making tiles with your own hands, it is important to decide on the shape and format of the elements. You can make both long fragments and small mosaic elements
And, despite the fact that home production does not require complex equipment for the production of glass tiles, it is better to take care that broken material does not get into your eyes, does not cut your hands, and other safety measures. In industrial workshops, tiles are coated with enamel, which is applied to the element and then fired at high temperatures, and pressed tiles made of tempered glass are also produced. But homemade batches are in no way inferior to industrial batches in quality, but surpass the latter in uniqueness and aesthetics.