Repairing the mechanisms of the flush tank is not particularly difficult, but to carry it out you need to at least get inside.
And here a snag may arise: you are surprised to discover that something is holding the lid from the inside.
If all your persuasion and even the phrase “open up, police!” uttered in a stern voice! the lid does not respond, we recommend that you read this article. In it we will talk about how to open the toilet tank and what not to do so that it can be closed again.
Reasons for removing the toilet lid
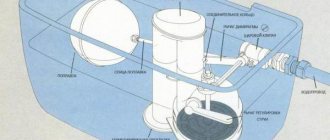
There is only one reason: this is a “strike” of mechanisms designed for two tasks - for collecting and draining water. First, the container is filled to a certain level, after which the flow stops due to the operation of the shut-off valve. When you press the button, the lever is activated, raising the locking device. Therefore, water again begins to flow into the empty container.
The relative simplicity of designs does not mean the absence of problems. The reason is the wear and tear of plastic and rubber elements, which do not have a long service life in an aquatic environment, so at some point they fail. Reasons requiring the intervention of a specialist or owners:
- inoperative water drain;
- liquid flowing onto the floor from under the tank;
- continuous flow of water into the toilet bowl;
- There is not enough water in the container; this indicates that the device is not adjusted correctly.
Problems with the water level or breakdown of any of the consumables require adjustment or prompt replacement of the failed part. Sometimes it makes sense to purchase a new set of fittings and replace the entire assembly, rather than a separate part of it. As a rule, such sets do not have a ruinous price, and the new mechanism almost completely guarantees the absence of problems. At least in the near future.
When may it be necessary to remove the flush plate?
The main elements of the installation - a steel frame and a built-in flush cistern - are hidden behind the wall. The only part that is outside besides the bowl is the drain button. It can be installed on a front or horizontal surface. Installation features depend on the location of the technological hole in the tank, through which the fill valve and drain fittings can be removed and installed.
Spare parts for toilet installation
from 240 rub.
Go to catalog
Installations from trusted brands last a long time and ensure trouble-free operation of the flush system. The tanks are equipped with a built-in overflow system. This means that if the fittings break, water will flow into the toilet, and not onto the floor behind the wall. But even with the best plumbing, over time, filters and hoses become clogged with dirt, gaskets wear out, and parts of the lifting mechanism or drain valve break.
Symptoms of a problem
- Water continuously flows into the toilet due to leakage or constant filling of the tank.
- The drain fittings do not work correctly - the flush does not work completely, only at a large or small volume.
- The tank fills very slowly or water does not fill at all.
To assess the situation, remove and wash the filter, replace the hose, inlet valve, flush mechanism or key parts, you need to disassemble and remove the button from the installation tank.
Features of new designs
The most popular type of such products remains “Compact” toilets, in which the tank is located directly on the shelf of the bowl. Previously, there were only two control mechanisms for plumbing fixtures: a ball (handle) connected to a bulb using a retractable rod, or a lever that was located on the side surface of the tank.
Disassembling the old-style design was a simple matter: you just had to unscrew the cap from the stem. After this operation, you can remove the cover without any problems. Now almost all existing models have another type of control over the operation of the device: these are the most convenient buttons. Tanks can be equipped with:
- one button, which provides for draining the entire volume of water at once;
- two buttons, or one key, but divided into two autonomous parts.
The first toilets are relatively simple, but their main drawback is the irrational use of water. The second option is much more complicated, but it has an undeniable advantage over single-button models. Such designs have a more complex control system, but they guarantee a quick payback for the toilet, because they allow the use of plumbing in two modes - normal and economical.
- If one button is pressed, the water is completely drained from the container.
- When the second one is pressed, only part of the water pours out. As a rule, this is half the volume.
Thus, a dual-mode unit makes it possible to save a certain amount of water, and this is important. High liquid consumption for household needs is a problem that grows along with utility bills. Two-button models allow you to achieve significant savings.
There is another variety that is not very easy to use. These are tanks that have two modes, but only one key. The dosing of liquid into them is ensured by different durations or intensity of pressing the button when the water needs to be drained.
Tips and tricks
Factory flush water volumes can be adjusted to suit your needs. The range of settings for barrel fittings is wide - from 4.5 to 7.5 liters for a large discharge and 3-4 for a small discharge.
The keys are selected according to size for a specific installation. If the conditions of installation, operation, and dimensions are the same, they can be replaced or used with a modified valve.
Please note that the malfunction can have different causes. If the water is constantly flowing, check the flush mechanism, gasket, bottom valve and lift if you have a pneumatic system installed. If the flush is not working, use the hoses and filter.
Thus, you can repair the installation by removing the button yourself, without involving specialists. But if you still need the help of a plumber:
Leave a request for a technician to visit you within the Moscow Ring Road for free
To other materials:
- Repair of Cersanit installation
- Do-it-yourself toilet cistern repair
How to remove the toilet lid?
A plumbing fixture that refuses to work is best left to a professional, but cleaning the tank or adjusting the fixture are operations that can easily be done without outside help. The dismantling procedure will not take much time, but to ensure that this conclusion is correct, you need to learn how to remove a toilet lid with a double button. However, before that, it’s better to get acquainted with how they “deal” with models that have simpler controls - just one mode. The reason is the slight differences in both operations.
How to remove a toilet lid with one button?
The good thing about old “toilet duos” is that any owner or housewife can easily and quickly get to the “filling” of the container. New models do not allow such “liberties”. Therefore, anyone who conceives of this operation must act according to a certain algorithm, which is no different for all manufacturers and all models.
In both cases, first shut off the water entering the container. To do this, close the shut-off valve located between the pipeline and the supply line: flexible or rigid. Then the tank is emptied.
- First, use a screwdriver to pry up the ring located around the button. After it moves from its place, the tool is removed to the side, turning the element counterclockwise with your hands.
- The unscrewed ring is set aside. Take the lid with both hands, lift it slightly, then carefully unfold it so that it is perpendicular to the tank.
This movement is necessary in order to be able to reach the clothespin that secures the button. Then the button block is carefully released from the plastic element, then the tank lid is removed and set aside.
How to remove a toilet lid with a double button?
Knowing how single-button models are disassembled, it is easy to understand how to remove a toilet lid with a double button. This procedure does not have any fundamental differences, but there are some peculiarities regarding the two keys.
- To disassemble the mechanism, first press one of the buttons. As a rule, it is smaller in size.
- On the inner side of the second part, a small slot is found into which a flat-head screwdriver is inserted.
- The button is removed, then the remaining key is treated in the same way. A slotted screw is found in the hole, which is also unscrewed.
- In a similar way, lift the tank lid, turn it across, then disconnect the fixing clothespin.
After all manipulations, the cover is removed and maintenance or adjustment is carried out. Then the results of the work are checked, after which the product is assembled in the reverse order. The procedure is almost the same for all toilet models. A problem may arise with unscrewing the fasteners located under the buttons.
For some manufacturers, these are ordinary elements that can be easily removed with a Phillips screwdriver. In some models, the usual fasteners are replaced with plastic nuts that require a special wrench. In this case, the problem can also be solved: the missing tool is replaced with ordinary pliers.
When there are problems with installation
These are relatively new plumbing fixtures in which the tank is hidden behind a wall, often made of plasterboard. Judging by the reviews of satisfied owners, such models in most cases work properly, and for years. However, no one is immune from accidental breakdowns. The best way out in such a situation is to seek help from a specialist.
In this case, in order to dismantle the cover, you will have to disassemble part of the wall. If the installation model has a two-button drain system, then it differs from most conventional outdoor appliances. Each button of structures built into the wall has its own pusher rod. For this reason, each of them will have to be disconnected. To remove the cover, perform several sequential steps.
- First, press the button from below, trying to gently pull it out using up and down movements. The fasteners are unscrewed with a Phillips screwdriver.
- Also carefully pull out the clamps, then remove the plastic pusher rods.
- Remove the brackets and dismantle the partition, which is fixed with special clamps.
- Shut off the water supply, dismantle the valve lever and the valve mechanism itself.
- Remove the latch by carefully bending the petals.
The drain valve is not touched; only the upper part of this fitting is removed. This type of work is relatively complex, so it is best to proceed with caution. First you need to study the model documentation. Many manufacturers supplement it with step-by-step instructions designed for correct installation of products. However, the best solution will always be to contact the technician who installed the built-in tank of the plumbing fixture.
Posts 6
Deprecated
: Non-static method Reputation_Hook_Dispatcher::vt_qr_get_posts() should not be called statically in
/var/www/decore/data/www/decore.ru/remont/viewtopic.php(320) : eval()'d code
on line
9
Deprecated
: Non-static method Reputation_Hook_Dispatcher::vt_row_pre_post_actions_merge() should not be called statically in
/var/www/decore/data/www/decore.ru/remont/viewtopic.php(491) : eval()'d code
on line
9
- Basil
1 Topic by Victor25 2013-04-09 01:51:51
- Victor25
- Participant
- Inactive
- Registered: 2013-03-18
- Messages: 121
Topic: How to open a GUSTAVSBERG toilet cistern
Hello! Please, help. Believe it or not, I’ve been struggling with the toilet for three days; I can’t figure out how to remove the plastic lid with the button from the tank. I've already crawled all over the Internet, to no avail. In the catalog on the manufacturer's website, all the covers only have round buttons that simply unscrew - and the problem is solved. And my button is square. How it can be removed is completely unclear. Now we are suffering with the bucket, it’s terribly inconvenient, but we can’t fix it...
Additional element checking
If there is a need to clean the tank from the inside, then it makes sense to combine this operation with an inspection of all structures. When a certain problem arises, such actions will also not be superfluous.
Checking shut-off valves
As a rule, the diagnosis of possible problems begins with it.
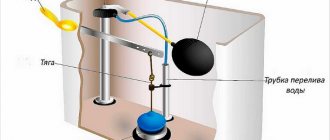
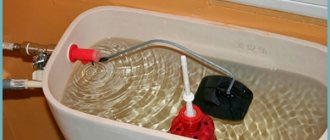
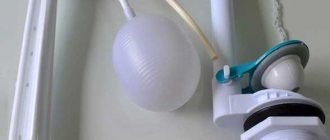
- The first thing to do is inspect the float. It must remain sealed and not have any external damage, signs of friction, etc. If any defect is detected, it is better to think about purchasing a new element.
- Checking the operation of the pivot arm that connects the float to the shut-off valve is the next step. The main requirement for it is smooth movement, the absence of any “anomalies” - both dips and jams.
- Checking the functioning of the shut-off valve is carried out as follows: first drain the water, then open the pipeline tap. With the float located at the bottom, the liquid should flow freely into the container. When the maximum level is reached, the valve should almost immediately shut off its flow.
If water continues to flow into the tank, then change the rubber seal or begin adjusting the position of the float lever. When water flows into the container poorly, clean the internal lumen of the shut-off valve.
Checking the drain system
Such an operation usually becomes a necessary step if any serious problems with the drain are discovered.
- First, check the condition of the plastic rod connecting the button to the drain shut-off valve. If its integrity is damaged or there is a defect, then this consumable requires replacement.
- Then check the rubber diaphragm of the siphon. Since the material does not withstand prolonged contact with water, its destruction over time is more likely to be the rule than the exception. The best solution in this case is to buy a new drain siphon.
A breakdown of the inner sleeve of this element also requires its replacement. Often the cause of malfunctions in the toilet is the ingress of debris and rust into the drain siphon. In this case, it is better to dismantle the mechanism, thoroughly clean it, rinse it with water and put it back in place. If this operation does not help, then the solution is the same - replacing the internal fittings with new ones.
How to dismantle the tank?
Sometimes such surgery may be required. However, even in this case, the master will not encounter insurmountable obstacles. Typically, the cistern is secured to the toilet shelf with two bolts. Their diameter is 5-7 mm. Another possible type of fastening is two threaded studs. On modern models, steel elements are no longer provided.
The tank is fixed on a ceramic shelf that has two holes that are coaxial with the same elements at the bottom of the tank. Studs are threaded through them. To connect the two parts of the toilet, rubber gaskets and nuts of the appropriate diameter are used. At the junction of the tank and bowl, a special seal is provided to protect the problematic joint from potential leaks.
To dismantle the drain tank, act in a certain sequence.
- Turn off the water, then disconnect the flexible hose or rigid line. The water from the tank is completely drained, then the lid is removed.
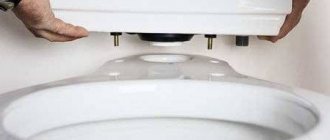
- Once the operation is completed, it is removed. Remove water from the bottom and walls of the container using a sponge or cloth. Then unscrew the nuts located under the toilet shelf.
The “freed” tank is carefully lifted, then it is transferred to another (convenient for work) place.
Disabling flexible line
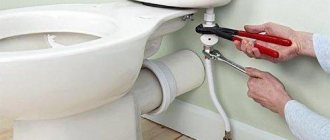
Regardless of the manufacturer of the tank and its novelty, the process of disconnecting the flexible connection is the same everywhere and requires only an adjustable wrench.
- Close the valve to the tank.
- Holding the float valve with your hand, unscrew the union nut with a wrench.
In some cases, instead of an unscrewed union nut, we get a valve that rotates relative to the wall of the tank.
The problem concerns primarily old domestic tanks with side connections and has two solutions:
- If the valve is plastic, or the tank is made of cast iron, we arm ourselves with pliers or a gas wrench and unscrew the valve with force. You can grab it either by the body or by the hexagon specially molded together with the plastic valve.
- The brass valve, which is mounted on a faience tank and does not want to unwind, is safer to cut off with a hacksaw. With great effort, the risk of getting a broken tank instead of a removed one is too great.
The plastic valve is usually removed easily and without incident.
