One of the reasons for toilet failure is water leakage from the cistern. The nature of this phenomenon has various causes, but in most cases you can eliminate water leakage yourself by carrying out repairs on your own. Indeed, in most cases, malfunctions are of a typical nature, which allows you to quickly find the problem and promptly fix it.
| 1. Water flows in the toilet after filling the tank 2. Water flows into the toilet after flushing 3. The tank leaks in the places where the bolts are attached 4. Leaks between the toilet and the tank mount 5. The tank flows on the sides or from the bottom to the floor 6. The toilet tank leaks from button 7. What should I do to prevent the tank from leaking? |
Water flows in the toilet after filling the tank
The design of toilet flush tanks is based on the principle of filling the vessel with tap water until the water supply valve is activated, which blocks its flow into the tank.
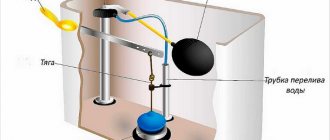
One of the safety devices in this system is the overflow mechanism: when the tank is filled, if the shut-off valve does not operate and water continues to flow into the cavity, the excess volume of water flows by gravity into the toilet. The situation when, for some reason, the inlet valve does not close is not the most critical, unless you take into account that even with the toilet not working, water consumption increases to an average of 100 liters per day.
The reasons for water overflow can be:
Incorrect adjustment of the float mechanism of the flush tank
Overflow due to improper adjustment of the float mechanism is the most common problem in flush tanks. The float chamber, pushed by the volume of water through a metal rod or plastic guide, presses on the valve and thus stops the flow of liquid into the tank. If the metal guide is bent or the adjustment screw on the plastic guide is loosened, the float chamber moves and the supply valve simply does not shut off the supply.
The method to solve the problem is simple: remove the tank lid and adjust the position of the float relative to the upper water level. For most toilets, the float is adjusted so that the water level does not reach the overflow neck by 1-1.5 cm.
Float chamber malfunction
If the float is damaged, the supply valve simply does not close. A float filled with water does not float up and thus the supply valve is simply constantly in the open position.
The simplest repair method is to replace the float or drain the water from it and seal the leak.
Water supply valve diaphragm malfunction
For diaphragm water supply valves, the supply is closed by pressing the plastic rod onto the rubber membrane, while the supply hole on the reverse side is tightly blocked by the rubber. Over time, a groove forms on the rubber at the inlet hole, through which water first begins to simply seep through, and after a while it simply flows unhindered into the tank. The repair method is membrane replacement.
Drain mechanism malfunction
This problem begins to manifest itself gradually when the tank itself, after a certain time, begins to fill with water. In this case, it is necessary to disassemble the drain mechanism, clean it of deposits and change the rubber seals.
Poor water quality
The reason for the tank overflowing is often associated with poor-quality tap water - a large amount of iron oxide, lime or mechanical inclusions form a coating on the walls and mechanisms, which over time acts on the rubber seals as an abrasive, literally eating the surface. In this case, it is necessary to install a filter system and replace rubber gaskets, membranes and seals.
Types of problems and solutions
There are many reasons for water leakage:
- The float mechanism is broken.
- The drain column is broken.
- dirt interferes with the operation of the part.
- The gaskets are worn out.
Let's look at common device problems and look at ways to eliminate leaks:
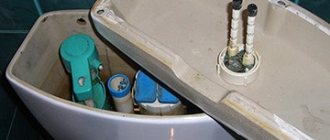
- Constant leakage of water. If water flows in a thin stream from the container, this indicates the need for repairs. If the outlet pipe from the main does not have filters, then due to constant leakage, rust will form on the toilet bowl. First you need to identify the reason why the water is flowing. The obvious reason lies inside the drain container. Lifting the tank lid, determine the location of the leak by eye. If you can’t find out what’s wrong, then you need to dismantle the valves. Removing the valve device:
- Stop water supply.
- Unscrew the drain button.
- Remove the cover.
- Get all the details. If necessary, you can dismantle the tank. First, unscrew the fastening screws connecting the tank to the toilet shelf. These instructions are universal for all types of toilets. Let's look at common breakdowns.
- The float device is broken. You can see the breakdown by looking under the tank cap. If the float does not move, or with a weak amplitude, then the element must be changed. The float stops responding to water that exceeds the control mark, so the overflow system is triggered and water flows out of the tank in vain. As a rule, this happens because a crack has appeared in the float and it sinks. The cause may be a broken float mount. The old element must be replaced with a new one. You need to remove the worn float and buy the same sample in the store. How to remove the float and install a new one:
- unscrew the drain button.
- remove the cover.
- testing the float device.
- we identify the problem.
- We dismantle the tank.
- replace the float.
- We attach the tank to the shelf.
- testing the device. If during the test test there is no leakage, then the problem has been fixed.
- The sealing gasket is worn out. The rubber or plastic seal in the form of a ring has the most vulnerable position. The elements are located when water leaves the tank and serve as a barrier to dirt and various precipitation, so the rings can become dirty or wear out.
If the gasket is dirty, it must be cleaned; if worn, it must be replaced. Other drain parts are reliable and cannot break. To clean the mechanism, it must be removed from the drain container; to do this, the fittings must be turned to the left half a turn until a click is heard.
How to clean the valve:
- dismantle the drain fittings.
prepare the cleaning agent.
- clean valve elements.
- install the mechanism in place.
When cleaning, you can see cracks and deformation on the sealing ring; in this case, you need to replace it with a new one. A worn part should not be left behind, because over time it will cause a leak.
Water flows into the toilet after flushing
The problem associated with water leakage after flushing occurs both in old-style systems with cast-iron wall-mounted tanks and in new “compact” systems. The reason for this phenomenon is the improper operation of the flushing mechanism.
When you press a key or button, water is discharged and the drain hole opens as wide as possible. At this time, the locking and adjusting mechanisms are in a suspended state - when the button is pressed, the valve or weight with the gasket cannot lower, but as soon as the button is released, the mechanism returns to the lowest position and closes the drain neck.
A sudden release of the button causes the locking mechanism to move along the guides under the influence of the water flow. At the same time, the deterioration of plastic parts becomes more and more visible, this leads to distortions and “freezing” of the mechanism itself. The result of such a defect is the following: the drain neck is skewed and incompletely closed; the water entering the tank is simply immediately drained into the toilet.
The method of troubleshooting is to completely replace the drain mechanism and then adjust its operation:
One of the additional causes of the problem may be increased water hardness and the natural aging processes of plastic.
Installation of flush fittings
The body of the tank is made of sanitary ware or special plastic. Unlike traditional cast iron, these materials do not corrode and can last a very long time. Any toilet flush mechanism consists of three basic components:
- An inlet valve
connected to a float. It is responsible for controlling the water level in the tank during collection. As soon as the float rises to the desired height, the valve stops the flow of liquid. - Locking mechanism
ensuring water drainage. In Soviet plumbing, a lever or chain was installed for this; they were connected to a bulb placed at the bottom of the tank. New models have a push-button mechanism, and sealing gaskets are provided to protect against water leakage. - Overflow system
. Its purpose is to protect against flooding of the room if for some reason the inlet valve stops working. The shut-off valve ensures that water drains into the bowl if its level exceeds a certain level.
To ensure timely operation of the intake valve, several types of floats are used. Modern toilet models use a hollow rubber float with air inside. Old plumbing used a glass-shaped plastic float. Thanks to the air filling, it begins to float as soon as the water reaches a certain level.
If there is a leak in the tank, do not panic. Most problems can be resolved on your own. To determine the cause of the problem, remove the toilet tank lid and examine the condition of the mechanism.
The tank is leaking where the bolts are attached
Installation of compact type toilets is carried out using a bolted connection between the tank and the toilet. In this case, the most common bolts are made of metal with a zinc coating to protect against corrosion. Rubber gaskets and universal silicone sealant are used as sealing. In more expensive models, the bolts may be made of brass or bronze, but in most cases it is galvanized metal, which is still susceptible to corrosion.
Leakage at bolted joints begins with a small amount of water seeping in, and gradually the leakage will increase. The following can be suggested as preventive measures:
- Shut off the water supply.
- Drain the water from the tank.
- Carefully loosen the thread.
- Remove the bolts.
- Remove rubber gaskets.
- Clean the surface of the rubber gaskets from silicone and dry them.
- Clean the ceramic surfaces where the bolts are installed.
- Apply a layer of silicone sealant and install rubber seals.
- Again treat the seat of the bolted connection with silicone, install the bolts, add 2-3 metal washers from below and tighten the connection with a nut.
If the leak cannot be stopped, the entire fastening system must be replaced, from bolts to rubber seals. In this case, there is no point in trivializing; everything needs to be changed.
Leak between the toilet and the cistern mounting
At the junction of the toilet tank itself, a leak can be the result of several defects:
- incorrect installation of the tank on the toilet;
- failure of the rubber seal;
- defect of the tank and (or) toilet.
A leak at the installation site due to a violation of the installation technology may occur due to:
- improper installation of the rubber gasket;
- the fit between the tank and the toilet is not tight enough;
- aging rubber seal.
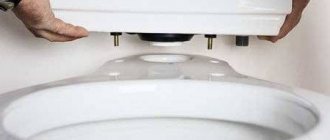
Installation of compact type toilets with a flush cistern attached to the toilet is done by installing a rubber gasket between the toilet and the cistern. The gasket is pressed tightly with bolts. A distortion made during installation will certainly lead to a violation of the tightness of the gasket and the beginning of water leakage when the tank is full.
In models where there is a ceramic cistern pipe that fits into the toilet opening, leakage due to a leaky gasket is unlikely. Most likely, the appearance of water here is due to a crack in the body of the pipe or tank. For some time, you can seal the crack with silicone or silicate (office) glue. But this is only a temporary measure for 2-3 months; in the future, the operation will have to be repeated more and more often. Therefore, it is recommended to immediately start looking for a new tank or completely replace the entire set.
Main causes of leakage
Since all the holes in the tank are equipped with seals, the first “suspicion” falls on them.
Seals are present on the fastening of the container to the toilet (in the “compact” system) and on the flush mechanism. If the tightness of the fastening holes is broken, water penetrates in a very thin stream, drops, and this happens constantly. Replacing the fasteners or, in some cases, the presence of other operating defects - the entire tank.
If the toilet tank is leaking water into the toilet, this may be due to a faulty flush mechanism or a broken seal. In the first case, after flushing, the water stops flowing until the tank is full, after which it continues to flow into the toilet. The flow is less strong than at the time of flushing, but quite active. In the second, water seeps in constantly, the activity depends on how badly the seal is damaged.
The diagram shown in the illustration above shows a modern toilet cistern controlled by a push-button flush mechanism. A special membrane is used as a drain valve. This part cannot be repaired; disassembling the siphon with membrane is not recommended. The easiest way to solve the problem is to completely replace the siphon with one of the appropriate size.
Repairing a toilet cistern with a constant leak due to a gasket that has lost elasticity or integrity involves replacing the gasket. But, depending on the model, it may be necessary to completely change the “filling” of the container, since the parts are offered in a non-separable version.
Additional leak options
The question of how to fix a leak in a toilet may concern a leak in the water hose that connects the tank to cold water. There are two main types of problems here: a violation of the integrity of the hose (the internal rubber part in a metal braid) and the nut securing the hose to the container. The hose bursts at the point of greatest bend, after prolonged use, at elevated temperatures and low external humidity in the toilet. The nut may be initially of poor quality, the thread may break during installation, or there may be a crack in the metal. The hose and nut must only be replaced.
The tank leaks from the sides or from the bottom to the floor
Quite often, a tank leak is confused with the presence of condensation on its surface. Filling a container with cold water in a room at normal room temperature automatically causes dew drops to appear on the outer walls. It’s another matter when marks characteristic of a constant flow are visible on the sides. Rusty or calcareous marks left after water flow indicate a defect in the internal mechanism or cracks in the ceramic bowl itself.
Problems associated with the presence of traces of leaks can be classified as follows:
- presence of traces of water jets from technological holes;
- traces starting below the holes, appearing in places of microcracks;
- presence of traces at the bottom of the tank.
In the first case, when water simply overflows through the technological holes, the cause of the defect may be a malfunction of the overflow mechanism or the absence of a special hose attached to the filler pipe.
If the mechanism malfunctions, water overflows and finds a place to exit through the mounting holes. Solving the problem is quite simple - adjust the mechanism, check the drain neck and install plugs on the unused hole for connecting the hose.
A fallen tube on the inlet pipe of the valve is not a critical malfunction; simply, under the pressure of water, a large amount of splashes with an unpredictable trajectory is formed in a confined space, as a result of which a certain amount of water simply splashes out. Flaw correction method:
- Shut off the water supply.
- Remove the cover.
- Place the fallen pipe onto the pipe and secure it with a clamp.
If the ceramic or plastic bowl of the tank is mechanically damaged, a leak may occur on the walls at the fracture site. It is useless to repair visible cracks that threaten the integrity of the structure; the constant process of filling and draining water systematically affects the walls and breaks the seam, no matter how strong it may be. In this case, you just need to replace the tank.
If no visible cracks are visible, but water seepage still occurs, it is recommended:
- Shut off the water supply.
- Drain the water from the tank.
- Mark places where water leaks.
- Dry the tank outside and inside.
- Using silicone sealant or silicate glue, treat microcracks inside and outside the walls.
- After finishing the treatment, fill the tank with water.
Filling microcracks with sealing compounds will ensure sealing of the walls for a fairly long period, but this is provided that the walls are not subject to mechanical stress that can turn microcracks into real faults.
Tanks with bottom hose connections most often leak at the hose connection. The defect can be eliminated by tightening the hose nut on the fitting or removing the hose and reinstalling it using fum tape or tow.
Deformation of the siphon membrane
Finally, another frequent failure, due to which water can flow continuously from the tank into the toilet bowl, is a violation of the siphon membrane. In this case, the problem will only be corrected by replacing the membrane with a new one, since the old one cannot be repaired. The procedure is performed according to the following scheme:
- Drain all the water from the tank so that during further actions it does not leak onto the floor.
- Attach the float arm to the cross bar to block the water supply. For example, you can remove the lid of the cistern, fasten a wooden stick in its place and tie a lever to the latter.
- Unscrew the nut that secures the drain pipe to the tank.
- Unscrew the nut that secures the siphon to the float lever - it is usually located at the base of the tank.
- Remove the siphon and replace the deformed membrane. Keep in mind that the new part must have exactly the same dimensions as the old one.
- Reassemble all the elements of the tank in exactly the reverse order.
As you can see, there is nothing overly complicated in diagnosing and correcting breakdowns of the drain tank - most of the problems can be quickly and inexpensively solved with your own hands. So we advise you to carefully study common problems and tips for eliminating them - perhaps your tank does not hold water for precisely one of the reasons mentioned?
Leaking toilet cistern with button
Models equipped with a button, in addition to all the listed diseases, may have another problem unique to them - the development of the mechanism and the weakening of the release spring.
The appearance of this defect is associated with the mechanism of operation of the drainage system - when you press the button, the drainage process begins, the button is restored to its original position after the mechanism has completely drained the water and released the spring.
Solving the leakage problem in this case is quite simple:
- Shut off the water supply.
- Remove the cover.
- Adjust the mechanism and slightly stretch the spring.
- After this, check the functionality of the mechanism and, if necessary, make adjustments again.
What should I do to prevent the tank from leaking?
There are few recommendations in this case. First of all, you need to install the toilet correctly and be sure to secure it with mounting screws. A skewed toilet or a toilet with play will itself cause leaks in connections and gaskets.
The second point is related to the need to use modern means of cleaning the tank. Chemical agents allow you to remove lime and rust deposits, which means the mechanism will work longer.
The third thing worth remembering is the need to promptly replace them at the first signs of destruction of rubber gaskets.
A leaking toilet tank is a common problem that has many causes. Finding out why the breakdown occurred and then trying to fix it is the correct sequence of actions.