How to choose the correct height of the toilet from the floor?
Every city resident faces the problem of choosing a toilet at least once in his life. After all, a toilet is a durable thing, but after ten to twenty years it still begins to need replacement. In addition, when moving to another apartment, new owners often prefer to change all plumbing equipment in common areas. And of course, buying a new toilet cannot be avoided if you move into an apartment without construction renovations. Thus, sooner or later, the issue of purchasing a toilet will probably affect you too. To be prepared for this in advance, you should have an idea of the main factors that should be taken into account when choosing a given plumbing fixture. One of these factors is the height of the toilet.
The height of the toilet will largely depend on its type.
According to the method of fastening, toilets are divided into:
- Floor-standing. This model is installed in most bathrooms today. This is a standard toilet, consisting of a base bowl and a flush cistern attached to it. This toilet is installed directly on the floor, that is, the bowl simultaneously plays the role of a stand.
- Hanging. More modern models that are not yet widespread. Most often they can be found in bathrooms located in public places (restaurants, sports clubs, etc.). Wall-hung toilets are attached above the floor directly to the wall using a rigid frame that holds all the structures. In this case, the cistern is often hidden behind a false wall.
Based on the shape of the bowl, the following types of toilets are distinguished:
- With a funnel-shaped bowl. This bowl has no protrusions inside, so all impurities immediately fall into the drain, which is located strictly horizontally. The big disadvantage of this design is the splashing of water that occurs when rinsing.
- With a plate bowl. A bowl of this shape has a protrusion inside with a small depression into which all impurities initially fall. The disadvantage of this design is the frequent need to use a brush, high water consumption and splashing when washed off.
- With a visor bowl. This bowl is similar in shape to the previous one, but instead of a depression in the ledge, it has a small tubercle. Thus, sewage does not accumulate in the bowl, but rolls directly into the drain. Toilet bowls of this type are not characterized by water splashing.
Depending on the type of release, there are:
- With oblique release. This model is needed when the sewer pipe is located too close to the floor level.
- With horizontal outlet. This model should be purchased when the sewer socket is at a height of 5-10 cm from the floor level.
- With vertical outlet. It is advisable to buy this model when the sewer socket is located far from the wall to which the toilet will be mounted.
Installation: design and principle of operation
This equipment is a metal frame attached to the wall and designed for installation of suspended plumbing fixtures, controls (drain panel), hydraulic piping, siphon pipes, drain tank, fasteners (studs, couplings), etc. Its specific configuration depends on the type of equipment (sink, bidet, floor-mounted or wall-mounted toilet, urinal), its model, manufacturer and other criteria.
Attached to the wall and/or floor, the installation acts as a power frame that takes on the weight of the plumbing fixtures and additional elements, as well as the weight of a person sitting on the toilet or bidet. The load is distributed evenly throughout the entire structure, eliminating the risk of equipment falling out and damaging. Installations of two types are sold:
- Block
. They are a rectangular frame without metal legs, completely secured to a vertical surface using anchor bolts. The entire load from the installation itself and the equipment attached to it is transferred to the wall, so block systems are installed only on load-bearing walls. Their advantages include relatively low price, simplicity of design and installation. At the same time, their installation is possible only on a solid surface; they are not suitable for weakened partitions and false walls. - Frame
. They are based on the same rectangular frame, but equipped with two support legs that are adjustable in height. Frame installations are fixed simultaneously to the wall and floor using anchor bolts. In this case, the main load falls on the supports and is transferred to the horizontal surface. This allows you to install plumbing fixtures on non-permanent walls, weakened partitions made of plasterboard or other fragile materials. By adjusting the legs, you can change the height of the plumbing fixtures, adapting them to the characteristics of the room and the characteristics of the users.
Installations also differ in their configuration, depending on where they are planned to be used:
- Standard
. Designs of this type have a classic rectangular shape and are used for installing plumbing fixtures in rooms without size restrictions. Most often, they are equipped with standard small units in city apartments. The average dimensions of standard installations are 50 cm (width), 12 cm (installation depth) and 112 cm (height). Dimensions may vary slightly depending on the model. - Double-sided
. They are a combined structure of two supporting frames. Such models are used mainly in shopping centers, offices, and administrative buildings, where it is necessary to place plumbing fixtures on both sides of the dividing partition. - Angular
. Installations most often used for installing plumbing fixtures in compact bathrooms, where it is important to save as much space as possible. The peculiarity of these designs is four additional pads (two on top and bottom of the frame), located at an angle of 45 degrees to its main plane. Due to this, the systems fit into the corner space, being fixed to one or two walls and the floor. Movable pads also allow you to adjust their position if the corner of the wall is slightly different from straight, and secure it on one or both sides. - Low
. When other equipment or a window sill is placed above the plumbing, as well as in other cases that involve saving space, installations with a reduced height, not exceeding 82 cm, are used. As a rule, they are used for installing wall-hung toilets and bidets in compact bathrooms. Framed low installations also have the ability to adjust the height of the plumbing fixtures. - Longitudinal
. These are long horizontal installations for installing several plumbing fixtures on one line at once - most often these are toilets, bidets and urinals. Longitudinal models are manufactured in the form of a single horizontal structure with several mounts for attachments and additional elements (cistern, siphon, control panel, etc.). This distributes the load across the entire frame at once, increasing the reliability of the installation of all plumbing fixtures provided.
Regardless of the specific type and model, high-quality installations for suspended plumbing equipment are made from durable, deformation-resistant structural steel. Taking into account the fact that the mounting frames are located in a room with high humidity, they are coated with moisture-proof anti-corrosion paint, which prevents the metal from rusting and losing its load-bearing qualities.
Advantages and disadvantages of installations
Installation of wall-hung toilets, bidets, and urinals is only possible using metal mounting frames. To install sinks, such designs are used optionally, depending on the characteristics of the room. Does it then make sense to buy suspended equipment with a support frame, which is more difficult to install and costs more than its classic counterparts? Installed plumbing has its advantages:
- Rational use of space
. The compact dimensions of wall-hung sanitary ware make the bathroom or toilet room more spacious. The use of frame installations makes it possible not to tie the installation of equipment only to the main walls. In fact, it can be installed at any convenient point along the perimeter; you just need to take into account the location of communications and other plumbing. - Visual expansion of the room
. Auxiliary equipment for hanging plumbing (hydraulic piping, flush cistern, etc.) are installed behind a false wall, leaving only the toilet itself, bidet, urinal or sink on view. This improves the interior, making it more aesthetically pleasing, easier to perceive, and visually more spacious. - Hygiene
. Wall-hung plumbing does not have a support leg, around which dirt, moisture and bacteria accumulate. Cleaning a room with such equipment is much easier, which has a positive effect on overall cleanliness. - Low noise
. For wall-hung toilets and urinals, the flush cisterns are hidden behind a false panel, which partially absorbs the sounds of draining and collecting water. This advantage is especially noticeable at night - noise after using the toilet does not interfere with peaceful sleep, especially for children with their sensitive hearing.
Installation systems also have disadvantages - although there are few of them, they still need to be mentioned:
- Difficult to install
. Installation of the installation requires additional work, and you need to have certain skills and tools. Not every person can carry it out on their own; most often you have to turn to a professional plumber-installer for help. On the other hand, the presence of an installation simplifies the connection of equipment to utilities, since all pipes are located in strictly designed places - Difficulty of repair
. The false panel makes it difficult to access hidden communications and other additional equipment. To repair or replace these elements, it will be necessary to dismantle the cladding and the partition itself, followed by its restoration. This again will require the owners themselves to have special skills in working with building materials and equipment or seek help from plumbers and installers. - High price
. The presence of installation significantly increases the cost of hanging plumbing compared to floor-standing models. Accordingly, prices for its installation, repair, and maintenance also increase - as a rule, they are performed by qualified craftsmen for a fee.
Another disadvantage of installations can be considered the need to allocate part of the room area for its installation - in the event that it is carried out not in a niche, but on the surface of the wall.
Height Standards
Over more than a century of history in the production of plumbing equipment, certain standards have been developed regarding the size and installation height of toilets. These figures directly depend on the average height of a person - an indicator that is slowly but surely changing upward. That is why every decade the standard toilet height increases by several millimeters.
The dimensions and height of the toilet installation are shown in the following figure.
Floor
Thus, the standard height of a floor-standing toilet that existed in recent years - 40 cm, is already giving way to a more modern standard - 42 cm. And in some countries, the population of which is made up of especially tall people, toilets of half a meter in height have begun to be produced.
Before choosing, try different options and choose the best one for your height.
Suspension
For wall-hung toilets the numbers will be different. The main thing here is to take into account the distance from the floor level to the bottom edge of the toilet. Ideally it should be 20 cm.
It should be borne in mind that if, after installing the toilet, the installation of the finishing floor covering follows, this distance will be reduced and the position of the toilet will be inconvenient.
Distance from toilet to wall in small bathrooms
In a small bathroom we value every centimeter of space, therefore, wanting to put all the necessary equipment in it, we need to carefully calculate the space and draw up a plan for the location of individual elements of furniture and plumbing.
To properly furnish a small bathroom, it is worth carrying out careful planning. A standard toilet has a length of about 70 cm. If you install a wall-hung toilet, it will protrude less, but at the same time it will stand further from the wall by the width of the installation or rack in which the pipes and cistern are hidden. Regardless of the size of the bathroom, a free space of 80 cm wide and about 70 cm long should be left in front of the toilet. In order for the plumbing fixtures to be comfortable to use, they must be at a certain distance from the walls. The required distance from them is at least 20 cm; the same distance is required for other elements of equipment.
Selection process
In order to choose a toilet model that will be comfortable for all members of your family to use, you need to understand several important nuances:
- Price . Depending on the cost, three types of toilets can be distinguished: budget models (usually these include products from domestic manufacturers); models in the middle price segment (as a rule, these are products of Turkish, Czech, Polish manufacturers); luxury models (Swiss, Austrian and German production).
- Height. Everyone in your household should be involved in choosing the height of the toilet. Sit on the model you like: if you are comfortable, your feet touch the floor, and your muscles are relaxed, then this height is suitable for you.
- Flush type. Based on this feature, toilets with direct and circular flush are distinguished. In models of the first type, water moves only in one direction when flushing; this type of flush is considered more economical in terms of water consumption. In models with a circular flush, the toilet bowl is washed with water in two directions, which provides a more thorough cleaning.
- Material. Today, a variety of materials are used to make toilets: plastic, artificial stone, cast iron, steel, porcelain and earthenware. The most modern and the most favorable in terms of price-quality ratio are the last two options.
The procedure for installing a toilet using the open method
This method requires less time and effort, but is inferior to the second (closed) method in terms of aesthetics. The toilet must be placed in its intended permanent location and, using a pencil, make marks on the tiles in the holes that are intended for fastening
It is important that the pencil is strictly vertical, because otherwise the marks may shift and you will make holes that do not fit the mounting bolts
In addition to the marks for fastening, it is necessary to trace the outline of the base of the product on the tile. After this, you need to move the toilet to the side and drill holes in the places where the pencil marks were made.
First, use a core to scratch the glaze on the tile so that the drill does not slip on it. The first step is to use a glass drill bit to go through the tiles. After this, insert a concrete drill into the hammer or drill and drill a hole of the required depth, depending on the size of the purchased dowels. The finished hole must be cleaned of dust and filled with silicone sealant, which in this case acts as waterproofing, preventing water from entering under the base of the product. Dowels should be inserted into the holes filled with sealant.
Before fixing the toilet to the tile, apply a strip of sealant along the previously outlined contour of the product, which will prevent water from penetrating under the base of the toilet. Fasteners should be inserted into the mounting holes: bushings, screws or bolts and tightened to the required position. The fastening points can be covered with plugs to give the product an aesthetic appearance and to protect the fastening elements from moisture. Excess silicone that appears should be removed using a rubber spatula or any other available means.
No splashing
Water splashes very often interfere with the comfortable use of the toilet, not to mention the fact that this phenomenon is very unhygienic. Toilet manufacturers offer a variety of solutions to this problem. Toilet models with an anti-splash system are one of the relatively new engineering developments.
“Anti-splash” is a design feature of the toilet, which is designed to compensate for splashes that occur during its operation. Labeling about the presence of this system often deceives the buyer. To determine the presence of “anti-splash” yourself, look into the bowl of the toilet model you like. To suppress water movement, the drain hole should be very narrow and located as low as possible. Also make sure that the drain hole is offset from the center and that the water level in it is low enough. The drain hole should be surrounded by a special rim. If all these factors are present, then you have a toilet model equipped with an anti-splash system.
Method 2: glue installation
Using construction adhesive to secure the toilet to the floor is the easiest installation method. To prepare the epoxy mixture used as glue, it takes 12 to 15 hours.
The floor surface must be perfectly smooth. Ideally, this method is best used for tiles. It is better to make its surface a little rough to improve adhesion, clean it of dust and debris, and thoroughly degrease it.
The mixture can be purchased or prepared independently. If you already have something to glue the toilet onto, you can save preparation time. Otherwise the following items are required:
- epoxy resin – 100 parts (ED-6);
- cement - 200 parts;
- solvent – 20 parts;
- hardener – 35 parts.
The sequence of adding parts to the prepared solution is very important. First, you need to heat the resin to 50 degrees Celsius and add a solvent to it. After this, hardener and cement are added sequentially in the order presented. To ensure plasticity, the solution should be stirred thoroughly. This is how liquid nails are prepared.
The mixture remains in working condition for 1.5 hours. It is applied to the back of the toilet base so that the application surface covers approximately 20 cm square. The layer must be at least 4 mm thick.
How to choose the correct height of the toilet from the floor?
Every city resident faces the problem of choosing a toilet at least once in his life. After all, a toilet is a durable thing, but after ten to twenty years it still begins to need replacement. In addition, when moving to another apartment, new owners often prefer to change all plumbing equipment in common areas. And of course, buying a new toilet cannot be avoided if you move into an apartment without construction renovations. Thus, sooner or later, the issue of purchasing a toilet will probably affect you too. To be prepared for this in advance, you should have an idea of the main factors that should be taken into account when choosing a given plumbing fixture. One of these factors is the height of the toilet.
Attaching the toilet to the floor: 3 ways - with dowels, glue, taffeta
The process of attaching a toilet to the floor is a responsible job that requires certain skills. This is due to the reliability of further operation of the product and the durability of its operation. However, if you carefully study the various approaches, have patience and the necessary tools, and also take a responsible approach to the matter, you can fix the toilet completely on your own.
The work must comply with all construction standards and regulations. This will allow the plumbing equipment to serve for many years for the benefit of its owners.
Height Standards
Over more than a century of history in the production of plumbing equipment, certain standards have been developed regarding the size and installation height of toilets. These figures directly depend on the average height of a person - an indicator that is slowly but surely changing upward. That is why every decade the standard toilet height increases by several millimeters.
The dimensions and height of the toilet installation are shown in the following figure.
Floor
Thus, the standard height of a floor-standing toilet that existed in recent years - 40 cm, is already giving way to a more modern standard - 42 cm. And in some countries, the population of which is made up of especially tall people, toilets of half a meter in height have begun to be produced.
Before choosing, try different options and choose the best one for your height.
Suspension
For wall-hung toilets the numbers will be different. The main thing here is to take into account the distance from the floor level to the bottom edge of the toilet. Ideally it should be 20 cm.
It should be borne in mind that if, after installing the toilet, the installation of the finishing floor covering follows, this distance will be reduced and the position of the toilet will be inconvenient.
Device and classification
Shape of the outlet pipe of the drainage system
The following types of pipes are distinguished:
- Oblique (angular) or “outlet into the wall”
- Straight or horizontal
- Vertical or “floor outlet”
Type (shape) of the bowl
The standard is considered to be plumbing fixtures with a funnel-shaped, visor-shaped and dish-shaped bowl (see figure). The plate version can be considered obsolete despite its infrequent, but still presence in construction stores.
Funnel-shaped and visor have their own pros and cons. One form is good for everyone, but it splashes a lot, the other has almost no splashes, but more often a brush is required and the noise level is higher when draining water.
Flush cistern
Sanitaryware is also divided according to the installation method. Classics of the genre are floor-mounted and wall-hung toilets, which can be found in both corner and wall-mounted versions. It’s quite easy to get confused in such a variety, so let’s look at the standard sizes that you can use when choosing plumbing fixtures.
Do you know?
That the word “toilet” appeared quite recently. The Spanish company Unitas launched mass production of plumbing products made of earthenware 1909 Later, the word toilet began to be used to refer to any sanitary and technical device, regardless of the manufacturer.
Selection process
In order to choose a toilet model that will be comfortable for all members of your family to use, you need to understand several important nuances:
- Price . Depending on the cost, three types of toilets can be distinguished: budget models (usually these include products from domestic manufacturers); models in the middle price segment (as a rule, these are products of Turkish, Czech, Polish manufacturers); luxury models (Swiss, Austrian and German production).
- Height. Everyone in your household should be involved in choosing the height of the toilet. Sit on the model you like: if you are comfortable, your feet touch the floor, and your muscles are relaxed, then this height is suitable for you.
- Flush type. Based on this feature, toilets with direct and circular flush are distinguished. In models of the first type, water moves only in one direction when flushing; this type of flush is considered more economical in terms of water consumption. In models with a circular flush, the toilet bowl is washed with water in two directions, which provides a more thorough cleaning.
- Material. Today, a variety of materials are used to make toilets: plastic, artificial stone, cast iron, steel, porcelain and earthenware. The most modern and the most favorable in terms of price-quality ratio are the last two options.
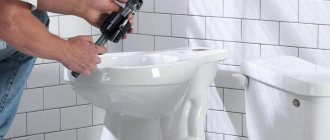
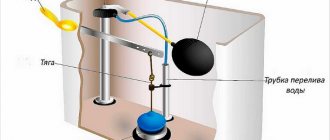
Installation procedure
The workplace has been successfully cleared and you can proceed directly to installation
It is very important to pay close attention to the preparation of the terminals and inputs: it is best to use flexible hoses. If some element does not fit, everything can always be compared with them without much difficulty
To a greater extent, this point concerns putting a hose on the tap, from which water will be supplied to the drain barrel.
Then we install the barrel itself, on the floor or on the wall, depending on the model. After securing the base, you can begin assembling the pipe, periodically checking the serviceability. At the final stage, you need to connect to the toilet seat. The device should already have factory fastenings; using the supplied bolts, a part of the product is attached to them.
This is a short procedure for installing a toilet to the floor. Now let's take a closer look at the fastening methods most commonly used today.
Installing a toilet is an easy process if you follow a clear action plan.
No splashing
Water splashes very often interfere with the comfortable use of the toilet, not to mention the fact that this phenomenon is very unhygienic. Toilet manufacturers offer a variety of solutions to this problem. Toilet models with an anti-splash system are one of the relatively new engineering developments.
“Anti-splash” is a design feature of the toilet, which is designed to compensate for splashes that occur during its operation. Labeling about the presence of this system often deceives the buyer. To determine the presence of “anti-splash” yourself, look into the bowl of the toilet model you like. To suppress water movement, the drain hole should be very narrow and located as low as possible. Also make sure that the drain hole is offset from the center and that the water level in it is low enough. The drain hole should be surrounded by a special rim. If all these factors are present, then you have a toilet model equipped with an anti-splash system.
Technical nuances of plumbing installation
A toilet of any configuration, like a plumbing fixture in general, is installed in accordance with the installation instructions. The initial installation of these plumbing fixtures (during the housing construction stage) is usually carried out by professional contractors.
But in the future, already established property owners often reconstruct the toilet, in particular, change the toilet. And they do it themselves in order to save on installation services.
Users often change equipment to suit personal preferences. Some of them do not know all the nuances of installation and fastening methods.
Self-reinstallation is not prohibited and is encouraged. However, such intentions of the owner must at least be accompanied by knowledge of methods for attaching the toilet to the floor. It would seem like a trivial detail of the installation procedure, but when they want to see a high-quality, reliable installation as a result, even the smallest details are important.
The nuances of installing toilets are directly related to the type of plumbing fixtures chosen for installation. In everyday life, floor-mounted toilets are most often used. At the same time, most of the mounted devices have a compact product configuration.
How to fix a compact and any other toilet to the floor of the toilet room, doing the installation yourself?
Self-taught craftsmen should strive for approximately this result.
On the floor or above the floor
In advertising brochures talking about the advantages of wall-hung toilets, the following main points are given:
- Hanging plumbing does not interfere with cleaning , leaving the entire floor area accessible.
- It makes a compact toilet spacious , allowing you to save space due to the tank.
- It allows you to completely hide communications , thereby improving the appearance of the bathroom.
Let's try to find out how much truth there is in marketers' statements.
Free floor
The statement is true without any qualifications. Installation - the frame to which the toilet is attached is hidden behind a false wall, leaving the entire floor area accessible.
This indicates that in your bathroom there will no longer be black and damp places under the tank, that the base of the toilet bowl will not really interfere with cleaning, and to change the tiles you will not need to dismantle it. In addition: the vacated floor will give more scope to your imagination when choosing a flooring pattern.
Compactness
Console plumbing will indeed make the room more spacious, but only visually. The dimensions of a wall-hung toilet with a concealed cistern and installation are at least no smaller than the floor structure: due to the thickness of the false wall, they are likely to be larger.
See: the back wall of the toilet room will move forward by about 20 centimeters, thereby depriving you of the opportunity to use the space behind the toilet for shelves or a small cabinet.
Connection to the sewer system
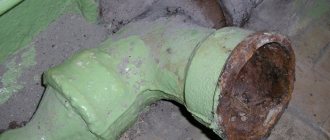
The toilet is connected to the sewer system using a corrugated plastic pipe. Corrugation makes it possible to change:
- the angle of inclination depending on the location of the riser outlet: in the floor or in the wall;
- the distance from the product itself to the entrance to the sewer riser.
The corrugation is not glued to the toilet outlet, but is tightly and hermetically connected to the outlet of the product, precisely due to the rubber membrane installed inside. The corrugation is also inserted into the sewer riser without the use of glue, using a special rim, which prevents unpleasant odors and drainage from penetrating into the room.
After connecting the toilet to the sewer system, you need to connect the tank to start connecting cold water. It is necessary to insert silicone or plastic washers onto the metal bolts to prevent them from coming into contact with the earthenware of the product.
distances and dimensions
Are you scared by the criticism of the decision we are discussing? Well, let's move on to the next stage.
The size of the installation and the wall-hung toilet depends on the model and manufacturer within a fairly wide range.
At what height must a wall-hung toilet be attached to the wall? The optimal values are in the range of 400 - 450 millimeters.
As always, there is a sequence of nuances.
- Don't forget about the thickness of the seat. By setting the edge of the toilet to a height of 450 mm and installing the seat, you may find that the height has become uncomfortably high.
- The height is selected based on the level of the finished floor covering. If you position the toilet so that its edge is 400 mm from the floor, and then fill in the screed and lay the tiles, you will have hearing problems when visiting the toilet. Your ears will be covered with your knees.
- Finally, if the height of your family members differs significantly from the average in one direction or another, the height of the wall-hung toilet can be adjusted accordingly.
We should not forget about the placement of plumbing items in the room.
- Distance from the edge of the bowl to the wall, bidet, washing machine, etc. ideally should not be less than 20 centimeters. The distance to these objects from the longitudinal axis of the bowl should not be less than 40 cm.
- A reasonable minimum distance from the front edge of the seat to the door is 60 cm. No, a closer door won’t hurt to sit down, but fixing your clothes is a big deal.
- The optimal height of the drain button is about a meter from the floor.
Distance norms
The distance of the toilet bowl from the side wall is the norm dictated by SanPiN for the normal implementation of treatment with disinfectants or disinfectants in areas of potential danger of contamination by pathogenic agents.
This piece of plumbing must be kept in perfect cleanliness; the edge of the toilet bowl is especially carefully disinfected. This is especially true if there are small children in the family. The wall close to the toilet and the floor in the room are also treated. But if the minimum specified parameter is not met, it will be problematic to carry out the necessary procedures.
Gosstandart dictates installation standards, because they have already been determined and verified as optimal and convenient sizes, distances and distances. If you adhere to the standards, you can avoid possible negative consequences.
The distance from the wall when installing the toilet, as well as the parameters of the toilet itself, are aimed at human convenience, creating optimal conditions for a comfortable, hygienic and safe discharge of natural needs.
Recommendations you need
Let us allow ourselves to give the reader some advice on the installation and selection of the plumbing fixture that interests us.
Choice
Like floor-mounted, wall-hung toilets can be made from various materials. Let's try to evaluate them.
Polished stainless steel is virtually dirt-free due to its smooth surface. If deposits still remain on it, they can be easily removed using any household chemical.
Why does stainless steel occupy a much smaller market share than competing solutions?
- Pair of breech type metal plumbing fixtures. It has become familiar as anti-vandal equipment for public restrooms and evokes corresponding associations among many potential clients.
- In addition, the price of stainless steel toilets is much higher than that of ceramic analogues, and starts from approximately 20,000 rubles.
Glass is not much inferior to stainless steel in practicality; but viewing through the translucent walls what remains on the walls of the bowl below the water level is a rather dubious pleasure.
The main disadvantage of polymer concrete is its limited resistance to aggressive cleaning scratches and cleaning agents. Removing lime deposits and urinary stone from it without disturbing the appearance of the surface is not an easy task.
The main value of sanitaryware is its low cost. It is precisely on this basis that it is the undoubted favorite of the plumbing market. The downside is that its large-porous surface actively collects dirt and quite often lacks cleaning.
Glazed faience, thanks to its glassy coating, is much more resistant to stains and easier to find, practically no different in price from material without glaze.
Finally, the material that is optimal in terms of functionality and cost combination is porcelain. The walls of the toilet will remain white as snow for a long time; If the need for cleaning does arise, you can safely use acidic and alkaline preparations.
Installation
Are there any subtleties to installing a wall-hung toilet yourself?
The installation stages themselves are comprehensively outlined in the accompanying documentation:
- The placement of the installation frame is marked by level or plumb.
- It is anchored to the wall and/or floor.
- Water is supplied to the tank, and a sewer pipe is supplied to the location of the toilet flare.
- The hole in the tank for the drain button is closed with a special membrane or simple polyethylene, after which the communications and installation are hidden behind a false wall. In most cases, it is laid out from moisture-resistant plasterboard over a galvanized profile and laid out with tiles.
- Once the tiles have firmly set, the toilet is hung on the studs of the installation, and a flush button is installed in the tank. A damper gasket is needed between the wall and the toilet to distribute the load on the tile and prevent chips from occurring.
By the way: in the absence of a gasket, silicone sealant can play its role.
There are a couple of nuances here:
- It is better to place the tiles away from the drain button, so that the seams are located symmetrically relative to the center of the button. Asymmetry does not look very careful.
- The smaller the sewerage drain to the riser, the less likely it is to become clogged. Do not forget about the slope: for pipes with a diameter of 90 and 110 mm used for hidden installation, it is equal to 2 cm per linear meter.
- It is better to collect the sewerage using sealant. The instructions are due to the fact that rubber seals can lose elasticity over time and allow leaks.
- Forget about flexible eyeliners. Water is supplied to the tank by a solid pipe. The service life of a braided rubber hose rarely exceeds 5 years.
- Despite the fact that the tank fittings in most cases allow you to shut off the water through the service hatch behind the drain button, it is better to provide the supply to the tank with a valve and leave a hatch in the false wall to access it.
Method 3: fastening with taffeta
It is ideal to attach the toilet to taffeta in case of a wooden floor. It is better to place nails nailed on the back side of the taffeta in a checkerboard pattern. They should protrude approximately 1-2 cm above the front surface of the part. This provides better grip on equipment and long-lasting stability. It is better to entrust the fastening of the toilet to the floor with taffeta to specialists, however, if you make an effort, you can do it yourself.
It is necessary to prepare a recess in the floor where the cement solution will be poured. It is better to do this with the provided plumbing tools. If the floor is concrete, then it is better to use a jackhammer. But this must be done as carefully as possible. The recess should be smooth and have clear corners corresponding to the corners of the toilet base.
This form will prevent the occurrence of unwanted gaps between the product and the floor. After this, you need to pour the cement mortar. Taffeta is sunk into it downwards onto pre-prepared anchors. The result is taffeta that is flush with the floor.
The solution dries within 12 hours (sometimes longer). Next, the installation of equipment begins. The product must be fixed with special screws, under the heads of which washers-gaskets must be installed. Such elements are made of rubber. They prevent possible failure of the frame.
Construction experts recommend lubricating screws with a special substance - graphite or grease. This makes it easy to unscrew them if necessary.
The taffeta under the toilet bowl is easily replaced with a rubber backing. It is cut from a sheet of material, the thickness of which varies between 5-15 mm. A classic example is an old rubber mat, which is usually placed in the hallway or on the landing. Remember that the backing should be approximately 1-2 cm smaller than the toilet support post.
Source
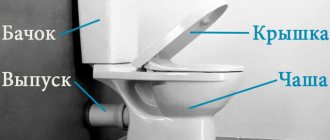
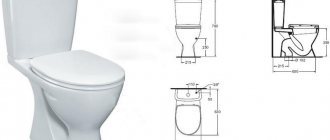
Standard bowl height for a floor-standing toilet
The most common type of floor design is the compact toilet. The product consists of a bowl, which is attached to the floor on a special leg, as well as a tank for flushing water. The tank can be installed separately or placed on a solid cast bowl shelf. The model is very popular due to its price, ease of connection, small size and ease of maintenance. Unlike installations, installation will not require additional installation work .
Photo 1. Compact toilet installed in the bathroom near the sink. It is very popular due to its price, ease of connection, and small dimensions.
According to SNiP (sanitary norms and rules), the standard height from the floor to the top of the bowl was 40 centimeters . But given the increase in average height, the parameter was raised to 43 centimeters . This is the size of installation recommended by most plumbing stores. This option is suitable for most adults and children .
The height of the bowl from the floor affects the ease of use of the toilet. The ideal option involves the formation of an acute angle between the torso and legs of a person. Also, when choosing a plumbing fixture, your own comfort is taken into account. Incorrect bowl sizes will become a real problem in long-term use.
Important! The dimensions of floor-standing toilets are not adjustable , so it is necessary to carefully select plumbing fixtures at the renovation planning stage.
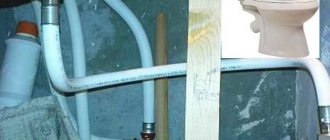
Connecting the toilet to the water supply
These plumbing products have a different connection system to the water supply:
- closed connection;
- external connection.
Despite the different connection options, all joints must be sealed. With a hidden connection method, a flexible water hose made of different materials or a copper tube can be used. If a copper tube is included with the product, then a flexible liner will have to be purchased separately.
Particular attention must be paid to the water pipe leading to the tank. It can be either with internal or external thread
If the thread is internal, you will need to install an adapter and use a sealing winding. After the connection is made, it is necessary to check the operation of the toilet cistern and the possibility of leaks. If everything works fine, tighten the fastening bolts until they stop and install the cover.
Experts recommend using screws when installing various types of plumbing fixtures, because... only they are the safest and you can minimize the risks of various kinds of problems, for example, with water in conditions of high humidity. In any case, when you go to a plumbing store, be sure to consult with consultants and salespeople: they will help you choose the most suitable option.
Plumbing with non-standard bowls
The previously developed standards satisfied the needs of the average European person. Over the past few decades, the height of people has increased, so appropriate adjustments have been made to ensure comfortable use of plumbing fixtures. Over 130 years, the height of the average person has increased by 15 cm , and the distance from foot to knee - by 6 cm . The current standards are not suitable for everyone, so for comfort in the toilet room, non-standard models with a high or low bowl are used.
A tall (royal) toilet is an ideal solution for people who are dissatisfied with the mass supply on the plumbing market.
Unlike the standard height, here the bowl is located at a level of 46-50 cm from the floor. Comfort for tall people is guaranteed. As a rule, the bathroom is complemented by a sink and furniture of non-standard sizes.
An excellent option is the Kolo Nova Pro M39045000 compact toilet with a bowl height of 460 mm and a total of 845 mm .
Low models are used in the opposite case. People with short stature or limited mobility reduce the distance between the floor and the bowl to protect themselves and ensure a comfortable environment in the bathroom.
This option is also suitable for saving space. As an example, you can use the Spanish plumbing fixtures ROCA Gap A34947800W with a height of 385 mm .
Height of toilets with a tank from the floor: norms up to 70 cm
When choosing models with a tank, you should pay attention not only to the height of the bowl, but also to the size of the entire structure. Correctly selected parameters help to facilitate the repair process and better think through the design of the room. For example, a boiler is often installed above a plumbing product, and in order to combine both devices, you need to know the dimensions in advance .
Standard parameters on the Russian market:
- width - 350-380 mm ;
- length - 620-600 mm ;
- height - 700-730 mm .
Photo 2. Turkish compact toilet IDEVIT Alfa Rimless SETK3104-0315-001-1-6200 with a height of 89.5 cm.
Tall models are, in most cases, used in bathrooms with a lot of free space. The devices are characterized by an increased distance from the floor to the bowl, the overall size of the structure and width. The height of non-standard products starts from 77 cm . As a rule, manufacturers do not create toilets higher than 90 cm , but there may be exceptions. As an example, you can pay attention to the Turkish compact toilet IDEVIT Alfa Rimless SETK3104-0315-001-1-6200 with a height of 89.5 cm .
Low models are also in demand. Compact products are purchased when it is necessary to save space in all planes. The distance from the floor to the top of the tank is up to 69 cm . Models from some manufacturers may be lower, up to 60 cm . For example, the ROCA Inspira Square A342537000 together with the tank occupies only 64.5 cm .
Important! It should be taken into account that for non-standard toilets the height of the bowl has been changed up or down.
Dimensions of built-in high toilets: what should they be
Hanging models have been in great demand lately. This is due to the aesthetics and ease of maintenance of the device.
to install the installation during a rough renovation , because it requires the installation of a special box or hiding plumbing communications in the walls. In this case, the tank is hidden, and all you see is the bowl and the button mounted on the wall. Standard parameters:
- width - 350-370 mm ;
- depth - 480-700 mm ;
- height - 500-600 mm .
In addition to standard dimensions, the installation height should be taken into account. The metal structure occupies from 110 to 130 cm . Therefore, the option is not suitable for bathrooms with limited space.
Important! Installations are recommended to be used only if the rough plumbing can be hidden in a wall or false box .
There are also non-standard installations, the height of which reaches up to 130 cm . In this case, it is almost impossible to place anything above the structure. The distance from the floor can only be adjusted using specific bowl designs.
Reference! When choosing a built-in bowl, consider the distance between the mounting bolts. As a rule, two main sizes - 15 or 18 cm .
Tools and materials for work
The kit for fixing the toilet depends on the method of carrying out this work. In the case of dowels, you must purchase the following list of products:
- yardstick;
- marking pencil or marker;
- electric drill;
- concrete drill (it is advisable to have an additional product as a spare);
- microfiber (rag or set of napkins);
- ammonia alcohol.
Fastening a toilet using construction adhesive or silicone sealant is carried out using the following tools and materials:
- sealing silicone sealant or construction adhesive;
- corner ruler, tape measure;
- marking pencil or marker;
- glue gun;
- narrow spatula;
- small rag;
- emery skin;
- ammonia.
If it was decided to install plumbing equipment on taffeta, then the kit for fastening the equipment should be as follows:
- wooden taffeta;
- a set of nails or anchors;
- cement mortar;
- screws (usually included);
- jackhammer.