The task of arranging a comfortable modern bathroom is usually one of the first things that owners consider when carrying out renovations in their apartment. An important component of the comfort created, of course, is a practical toilet that is harmoniously adapted to the interior. Indeed, in addition to its combination with surrounding objects, tiles, and the general concept of apartment renovation, it must be convenient to use, fully perform sanitary functions, and be reliable and durable household equipment.
General views
It is precisely taking into account the above characteristics that the owner undertaking a renovation should consider, as an option, a floor-standing toilet with a hidden cistern. Such products are installed on the decorative floor covering close to the wall. Such models successfully combine the properties of both classic floor and suspended installed frame products.
Attached toilets are equipped with flat flush cisterns connected to water supply and sewerage systems hidden behind a decorative wall. Therefore, attached-type equipment, being much cheaper than frame installations, becomes the optimal solution for rooms that combine a latrine and a bathroom.
In addition to performing the usual functions, the plumbing fixture can be supplemented with some convenient options.
- Microlift. A mechanism resembling a door closer. It smoothly lowers the lid, thereby protecting the product from mechanical damage and preventing the plastic from hitting the ceramic.
- Bidet. Faucet, to facilitate hygiene procedures, mounted on the bowl of a plumbing fixture.
Design
An attached or wall-mounted toilet is a fairly popular design.
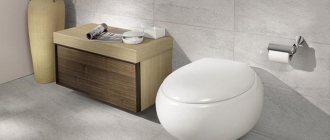
It is a monolithic plumbing device that has a streamlined shape. This toilet is suitable for both spacious bathrooms and small rooms. Attached toilets are characterized by a hidden, slightly less often external, flush system.
Attention! Before installing a floor-standing toilet, pay attention to its outlet. It can be oblique, straight and vertical. Therefore, you need to purchase an attached toilet based on the toilet outlet in your toilet.
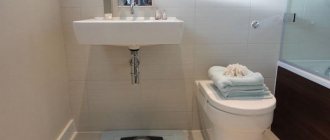
When you enter a bathroom that has a wall-mounted toilet, you will not see the cistern. This is his distinctive feature. Instead of a regular cistern, a flat device is installed, hidden behind the thickness of the wall.
Installation of an attached wall-mounted toilet
In addition to all of the above, the attached toilet has a useful device - a microlift. It makes lowering the toilet lid smoother and quieter. Some call this function a closer, by analogy with the mechanisms installed on furniture doors.
Let's look at the advantages and disadvantages
A floor-mounted toilet with a hidden cistern exhibits its undeniable advantages in the following:
- its tank is filled and emptied during the pouring process practically without unnecessary noise, due to the acoustic decoupling through the decorative wall, as well as additional foam inserts;
- it significantly saves space in the toilet, both actually and visually, which is especially important for typical small-sized apartments;
- the interior of the bathroom adds aesthetic appeal;
- does not require an expensive supporting frame for installation, which also simplifies installation activities compared to a suspended installed model.
The weaknesses of the described devices are relative in comparison with other types of plumbing products for similar purposes:
- the cost of attached toilets is noticeably higher than classic floor-standing products;
- if it is necessary to replace the tank or repair communications, there will be inconvenience associated with dismantling the decorative partition;
- Unlike hanging models, they are rigidly fixed to the floor surface, which makes cleaning underneath them difficult, and also does not always meet design requirements.
Installation without installation system
It turns out that you can install a built-in toilet without installation. In this case, you will install the built-in toilet directly to the wall, but the coupling for draining the liquid flow and the flush tank will be installed in a hidden monolithic concrete base. In addition, the concrete base will serve as a support for the toilet from below. As practice shows, this method of fastening is in no way inferior to the installation method, and will cost you even less. To do this you will need the following materials and tools:
Now let's look at the sequence of actions for correctly installing a built-in toilet on the base:
It is better to entrust the installation of a built-in toilet to professionals, but if you have construction skills, then you can do it yourself.
A built-in toilet is the optimal solution for small bathrooms. This hanging option saves space. The presence of a huge number of color and design solutions on the market allows you to choose a model exclusively to the buyer’s taste. Indeed, until recently, the bathroom in every house was a standardized room. Each apartment had a simple toilet. But, due to the improvement of technology, now, the toilet is something special and intimate, and everyone strives to make it as comfortable as possible.
Materials used in the production of sanitary ware
Many brands use the same ceramics (porcelain and earthenware) for the manufacture of toilets with hidden tanks as for their other products. However, at the same time, there are products made from composite materials, natural stone or stainless steel.
- Porcelain toilets are durable, resistant to household cleaning agents, do not retain unpleasant odors, and are therefore easy to clean and disinfect.
- Earthenware products are cheaper than porcelain analogues, being a classic representative of products for bathrooms. The material for its production, just like for porcelain, is a mixture of ceramic clays with other mineral additives. However, earthenware firing occurs at lower temperatures. Despite the fact that earthenware toilets are covered with a protective glaze, like earthenware ones, their practicality is somewhat lower - over time, microcracks appear on them, they retain their original whiteness less well.
- Models made of composite materials have a wide range of colors, which is achieved by adding special pigments to the polymer concrete base.
- Toilets with a hidden tank , made of stainless steel, are easy to clean and are the most durable, including shock-resistant. “Stainless steel” prevents the growth of bacteria. Public toilets are often equipped with such plumbing fixtures.
- Models made of natural stone are bright representatives of the elite class, which is confirmed by their highest price. As a rule, they are produced according to special orders for the installation of expensive bathrooms and saunas.
Design features of hidden models ↑
A tank walled up in the wall looks different than a regular drain tank. To make it, high-strength plastic is used instead of sparkling ceramics. The main thing for invisible equipment is not design delights, but reliability and flawless operation. Elastic plastic is not as fragile as earthenware or porcelain, it can easily withstand water pressure, and is not susceptible to corrosion or fungus.
The flat shape of the tank is explained by space saving, and in size and volume it is smaller and lighter than its traditional counterpart. Design differences include the location of the drain button. In conventional models it is located in the upper part of the tank (in older ones - in the form of a side lever), in hidden models it is brought out and is located directly above the bowl.
The flat tank does not take up much space
There are three types of push-button flush control:
- a simple button of a round or rectangular shape, when pressed, a single flush is performed in full;
- a double button that regulates water flow means complete or partial emptying of the container;
- “stop-flush” control - the first press starts the flush, the second – stops it.
In addition to mechanical control, there is also remote control - using a remote control or an infrared sensor (as soon as a person leaves the “working” area, automatic flushing occurs).
The internal fittings are practically the same and are controlled by the adjustable valve principle. All its parts, like connecting hoses, are made of strong, durable plastic.
Scheme of the built-in tank
How to choose a product, taking into account its form factor?
When choosing toilets with a hidden cistern to renovate your bathroom, in addition to its aesthetic aspects, you should take into account the method of connecting the equipment to the sewer inlet pipe, which must correspond to the release of the product. At the same time, there are only three types of releases: straight, oblique and vertical.
- The straight line occupies a horizontal position relative to the plane of the floor. Easily connects with a corrugated or corner adapter to a sewer pipe located in an inclined or vertical position;
- The oblique has an axis of inclination to the floor at a certain angle, if it coincides with the inlet pipe, it can be mounted without the use of adapters;
- The vertical one connects to the sewer pipe located under the toilet in the floor.
In facilitating the maintenance of toilet fixtures, its internal shape also plays a certain role. Let's look at typical models.
- With a plate bowl or in the form of a shelf. Everything that ends up on the plate surface is effectively washed off with water without causing splashes. However, remaining water on the shelf contributes to the appearance of an unpleasant odor and the deposition of salts. Another disadvantage is the increased water consumption.
- With a funnel-shaped bowl. Once in, the sewage does not linger and is directed through the water seal into the sewer system. At the same time, unpleasant odors practically do not have time to form, and water is also saved.
- With a bowl like a half-shelf. The model combines the two previous forms, where one side is flatter. There is less contamination of the toilet while saving water when flushing.
Installation work - installing the structure
Thanks to the installation, a toilet with a built-in tank can be installed in any part of the room. Of course, the main factor determining the position of the product is the location of the sewer system to which the device is connected. But, if you contact a competent specialist, this trouble will not become a problem.
Regardless of the position of the plumbing, there are only two types of installation. The first type is classic solutions, which look like a metal frame equipped with fasteners and supports. The second type of installation is a device that allows you to mount the toilet in the corner of the bathroom.
The rail installation deserves special attention. The key feature of this product is that in addition to the toilet, it can be used to install a urinal, bidet and washbasin, while combining the entire structure into one.
Installation procedure
Proper installation of a toilet with a built-in tank is established according to the following rules:
- Before starting installation work, it is necessary to check the quality of the floor and walls for strength, and check the good condition of communications (pipes). If the sewer pipe has become unusable over time and is crumbling before our eyes, it is recommended to have it repaired.
- These measures will protect you from accidental collapses, malfunctions and breakdowns, which will subsequently require repair measures;
- The next step is to fix the installation on the floor, screw in all the studs that are included in the structure of the built-in toilet;
- After fixing the installation, it is necessary to insulate it well - for these purposes, most craftsmen choose drywall, but other materials can also be used.
- The main advantage of drywall is its ease of installation and the fact that you can easily stick tiles or mosaics onto it;
- Now, you need to take the toilet and place it on the studs. The next step is to insulate the studs themselves using special washers;
- At the final stage, all that remains is the decorative finishing of the fixed structure, which can be made with any convenient and attractive material.
That's it, the installation work is completed - the built-in toilet cistern is securely hidden in the wall and the device functions perfectly. You will be pleased with the convenient design of this product and the low noise level produced by the tank.
Other design features
Another unshakable advantage of such products is the cost-effectiveness of flush tanks. Standardized tank models installed on simple toilets consume about 7-9 liters of water per flush. Built-in tanks consume about 4-5 liters per flush, which is 1.5-2 times more economical, while the quality of the flush does not suffer at all. If your home has water meters, such a toilet will be an excellent solution for your bathroom.
Having considered all the positive qualities and disadvantages, features of installation work and other characteristics, it becomes clear that toilets with a built-in tank are a smart and rational purchase. Such devices have a long service life and are unpretentious in terms of maintenance. If you have the means and you decide to renovate your bathroom, then purchasing a built-in toilet will be the ideal solution.
Drain device
The attached plumbing fixture is equipped with a special flat tank, which is specially designed for hidden installation. It is installed in a niche, which is made in wall structures to a depth of 10 cm.
The tank, made of high-quality polymer material, is highly durable and has a long service life, which also applies to all its filling. Therefore, situations with adjustments or repairs will not bother you for many years.
A concealed cistern for an attached toilet can be connected to the water supply network from any accessible position along the perimeter of its side surface. The built-in shut-off valve is a prerequisite for its operation.
The drain fittings are connected to the flow activation button by a pneumatic drive or cable. The control, consisting of two buttons, allows for significant water savings. One button initiates the pouring of half the volume of liquid, the other - the remaining part. And equipping with a device that allows you to interrupt the flow by pressing the button again makes it possible to independently regulate the amount of water discharged.
Toilets with double tank. No condensation
Due to the temperature difference between the walls of the tank and the air in the bathroom, drops of condensation appear on the toilet. If you don't want to waste time wiping up drips, choose a toilet with a dual tank. The tank in this model consists of two “layers”. Inside there is a plastic tank with drain fittings. A ceramic casing is placed on top of it. It prevents warm air from coming into contact with the cold walls of the drain tank, and hence the appearance of condensation. Another advantage of models with a double tank is the absence of a seam between the tank and the lid. It looks aesthetically pleasing and makes cleaning easier.
Installation steps
Installing a toilet tank means installing it in a wall niche as provided in the design, fastening it using dowels with self-tapping screws or anchors. Communications are connected to the device: water supply, spout pipe, and also a box-shaped extension for the button is attached with latches. The spout pipe is pre-adjusted to the length and height corresponding to the distance from the outlet of the plastic container to the entrance to the attached bowl.
Installation of a concealed tank, video:
Securely fixed pipelines and the tank are completely walled up with cement mortar or covered with sheet materials (plasterboard, magnesite, fiberglass, etc.), which, as a rule, are decorated with tiles, sometimes with cement plasters or other hydrophobic methods. On the outside of the screen (in its holes) there remains a socket for connecting to the sewer (for straight and oblique outlets) and a flush pipe, to which the attached toilet is later connected, as well as a protruding box-shaped extension of the button.
Final assembly of the push-button mechanism is carried out after trimming the extension flush with the outer surface of the decorative trim and checking the operation of the shut-off valves.
Next, the bowl itself is installed, which is initially placed in the intended location for marking. Having identified the points of the fastening elements, the product is moved to the side and holes are prepared for anchoring. After which you can connect the toilet to the water supply and sewerage pipes, installing it in place and tightening the fasteners. It is recommended to treat the back mating surface of the bowl with sealant.
Installation of a floor-mounted attached toilet, video:
Material
The materials from which wall-mounted and regular floor-standing toilets are made are exactly the same. This could be earthenware, porcelain or liquid stone, etc. In order to find out which materials are considered the best, you need to analyze their characteristics.
- Earthenware is one of the cheapest and most popular materials. Quite durable, but has a porous structure. It is for this reason that it gets dirty quickly. To solve the above problem, faience wall-mounted toilets are glazed, that is, a coating of sintered ceramic is applied. This makes caring for them easier.
- Porcelain is a more expensive material than earthenware. Its structure is denser and stronger, surpassing even glazed faience. A toilet made of this material gets dirty much less often.
Porcelain wall mounted toilet
- Liquid metal is another material from which wall mounted toilets are made. True, it is not used as often as the two previous types. The reason for this is the high cost of the product and low resistance to contamination.
- Stainless steel is a material that is very popular. Toilets made from it can mainly be found in public toilets. Stainless steel is easy to clean, bacteria do not grow on its surface and this metal cannot be broken.
Advice. A floor-standing toilet should be selected based on the conditions in which it will be used. So, stainless steel is suitable for a summer house, porcelain is suitable for a classic bathroom, and natural stone is suitable for an Art Deco room. Of course, this division is not suitable for many. You can independently decorate your room in a suitable style.
What else to consider?
- That the height of installation of plumbing fixtures depends on the tiles being laid, i.e. plus 12-20 mm to the semi-finished floor surface.
- That the connection of sewer systems is carried out with a rigid liner. Connection using corrugated cables is not recommended due to their rapid wear.
- That at all stages, until final fixation, control of the spatial orientation of the construction blocks is used using a level.
- That the connection of pipes will become easier and more reliable if plumbing silicone is used to connect them.
Compliance with simple installation techniques, as well as the recommendations of the factory instructions, which are necessarily included with the attached toilet , will provide you with a guaranteed long term of comfortable operation of this plumbing product.
Popular manufacturing companies
The Russian and European markets offer a wide range of wall-mounted toilets. Despite the one-sided opinion of repairmen that products from foreign manufacturers are more reliable, many can challenge this, because domestic products can also compete in quality. What you should pay attention to when purchasing is the installation. The service life of the toilet will depend on the performance characteristics.
Choose a reliable design from trusted manufacturers
Among all European brands, taking into account consumer reviews, we can make the top five.
- Grohe.
- Tece.
- Geberit
- Sanita.
- Viega.
These companies have proven themselves to be the best. Their products are distinguished by quality and reliability.
Installation installation ↑
Thanks to a brief description of the installation work, you will be able to install a hidden toilet cistern yourself. However, it should be remembered that different models may have technical features and differ in operating nuances, so you must use the instructions provided by the manufacturer.
Sample installation diagram from the manufacturer
Tools and materials ↑
Even when purchasing plumbing fixtures, you will find out that the installation is sold separately from the main equipment, but all the necessary pipes and fasteners are usually included with it. The consultant usually provides information about the equipment that should be purchased. You should also take care of the covering material in advance. This is usually a large sheet of drywall and a finishing product - primer, tile (with adhesive) or paint. Instead of drywall, you can use plastic decorative panels - they are appropriate if they are already present in the decoration of the bathroom.
Decorating drywall with mosaics
List of tools:
- hammer drill or drill for drilling holes;
- a set of adjustable wrenches and wrenches of the size stated in the instructions;
- marking kit – tape measure, level, pencil;
- screwdrivers;
- glue spatula or paint brush.
Other materials and tools are selected as needed.
Communications liner ↑
In older buildings, sewer and water pipes should be replaced. If new communications do not inspire confidence in their long-term performance, it is also necessary to replace them with better analogues. All pipe replacement work is carried out before installation work begins. You will need a plastic sewer outlet with a diameter of 110 mm and a water supply pipe of standard diameter (the best option, which does not require an adapter, is usually indicated in the instructions). The closer the device is located to the riser, the fewer problems you will encounter in further system maintenance (for example, removing blockages).
Connecting pipes to the installation
Frame installation ↑
It is important to secure the frame correctly, and for this you need to make precise markings. If the floor in the room is level, there will be no problems with installation. Using a level, we align the frame, adjusting the position with retractable rods and fixing pins. We try to attach the bowl to accurately determine its place on the frame. The rim should be at a standard height of 45 cm from the floor (if necessary, the position of the bowl can be easily adjusted). When the desired height is set, we string the toilet onto the studs and check the degree of comfort. If everything is satisfactory, we fix the frame exactly according to the marks to the floor or wall. For screws and dowels, fastening devices with holes are provided in the four corners.
Installation and alignment of the installation
We check the pipe connections to the frame. Try to avoid flexible hoses whose maximum service life is no more than 3 years. Hard plastic is more reliable, and it also ensures the stability of the structure as a whole.
Installation and connection of the toilet ↑
There are usually no problems with attaching the bowl; the main difficulty is connecting the pipes. The first supplies water for flushing, the second discharges wastewater into the sewer. To avoid leaks, you should select the correct size of the parts and ensure the tightness of the connections. Modern models, as a rule, are equipped with a set of eyeliners, which makes work easier.
Scheme of attaching the toilet to the frame
All that remains is to install a toilet without a tank. To ensure reliable connections, the fastening points are equipped with elastic gaskets and couplings. We put the bowl on the studs and fix it by carefully tightening the nuts. We fix the pipes in the same way. We connect the outlet to the sewer, trying to position them along the vertical axis. If levels of different heights arise, we use elbows for connections. We tighten the joints tightly and seal them. At this stage, you can do a control flush for the first time. If there are no leaks, you can safely install a drain button.
System testing
Cladding work should be carried out no earlier than you are confident in the impeccable functionality of the drainage system. To check, fill the tank several times and drain it. We test the joints for leaks (you can use a napkin or a dry cloth) and check the reliability of the toilet fastenings. Only after testing is completed can the construction of the partition begin.
Do-it-yourself installation installation:
Covering hidden equipment ↑
The most common and easiest way to disguise an installation is to install a plasterboard partition. There are two options:
- covering the entire wall (suitable for narrow walls and niches);
- creation of a box, partial cladding (up to the upper fastenings of the installation).
Both solutions are popular, but choosing the second frees up the upper part of the wall, which can be decorated with a painting or flower arrangement. The horizontal surface of the box plays the role of a table or shelf.
Glossy paneling
We install plasterboard in the traditional way - on a metal profile. In the place where the drain button is attached, we make a technical hole, which will be useful for repairs or maintenance. The final finish depends on the style and design of the bathroom or toilet. The easiest and most inexpensive way to decorate is to coat the primed surface with acrylic paint.