Modern plumbing systems are developing every year and as a result, designs appear on the markets that are significantly different from other, already familiar products. At the same time, consumption points deserve special attention, since they are the ones that combine several options for technical solutions and it is for them that a new device is released almost every year. Considering this, the question of how to repair a toilet cistern with a bottom connection is quite common.
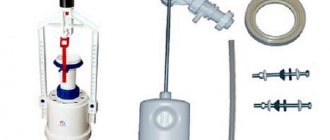
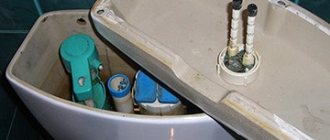
Amateur photos of the internal arrangement of such a system with its location in the tank
Flush tank design with bottom water supply
Main menu » Apartment » Toilet » What to prefer: shut-off valves for a toilet with bottom or side connections?
What to prefer: shut-off valves for a toilet with bottom or side connections?
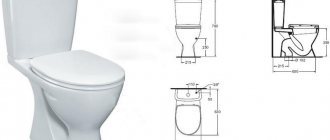
Modern housing is almost impossible to imagine without a well-equipped toilet room (or a combined bathroom). The toilet has become a common plumbing fixture in every apartment, house and office. Its design seems complicated to most ordinary people, and repair work is entrusted in most cases to professional plumbers.
Meanwhile, if you have repeatedly resorted to their services, you have probably encountered the following situation: the master who came on call removes the lid from the toilet tank, “does magic” for a minute or two, then reports that the work is done . Without even opening your suitcase with tools and spare parts.
This indicates that most problems associated with the locking mechanism of the toilet tank are quite easy to fix . And there is no need to turn to the services of a plumber, wait for his visit and spend extra money on paying for his labor.
Mechanism of action, device and differences
The design that performs the function of filling the container with water is divided into two main types:
- with top (side) connection;
- with bottom connection.
Shut-off valves for a toilet with a side connection are used in most modern modifications of flush cisterns in the budget segment - compact versions and designed for installation at a certain height from the toilet. It is characterized by ease of installation and ease of repair and adjustment work .
If the connection is on the side
The components of such a mechanism are as follows:
- Diaphragm or rod type shut-off valve . In domestic versions, a more inexpensive rod design is often used.
- Control lever (bar) . It can be made of brass or plastic.
- Float . It can be made of foam material or be a hollow plastic container.
- Filling tube . Designed to reduce the noise produced by the outflow of liquid when filling the tank.
There are modern modifications with a float moving along a vertical guide, but since this design is the main one for a system with a bottom line, its structure and principle of operation will be covered in the next subsection.
The operating principle of the filling mechanism with a horizontal control device is as follows:
- When the water level in the tank drops (flushing occurs), the float device lowers, dragging a rod with it, which opens the shut-off valve.
- Liquid begins to flow into the container, lifting the control element.
- When using a rod valve, the flow decreases gradually, and when using a diaphragm valve, it is blocked immediately and completely upon reaching a certain level.
If from below
The main structural elements of shut-off valves for a toilet cistern with a bottom connection are:
- float;
- guide;
- a glass into which the float device is lowered when draining liquid from the tank;
- a rod attached, on the one hand, to the float, on the other, to the locking device;
- membrane valve.
The operating principle of a flush cistern with a bottom water supply is as follows:
- When the toilet storage tank is emptied, the float moves down along the guide.
- The rod transmits force to the diaphragm valve, opening it.
- Water begins to flow into the tank.
- The float chamber rises to a level limited by the size of the control rod, after which the valve closes, stopping the flow of liquid into the container.
Frequent breakdowns of toilet fittings result in continuous leakage of water and subsequent costs and rust. Find out what to do if your cistern won't hold water.
Do you know how to install a flush cistern on a toilet yourself? It's not difficult, you just need to follow the instructions.
And from this article https://sansovet.com/remont/unitazy/bachki-s-knopkami.html you will learn how to repair a cistern with a button.
How to adjust it yourself?
Adjusting the flush cistern of a toilet with a bottom water supply is carried out by simply turning the adjusting screw . determining the position of the float on the rod. To increase the maximum liquid filling, you must rotate the screw counterclockwise, to decrease it, clockwise.
To adjust the water level in a storage tank with a side supply and a horizontal control device, it is necessary to move the float chamber along the rod.
By increasing the size of the lever, you can achieve an increase in the filling level of the tank and vice versa. To do this, you need to unscrew the fixing screw (or wing), move it to the desired position and lock it . Or simply move the float along the toothed plastic rod.
In designs with a metal rod, changes in the filling level of the container can be adjusted by simply bending the rod in the desired direction.
Comparison of both types and their disadvantages
Which locking device for the toilet cistern should you prefer - with top or bottom connection? The first design has been in use for a long time. Its advantages are ease of installation and maintenance. The following are considered disadvantages:
- Increased noise when filling the tank . Typically a soft polymer filling tube is used to reduce noise. But over time, it can fall off the pipe, leading to increased noise in the water intake.
In addition, a disconnected filler tube may well get between the bulb and the drain hole, preventing it from closing and leading to a constant leakage (and therefore inflow) of water.
- When using a design with a stem valve that gradually shuts off the flow of water into the tank, filling to the maximum level can occur within a few minutes . which is not always convenient, especially when installed in the toilet of a public office building.
- Another nuisance characteristic of fittings with a top connection and a horizontal arrangement of the control element is its displacement or detachment from the rod during operation . which will require intervention in the system.
- Inconvenient installation and repair . The lower connection, although more aesthetically pleasing, is less conspicuous, but leads to cramped conditions when installing it and repairing the toilet cistern.
- The diaphragm valve requires high quality water used . that is, the connection to the system must be made after the water filter. Otherwise, the valve will often become clogged, stopping the flow of liquid into the tank.
- Water leakage is possible at the connection point of the fittings . occurring due to insufficiently reliable fastening of the fixing nut or a violation of the properties of the rubber gasket.
The operation of a toilet, the tank of which is connected to the water supply system from below, also has some nuances:
A common “disease” of any type of locking mechanism is a violation of the tightness of the float, which will lead to its flooding, therefore, water will constantly flow into the tank and go into the sewer through the safety overflow tube. Therefore, it is better to give preference to foam modifications.
To summarize, we can say: if all installation rules are followed and a water filter is used, fittings with a bottom connection type are more reliable in operation and comfortable , creating a minimum of noise when filling the tank. But, on the other hand, designs with top connections are cheaper and easier to repair yourself.
Source: https://kanalizacia-doma.ru/ustrojstvo-smyvnogo-bachka-s-nizhnej-podvodkoj-vody.html
How to connect the tank
You can supply water to the device without contacting specialists. But still this process has its subtleties.
Also interesting: Which toilet to choose?
The work can be done quickly, but the main thing is to do it correctly.
Warning!
Before you begin installing the cistern, you should turn off the water supply from the water supply system.
This will not lead to unforeseen situations during the installation process.
After this, you should select the type of eyeliner.
Most often a rigid connection is used. Its design is formed from special steel tubes.
A flexible connection to the toilet canister is often used. It is made from simple hoses, which are characterized by high flexibility (that’s why the product got its name).
During use, the products do not lose their qualities. At the same time, it performs its functions no worse than a rigid insert.
Many experts believe that rubber liners are the right choice, especially when there is a reinforced coating. Proper installation will allow the device to serve for a long time.
When using flexible inserts, only cold water should be connected. The duration of normal functioning of the entire system depends on the quality of the product and correct installation.
You can also use metal eyeliner. It is created on the basis of a corrugated pipe. The element is considered reliable enough for a constant supply of water.
The next stage of installation is connecting the pre-selected supply to the pipeline or riser.
For this you can use a classic fitting. The other end of the insert should be connected to the corresponding hole in the cistern.
After this, it is worth checking the quality of all connections and their tightness. If the situation leaves much to be desired, then you can use rubber gaskets or sealants.
This will give you confidence that water will no longer pass through here until the material is completely worn out.
At the end, it is necessary to test the overall performance of the plumbing fixture several times. In the process of draining and collecting liquid into the tank, no difficulties or leaks should arise.
If defects or incorrect operation are found, then it is worth considering whether the installation was carried out correctly.
Do-it-yourself installation of toilet cistern fittings in three stages - Review +
Setting up the cistern fittings is the main task after installing the toilet. The cistern fittings are a system that provides regulation of its filling and flushing.
There are a huge variety of toilets on the modern market, but the cistern drain fittings are not so diverse. Geberit and Alcaplast are the most common models.
Any of the tank models (with a lever, with one button, with two buttons, with a chain) requires correct installation.
The installation principles are the same.
General information
Design of the toilet cistern mechanism:
- drain hole
- overflow tube
- valve covers with rubber
- tank filling mechanism
- drain mechanism
On a note!
Tools and materials needed to install fittings in the toilet cistern:
- pliers,
- locking mechanism
- adjustable wrench (two-inch),
- open-end wrenches,
- Water taps,
- screwdriver,
- flexible hose,
- silicone sealant.
The entire functionality of the tank fittings consists of two main mechanisms:
- Filling the tank
- Draining the tank
The first step is filling the tank
A float and a shut-off valve are responsible for regulating the water level in the toilet flush tank. The float goes down as the water level decreases. Due to this, the shut-off valve opens. The water level rises, the valve shuts off the water supply.
Second step - draining the water
The flush mechanism is responsible for the flow of water from the tank into the toilet. Using the damper (at the bottom side of the drainage unit) we regulate the amount of water remaining after the maximum flush. The damper can have from two to six positions that set its level.
The drain siphon and the drain lever (button) are responsible for draining the water. A siphon, usually a rubber cylinder resembling a plunger, seals the drain hole. If the siphon is faulty, water will leak.
Installation of toilet cistern fittings
The kit includes: fill valve, release valve, push-button assembly, tank mounting kit and gaskets. Depending on the type of tank filler, the filler valve can have a side connection or a bottom connection. The release valve can be single-level or two-level.
The main parameter for setting up the reinforcement is its height.
If the fittings were purchased separately from the tank, we configure it.
We measure the distance from the bottom of the tank to the surface of the lid
Important!
The ruler must be on the inner surface of the tank!
In the adjustment table we find the resulting size and set it on the wall of the reinforcement rack.
We unfasten the rod, tighten the clamps and move the rack to the desired value and attach the rods.
Important!
We attach the rods so that there is a free movement of the frame of 3 mm.
Installation of fittings is carried out in three stages.
The first stage is installation of valves
We twist the fastening nut of the exhaust valve and install it in the tank. We tighten the fastening nut on the back of the tank until it stops completely.
We do the same with the filling valve.
When installing a barrel with a side water supply, the filling valve is installed as follows: twist the fastening nut and remove the oblique washer.
Note!
The damper tube must be present on the valve and not fly off during installation!
If the valve does not fit and the filling valve is in the way, then you need to loosen the nut (1.5 turns is enough) and turn the upper part of the valve in the desired direction, after which the nut is tightened. Then the oblique washer and fastening nut are put on. The valve is set in a horizontal position.
Important! Make sure that the valves do not touch each other or the walls of the tank, and secure the nuts.
Stage two - installation of the tank
We install the gasket, assemble the mounting screws (washer, then cone seal). We insert the mounting bolts into the hole in the tank. We put rubber gaskets on the mounting screws. We install the tank and fix the wing nuts evenly. We install a flexible water supply hose.
The third stage is the installation of the tank lid and push-button assembly.
If the push-button assembly does not screw in, it means you have configured the fittings incorrectly. The filling valve needs to be reset.
Important!
The gap between the cover and the assembly should be 1-7mm.
After the final installation of the fittings, drain the water several times to ensure that there are no leaks and that the fittings are installed correctly.
If the drainage is not carried out correctly, it is necessary to adjust the water intake and drainage system.
For this:
- Disconnect the rod from the overflow pipe
- Press the latch to freely move the “glass” vertically
- Adjusting the position of the mechanism
- Install the overflow tube 2cm above the water level
- We fix the fittings and supply traction.
Important!
If water stops flowing into the filling valve, you need to clean the coarse filter.
Source: https://iseptick.ru/santekhnika/unitazy/nastrojka-armatury-slivnogo-bachka-samostoyatelno-poshagovaya-instrukciya.html
Flush tank for toilet: device, installation, configuration, repair
No matter how high-quality the toilet and fittings are, problems arise from time to time: either water does not fill, or, on the contrary, it constantly flows from the drain. All these problems are associated with fittings (drain and inlet valves), which are placed in the drain tank. Next, we’ll talk about how to install, change, adjust and repair it yourself, with your own hands.
No matter what the toilet looks like, the filling in the cistern will be similar
Internal organization
The toilet cistern consists of two simple systems: collecting water and draining it. To troubleshoot possible problems, you need to understand how everything works and works. First, let's look at what parts the old-style toilet cistern consists of. Their system is more understandable and visual, and the operation of more modern devices will be clear by analogy.
The internal fittings of this type of tank are very simple. The water supply system is an inlet valve with a float mechanism. The drain system is a lever and a bulb with a drain valve inside. There is also an overflow tube - it drains excess water from the tank, bypassing the drain hole.
Old design cistern design
The main thing in this design is the correct operation of the water supply system. A more detailed diagram of its device is shown in the figure below. The inlet valve is connected to the float using a curved lever. This lever presses on the piston, which opens/closes the water supply.
When filling the tank, the float is in the lower position. Its lever does not press on the piston and it is pressed out by water pressure, opening the outlet to the pipe. The water is gradually filling up. As the water level rises, the float rises. Gradually it presses the piston, cutting off the water supply.
The device of the float mechanism in the toilet tank
The system is simple and effective; the filling level of the tank can be changed by bending the lever slightly. The disadvantage of this system is the noticeable noise when filling.
Now let's look at how draining water in a tank works. In the version shown in the figure above, the drain hole is blocked by the drain valve bulb. There is a chain attached to the bulb, which is connected to the drain lever. We press the lever, lift the bulb, the water drains into the hole. When the level drops, the float moves down, opening the water supply. This is how this type of cistern works.
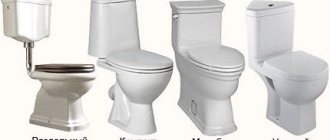
Modern models with lever flush
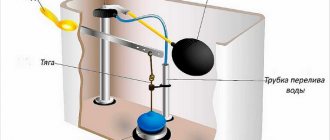
There is less noise when filling toilet tanks with bottom water supply. This is a more modern version of the device described above. Here the tap/inlet valve is hidden inside the tank - in a tube (in the photo there is a gray tube to which the float is connected).
Drain tank device with water supply from below
The operating mechanism is the same - the float is lowered - the valve is open, water flows. The tank filled, the float rose, and the valve shut off the water. The drainage system remained almost unchanged in this version. The same valve that rises when you press the lever. The water overflow system has hardly changed either. This is also a tube, but it goes into the same drain.
You can clearly see the operation of the drain tank of such a system in the video.
With button
Models of toilet tanks with a button have similar water inlet fittings (some with side water supply, some from the bottom). Their drain fittings are of a different type.
Tank device with push-button drain
The system shown in the photo is most often found in domestically produced toilets. It is inexpensive and reliable. The design of imported units is different. They basically have a bottom water supply and another drain and overflow device (pictured below).
Imported fittings for the cistern
There are different such systems:
- with one button the water is drained while the button is pressed;
- draining starts when pressed, stops when pressed again;
The working mechanism here is slightly different, although the principle remains the same. In this fitting, when you press the button, the glass rises, blocking the drain. The stand remains motionless. In short, this is all the difference. The drain is adjusted using a rotary nut or a special lever.
Installation and replacement of cistern fittings
A significant part of toilet problems can be solved by adjusting or replacing the tank fittings. In any case, you need to know how to disassemble and assemble the insides of the tank. This skill will definitely come in handy. When replacing, you first need to dismantle the old device and then install the new one. We will describe in detail the entire process, including the installation of new fittings.
How to remove the cap from the tank
If a flush tank with a button is being repaired, it is not always immediately clear how to remove the lid. This is easy to do: press the button and turn the ring.
How to remove the lid from a tank with a button
If you can’t press the button with your fingers, examine its inner rim. There are two special slots there. You can take a screwdriver with a narrow end and use it to turn the ring a little. Then you can unscrew it with your fingers.
After this, remove the button by pulling it up. That's it, the lid can be lifted.
Removing the tank
To replace the old cistern fittings, it must be removed from the toilet bowl. First of all, turn off the water supply, then drain the water from the tank. Then, using wrenches, remove the water supply hose (it is attached to the side or bottom).
When the water supply is located at the bottom, it is located next to the mounting studs
Next, you need to disconnect the tank from the toilet bowl. If you look underneath it, you can see bolts that are tightened with nuts. So we unscrew them using a set of open-end wrenches or an adjustable wrench. Before doing this, place a container or a rag near the toilet - a certain amount of water always remains in the tank, and when you unscrew the nuts, it will drain.
After unscrewing two nuts - on the right and on the left, we remove the tank. There is usually a gasket left on the bowl. If it has become deformed or dried out, it is also advisable to replace it.
Remove the drainage tank from the bowl
Place the tank on a flat surface. There is a large plastic nut at the bottom. It holds the drain mechanism, we unscrew it. Sometimes the first turns have to be made using an adjustable wrench, but do not over-tighten it - the plastic can be brittle.
Unscrew the nut holding the drain mechanism
Now the water drainage mechanism can be easily removed.
This is what the cistern fittings look like after several years of operation.
Similarly, remove the water supply mechanism. With bottom feed, the fastening nut is also located at the bottom (right or left of center).
Water supply mechanism fastening nut
This was the removal of the water supply device to the tank
After that, we look inside the drain tank. Usually, rusty sediment, small metal particles, sand, etc. accumulate at the bottom. All this must be removed and, if possible, washed. The inside must be clean - any debris caught under the gaskets can cause a leak. After this, we begin the installation of new fittings.
Installation of cistern fittings
Everything happens in reverse order. First, we install a new drain mechanism stand. We unscrew the plastic nut from it and put a rubber gasket on the pipe. It can be white (as in the photo) or black.
We put a rubber gasket on the thread
Place the device inside the container and screw the plastic nut on the outside. We twist it as far as possible with our fingers, then tighten it a little with a wrench. You can't overtighten it - it will burst.
Install and tighten the nut
Sealing
Now on the toilet bowl we replace the o-ring that seals its connection with the flush cistern. Dirt and rust often accumulate in this place - we wipe it off first, the seat should be dry and clean.
Install the O-ring
We install mounting bolts inside the tank, not forgetting to put gaskets. We put the drain tank in place until it can be leveled. The main thing is to get the screws and the outlet part into the seats. Take a washer and nut and screw them onto the screws.
Tighten the fastening
When both nuts are installed, but not yet tightened, level the container. Then, using a wrench, we begin to tighten the fastening. We turn it a few turns, first from the right, then from the left.
Install the exhaust valve
Lastly, install the inlet valve for the drain tank. It could have been installed earlier, but then it would be inconvenient to install the mounting bolts - there is too little space. We also put a gasket on the outlet pipe, then install it inside and secure it with a nut.
Tighten the intake valve mounting nut
The next step is to connect water to the same pipe. Before connecting the flexible water hose, open the water for a while, giving the opportunity to remove scale, which accumulates every time after closing the tap, even for a short time. After draining a certain amount of water (place a bucket so as not to wet the floor), connect the hose to the fitting (turn off the water again).
Connecting water to the toilet tank
Although the fitting is metal, there is no need to tighten this connection too much - first with your fingers, then one turn with a wrench. If you notice drops when you turn on the water, you can tighten it another half turn.
After this, we check whether the system is working correctly. If everything is correct, install the cover and screw the button. You can test it again. This completes the installation of the drain tank fittings.
As you can see, everything can be done with your own hands.
Adjustment and repair
When using the toilet, problems periodically arise - sometimes it flows, sometimes, on the contrary, water does not fill into it. Sometimes, tired of the inconvenience, people buy new toilets. But in vain. Most faults are resolved in 10-20 minutes. Moreover, everything is so simple that anyone can do it. You don't have to call a plumber. You can do everything yourself.
Adjusting the water level
We will talk about devices with bottom water supply. After installation, the toilet cistern must be adjusted. By default, they come from the factory set to the maximum amount of water in the container. This amount is often excessive. With the help of simple adjustments we can reduce the volume of water in the tank. For this:
- Turn off the water supply and drain the water.
- Unscrew the button.
- Remove the cover. Where is the adjusting screw located?
- There is a plastic screw on the float mechanism. By unscrewing/twisting it we change the amount of water. If you need to reduce the amount of water, tighten the screw, lowering the float down. The next time you fill (you can turn on the water), the water level should drop.
- Reinstall the cover and button.
The same procedure is necessary if water is constantly leaking from the tank. One of the reasons is that the float is raised too high. Because of this, water flows through the overflow system.
With a side water supply and a float mechanism, adjustment is even simpler - we change the position of the float by bending its lever. On the one hand it is simpler, but on the other hand it is more difficult. You have to bend it many times to achieve the required level.
By bending the float lever we change the water level in the drain tank
Toilet tank is leaking
If the water in the toilet constantly leaks and its level is normal, we move on. There are several reasons for this leak. And if so, then the methods of elimination will be different.
- The rubber seal under the drain valve in the tank has silted up, dirt has gotten under it, and a groove (or several) has appeared on its surface. The method of treatment is to clean the existing gasket or replace it with a new one. To resuscitate the old one, you need to: turn off the water, drain it,
- remove the drain mechanism by unscrewing the plastic nut from below;
- pull out the drain valve, remove and examine the gasket, clean it of settled particles, if necessary (there are grooves), sand it with very fine sandpaper until smooth;
- install it in place, connect everything and check operation.
- The trigger mechanism itself was demolished. To check whether this is the case, you can lightly press the mechanism with the cover removed. If the leak stops, that means this is the problem. If it still leaks, you should try cleaning the gasket (described above) or replacing it. If the flow stops when pressed, you can replace the fittings or weight the glass. Where to put the weighting agent To do this, remove the release mechanism and place something heavy in its lower part. This could be several pieces of metal, a sock filled with pennies, sand, etc. We install the device in place and check the operation.
Water does not fill
Another problem that you can fix yourself is that water does not fill into the drain tank. Most likely the problem is a blockage - the filter or tubes are clogged. It's a long story, better watch the video.
Source: https://stroychik.ru/sanuzel/slivnoj-bachok-unitaza-ustrojstvo-ustanovka-regulirovka-remont
Basic repair methods
If the plumbing tank is initially equipped with high-quality fittings, it can last up to 20 years, but breakdowns often occur much earlier. However, many of them can be dealt with without much difficulty. Basic troubleshooting methods:
- If problems with the inlet membrane are caused by clogging with rust, scale or other large debris, the device component must be cleaned of contaminants. Installing a coarse filter before the water supply enters the tank will help completely solve the problem: it will trap large insoluble particles, and the toilet will last longer without failures.
- If the water does not drain when you press the flush button, you need to remove the cover and find the cause of the device malfunction. Button failure is usually associated with problems with plastic parts that will require replacement.
- If water does not fill the container quickly enough, it is necessary to adjust the position of the overflow tube. It should be located at least a centimeter below the button, the fittings must be placed in the correct position.
- If leaks appear at the threaded connections of toilet bowls, they can be eliminated by replacing the threaded gaskets. The connection is disassembled, new gaskets are installed, after which it is important to reassemble it correctly.
- If the pressure of the toilet flush has deteriorated, the cause is most often large particles of lime deposits and rust that have gotten into the hole. It must be cleaned of contaminants.
If you have never repaired toilets before or have never worked with plumbing, it is best to leave the task to a professional.
Leaks not only disrupt the comfort of using the fittings: they significantly increase water consumption, which means that utility bills increase. In addition, there is a risk of flooding your neighbors, after which you will also have to pay for someone else’s repairs. Toilet problems can be avoided if minor problems are corrected in a timely manner.
Bottom water supply to the toilet: design and installation features
Modern plumbing systems are developing every year and as a result, designs appear on the markets that are significantly different from other, already familiar products.
At the same time, consumption points deserve special attention, since they are the ones that combine several options for technical solutions and it is for them that a new device is released almost every year.
Considering this, the question of how to repair a toilet cistern with a bottom connection is quite common.
Amateur photos of the internal arrangement of such a system with its location in the tank
Advantages and disadvantages
To begin with, it is necessary to say that this article will not talk about specific models, but about the general system.
The fact is that usually no one is interested in which inlet valve for a toilet with a bottom supply is used, and most often questions are asked about design features and technical solutions.
People want to know which product is best to choose and what its advantages are.
Some designs of this type of tank arrangement are very similar to products with side entry, although they are considered less practical
- First of all, it should be noted that such structures have a good appearance, since all the pipes are hidden . At the same time, a toilet with a bottom water supply usually has a rather original shape and design.
Another type of design with bottom water entry into the tank
- The fact that these systems are practically silent deserves special attention . There is no nasty sound of pouring water, which so irritates many users.
- It also needs to be said that a toilet with a bottom water supply is considered one of the most practical . This design has a high level of reliability and failures are much less common for products with side entry.
Tip: Ceramic manufacturers usually do not equip their products with an internal cistern mechanism.
Therefore, it is worth selecting it separately, based on the internal configuration.
With a side entry, pipes will always be visible, which greatly spoil the appearance and sometimes interfere with the convenient location of the toilet in the room
The most basic disadvantage identified when using this design is the inconvenience of installation. This is also reflected in a process such as repairing a flush cistern with a bottom water supply, since it may require complete removal of the product.
Some models of toilets with bottom entry are also equipped with not very beautiful inlet valves, which means that the device itself should be chosen very carefully
The fact that such a system breaks down quite rarely deserves special attention. However, when this happens, it is much easier to completely replace the entire assembly than to change an individual element. (See also the article Anti-splash toilet: features.)
Individual parts of such structures may have an original appearance and their own operating characteristics.
Typically, products of this type began to be used in European or American countries, which means that the first such products were manufactured according to the standards of these places. Taking this into account, when installing it yourself, you must immediately ensure that you have all the necessary adapters or couplings. However, some of them may be unique or very specific.
Advice! When purchasing such a design for a specific product, it is best to make the purchase together and in one store.
This way you can check the possibility of installation on site and immediately determine compatibility with a specific model.
The original appearance of such toilets sometimes involves organizing a water supply through the seat itself, which is attached to the tank over the entire area
Considering that automation for a toilet cistern with a bottom line has been used relatively recently in our country, many craftsmen are experiencing certain difficulties with its installation and repair. However, it should be said right away that there is nothing complicated in these processes, although it has certain differences.
Some types of such structures have their own individual characteristics and, accordingly, their own installation method, suitable only for them
Installation
- First of all, it should be noted that all such products have their own technical passport, which is accompanied by installation instructions.
If these documents are not included in the kit, then you should not purchase it. It is also important to mention that the toilet itself usually comes with the necessary connecting elements and fasteners.
Usually only the pipe itself is connected to the inlet valve using wrenches, although sometimes they are used to tighten the control nut on the ceramic itself
- When starting installation, you first need to install the lower part of the toilet, fixing it in the required position. Before this, it is recommended to check the correctness of the water supply and the length of the hoses. If the need arises, the supply system can be modified in accordance with the design of the product.
- The next step will be to install the tank. It is at this moment that the internal structure is installed.
Some installation instructions contain detailed drawings of these structures, which is very helpful for self-assembly, since most manufacturers supply these parts partially disassembled
- Usually, the filler valve for a toilet with a bottom connection is first installed when connecting the tank itself. To do this, sealed rubber bands and adapters are fixed. Some designs assume that the inlet valve will be installed at the same moment, but it all depends on the specific model.
- All other elements are assembled according to the instructions and drawings in it. However, it should immediately be noted that first it makes sense to completely disassemble the drainage device and then reassemble it. This will allow you to independently verify the tightness of the connections and the level of clamping of the parts.
Advice! All elements of such systems are assembled by hand without the help of a special tool.
However, this must be done so that the connections are sufficiently tight.
Sometimes the water level marks on the product do not correspond to reality and you often have to make the adjustment yourself
Maintenance and repair
Usually the biggest problem when setting up and maintaining such a system is the question of how to adjust the toilet tank with a bottom line. This is due to the fact that it has a fundamentally different design, although it is based on a float.
Holes that are not used for introducing water into the tank should be closed with special plugs, but they are not always included in the delivery of such mechanisms and must be purchased separately
First of all, it is necessary to fill the tank with water so that its level does not reach the overflow hole or funnel by 1-2 cm. After this, adjust the float so that, floating on the surface, it closes the inlet valve at the entrance to the tank.
Repair of such products does not require quite a long time. Therefore, sometimes it is much easier to replace an entire unit than to repair some parts. The fact is that the price of such a device is relatively low, and the simplicity of the design significantly increases its service life.
However, there are situations when replacing the flush system involves almost complete disassembly of the toilet. Therefore, it is worth remembering that products with metal elements that are subject to corrosion do not need to be purchased at all. Some craftsmen, for lack of an alternative, simply replace the brackets and strips with structures made of stainless material.
Advice! When purchasing a specific model of such a drain system, you need to immediately buy some spare parts for it. In this case, special attention should be paid to rubber gaskets and seals, which fail most quickly.
The fact is that after a certain time they may not be on sale.
Partial replacement of the drain system using stainless steel parts
Recommendations from the experts
- You need to be very careful when working near ceramics with a tool. Even minor mechanical damage or impact can lead to a chip or crack.
- If, after installation, leaks were found in the contact areas between the outlet valve of the toilet cistern and the drain hole, then it is worth doing a little grinding or cleaning the surface of all contacting elements.
If this defect has not been eliminated, then you should contact the seller for a refund or replacement. - When the system is being repaired, it is worth cleaning all parts from rust.
However, this must be done very carefully so as not to damage the parts on which it appeared.
Sometimes even such a simple job is associated with a number of difficulties and some people need to turn to specialists to complete it