0
(0)
Looking at the ingenious interweaving of sewer, water pipes, hoses, having “talked” enough with gentlemen plumbers from the housing department who arrived on a regular visit regarding an extraordinary blockage or leak, after a superficial study of the structure of the toilet, having re-read a bunch of responses and advice from experienced people, you come to Volence-nolens I conclude that a toilet with a bottom water supply is the best option.
How exactly does a dual-flush toilet help save water?
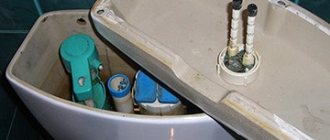
This drainage system operates in two versions - economical and standard. For consumer clarity, the mechanism is equipped with two buttons that differ from each other in size . 6-8 liters leave the tank . Small - starts the economy mode and the system releases 2-4 liters per flush.
Photo 1. When you press the large button, the standard shutter mode is launched, and the small button launches the economy mode.
This type of descent should not be underestimated, because modern systems are equipped with a special auger, which not only drains the liquid down, but forces it to rotate intensively in a circle, which increases the flow force and has a good effect on the cleanliness of the plumbing .
Important! If the double flush mechanism is installed incorrectly, pressing the small button may provoke a complete flush . It's worth paying attention to this.
Equipment installation
It is not difficult to buy shut-off valves at any plumbing store, but it would be better to install the branded components included in the kit. Thus, there is a greater likelihood of matching all components.
To install the cistern yourself, you need the following tools:
- wrenches: adjustable and open-end;
- bendable hose;
- screwdriver;
- plumbing system;
- gaskets of the required size;
- fuma made of rubber.
The instructions for installing such equipment include several stages. Initially, you should install the lower part of the drain assembly in the tank, the main thing is to make a tight fit to the outlet hole. Install a rubber gasket between the bottom of the container and the base. Then install the tank on the toilet.
If this is a drain tank device with a button with a bottom water supply, then before installing the structure, the elements that will supply the liquid should be correctly installed. In this system, rubber gaskets should be firmly secured. They will help avoid leakage. In a structure placed on top, these elements will not be needed, since they are above the water level.
The next step will be to attach a bendable hose to the riser fitting and attach a water tap, allowing, if necessary, to carry out repairs and shut off the flow of water. Typically, hoses have nut-spacer elements in their design, which ensure fastening strength. However, craftsmen most often build in a fuma for greater reliability. After connecting the tank to the water supply system, the float should be adjusted. The liquid level should be 15 cm below the edge of the tank.
At the last stage of installation, you will need to install the mechanism. The top fittings should be placed in the hole of the cover and secured with decorative elements covering the hole.
Installation of fittings
Even a non-professional can install the mechanism in the flush cistern. Initially, you should read the instructions included with the kit; you shouldn’t neglect to study them.
- First, the filling valve is installed; adapters and gaskets are used for this. For some toilet models, the filler and inlet valves are installed simultaneously.
- The system can be installed in the flush cistern before the toilet is completely installed; to do this, place a rubber gasket on top of the drain system. Place the mechanism directly into the flush tank and secure it with a nut.
- All fasteners intended to secure the mechanism are equipped with rubber gaskets on the inside and plastic gaskets on the outside. Rubber gaskets can be treated with sealant. It is advisable to carry out this procedure even for new membranes and gaskets. Replacing a failed gasket or membrane by disassembling and assembling the device.
- If the toilet is not monolithic, then the gasket located between the tank and the bowl is also treated with sealant.
- Parts of the fittings should not touch the inner walls of the tank; a gap of 0.5 cm should be left.
- Upon completion of installation, the flush tank is installed on the toilet.
- Place the lid on the tank and screw on the flush button.
- Add water and test the drain.
Operating principle of a drain mechanism with two buttons
Everything about the principles of operation of such a product - how the mechanism works and how the process of collecting and discharging water occurs.
Device of two-button fittings with bottom connection
Two-button fittings include the following elements:
- fill valve;
- drain column;
- float;
- gasket between the tank and the bowl of the product;
- gasket for the drain column;
- nut for fastening the column;
- bolts for attaching to the toilet.
The dual-mode drain mechanism is designed in such a way that one button in it is responsible for emptying part of the tank (half the volume of the tank), the second is responsible for completely draining it .
Reference! The float valve, float and all levers are one solid mechanism , which in height occupies almost the entire space of the tank.
It simultaneously performs 3 main functions independently of each other:
- filling;
- drain;
- overfill protection
Putting water into a tank: how it works
Filling the tank follows the same principle as in a conventional mechanism .
After emptying, water is supplied to the tank from the water supply system through a flexible hose on which a special shut-off valve is installed, connected to a float.
The liquid is drawn to its set level along with the float, which closes the supply valve, and the collection of water stops.
In case of a malfunction a special tube is provided connected to the drain column. If the volume of liquid exceeds the maximum permissible level, it will begin to overflow into this tube and go down into the toilet.
Economical drainage: how to reduce consumption
The release mechanism, depending on the manufacturer of the fittings, can be designed differently . In most cases, it provides two valves in the drain column. The small button affects only the upper valve , and the large one affects the lower one .
When you press a small button, only the upper valve opens and the water descends to the level of the border with the lower valve, usually about 15-20 cm from the bottom of the tank .
When you press the big button, both valves open and all the contents are flushed. In addition, the volume of drained liquid itself is set with special sliders.
The fittings have a vertical “slider” that moves up and down. This is the low flow regulator. The higher it is set, the less water will be released when the small button is pressed.
At the bottom of the device there is a second “slider” that moves in a horizontal direction. This is a regulator of the remaining water after the tank is completely emptied. Typically it has a score from 1 to 6 . At one , the system will leave a minimum volume of water in the tank and the higher the indicator, the greater the remaining liquid will be.
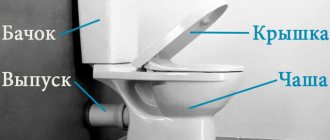
Flush tank design with bottom water supply
Main menu » Apartment » Toilet » What to prefer: shut-off valves for a toilet with bottom or side connections?
What to prefer: shut-off valves for a toilet with bottom or side connections?
Modern housing is almost impossible to imagine without a well-equipped toilet room (or a combined bathroom). The toilet has become a common plumbing fixture in every apartment, house and office. Its design seems complicated to most ordinary people, and repair work is entrusted in most cases to professional plumbers.
Meanwhile, if you have repeatedly resorted to their services, you have probably encountered the following situation: the master who came on call removes the lid from the toilet tank, “does magic” for a minute or two, then reports that the work is done . Without even opening your suitcase with tools and spare parts.
This indicates that most problems associated with the locking mechanism of the toilet tank are quite easy to fix . And there is no need to turn to the services of a plumber, wait for his visit and spend extra money on paying for his labor.
Mechanism of action, device and differences
The design that performs the function of filling the container with water is divided into two main types:
- with top (side) connection;
- with bottom connection.
Shut-off valves for a toilet with a side connection are used in most modern modifications of flush cisterns in the budget segment - compact versions and designed for installation at a certain height from the toilet. It is characterized by ease of installation and ease of repair and adjustment work .
If the connection is on the side
The components of such a mechanism are as follows:
- Diaphragm or rod type shut-off valve . In domestic versions, a more inexpensive rod design is often used.
- Control lever (bar) . It can be made of brass or plastic.
- Float . It can be made of foam material or be a hollow plastic container.
- Filling tube . Designed to reduce the noise produced by the outflow of liquid when filling the tank.
There are modern modifications with a float moving along a vertical guide, but since this design is the main one for a system with a bottom line, its structure and principle of operation will be covered in the next subsection.
The operating principle of the filling mechanism with a horizontal control device is as follows:
- When the water level in the tank drops (flushing occurs), the float device lowers, dragging a rod with it, which opens the shut-off valve.
- Liquid begins to flow into the container, lifting the control element.
- When using a rod valve, the flow decreases gradually, and when using a diaphragm valve, it is blocked immediately and completely upon reaching a certain level.
If from below
The main structural elements of shut-off valves for a toilet cistern with a bottom connection are:
- float;
- guide;
- a glass into which the float device is lowered when draining liquid from the tank;
- a rod attached, on the one hand, to the float, on the other, to the locking device;
- membrane valve.
The operating principle of a flush cistern with a bottom water supply is as follows:
- When the toilet storage tank is emptied, the float moves down along the guide.
- The rod transmits force to the diaphragm valve, opening it.
- Water begins to flow into the tank.
- The float chamber rises to a level limited by the size of the control rod, after which the valve closes, stopping the flow of liquid into the container.
Frequent breakdowns of toilet fittings result in continuous leakage of water and subsequent costs and rust. Find out what to do if your cistern won't hold water.
Do you know how to install a flush cistern on a toilet yourself? It's not difficult, you just need to follow the instructions.
And from this article https://sansovet.com/remont/unitazy/bachki-s-knopkami.html you will learn how to repair a cistern with a button.
How to adjust it yourself?
Adjusting the flush cistern of a toilet with a bottom water supply is carried out by simply turning the adjusting screw . determining the position of the float on the rod. To increase the maximum liquid filling, you must rotate the screw counterclockwise, to decrease it, clockwise.
To adjust the water level in a storage tank with a side supply and a horizontal control device, it is necessary to move the float chamber along the rod.
By increasing the size of the lever, you can achieve an increase in the filling level of the tank and vice versa. To do this, you need to unscrew the fixing screw (or wing), move it to the desired position and lock it . Or simply move the float along the toothed plastic rod.
In designs with a metal rod, changes in the filling level of the container can be adjusted by simply bending the rod in the desired direction.
Comparison of both types and their disadvantages
Which locking device for the toilet cistern should you prefer - with top or bottom connection? The first design has been in use for a long time. Its advantages are ease of installation and maintenance. The following are considered disadvantages:
- Increased noise when filling the tank . Typically a soft polymer filling tube is used to reduce noise. But over time, it can fall off the pipe, leading to increased noise in the water intake.
In addition, a disconnected filler tube may well get between the bulb and the drain hole, preventing it from closing and leading to a constant leakage (and therefore inflow) of water.
- When using a design with a stem valve that gradually shuts off the flow of water into the tank, filling to the maximum level can occur within a few minutes . which is not always convenient, especially when installed in the toilet of a public office building.
- Another nuisance characteristic of fittings with a top connection and a horizontal arrangement of the control element is its displacement or detachment from the rod during operation . which will require intervention in the system.
- Inconvenient installation and repair . The lower connection, although more aesthetically pleasing, is less conspicuous, but leads to cramped conditions when installing it and repairing the toilet cistern.
- The diaphragm valve requires high quality water used . that is, the connection to the system must be made after the water filter. Otherwise, the valve will often become clogged, stopping the flow of liquid into the tank.
- Water leakage is possible at the connection point of the fittings . occurring due to insufficiently reliable fastening of the fixing nut or a violation of the properties of the rubber gasket.
The operation of a toilet, the tank of which is connected to the water supply system from below, also has some nuances:
A common “disease” of any type of locking mechanism is a violation of the tightness of the float, which will lead to its flooding, therefore, water will constantly flow into the tank and go into the sewer through the safety overflow tube. Therefore, it is better to give preference to foam modifications.
To summarize, we can say: if all installation rules are followed and a water filter is used, fittings with a bottom connection type are more reliable in operation and comfortable , creating a minimum of noise when filling the tank. But, on the other hand, designs with top connections are cheaper and easier to repair yourself.
Source: https://kanalizacia-doma.ru/ustrojstvo-smyvnogo-bachka-s-nizhnej-podvodkoj-vody.html
Toilet cistern design
Today, the construction products market includes a wide variety of flush cisterns; their differences lie in the source material, the working arrangement of the parts, price and quality.
Toilet bull with one flush button
- with one flush button;
- with a pair of flush buttons;
- with a device that has two modes.
Relatively recently, a mechanism appeared on sale that included two buttons. This system can reduce water consumption. Using one button, all the liquid flows out from the drain tank; using another button, only a part will drain. The flushing procedure itself also looks different:
- Water enters the toilet directly from the flush cistern; here the water moves in one direction.
- During flushing, water constantly flows in different directions. This drain is more efficient, but it produces a lot of noise.
In order not to make a mistake in choosing such a device, and in the future to easily carry out assembly and repairs, it is worth knowing its design. The mechanism of operation of flush cisterns is simple: its work begins with collecting the required amount of water and discharging it into the sewer through the toilet.
We invite you to familiarize yourself with How can you pay a debt to bailiffs quickly and without commission?
To some extent, the design resembles a conventional water seal, which includes a seal, levers and a float. By independently pressing the lever or button on the lid, water flows out, while performing the most important tasks - eliminating waste into the sewer.
The invisible part of the structure includes:
- stub;
- float valve;
- drain fittings.
Flush tank for toilet: device, installation, configuration, repair
No matter how high-quality the toilet and fittings are, problems arise from time to time: either water does not fill, or, on the contrary, it constantly flows from the drain. All these problems are associated with fittings (drain and inlet valves), which are placed in the drain tank. Next, we’ll talk about how to install, change, adjust and repair it yourself, with your own hands.
No matter what the toilet looks like, the filling in the cistern will be similar
Internal organization
The toilet cistern consists of two simple systems: collecting water and draining it. To troubleshoot possible problems, you need to understand how everything works and works. First, let's look at what parts the old-style toilet cistern consists of. Their system is more understandable and visual, and the operation of more modern devices will be clear by analogy.
The internal fittings of this type of tank are very simple. The water supply system is an inlet valve with a float mechanism. The drain system is a lever and a bulb with a drain valve inside. There is also an overflow tube - it drains excess water from the tank, bypassing the drain hole.
Old design cistern design
The main thing in this design is the correct operation of the water supply system. A more detailed diagram of its device is shown in the figure below. The inlet valve is connected to the float using a curved lever. This lever presses on the piston, which opens/closes the water supply.
When filling the tank, the float is in the lower position. Its lever does not press on the piston and it is pressed out by water pressure, opening the outlet to the pipe. The water is gradually filling up. As the water level rises, the float rises. Gradually it presses the piston, cutting off the water supply.
The device of the float mechanism in the toilet tank
The system is simple and effective; the filling level of the tank can be changed by bending the lever slightly. The disadvantage of this system is the noticeable noise when filling.
Now let's look at how draining water in a tank works. In the version shown in the figure above, the drain hole is blocked by the drain valve bulb. There is a chain attached to the bulb, which is connected to the drain lever. We press the lever, lift the bulb, the water drains into the hole. When the level drops, the float moves down, opening the water supply. This is how this type of cistern works.
Modern models with lever flush
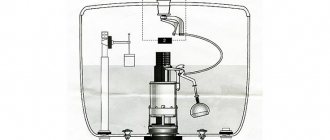
There is less noise when filling toilet tanks with bottom water supply. This is a more modern version of the device described above. Here the tap/inlet valve is hidden inside the tank - in a tube (in the photo there is a gray tube to which the float is connected).
Drain tank device with water supply from below
The operating mechanism is the same - the float is lowered - the valve is open, water flows. The tank filled, the float rose, and the valve shut off the water. The drainage system remained almost unchanged in this version. The same valve that rises when you press the lever. The water overflow system has hardly changed either. This is also a tube, but it goes into the same drain.
You can clearly see the operation of the drain tank of such a system in the video.
With button
Models of toilet tanks with a button have similar water inlet fittings (some with side water supply, some from the bottom). Their drain fittings are of a different type.
Tank device with push-button drain
The system shown in the photo is most often found in domestically produced toilets. It is inexpensive and reliable. The design of imported units is different. They basically have a bottom water supply and another drain and overflow device (pictured below).
Imported fittings for the cistern
There are different such systems:
- with one button the water is drained while the button is pressed;
- draining starts when pressed, stops when pressed again;
The working mechanism here is slightly different, although the principle remains the same. In this fitting, when you press the button, the glass rises, blocking the drain. The stand remains motionless. In short, this is all the difference. The drain is adjusted using a rotary nut or a special lever.
Installation and replacement of cistern fittings
A significant part of toilet problems can be solved by adjusting or replacing the tank fittings. In any case, you need to know how to disassemble and assemble the insides of the tank. This skill will definitely come in handy. When replacing, you first need to dismantle the old device and then install the new one. We will describe in detail the entire process, including the installation of new fittings.
How to remove the cap from the tank
If a flush tank with a button is being repaired, it is not always immediately clear how to remove the lid. This is easy to do: press the button and turn the ring.
How to remove the lid from a tank with a button
If you can’t press the button with your fingers, examine its inner rim. There are two special slots there. You can take a screwdriver with a narrow end and use it to turn the ring a little. Then you can unscrew it with your fingers.
After this, remove the button by pulling it up. That's it, the lid can be lifted.
Removing the tank
To replace the old cistern fittings, it must be removed from the toilet bowl. First of all, turn off the water supply, then drain the water from the tank. Then, using wrenches, remove the water supply hose (it is attached to the side or bottom).
When the water supply is located at the bottom, it is located next to the mounting studs
Next, you need to disconnect the tank from the toilet bowl. If you look underneath it, you can see bolts that are tightened with nuts. So we unscrew them using a set of open-end wrenches or an adjustable wrench. Before doing this, place a container or a rag near the toilet - a certain amount of water always remains in the tank, and when you unscrew the nuts, it will drain.
After unscrewing two nuts - on the right and on the left, we remove the tank. There is usually a gasket left on the bowl. If it has become deformed or dried out, it is also advisable to replace it.
Remove the drainage tank from the bowl
Place the tank on a flat surface. There is a large plastic nut at the bottom. It holds the drain mechanism, we unscrew it. Sometimes the first turns have to be made using an adjustable wrench, but do not over-tighten it - the plastic can be brittle.
Unscrew the nut holding the drain mechanism
Now the water drainage mechanism can be easily removed.
This is what the cistern fittings look like after several years of operation.
Similarly, remove the water supply mechanism. With bottom feed, the fastening nut is also located at the bottom (right or left of center).
Water supply mechanism fastening nut
This was the removal of the water supply device to the tank
After that, we look inside the drain tank. Usually, rusty sediment, small metal particles, sand, etc. accumulate at the bottom. All this must be removed and, if possible, washed. The inside must be clean - any debris caught under the gaskets can cause a leak. After this, we begin the installation of new fittings.
Installation of cistern fittings
Everything happens in reverse order. First, we install a new drain mechanism stand. We unscrew the plastic nut from it and put a rubber gasket on the pipe. It can be white (as in the photo) or black.
We put a rubber gasket on the thread
Place the device inside the container and screw the plastic nut on the outside. We twist it as far as possible with our fingers, then tighten it a little with a wrench. You can't overtighten it - it will burst.
Install and tighten the nut
Sealing
Now on the toilet bowl we replace the o-ring that seals its connection with the flush cistern. Dirt and rust often accumulate in this place - we wipe it off first, the seat should be dry and clean.
Install the O-ring
We install mounting bolts inside the tank, not forgetting to put gaskets. We put the drain tank in place until it can be leveled. The main thing is to get the screws and the outlet part into the seats. Take a washer and nut and screw them onto the screws.
Tighten the fastening
When both nuts are installed, but not yet tightened, level the container. Then, using a wrench, we begin to tighten the fastening. We turn it a few turns, first from the right, then from the left.
Install the exhaust valve
Lastly, install the inlet valve for the drain tank. It could have been installed earlier, but then it would be inconvenient to install the mounting bolts - there is too little space. We also put a gasket on the outlet pipe, then install it inside and secure it with a nut.
Tighten the intake valve mounting nut
The next step is to connect water to the same pipe. Before connecting the flexible water hose, open the water for a while, giving the opportunity to remove scale, which accumulates every time after closing the tap, even for a short time. After draining a certain amount of water (place a bucket so as not to wet the floor), connect the hose to the fitting (turn off the water again).
Connecting water to the toilet tank
Although the fitting is metal, there is no need to tighten this connection too much - first with your fingers, then one turn with a wrench. If you notice drops when you turn on the water, you can tighten it another half turn.
After this, we check whether the system is working correctly. If everything is correct, install the cover and screw the button. You can test it again. This completes the installation of the drain tank fittings.
As you can see, everything can be done with your own hands.
Adjustment and repair
When using the toilet, problems periodically arise - sometimes it flows, sometimes, on the contrary, water does not fill into it. Sometimes, tired of the inconvenience, people buy new toilets. But in vain. Most faults are resolved in 10-20 minutes. Moreover, everything is so simple that anyone can do it. You don't have to call a plumber. You can do everything yourself.
Adjusting the water level
We will talk about devices with bottom water supply. After installation, the toilet cistern must be adjusted. By default, they come from the factory set to the maximum amount of water in the container. This amount is often excessive. With the help of simple adjustments we can reduce the volume of water in the tank. For this:
- Turn off the water supply and drain the water.
- Unscrew the button.
- Remove the cover. Where is the adjusting screw located?
- There is a plastic screw on the float mechanism. By unscrewing/twisting it we change the amount of water. If you need to reduce the amount of water, tighten the screw, lowering the float down. The next time you fill (you can turn on the water), the water level should drop.
- Reinstall the cover and button.
The same procedure is necessary if water is constantly leaking from the tank. One of the reasons is that the float is raised too high. Because of this, water flows through the overflow system.
With a side water supply and a float mechanism, adjustment is even simpler - we change the position of the float by bending its lever. On the one hand it is simpler, but on the other hand it is more difficult. You have to bend it many times to achieve the required level.
By bending the float lever we change the water level in the drain tank
Toilet tank is leaking
If the water in the toilet constantly leaks and its level is normal, we move on. There are several reasons for this leak. And if so, then the methods of elimination will be different.
- The rubber seal under the drain valve in the tank has silted up, dirt has gotten under it, and a groove (or several) has appeared on its surface. The method of treatment is to clean the existing gasket or replace it with a new one. To resuscitate the old one, you need to: turn off the water, drain it,
- remove the drain mechanism by unscrewing the plastic nut from below;
- pull out the drain valve, remove and examine the gasket, clean it of settled particles, if necessary (there are grooves), sand it with very fine sandpaper until smooth;
- install it in place, connect everything and check operation.
- The trigger mechanism itself was demolished. To check whether this is the case, you can lightly press the mechanism with the cover removed. If the leak stops, that means this is the problem. If it still leaks, you should try cleaning the gasket (described above) or replacing it. If the flow stops when pressed, you can replace the fittings or weight the glass. Where to put the weighting agent To do this, remove the release mechanism and place something heavy in its lower part. This could be several pieces of metal, a sock filled with pennies, sand, etc. We install the device in place and check the operation.
Water does not fill
Another problem that you can fix yourself is that water does not fill into the drain tank. Most likely the problem is a blockage - the filter or tubes are clogged. It's a long story, better watch the video.
Source: https://stroychik.ru/sanuzel/slivnoj-bachok-unitaza-ustrojstvo-ustanovka-regulirovka-remont
Installation methods
The ease of installation of the tank is often a decisive factor in its selection. Next, we will consider in detail the installation of drain structures of all three types.
The easiest option to use is a cistern mounted on the toilet bowl. You don't need a lot of tools to install it. This process is carried out as follows:
- The parts that make up the drain mechanism are fixed inside the tank
- A sealant is placed at the location where the tank is installed. For greater confidence, you can use silicone glue. The seal will ensure the proper level of tightness in the place where the drain hole is located.
- The tank is placed on the toilet so that the location of the bolts of both parts strictly coincides, and the seal is under the bottom of the drain.
- Plastic washers and cone-shaped rubber gaskets are put on the connecting bolts, after which they are threaded through special holes. Then the next set of fasteners is tightened, also consisting of gaskets, only flat ones, and plastic washers. After this, the nuts are tightened using a wrench.
Installation and replacement of drain fittings
Before you begin installing or replacing fittings, you need to prepare the necessary tools: pipe and other wrenches, pliers. Additional materials required include sealing tape, gaskets of different diameters, and flexible pipes. If the tank has two holes, a decorative plug will be needed to cover the unused hole.
Part of the fittings is installed before installing the tank, and then another part. The first stage involves installing the base of the drain mechanism. Secure it with a plastic nut. Next, put a rubber sealing gasket on the nut and attach the tank itself.
The next step is the installation of the device responsible for the flow of water and connecting the hoses from the water supply.
During installation, be sure to adjust the float, levers, and valve. Adjust the float so that it provides the volume of water required for draining. The foam float is easily adjusted - it is moved along the bar. Plastic - by changing the angle between the slats.
You can see what the installation of fittings looks like in the following video:
The device of the drain tank: mechanisms and adjustment
The time when toilets ceased to be a luxury, after street toilets, is long gone. However, installing them in apartments required modification of the latrine with filling and draining systems. After all, without these systems, there can be no talk of any convenience or hygiene, the toilet will simply turn into a stationary potty, which will have to be constantly cleaned and washed by hand. However, this situation is familiar to many, when the cistern device begins to take on a life of its own, incorrectly performing its assigned functions.
Related article: Toilet with built-in bidet
It would be useful for a home handyman to know how common models of plumbing mechanisms of toilets function and are configured, for which we will consider what the majority of our compatriots use today.
Source
Toilet water supply fittings - how to make the right choice
The supply fittings for the flush tank will not only help maintain the correct operation of the toilet, but also save money on water consumption.
The fittings are divided into two types:
- Drain fittings - designed to flush water in the toilet and timely shut off the drainage of liquid.
- Filler fittings for toilet. Its operating principle ensures that the toilet tank is filled with water to a certain level. After collecting the required amount of water, access is blocked.
Toilet flush mechanism: operating principle and basics of device repair
A mandatory accessory of any comfortable home is a cistern and the toilet flush mechanism included in its kit. The latter most often fails, which leads to the creation of uncomfortable conditions when visiting the bathroom. In order to encounter this problem less often, you should correctly select, install and configure the drainage mechanism. This article will help you deal with this issue.
In order for the drain mechanism to perform its functions efficiently, it must be installed and configured correctly.
Repair of fittings
Over time, all parts begin to wear out, which leads to valve failure. In order not to replace all components at once, you should find out the causes of the malfunction.
The reasons for incorrect operation can be various:
- Valve fault
- Float fault
- Gasket wear
- Plaque formation
- Lever system malfunction
- Drain button malfunction
The push-button design allows you to minimize the size of the fittings and place them in the tank. It is for this reason that if a malfunction occurs, the entire assembly will need to be replaced.
If the button malfunctions, you can purchase a similar one at plumbing stores. When choosing, you should pay attention to its size in order to make an equivalent replacement.
Plaque in the tank causes the valves to not close tightly, which leads to excessive water consumption if the drain valve is faulty and to overflowing the tank if plaque forms on the inlet valve. This problem can be eliminated by blocking the access of water to the tank. It is necessary to drain all the water and clean out areas where solid particles have accumulated.
Over time, the rubber used in the form of gaskets can become deformed or worn out. Such a malfunction leads to leaks. If such a malfunction occurs, you can purchase a gasket repair kit and replace it. Important! When purchasing a repair kit, it is better to have with you the documents for the installed fittings, where all dimensions are indicated, or bring a sample of the gasket.
How the toilet cistern works: the internal filling of the device
The normal operation of the drainage system is ensured through the interaction of its individual components. The water supply to the container is carried out thanks to the fill or inlet valve for the toilet. It is represented by a threaded pipe that is inserted into a hole in the side wall or bottom of the tank. The presence of a thread allows you to press the element to the tank wall using nuts, which will ensure a tight connection. Control over the opening and closing of the hole through which water enters is carried out by a locking mechanism connected to the rocker arm.
The principle of operation of the flush mechanism in the toilet cistern
The rocker arm is the lever that moves the exhaust valve. The free end of the element is attached to a float or control valve. A float is a plastic sealed container with air inside. At the moment when the float floats up or the shut-off device is activated, the rocker arm rises, which helps to close the gap in the filling valve or vice versa.
In normal condition, the drain hole is closed by the drain valve. This is a flat or hemispherical elastic gasket that connects the load-bearing part to the hinge mount.
The operation of the drain mechanism for the tank is controlled by a push-button or lever mechanism, which is located in the upper part of the tank. When exposed to it, its load-bearing part rises, opening a hole for water to flow at high speed into the toilet bowl.
All components of the mechanism can be arranged in different ways. In older models of tanks, the flushing and water overflow control mechanisms were mounted separately. In modern models, shut-off valves are presented as a single complex, which facilitates easy installation and configuration, while at the same time complicating repairs.
Water is supplied to the tank capacity through a fill or inlet valve
How a toilet flush mechanism should work
The flush mechanism for the toilet is located inside the tank. It does not have a complex design, but it performs important functions. The drain mechanism is responsible for draining water from the tank, filling the container with water, and controlling the water level, which eliminates the possibility of the tank overflowing when the liquid reaches a certain level.
The principle of operation of the drain tank is as follows. Water enters the container through a fill valve, which may be located in the wall or bottom of the tank. As the container fills, a shut-off device in the form of a float or valve is activated, which shuts off the supply of liquid when it reaches a certain level, blocking the filling valve.
When it becomes necessary to flush the water, the button or lever is pressed, which opens the shut-off valve of the toilet cistern. As a result, liquid enters the toilet bowl. Double button systems work similarly. When the small button is pressed, part of the water is poured out of the tank, when the large button is pressed, a complete drain is performed.
Important! The flush mechanism of the toilet tank with a button for two modes ensures water saving.
Water can enter the tank through a valve located in the bottom or wall
Draining the water entails a decrease in the liquid level in the container. This helps activate the control devices, as a result of which the outlet valve opens and the tank fills with water.
Features of plumbing with bottom water supply
Compact toilet with bottom connection
Everyone is already accustomed to the side supply of water to the toilet canister.
This is a classic type of connecting plumbing to water supply. Often there is not enough free space in the room.
Therefore, it is necessary to exclude the possibility of installing such a system.
In addition, a significant disadvantage of this type of plumbing is its relative unattractiveness.
Few people will like the tubes sticking out of the cistern.
Therefore, it was a completely logical phenomenon that devices with a connection to the water supply from below appeared on the market. It is worth noting that the operating principle of the model is no different from other variations.
The model consists of the following elements:
Control device. Most often represented by a shutter button. Economical options have 2 controls.
Fittings. Most often, this toilet design has a membrane filling.
Diaphragm valve
Release valves.
The main problems in the operation of the drain tank will be described below.
Types of drain fitting design for toilet cistern
There are several options for the drainage system. The filling valve can be bottom or side mounted. In the first case, the pipe is located in the bottom of the drain container. This system includes a vertical rod float, a rod and a buoy. The last two elements are connected into a common structure, which acts as a water limiter.
When the tank is empty, the float lowers. At this moment, draft begins to act on the toilet valve, opening it. When the float reaches a certain level, the valve closes. Sealing of the system is ensured by a pair of gaskets.
When placed on the side, the pipe with the valve is inserted into the tank through a side hole, which is located in the wall of the container under the lid. This gap is made conditionally sealed, since water does not reach it. In this design, the control mechanism of the flush tank is placed horizontally. It consists of a shut-off device, a float, a lever and a filling tube. When the tank is emptied, the float lowers, which moves a rod that opens the shut-off valve. When the tank is filled with water, the control mechanism gradually rises.
In a side-valve design, the mechanism is located horizontally
From the point of view of efficient and comfortable operation of the drainage device, it is better to choose models with a bottom connection, which are more reliable and make less noise when the container is filled with water. Systems with side connections are characterized by ease of installation and ease of adjustment and repair work.
Important! Tanks with bottom connections require close attention to the tightness of the connection.
The flush mechanism is activated by a trigger, which can be a lever, a rod or a toilet button. Older models were equipped with a lever to which a cord with a handle or a chain was attached. The drain system with a rod was activated by lifting the handle up. This option has also lost popularity and is rarely found in modern tanks.
Bottom-mounted designs are more reliable
Currently, models are most often controlled by pressing a button located in the tank lid. The push system, in turn, can be one-button or two-button. In the first case, the tank is completely emptied when you press the button. The second option involves two modes of operation of the tank drain mechanism with a button. The first ensures that half the volume of the container is drained, and the second ensures that the tank is completely emptied.
How to adjust toilet fittings
If the drain test gives poor results, adjustments should be made. The rod from the overflow pipe is disconnected, the drain system lock is released so that the glass can move easily. The position of the fittings is carefully adjusted to the required level - about 5 cm to the top of the cistern, fix it, insert the rod so that the water overflow tube is immersed in water by 2 cm. The flush mechanism can have the function of draining a full or half of the cistern. The system for draining half of the tank is adjusted by adjusting the float for the smaller drain.
Types of toilet flush valve as a system overflow control mechanism
The toilet cistern flush valve can be a float or membrane shut-off device. Models of the first option may differ in structure and principle of operation. Old tanks were equipped with Croydon valves, which consisted of a body, piston, axle, seat and float lever. When the float lever was acted upon, the mechanism began to function. In this case, the piston moved vertically.
Most modern drain mechanisms are equipped with a piston valve, which moves horizontally when the lever is pressed. The water supply is regulated by the contact of the piston and the seat. When the container is filled, the inlet hole is closed using a gasket located at the end of the piston.
The diaphragm valve is not equipped with a piston gasket, but with a rubber or silicone membrane. When a lever acts on it, the plastic piston begins to displace the membrane, which closes the water supply.
The drain valve can be equipped with a membrane or float mechanism
Important! The diaphragm valve facilitates quick and silent filling of the tank.
The disadvantage of this element is the greater sensitivity of the product to dirt and the presence of impurities in water. The diaphragm valve will quickly lose its operational properties due to poor quality water in the system. A mechanical cleaning filter will help avoid problems.
There are floatless options for the drain system. The water supply to them is stopped due to the presence of a special chamber shaped like an inverted glass.
Material for making toilet flush valves
Expensive models of toilet flush systems are made of bronze or brass. These materials are characterized by strength, reliability, corrosion resistance, and the ability to withstand mechanical and chemical loads. The design can be either simple or complex. Metal filling is found in expensive collectible models, which are produced with a certain stylization.
Most drain valves are made from polymers
In other cases, bronze and brass can be used in the manufacture of only the fill valve, which makes the shut-off and drain system universal, easy to install, configure, repair, and allows you to replace each unit individually.
Many valve models are made from polymers. The quality of plastic and precision of production affect the cost of the product. The more expensive the fittings, the more reliable and durable the drainage system will be. However, there are high-quality models that have an affordable price.
How to choose the right toilet parts
If elements of the drain system fail, it is important to choose the correct option that will correspond to the factory configuration. The units may differ in the material they are made of. Products made of bronze and brass are considered the highest quality and most durable. However, they are characterized by high cost.
The repair kit for the toilet is selected based on the model of the tank. Important parameters are the location of the inlet, its size, the diameter of the drain opening and the overall dimensions of the device, which must fit freely into the tank. The flush mechanism for a toilet can be represented by a single design or consist of separate (drain and fill) devices. The second option significantly facilitates and simplifies the process of replacing products.
If elements of the drain mechanism break down, the repair kit is selected based on the model of the tank
When choosing a valve, you should pay attention to the quality of the product. The mechanism must operate under its own weight. It is necessary that all its components are movable, move smoothly and unhindered. There should be no jamming of any kind.
When choosing a drain mechanism, you should carefully inspect the elements. They must have a solid body, free from chips and cracks, and the correct geometric shape, which will contribute to efficient and uninterrupted operation. Spare parts for toilets made from high-quality material have a high cost.
Seals and gaskets should be purchased from silicone. Such products, unlike rubber ones, are characterized by strength, reliability and durability. Elements are checked for compression and bending. They should not be deformed or cracked.
Helpful advice! The best performance and strength properties are provided by sealing elements, in the manufacture of which rubber is added to enhance elasticity.
New mechanism parts must be of high quality, without chips or cracks.
Reinforcement selection criteria
Replacement of toilet fittings is required when malfunctions in the operation of the system are detected. In order for a new device to serve for a long time, when choosing, you should be guided by the following aspects:
- the fittings can be made of plastic or brass. Brass products can last longer than plastic ones;
- If you purchase plastic bottom or side fittings for a toilet, then you need to check the quality of the components. Plastic components must be smooth, free from burrs and deformation;
- It is more advisable to purchase plastic fittings made of polypropylene or low-density polyethylene. Such devices are considered the most reliable;
- The gaskets used for assembly should be as soft to the touch as possible. If you slightly stretch the sealing element, then no cracks should be visible on it. This aspect indicates the quality of the gaskets and the correctness of their manufacture. All gaskets must be of the correct shape;
Sealing elements for fittings
- The fastening elements of the fittings can be made of plastic or bronze. Metal fasteners are more durable during installation. There should be at least two gaskets on the fasteners;
Set of elements for fastening fittings
- the movement of the float valve must be smooth. Sudden jumps or jamming are not allowed;
- the prefabricated structure must be durable. All elements must be securely fastened to each other. If a separate component part has free movement, the valve will quickly fail.
Dismantling and installation of the flush mechanism for the toilet cistern
If the drain mechanism fails, you can replace it with a new repair kit yourself. Replacing the flush mechanism in the toilet cistern is carried out according to the following algorithm.
Related article:
Review of the 5 most popular manufacturers and models. Common breakdowns and ways to fix them.
The first step is to turn off the water supply. Next, press the drain button to empty the tank. It is carefully removed, which makes it possible to remove the tank lid. Then the water supply hose is disconnected. The nut that secures the filler pipe is unscrewed. You need to remove the part itself from the hole.
Helpful advice! Before changing the flush mechanism in a toilet cistern with bottom water supply, it is recommended to install a small container under the plumbing fixture into which the water that does not go down the drain will drain.
The internal fittings are removed from the tank and unscrewed from the fasteners. Next, unscrew the bolts securing the tank to the toilet bowl. The container is removed. After this, the lower part of the drain system is dismantled and the sealing gaskets are removed. After disassembly is completed, it is necessary to clean the inner surface of the tank and all its openings, remove plaque, debris and lime deposits.
Do-it-yourself installation of toilet cistern fittings in three stages - Review +
Setting up the cistern fittings is the main task after installing the toilet. The cistern fittings are a system that provides regulation of its filling and flushing.
There are a huge variety of toilets on the modern market, but the cistern drain fittings are not so diverse. Geberit and Alcaplast are the most common models.
Any of the tank models (with a lever, with one button, with two buttons, with a chain) requires correct installation.
The installation principles are the same.
General information
Design of the toilet cistern mechanism:
- drain hole
- overflow tube
- valve covers with rubber
- tank filling mechanism
- drain mechanism
On a note!
Tools and materials needed to install fittings in the toilet cistern:
- pliers,
- locking mechanism
- adjustable wrench (two-inch),
- open-end wrenches,
- Water taps,
- screwdriver,
- flexible hose,
- silicone sealant.
The entire functionality of the tank fittings consists of two main mechanisms:
- Filling the tank
- Draining the tank
The first step is filling the tank
A float and a shut-off valve are responsible for regulating the water level in the toilet flush tank. The float goes down as the water level decreases. Due to this, the shut-off valve opens. The water level rises, the valve shuts off the water supply.
Second step - draining the water
The flush mechanism is responsible for the flow of water from the tank into the toilet. Using the damper (at the bottom side of the drainage unit) we regulate the amount of water remaining after the maximum flush. The damper can have from two to six positions that set its level.
The drain siphon and the drain lever (button) are responsible for draining the water. A siphon, usually a rubber cylinder resembling a plunger, seals the drain hole. If the siphon is faulty, water will leak.
Installation of toilet cistern fittings
The kit includes: fill valve, release valve, push-button assembly, tank mounting kit and gaskets. Depending on the type of tank filler, the filler valve can have a side connection or a bottom connection. The release valve can be single-level or two-level.
The main parameter for setting up the reinforcement is its height.
If the fittings were purchased separately from the tank, we configure it.
We measure the distance from the bottom of the tank to the surface of the lid
Important!
The ruler must be on the inner surface of the tank!
In the adjustment table we find the resulting size and set it on the wall of the reinforcement rack.
We unfasten the rod, tighten the clamps and move the rack to the desired value and attach the rods.
Important!
We attach the rods so that there is a free movement of the frame of 3 mm.
Installation of fittings is carried out in three stages.
The first stage is installation of valves
We twist the fastening nut of the exhaust valve and install it in the tank. We tighten the fastening nut on the back of the tank until it stops completely.
We do the same with the filling valve.
When installing a barrel with a side water supply, the filling valve is installed as follows: twist the fastening nut and remove the oblique washer.
Note!
The damper tube must be present on the valve and not fly off during installation!
If the valve does not fit and the filling valve is in the way, then you need to loosen the nut (1.5 turns is enough) and turn the upper part of the valve in the desired direction, after which the nut is tightened. Then the oblique washer and fastening nut are put on. The valve is set in a horizontal position.
Important! Make sure that the valves do not touch each other or the walls of the tank, and secure the nuts.
Stage two - installation of the tank
We install the gasket, assemble the mounting screws (washer, then cone seal). We insert the mounting bolts into the hole in the tank. We put rubber gaskets on the mounting screws. We install the tank and fix the wing nuts evenly. We install a flexible water supply hose.
The third stage is the installation of the tank lid and push-button assembly.
If the push-button assembly does not screw in, it means you have configured the fittings incorrectly. The filling valve needs to be reset.
Important!
The gap between the cover and the assembly should be 1-7mm.
After the final installation of the fittings, drain the water several times to ensure that there are no leaks and that the fittings are installed correctly.
If the drainage is not carried out correctly, it is necessary to adjust the water intake and drainage system.
For this:
- Disconnect the rod from the overflow pipe
- Press the latch to freely move the “glass” vertically
- Adjusting the position of the mechanism
- Install the overflow tube 2cm above the water level
- We fix the fittings and supply traction.
Important!
If water stops flowing into the filling valve, you need to clean the coarse filter.
Source: https://iseptick.ru/santekhnika/unitazy/nastrojka-armatury-slivnogo-bachka-samostoyatelno-poshagovaya-instrukciya.html
Testing the toilet flush system after installation
After installing or repairing the toilet cistern flush mechanism with a button, the system is tested. The first step is to check that there are no visible leaks. To do this, you need to run water through the plumbing fixture several times. Water should not flow into the toilet bowl unnecessarily, and you should also make sure that there are no leaks underneath. If they are detected, it is necessary to fix the fastenings as firmly as possible.
Next, it is checked whether the water level in the tank has reached the required level. If this does not happen, the toilet tank is adjusted. The filling valve should work normally and not stick. You can verify the quality of its operation by applying sharp downward or upward pressure to the mechanism.
Next, you need to evaluate the operation of the system by ear. If there is a hissing, whistling, or other sharp sound, this indicates that the flapper valve is closing. The problem is resolved by lowering or raising the element using a screw, which is driven by a screwdriver.
To ensure normal operation of the system, the water level in the tank is adjusted. The float, which is held in place by a thick wire, should be placed so that it is located 1-2 cm below the edge of the reinforcement. To gain more water, the metal lever needs to be bent in an arc downwards. To reduce the liquid level, the product is bent in the opposite direction.
After installing the drainage system, it must be tested
If the float lever is made of plastic, its adjustment is carried out by a special screw, which rotates until the float takes the desired position. The optimal level of liquid in the tank is considered to be at which the water will be 3 cm lower than the overflow hole.
The correct position of the buoy indicates that water does not overflow through the system and does not go into the toilet bowl unnecessarily. After adjustment, the lid is installed on the tank and secured with a button.
Advantages and disadvantages
To begin with, it should be said that this article will not talk about specific models, but about a non-specialized system. The fact is that in most cases no one is interested in which inlet valve for a toilet with a bottom supply is used, and much more often questions are asked about design features and technical solutions. People want to know which product is best to choose and what its advantages are.
Advantages
- First of all, it is necessary to note the fact that such structures have a good appearance because all the pipes are hidden . Along with this, a toilet with a bottom water supply in most cases has a rather unique shape and design.
- The fact that these systems are virtually silent deserves special attention . There is no unpleasant sound of pouring water, which so angers many users.
- In addition, it must be said that a toilet with a bottom water supply is considered one of the most practical . This design has a high level of reliability and fails much less than a product with side entry.
Advice! Ceramic manufacturers in most cases do not equip their products with an internal tank mechanism. Based on this, it is worth selecting it separately, based on the internal configuration.
Flaws
The main drawback identified when using this design is the inconvenience of installation. This is also reflected in such a process as repairing a flush cistern with a lower water supply, because it may require complete removal of the product.
The fact that such a system breaks down quite rarely deserves special attention. But when this happens, it is much easier to completely replace an entire assembly than to change an individual element. (See also the article Anti-splash toilet: features.)
In most cases, products of a similar type began to be used in European or American countries, respectively, the first such products were manufactured according to the standards of these places. Taking this into account, when installing it yourself, you need to immediately take care of the presence of all the necessary adapters or couplings. At the same time, some of them may be unique or very specific.
Advice! When receiving such a design for a specific product, it is optimal to make the purchase together and in one store. This makes it possible to check the possibility of installation on site and immediately determine compatibility with a specific model.
Possible system malfunctions and ways to eliminate them
Studying the principle of operation of the toilet will help identify possible malfunctions and eliminate them. If the overflow control does not work, you need to find the reasons that caused the damage to the system. The most common may lie in the misalignment of the lever or rocker arm that holds the float. It must be aligned, which will ensure the correct movement of the float and the restoration of the system.
For toilet flush systems with a membrane valve, when the element moves to the upper position, the hole may remain open. In this case, the position of the membrane is adjusted or replaced. The reason for the failure of the overflow control system may be perforation of the float with water ingress. This problem requires a complete replacement of the element. If the above operations do not resolve the malfunction, it is necessary to replace the inlet valve.
There are many reasons for a malfunctioning tank drain system.
A leak at the fill valve occurs primarily as a result of wear on the sealing gasket. In the early stages, the problem can be eliminated by tightening the fastening nut. In advanced cases, you will need to replace the gasket.
If the drain button does not work, the cause may be a misalignment of the lever that connects it to the drain valve. Such a malfunction may occur due to the breakdown of plastic elements of the internal fittings. In this case, replacement of the drain mechanism is required.
During the initial operation of the tank, problems may arise as a result of incorrect adjustment of the system. To ensure its functionality, it is necessary to select the height of the drain cup corresponding to the height of the tank, fixing it in the correct position.
If weak pressure is observed while filling the tank at normal pressure in the general system, the water supply hose is dismantled, cleaned, and lime deposits that have blocked the lumen are removed. If cleaning cannot be done, the hose is replaced with a new one.
A misaligned lever may cause the button to not operate.
If the problem is not resolved, you need to inspect the intake valve and check its functionality. To do this, open it, clean the inner chamber and adjust the overflow system. If the problem persists, the valve must be replaced.
Popular manufacturers of toilet cistern flush devices
One of the most famous manufacturers of plumbing products and spare parts for them is the Czech company Alka Plast. It produces high-quality, functional and durable products at an affordable price. A popular universal model is the AlkaPlast A2000 drain mechanism with a stop button function. The device is suitable for replacing the existing mechanism in ceramic tanks. Thanks to the special design, the height of the product can be adjusted within the range of 310-405 mm (depending on the height of the tank).
The device is equipped with a stop function button, which starts draining the water when pressed for the first time and stops it when pressed again. The mechanism is made of ABS plastic, which is resistant to abrasion and various types of loads. You can buy a drainage device for 850 rubles.
The Alka Plast A08A dual-flush drain mechanism has two modes of water release with a volume of 3 and 6 liters. The design of the device allows you to adjust the height of the drain mechanism within the range of 315-450 mm. The product is made of ABS plastic. The cost of the device is 1.1 thousand rubles.
The Czech company Alka Plast produces high-quality and durable drainage devices
Another equally popular manufacturer of toilet flush mechanisms is the Swiss company Geberit. The products of the global manufacturer are of high quality. The company is constantly improving its manufacturing methods for sanitary ware, introducing technological innovations.
Among the popular models of drainage systems, one can highlight the Geberit Impuls Basic 230 dual-flush mechanism, equipped with a chrome button. The device is made of durable high-pressure plastic, which increases its technical and operational properties. You can buy a flush mechanism for a Geberit toilet for 2.3 thousand rubles.
A high-quality model is the Geberit Impuls Type 290 drain mechanism, designed for two operating modes - drain for 3 and 6 liters. The device is intended for tanks with a height of 300-450 mm. The water supply can be carried out both from the side and from below. The cost of the Geberit drain mechanism is 2.8 thousand rubles.
The drain mechanism is a simple design. Having understood the principle of its operation and following the above tips, you can independently install, adjust and repair the device without completely replacing the toilet cistern.