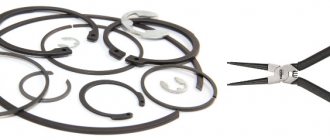
What does the retaining ring look like?
Many people mistakenly confuse a lock washer with a lock ring due to the name and round shape. However, in reality, there is a big difference between these two products. First of all, the retaining ring is an open circle, meaning there is a small opening in it. In addition, the locking ring has special lugs, with the help of which the part is securely fixed in the structure, since the lugs act as a shoulder, that is, a lever.
Production of retaining rings
The production of retaining rings implies strict compliance with all standards established by GOST 13940-86, GOST 13942-86 or DIN 471 for external rings, as well as GOST 13941-86, GOST 13943-86 and the European analogue of DIN 472 for internal rings. According to the requirements of these standards, the materials for the manufacture of these products are carbon steel 65G, structural steel 60C2A, heat-resistant steel 40X13 and other grades.
For the production of retaining rings, steel sheets and strips are usually used; less often, they are made from round or oval wire. Rings are manufactured with a rectangular cross-section by default, but in some cases, at the request of the customer, their production can be carried out according to a given drawing. All steel blanks must undergo additional heat treatment. Their surface is treated using one of the following coatings:
- zinc
- cadmium
- phosphate
- oxide
Types of retaining rings
Retaining rings are selected for a specific unit of a certain mechanism based on the operating conditions and design features of the product. For example, external locking rings are used to secure elements on a shaft. To fix different products directly in the hole itself, internal locking rings are used. Types of retaining rings differ in the direction of the lugs: on external ones they are directed outward, on internal ones they are directed inward.
Application of retaining rings
The use of retaining rings in industry can be observed in almost all production areas where various mechanisms are involved. They are especially often found in mechanical engineering, shipbuilding, aircraft manufacturing, carriage building, machine tool building and similar industries. Such products can be installed in gearboxes, motors and other elements that rotate on their own axes and require very reliable fixation.
How to install the retaining ring?
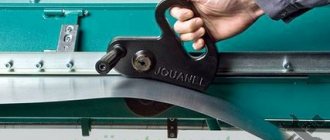
Finally, we have come to the point where we can consider recommendations on how to install the retaining ring. There are three ways to install retaining rings: manual, mechanical and automatic. For mechanical installation, a plunger and a conical plug are used, which is centered at the end of the shaft and has an angle of 6°. Actually, in this case, using a plunger, it will be possible to push the retaining ring straight through the cone plug.
Using the automatic method of installing the retaining ring, you need to use special presses or pneumatic cylinders. Please note that installation tools must be equipped with hardened working surfaces in order to minimize possible wear and tear on the equipment. And if you use the manual installation method, you can use a tool to install the retaining ring or use a screwdriver.
- Using pliers you need to push the coils of the ring apart
- One side of the product is inserted into the groove
- The coil is clamped tightly
- Holding the coil, the ring is gently pressed with a screwdriver
Retaining rings are widely used in the designs of a wide variety of mechanisms to secure a shaft, rod, axis of rotation or bearing. They are used in water valves and gearboxes, in ship gearboxes and in space stations. If it is necessary to replace or repair a mechanism assembly, the ring must be removed. For this purpose, special tools are used - ring removers.
How to install retaining rings on a motorcycle piston
One of the most serious breakdowns of a scooter is the failure of the cylinder-piston group, which immediately makes the scooter inoperative. It is the scooter’s CPG that is responsible for its movement; the slightest breakdown will lead to the impossibility of further movement. That is why if you are faced with a non-working piston, immediately start repairing it.
In general, any CPG has a certain lifespan; with a certain mileage, its wear increases and the buyer will have to replace the part. Often replacing the piston is enough, but sometimes more serious problems occur. Where you have to change the piston, rings and cylinder. Depending on the pit bike model and manufacturer, the installation may differ slightly, but we will look at the basic steps. Also, piston pit bikes may differ in power, but this does not affect the replacement process in any way.
After you have disconnected all wiring and made sure that the -oil and -gasoline hose are closed, remove the engine. In different pit bike models, engine removal may be different, so act according to the situation. Having received the finished engine, begin to remove the plastic cylinder casing; it protects the CPG from external dirt, dust, etc. The next step is removing the cylinder head. Depending on the type of pit bike (2t or 4t) the head may be more complex, 4t pit bikes also have valves that will then have to be adjusted. But the procedure for removing the head is to unscrew 4 nuts.
Next you will have to remove the cylinder, in some cases this is problematic due to large carbon deposits or a defect in the piston. If the cylinder is intact, but the piston is faulty, proceed to replacing the piston. How to properly install a piston on a pit bike.
Replacing a piston involves a number of difficulties, because the piston will come with several other basic parts. In the kit you will find locking rings, a pin and several rings (depending on the pit bike - 2t or 4t). In 2-stroke pit bikes, only two rings are usually installed, they are compression, the third thin ring is practically not needed, but we recommend placing it under the lower ring for springing. In the case of 4-stroke mopeds, there are three main rings, two of them are compression rings, the third is an oil scraper ring.
The ring assembly is based on a 2t pit bike; it has a simpler design. So, put two rings on the piston, then take your finger and insert it into the crankshaft hole so that the piston is held securely. Be sure to secure the finger with locking rings on both sides, this is necessary so that the finger does not come out during operation. Also, the retaining rings should not stick out, they should fit snugly into the special hole
Important: the piston must be installed with the arrow (or the inscription EX) facing the exhaust pipe, otherwise the whole procedure will be useless. The next step is installing the cylinder on the piston
Types of retaining rings
There are two main types of locking ring connections:
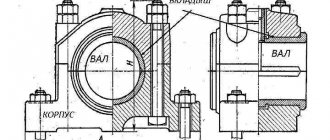
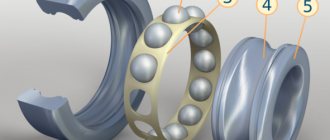
- Internal. Serve to fix parts inside holes. Used for fastening bearings. The ears protrude inward. To install them, you need to compress them so that the length of the outer circumference decreases, insert the part into the inner groove and release the ears. The part will straighten and partially fall into the groove, and partially protrude from it. This protruding part will not allow the bearing resting against it to move in the axial direction. To remove the mount, the ears need to be spread apart.
- External. Used for fastening parts on shafts, axles, rods. They are put on the shaft from the outside, the ears protrude on the outer side of the product, the cut between them is minimal. For installation, the ears are moved apart, the length of the inner circumference of the product increases, and it can be put on a shaft or axle, placed in a machined groove. After this, the ears are released, the part is compressed under the influence of elastic forces, fits tightly into the groove, leaving an annular rim on the outside. It will not allow the part to move in the axial direction. To remove such a part, the ears are brought together.
Retaining rings also differ in size, thickness, deformation force, and the metal from which they are made.
In technology, locking rings without holes and ears are sometimes used. They are simply a partial coil of spring wire placed in a groove in a shaft or hole.
Such designs are used in lightly loaded components with small axial loads, such as starter drives or fastening the pressure gauge glass.
Retaining rings and their purpose
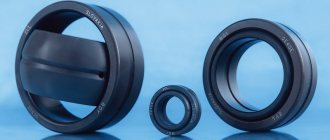
To limit the movement of a bearing, axle, shaft or other parts, many mechanisms use retaining rings (also called split washers). These parts are similar to lock washers, but their main difference is the presence of a through cut. High-strength spring steel is used to manufacture the split washer. Structurally, this part looks like a washer with a slot. Near the slot there are two areas with holes, which are called ears. It is through these lugs that parts are removed and installed.
The operating principle of such devices is quite simple - when the ring is compressed or unclenched, which is done by applying a special tool to the ears of the part, the circumference changes. The split washer, in a compressed or uncompressed state, is inserted into the groove and then released. In this case, it is compressed or expanded, thereby encircling the shaft, fixing the bearing and excluding its axial movement.
This is interesting!
Retaining rings have found their application in many areas of production. In everyday life, such parts are also found, for example, on bicycles, motorcycles, door handles, and in the design of various household appliances and tools.
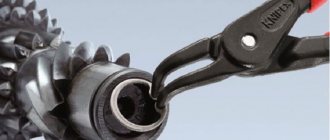
Types of circlip pullers
In order to install and remove retaining ring fasteners, engineers have developed many models of different types of pullers. They all share common design elements:
- handles connected by a hinge;
- working bodies, or jaws, serving as a continuation of the handles on the other side of the hinge.
Structurally, there are two main types of ring removers:
- For external fastenings. When the handles are brought together, the jaws will diverge, stretching the part and increasing the length of the inner circumference.
- For internal fastenings. When the handles are brought together, the jaws will converge, compressing the part and reducing its outer diameter.
There are also universal pullers, the operating mode of which can be selected using a selector lever. Some devices are equipped with additional functions: a screw stroke, a lock in an extended or compressed state, gear lever mechanisms, etc.
Characteristics of circlip pullers
In order to navigate the variety of ring remover models offered by domestic and foreign manufacturers, it is useful to know the basic parameters that characterize these devices. These include:
- Jaw length. This parameter determines the puller's ability to work with fasteners located in recesses and other hard-to-reach places. It should be remembered that as the jaws lengthen, according to the law of leverage, the compression force decreases (with equal force on the handles)
- Length of handles. Affects the ease of use and the maximum force of compression or expansion of the ears.
- Tip shape. Both straight and curved at a certain angle (from 0 to 90°) are used. Straight ones allow you to develop more force, curved ones are more convenient when working in recesses.
- Diameter of tips. Should be as close as possible to the diameter of the holes in the ears. A tip that is too thick simply will not fit into the hole, and a tip that is too thin may not withstand the load and break. In addition, the ring can slip off from thin tips.
- Reverse bending of tips. Used on external pullers to open the ears. The bend increases the reliability of holding the ring.
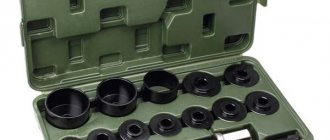
Best puller sets
In the arsenal of every tool manufacturer, circlip pullers are present in huge quantities. Below we provide a comparative review of puller sets from some popular tool manufacturers.
First, let's look at a set of pullers from the manufacturer FORCE. Like all tools from this manufacturer, the pullers are packaged in a plastic case. There are four pullers inside the case. Two of them are for removing the outer rings, the remaining two are for removing the inner retaining rings. What is noteworthy is that each type of puller (external, internal) has both straight and curved jaw shapes. The pullers are of medium size, which should be enough to handle the vast majority of circlip work.
Manufacturer KING TONY supplies its pullers on a fabric canvas with pockets. This is very convenient in a car service center when quick access to tools is required. At the upper corners of the canvas there are eyelets for hanging the set from the wall. The set includes four pullers, two for the outer rings, two for the inner ones. As in the previous set, the pullers are medium in size. Just like in the previous set, each type of puller has both straight and curved jaw shapes.
The Russian tool manufacturer Delo Tekhniki supplies its set of pullers, just like KING TONY, on a cloth with pockets. We described the convenience of such a supply of tools above. Just like in the two previous sets, the Russian manufacturer’s set includes four pullers. Naturally, two for the outer rings, two for the inner ones. Apparently, it has become a de facto standard for puller manufacturers to equip their kits with pullers with straight and curved jaws for each type. Technology does exactly the same. The only difference between this set and the previous two is that the two pullers are larger in size than those from other manufacturers. In some situations, having a slightly larger puller can make life a lot easier.
Conclusion. Each of these brands has established itself as a quality tool manufacturer. As can be seen from the comparison, the sets of pullers from these three manufacturers are almost identical in configuration. With any of these kits you can do 95% of your circlip jobs. What to buy? It's more a matter of taste and, of course, price.
Removing the retaining rings
Removing locking split washers is carried out using two main methods:
- With partial disassembly of the main mechanism. In this case, the assembly containing the ring is dismantled. It is fixed in a vice or other clamping device on the workbench, and the part can be removed in the comfortable conditions of a warm and well-lit workshop.
- No partial disassembly. The unit to be repaired is not dismantled; its disassembly and replacement of parts occurs in less convenient conditions, conceived in the open air.
In both cases, it is better to remove the locking part using special pullers that match the type and size of the locking fastener.
If for some reason they are not at hand, craftsmen adapt one or another universal tool or modify it by making a puller with their own hands. This approach may be justified if you urgently need to remove one or two rings. For large volumes of work, factory-made pullers demonstrate their superiority in a number of ways:
- strength;
- reliability;
- convenience and speed of work;
- safety.
Experienced craftsmen have formulated a number of recommendations on how to remove the lock washer from the front suspension wheel bearing:
- The rack is removed from the car and clamped in a vice.
- The hub is knocked out with a hammer.
- Lightly tapping the side of the inner retaining ring with a small hammer loosens its contact with the groove.
- Next, using a suitable type and size ring remover, you need to remove the ring mount. In the absence of a standard tool, some craftsmen manage to remove the stopper with two thin screwdrivers.
- After pressing out and replacing the bearing, you need to check its position: the front end must be at the level of the far wall of the groove for installing the locking part.
- The ring is compressed with a puller and brought to the groove. After alignment along the entire perimeter, the handles are gradually loosened and the part falls into place.
Recommendations on how to remove the rear wheel bearing and its retaining ring are as follows:
- Remove the wheel and brake drum.
- Using a flat-head screwdriver, carefully pry up and remove the oil seal.
- Remove the ring from the inner diameter with a puller of suitable size and type.
- Remove the inner race of the bearing.
- Knock out the outer ring by lightly tapping it on the beard and remove it.
After lubricating or replacing the bearing, reassemble the assembly in the reverse order.
Classification of retaining rings and suitable tools
Why buy a set of pliers when you only need one tool to work with circlips? Many beginners think this way, not realizing that there are two types of clamps. They are classified into the following types:
External - provide fixation of parts on shafts, axles and rods. To do this, the parts are put on the shaft from the outside, and the ears of the part protrude to the outside or outside. This type of part is easy to distinguish by appearance, since the protrusions of their ears are directed towards the outside. To install the fixing part, you will need to pick up the release pliers. Such a tool has a special expanding design, due to which, when acting on the ears, the internal diameter of the part increases. This is done in order to fit the part into the groove of the shaft with the inner part. After the action of the pliers stops, under the influence of elastic forces, the part is compressed and, fitting the groove, sits in it. If it is necessary to remove a part of this design, then again you will need to take the pliers in your hands to unclench it, and, working on the ears, perform the unclenching and subsequent dismantling. The diameters of external retaining rings range from 3 to 100 mm
Internal - a type of fixing rings that are designed to fix parts inside the holes. These types of devices have ears that are wrapped in the inner part, and the working part on them is the outer wall. To install the inner rings, you will need to use compression pliers to reduce the diameter of the outer circle. In this case, you can position the part in the outer groove, and after releasing the pliers, its outer diameter will increase and it will be securely fastened. The parts will rest against the protruding part of the ring, preventing them from moving in the axial direction. Diameters for internal devices range from 8 to 100 mm
In addition to the two main types, the devices in question also differ in size, thickness, deformation force, as well as the materials from which they are made. Depending on the size of the clamps to be removed or installed, it is necessary to choose the right pliers of suitable thickness.