Military sailors have a very precise expression, which is constantly confirmed in everyday life: the speed of the squadron is determined by the speed of the slowest ship. No matter how hard installation manufacturers try to extend the life of their plumbing fixtures, they constantly run into the problem of rapid wear of individual parts and assemblies. Therefore, breakdowns occur quite often even with such world-famous brands as Geberit, VitrA, Viega, Grohe, etc. And here the owners are faced with a dilemma: call a plumber or repair the toilet installation with their own hands.
Device overview and problems
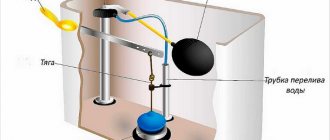
Before you begin repairing the toilet installation, familiarize yourself with the device and operating principle. A frame made of rectangular steel profiles serves as the basis for a wall bowl, drain and sewer pipes, a plastic tank with fittings, and a flush control system.
Frame installation Cersanit.
Composition of the Rapid SL Grohe installation
Filler (inlet, filling) and drain (bottom) valves are fixed inside the container, serviced through a technical window closed by a mounting box connected to the control panel brought out. Water drainage is initiated by a mechanical or pneumatic button located on the panel.
Here are possible installation malfunctions based on functional characteristics:
- Problems with the frame: distortions and movements occur due to improper installation and assembly of the frame; use of cheap profiles with low load-bearing capacity.
- Leaks at the connections of the inlet and outlet fittings of the toilet. They appear due to installation errors, frame deformation, aging, and seal defects.
- Cracks, chips of the bowl are the consequences of “crooked” assembly, accidental impacts during operation. At home, it will not be possible to reliably glue a broken one together, not to mention the aesthetics.
- Breakage of the lid microlift mechanism. When securing the seat, carefully adjust the even fit to the bowl, then tighten the nuts. A typical failure is a broken spring. The difficulty lies in the exact selection of an analogue; a mistake can lead to a sharply falling or “freezing” lid.
- Failures of cistern cistern components are the most common cases.
Fixing the problem yourself
To find the source of the problem, due to which the toilet is out of working order, you can resort to calling a plumber, calling a neighbor who helps everyone and charges inexpensively, or try to do everything yourself.
The first option is safe, but requires agreeing on the time of the work and will cost a decent amount of money. Of course, this is the most convenient and simple option - you don’t need to do anything, twist, change - you gave the money and accepted the job.
The option with a neighbor/acquaintance of friends is like a pig in a poke. Questionable quality of work can lead to even bigger problems and more serious breakdowns.
The third option involves independently studying the installation system installed in your bathroom and repairing it. This is a simple activity that does not need to be rushed. It is important to take the manufacturer's instructions and read the relevant section carefully. If the instructions are lost, you can find them on online store websites or ask a plumbing store consultant.
All controversial issues that arise during the installation repair process can be viewed in thematic video clips. Models of fittings for built-in tanks from different manufacturers may differ from each other.
Sometimes it is enough to disassemble the fittings of the drain tank, wash the components, replace worn parts, reassemble everything again, and the system works like a well-oiled mechanism - without failures.
Abnormal operation of the tank
European companies provide a 3-5 year warranty on valves and tanks, and 10 years on load-bearing elements of wall-mounted plumbing. The practical reliability of the system directly depends on the water treatment.
Often, products of well-known brands produced by Chinese factories are of mediocre quality; failures occur after months of service. We list the typical problems:
- The container does not fill or takes longer to fill than usual.
- Constant leakage into the bowl.
- The tank does not stop filling.
- The key does not work.
- Leaking in the body and/or inlet fittings.
Let us describe the probable causes of these situations.
Slow water flow
This may be due to clogging of the supply line filter or the built-in safety mesh of the filling mechanism (if equipped). Salt deposits, rust, and dirt prevent the filler valve from fully opening, even to the point of blocking.
Filling membrane yellowed from calcium deposits.
Turn off the cold water valve in the bathroom. Unscrew the cap of the brass filter, remove the mesh element, and clean with an old toothbrush. Rinse under running water and reassemble. If, after opening the tap, the filling time has not changed, you will have to remove the filling mechanism; we will analyze the procedure in detail below.
Important! Typical brass filters are equipped with a mesh with a mesh size of 500 microns. At the same time, solid particles already 50 microns in size, getting under the cuff, violate the tightness of the valve seat. Increased water hardness over a couple of months leads to identical results.
Sufficient protection for the filling and draining mechanism is provided by a two-stage battery with polypropylene cartridges with a filtration rating of 40, 10 microns. A softening module with a replaceable cassette or filled with polyphosphate salt is suitable against scale. A coarse filter with a stainless mesh 100 - 500 microns is required.
Continuously little water flows into the bowl
As a rule, the bottom valve is “sick”, the cuff of which has lost elasticity, has defects, and does not fit tightly on the seat due to contamination. Try draining the tank several times in a row; sometimes it is possible to wash away the particles that interfered with the closure, otherwise “surgical intervention” is necessary to disassemble the unit.
It may leak due to a lowered emergency overflow tube, lifting which eliminates the problem. If the tube is at the top, move the float lower, thereby slightly reducing the filling level. More often than not, the tank overflows due to the “fault” of the fill valve not closing the supply; it requires dismantling and inspection.
Water flows continuously into the tank
The flow is not blocked even with the float in the uppermost position. The reason is that the inlet valve is clogged. At a minimum, you will have to remove the control key, mounting box, partition to get to the fittings. It is recommended to remove the entire filling mechanism for inspection, washing, and possible replacement of the gasket.
The button doesn't work
A failure of a mechanical key occurs when the connection with the drain valve is broken, for example, one of the links has become disengaged, broken off, or jammed: a pusher, a rocker arm, or drain rods. Having restored the interaction of the parts, they check the work; the stuck parts will have to be replaced. We will discuss how to remove the control button below.
Check the opening of the bottom valve by pulling up the rods.
Sometimes the pneumatic key comes off, the impulse tube is not seated tightly or is torn. If the adjusted tube dangles, cut off the stretched end section, first making sure that there is enough length, otherwise replace the hose. A faulty pneumatic unit cannot be repaired by amateurs.
Leaking housing, liners
The most dangerous phenomenon, given its hidden nature, is that flooded neighbors can report trouble. Unfortunately, the crack permanently disables the tank. Craftsmen are trying to repair the container by gluing a strip of reinforced fiber and applying an epoxy compound, but the reliability of the method is questionable.
The main guarantee of “long life” is careful installation of the frame with level control and fastening according to markings according to company drawings. The absence of distortions will protect the plastic from increased stress. Handle the hammer drill carefully so as not to inadvertently snag the housing.
Fittings begin to leak through old gaskets and loose connections. Tightening by hand is generally accepted; the wrench is used only for metal hexagons. Hardened, wrinkled O-rings are replaced with new ones. Connections with gaskets are assembled without the use of silicone!
What kind of damage may occur?
There is no point in thinking that an expensive toilet installation can last forever without problems. Each toilet, like any other product, has its own service life. For some systems it can reach 10-12 years or more.
The service life of your plumbing fixtures can be found in the manufacturer's instructions in the warranty section. If you carefully study this document, you will see that some components have a shorter service life.
Image gallery Photos from Installation in the interior of the room Installation with a double button Installation takes up little space Wall-hung toilet - an excellent solution
Thus, the filter and gaskets must be replaced much earlier.
It is advisable to always have a set of spare parts for repairing fittings on hand. If necessary, it will help speed up the replacement of broken parts
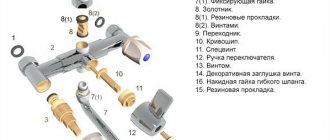
Built-in plumbing with an installation system consists of the following parts:
- frame or frame;
- cistern;
- units for inlet and outlet of working fluid;
- toilet/bidet/urinal.
Breakdown is possible in every part of the installation. To eliminate the cause of the malfunction, you must first find it. This task seems impossible without major renovations. But it seems so only at first glance.
When looking at the wall-hung toilet, a feeling of lightness is created. It’s not immediately clear how it stays on the wall and why it doesn’t fall - no one suspects about the rough metal frame
The frame or frame is made of durable metals, and the top is covered with an anti-corrosion layer. This part is durable - all other elements of the system will be attached to it. It can withstand up to 600-800 kg of load.
This characteristic will differ for each manufacturer. It is important to pay attention to the maximum permissible load of the model you like before purchasing. Sometimes, wanting to save money, they buy a cheap fake, where this figure is only 100 kg.
You can't save money by buying a cheap frame. A good installation is made of high-quality alloy, which is not afraid of either loads or corrosion. This is the key to long service life
Such a frame can easily bend or crack from overload - about 70-80 kg the weight of an adult + a water tank + the weight of the toilet itself. And if a large relative weighing more than 100 kg visits the bathroom, it’s scary to imagine what will happen. Therefore, you should not buy fakes - this is an unaffordable luxury.
If the integrity of the tank was damaged during installation, it must be replaced. It is not correct to fill the damage with sealant, hoping that it will last a long time
All manufacturers make the installation cistern from plastic. It is flat or triangular, and inside it there is a special fitting to ensure automatic filling and flushing. What can happen to the tank:
- The plastic container may break if installation errors occur. If this was a self-installation and the installer made mistakes due to inexperience, the tank may become warped and crack over time;
- if the installation was carried out by a crooked master and he was accidentally hit during installation, then after a short time a leak may occur at the place of the chip and will need to be replaced with a new container;
- the fittings installed inside the tank consist of plastic parts, rubber and silicone sealing gaskets. Often problems arise due to wear of one of the components.
The inlet and outlet units may leak. The coarse filter, installed before water enters the drain tank, becomes clogged over time. And at the junctions of all pipes, the tightness may be compromised - elastic rubber gaskets fail over time, turning into hard, almost plastic parts.
If this happens and the rubber gaskets have become inelastic, then they need to be replaced by using a spare one from the repair kit or by purchasing one that is suitable in diameter
Problems can also arise with the toilet - from a simple chip to a violation of the system for draining the working fluid into the sewer riser.
Removing Geberit tank fittings
Using the Geberit with mechanical control as an example, let's look at the sequence of the disassembly process. First, be sure to turn off the water supply to the bathroom and empty the tank by pressing the release! Then you need to:
- Remove the flush button: lightly press the panel from bottom to top to disengage. Check out the explanatory pictures on the partition.
Remove the button. - Remove the pushers: turn, pull towards you.
Pushers
Removable with a twist. - Turn the side clamps or unscrew the two screws securing the frame and remove the frame.
Rotatable side clamps.
Screw mounting option. - Remove the partition by pressing the latches.
We dismantle the partition. - Remove the rocker arm assembly.
Remove the rocker block. - Close the valve inside the tank.
We close the valve. - Unscrew the union nut and disconnect the supply hose.
Disconnect the supply hose. - Remove the filler block.
Remove the filler block. - Perform partial disassembly for cleaning and washing.
We disassemble and wash the block. - Remove the drain valve bracket by moving the upper hooks apart (the fastening design differs for different brands).
Remove the drain valve mount. - Remove the bottom valve in parts: holding the bottom of the flask, turn the upper element until the bayonet connection disengages; snap off the small flush rod and turn it to the bottom.
Bayonet connection.
Released small flush rod (white) and bracket (black).
Video instructions:
How to repair an installation yourself
Knowing the causes of the breakdown, you can successfully carry out repair work. As in the case of identifying problems, we will consider separately how to restore the functionality of each installation system.
Tank
1. A cracked tank requires replacement, for which it is necessary to dismantle the false wall. It is expensive and time-consuming - you have to pay for inattention.
2. Repair of fittings. Here you first need to gain access to the inspection window. To do this, you need to know how to remove the installation button for the toilet. The work is performed in several stages:
- The panel with the key is removed. To do this, it is squeezed up from below, and then, by moving towards itself, it is released from the upper latches;
- the pusher clamps are removed;
- the pushers are unscrewed from the rocker arm;
- the protective frame is removed - the hardware is unscrewed from the spacer rods;
- distance rods are removed;
- the septum is removed.
The window has become accessible; failed components can be repaired. But don't rush to fix it. There are a few required operations left to complete. Disassembly continues by turning off the water (the tap is turned on in the wall of the tank) and flushing its remains into the toilet. If you skip these operations, there will be a flood. Then the filling valve is removed from the clamps, after which the rocker arm is removed. Next comes the filler block.
Unit repair
Automatic filling and emptying fittings have a complex design. Home prevention includes:
- Inspection to check the integrity of connections, detect wear of moving contacting surfaces.
- Cleaning from debris, rust, limescale.
- Replacement of polymer cuffs, seals that have lost their elasticity, are deformed, or damaged.
- Replacement of worn, broken plastic elements.
The last point is difficult to achieve. Geberit, Grohe, Cersanit documentation contains article numbers for each spare part, but it is not always possible to find parts for sale. Some spare parts are supplied only in sets with others or in several pieces.
The developers of Geberit and Grohe have provided for the maintenance of fittings without the use of equipment. The supported principle allows you to remove almost any part manually; tools, on the contrary, can damage the tank equipment.
Inspection of the filling mechanism
After removing the filling unit, Geberit recommends disconnecting the valve head and flushing the seal under pressure. Additionally, use a toothbrush.
Dirty lock assembly.
Flushing
Cleaned node.
Disassembly of products from the Polish holding Cersanit is somewhat different:
- Use an adjustable wrench to loosen the union nut of the flexible connection.
Weaken - Unscrew it by hand.
Unscrew - We remove the mechanism.
We remove the mechanism. - We disassemble it into its component parts and wash it.
Let's sort it out - Disconnect the head with the lever.
Disconnect the head with the lever. - We disassemble the head and clean the holes with a needle.
Cleaning - We replace the worn silicone cylindrical gasket or rearrange it with the reverse side.
Silicone gasket.
Turning over a gasket made of damaged material is a temporary solution. The reverse side is better preserved, so the unit stops leaking, but a change in water supply pressure leads to a repeat of the situation. You should not put anything under the silicone, the effect will not last long.
Attempts to expand the control channel with a small drill do not exclude the cause of overgrowth, but they violate the design sections. Only filtration will eliminate periodic clogging.
- Reassemble in reverse order. Checking the lever stroke.
We collect - We return the valve to its place and connect it.
- We open the valve, wait for it to fill, and reset it by pulling the rod up. We control the cessation of leakage into the toilet after automatic dialing, repeat the operation several times.
We check the operation of the valve.
Masters experience:
Drain valve prevention
We remove the drain valve through the window, as described in point 4. Sometimes the rubber fixed ring of the basket passes along the joint with the bottom neck of the container. The basket is disconnected from the valve cylinder by turning the bayonet interface.
Next, clean the ring (black in the photo) and the bottom hole. The defective seal is replaced. Do the same with the drain cuff (yellowish in the picture).
Engineer's comments:
Adjusting the water level
Violation of the optimal volume of filling the installation tank leads to unstable flushing at low levels or excessive water consumption at high levels. You can easily adjust the required amount of liquid with your own hands.
By dismantling the button and partition, you gain access to the fittings. By turning the pin, the float is lowered or raised, lowering or raising the fill level accordingly.
Adjusting the float position.
It is not necessary to remove the filling block; you can rotate the pin through the opening.
The Geberit drain block is equipped with flag indicators that regulate the volume of large and small drains. Details from 2:45: , also watch the previous video from 2:25.
Vacuum systems from Grohe are equipped with an original mechanism for adjusting the volume of large and small release. The large drain is adjusted with a gate plug.
The gate (blue plate on the left) at the top is the minimum large drain.
Moving the plug to its lowest position.
Pressing the big shutter key.
Gate at the bottom - maximum large drain..
Economical drainage is regulated by moving the float along the flask. In the upper position, the minimum amount of liquid flows out, the lower position corresponds to the greatest discharge for the economy mode.
Pressing the economy shutter key, blue float at the bottom.
Largest reset in economy mode.
Moving the float up to reduce flow.
Initiation of economy mode with the float raised.
Remaining water after a small drain set to minimum.
Grohe recommendations for adjusting the Rapid SL system: