- Pipe installation methods
- Wiring types
- Installation of water supply when connecting to a central water supply
- What does an autonomous water supply system consist of?
- Installation of water supply when connecting the water supply to a well or well
- Sequence of installation of water supply at home
Send a request by email or call +7 (499) 113-68-14, and our engineer will prepare you our commercial offer.
A water supply system is a set of plumbing fixtures, shut-off valves and pipes that provide connection and supply of water for domestic and industrial needs. Water sources are called water intakes.
For cities, it is customary to use a central pipeline as a water intake, which includes an underground and above-ground network of pipes. With their help, water is supplied to a huge number of people at the same time. Country houses in the absence of a public water supply use an autonomous water supply system.
In the modern world, the plumbing system is an integral part of human life. Hot and cold water supply is required for cooking, washing dishes, bathing, laundry and other household needs. Without it, the heating and sewage system cannot function. Installation of water supply systems is a rather complicated process, consisting of several stages. The first stages are the design of circuits and the purchase of all necessary materials and equipment.
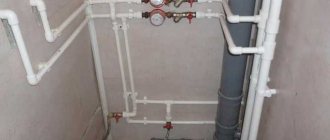
Pipe installation methods
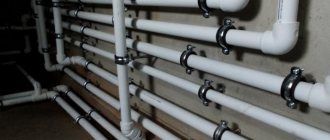
Pipe installation can be open or closed. The open method is considered simpler, more reliable and convenient, due to the ability to see all leaks and malfunctions. The disadvantage of this method is the difficulty of operating the system in the winter season; condensation forms when there is a temperature difference between water and air.
The hidden installation method is considered more labor-intensive, since it requires laying pipes in niches with the obligatory fulfillment of the following conditions:
- SNiP ban on cutting into a load-bearing wall;
- Avoiding joints between pipes that run inside the wall;
- Securing pipes using shut-off valves and communication networks in accessible areas;
- Protection of pipes that run inside the walls using a corrugated hose.
Hidden installation involves placing cold pipes above hot ones and packaging them in a tubular heat insulator.
Although the closed method has a number of difficulties, in the modern world it is customary to use it.
Wiring types
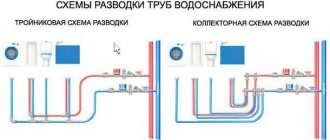
Classify series and collector wiring.
- Consistent view. It is characterized by simplicity and ease of installation of risers and pipelines. Sequential wiring involves a central water supply with lines that go to users. Main advantages: cost-effectiveness and ease of installation. Among the disadvantages, a decrease in water pressure is noted when two or more water intake points are turned on at the same time. And if repairs to one of the points are required, all water will need to be shut off.
- Collector wiring. This type involves connecting a separate pipe from one distribution manifold to each water intake point. Manifold wiring does not reduce pressure and pressure when using many points simultaneously. It is also possible to shut off any branch by closing the collector valve. Among the disadvantages, they note the high consumption of distribution elements and, accordingly, the high cost of the entire system in comparison with the previous wiring.
Step-by-step scheme for installing water supply and sewerage systems
Installation and replacement of water supply and sewerage systems requires a certain sequence of actions, which can be schematically presented as follows:
- Drawing up a plan and diagram that takes into account in detail the location of the network and each element.
- Preparation of tools necessary for installation, selection of materials suitable for installation on an internal water supply system and for installation of an external network.
- Dismantling of outdated devices for replacement.
- Carrying out excavation work to lay external communications at the required depth.
- Installation of water supply and sewerage pipelines for external networks.
- Restoring the normal appearance of the site where work and landscaping was carried out.
- Connection to internal networks. Transition to installation and replacement of individual devices related to internal networks.
Before starting any work, you need to draw up a diagram of the future pipeline and determine the type of material for its installation
Important! Special attention is given to the construction of the base for laying water supply and drainage pipes and backfilling in order to prevent incorrect operation and defrosting of the systems.
Installation of water supply when connecting to a central water supply
Water in a private house can be either from a central water supply or from an autonomous source (well, borehole).
In the first case, you will have to complete all the steps to insert into the central water supply plus installing a water meter.
Installation of water supply from a central network, as a rule, does not cause any special problems. Although it happens that the water pressure is not enough, especially in hot times, when all the surrounding residents intensively water their gardens. Then there are two options: either sit without water, or store it in barrels, buckets, pots, mugs, jars... in advance, or install a pumping station with reserve tanks. And then read this article to the end, choosing what relates to the installation of pumping stations.
Features of the well may also lead to the need to install some additional equipment, as read below.
What does an autonomous water supply system consist of?
Installing a water supply in a private house with an autonomous water source means not only laying pipes and screwing on taps, but also installing other equipment, and first, selecting it.
Here is what is included in the autonomous water supply system, regardless of the source (except for the central water supply):
Filters, taps, pumping station - all this depends on the method of obtaining water. Fine filters are selected individually - depending on the type of pollution: whether it contains organic matter, salts or something else, so this can only be found out in your area, specifically on your site, and not on the Internet.
Why city residents like work
Over the years of work, we have managed to earn the recognition and trust of Moscow residents. Quality and results are the motto of the employees. If you require installation of a water supply system, do not hesitate to call us. We will come, help, advise!
Why should you contact us? There are many reasons for this:
- The price is set at an adequate price for all customers. We do not inflate the cost of work and never “impose” unnecessary things.
- We work using modern technologies. We use the latest equipment and high-quality materials.
- Our staff includes only trained professionals who can cope with any emergency situation.
- We bring all the tools and equipment to the site. The client does not have to buy too much.
- We will come to any area in Moscow and provide water supply to a house, cottage, industrial building, etc.
- We conclude an official contract with clients and provide a warranty period for the order.
These are not all the advantages of cooperation with. Call and see for yourself!
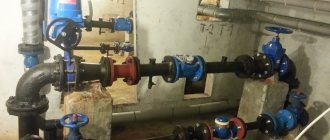
Installation of water supply when connecting the water supply to a well or well
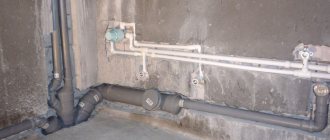
If water from a well is pumped by a deep-well pump, then we run the pipe from the well into the house, where we install a filter and a hydraulic tank:
The hydraulic tank compensates for water hammer and serves to accumulate water.
This was the first installation option.
Second option. Here everything depends on the depth of the well and on the required pressure in the water supply of the house. The point is this.
If the depth of the well is large, then the pump often fails due to the large loads that it has to overcome (water must not only be lifted from a certain depth, but also pressure must be created in the internal water supply system.
How to avoid pump failure? The solution is simple: in the house, in front of the pumping station, we place an additional container (200 liter plastic barrel). Water will be poured into this barrel using a well pump. There should be a relay on the barrel itself that will turn on the pump when the water level in the barrel drops and turn it off when the level is sufficient. And the pumping station installed after the barrel will already take water from it and build up the required pressure in the internal water supply system. As a result, the pump in the well will not be overloaded, and it will work for less time.
For a shallow well (as a rule, these are sand wells), only a pumping station will be sufficient, without a well pump. A check valve is mounted on the pipe in the well:
The pipe runs from the well to a pumping station installed in the house. This option is suitable when the height of the water rise is no more than 8 m (here you need to take into account the height of the pumping station above the ground).
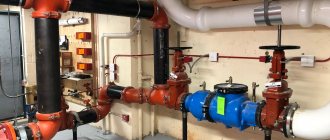
This is what the pumping station looks like with all the devices surrounding it:
Important! Be sure to install shock-absorbing pads under the mountings of the pumping station to reduce noise.
Important! There should always be water in the pumping station tank. If water does not flow while the pumping station is running, then immediately check the presence of water in the tank and pour it manually.
Sequence of installation of water supply at home
We begin the installation of water supply at home with a diagram of the water supply system. First we draw the cold water supply pipelines, then the hot ones. In this case, it is necessary to strictly observe the rule of the right hand. This means that cold water must be installed to the sink, bathtub, shower and boiler on the right, since most people are right-handed, and hot water on the left.
Exception for the toilet. Since it only needs cold water, the location of the connection may vary depending on the model. That is, the toilet connection can be on the right or left, at the top or bottom.
We start with the installation of cold water supply at home for several reasons. Firstly, there are often more cold water supply points than hot water supply. Secondly, one more rule must be used. This is when the cold water pipes should be under the hot water pipes.
This is done so that if there is condensation on a cold pipe, it will not drip onto the hot water pipe.
And third, since the heat from the hot water supply pipe goes up, it is necessary that this heat does not heat the cold water pipe. Otherwise, you will have hot water flowing in both pipes for some time. This is especially noticeable in the morning if there is a hot water recirculation system.
We begin the installation of cold water by connecting it to the inlet and then proceed according to the principle of tee connection of water sockets to plumbing. devices. Of course, we do not connect the pipe to the inlet directly, but through a filter and a cold water meter.
We lead the pipe into the bathroom to the first cold water connection point along the way. We attach the tee and mark it on the pipe. We solder a riser to the tee to connect the water socket. And then we weld the tee with the riser to the pipe. And so on until the very last point.
At the same time, do not forget to cut the risers a little larger and be sure to plug them so that no debris, pieces of plaster, brick, or so that anyone pushes anything into the pipe.
But before that, we put pipe insulation on the pipe. I insist on its constant use. Pipe insulation is available in several models. The most popular insulation is gray polyethylene foam. The thickness of the insulation wall is 8 mm.
The only downside to this insulation is that it is thick. That's why it's not always convenient to use.
The second type of insulation is foam rubber. Luxurious, thin insulation that is superior to polyethylene foam in many ways. But the price is also higher.
And the third type of insulation comes directly from metal-plastic pipes. That is, the pipes are already insulated. But we'll talk about this another time.
After installing the cold water supply pipes at home, we move on to installing the hot water supply. We conduct pipes in the same way as cold ones. Without forgetting the rules.
When installing hot water pipes at home, there is also a recirculation pipe. This pipe is installed mainly in apartments for heating heated towel rails and in large houses when used to prepare hot water for indirect heating boilers.
Here are several schemes for installing recirculation. Try to implement these schemes in your home or facility.
Materials
What materials can be used to install heating and water supply systems in a country house with your own hands?
Pipes
Let's remember the conditions under which autonomous heating circuits and hot water pipelines are operated: typical heating pressure is 1 - 2.5 kgf/cm2, typical temperature range is 50-75 degrees; on hot water at the same temperature, the pressure is equal to the pressure in the cold water main (typically no more than 4 kgf/cm2).
In such greenhouse conditions, you don’t have to look for materials with a margin of safety: cheap (from 20 rubles per meter) and durable (25 years for hot water and heating, 50 years for cold water) polypropylene pipes are quite suitable for wiring. They are connected with equally cheap and easy-to-install fittings for low-temperature welding.
Our choice is polypropylene
The only unpleasant feature of polypropylene is its significant elongation when heated (it is 13 times higher than the corresponding parameter of steel). This problem is completely solvable: on long sections of bottlings and risers, compensators are installed - U-shaped or ring bends, and the attachment points closest to the compensators are made sliding.
Expansion compensators on a polypropylene pipeline
By the way: polypropylene reinforced with mineral fiber elongates half as much as non-reinforced polypropylene, and aluminum foil reduces elongation when heated by four times. Replacing pipes with reinforced ones will not greatly affect the amount of the estimate for the installation of heating and water supply systems, and you will be able to get rid of most of the expansion joints.
Aluminum reinforcement: a layer of foil is glued between two polypropylene shells
Heating devices
What heating devices should I buy for my heating needs? We recommend choosing aluminum sectional radiators.
Aluminum sectional radiator
What is the instruction related to? With the fact that they combine a modest cost (from 240 rubles per section) with excellent heat transfer (180-215 watts of heat from each section).
Heat flow per section for the Global radiator range
Auxiliary equipment
Mandatory elements of a closed (without communication with the atmosphere) heating system with forced circulation are:
| Image | Description |
| A circulation pump responsible for the movement of the coolant. |
| A membrane expansion tank that accommodates excess coolant when it is heated and concomitantly expands. |
| Safety group consisting of a safety valve, automatic air vent and pressure gauge. The safety group allows you to control the pressure and relieve its excess, as well as remove air and water vapor when the reset circuit starts or the boiler heat exchanger boils. |
Hint: the pump is usually placed on the return line, in front of the boiler. The minimum temperature of the working environment helps to increase the service life of the impeller, plastic parts and elastic seals of the pump. The safety group is installed where the pressure first begins to increase when circulation stops - at the boiler outlet. The expansion tank is most often located on the return pipeline, in front of the circulation pump.
On DHW, if a storage water heater is used, a check and safety valve are installed on its feed pipe. The first eliminates the loss of heated water when discharging the cold water supply system, the second provides insurance in the event of a critical increase in pressure due to thermal expansion of water.
Check and safety valves at the inlet of an electric boiler
DHW circuits with volumetric boilers are additionally equipped with expansion tanks that prevent water loss through the safety valve.
Expansion tank in the boiler trim