In this article we will figure out how to dismantle the toilet with your own hands, if possible without causing any damage to it.
We will analyze two main scenarios: for a toilet that is installed on standard fasteners, with screws to the floor; and for a toilet that is simply mounted on adhesive mastic. It is this method of fastening that installation organizations often use when commissioning a new house.
To make a repair, you first have to destroy something.
Preparatory work before removing the toilet
Removing a toilet and attaching a temporary plumbing fixture is not as difficult a task as it might seem. In order to dismantle the toilet before its subsequent replacement, you need to stock up on the following materials and tools:
- crowbar;
- wrenches of different sizes;
- pliers;
- rags needed to get rid of residual water;
- latex gloves;
- disinfectant.
When dismantling the toilet, be sure to wear rubber gloves; this will help you avoid microtraumas and infections. Before starting work, the plumbing fixture must be thoroughly washed and treated with a disinfectant, for example, a chlorine solution. It can be rinsed with water with an antiseptic dissolved in it - ordinary chlorine-containing bleach.
After this, the workspace must be cleared of all foreign objects; everything should be removed, even rugs.
Removal of plumbing should begin by shutting off the cold water in the supply pipeline. The remaining water in the tank must be drained and the sewer system rendered inactive. You should not use water yourself, and you should also warn your neighbors above so that they refrain from water procedures for a while. After making sure that the supply valve is shut off securely, you can begin work.
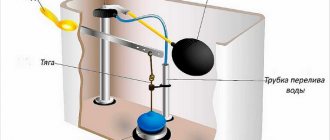
Connection between cistern and toilet
The next step is to screw the tank to the toilet. These bags contain an installation kit for connecting the tank and toilet:
We put such a plastic washer on the screw, then we put a conical gasket:
We insert the screw into the tank from the inside into these holes:
We insert it so that the gasket is pressed and water does not leak. Thus we assemble two bolts. Then we move down. We put a rubber gasket on the bottom, then a plastic gasket, and screw it all in with a nut.
The most important thing here is not to over-tighten. If you overtighten, your tank will simply crack, and you will run to the store for a new tank. Now we will show all this. Everything is ready to install the tank, put the gasket here:
It serves to seal the connection between the tank and the toilet. Then we take our two ready-made bolts, which we will use to fasten them from below. We take the tank itself, install it, insert the bolts into the holes, and place them level. If you place them unevenly, the white gaskets may also be placed unevenly, in which case they will leak later.
So, now you need to screw this mounting kit from below:
First we put on the rubber gasket, then the plastic gasket and nut. We support the screw from here, we insert everything here.
There is no need to rush here, this is a responsible matter. The rubber gasket was inserted, the plastic gasket was inserted. Of course, it is better to do this work together, but you can do it alone. We tighten the nut as far as possible by hand, then tighten it with a wrench. Also the second bolt. To tighten the bolts we use a regular 10mm wrench and a 10mm tubular wrench:
In this case, the bolt heads are 10 mm in size. We do this: we place a regular box wrench on the bottom and tighten it with a tubular wrench on top.
You need to tighten it until the tank stops wobbling. You can’t overtighten it too much, otherwise it will simply crunch. Now we will show what happened in the end. Top view: one bolt, second bolt under the float.
Here is the installed float, installed counterpart for the drain valve. Now the bottom view: the lower part of the float, this is where the inlet hose will be attached:
One bolt with a tightened nut and the second, also tightened:
Make sure the bolts are tightened evenly so that the tank sits level. Here the distance should be the same everywhere, the gasket should be pressed so that water does not flow here.
Freeing the toilet base
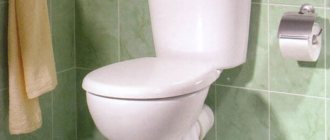
Diagram of a compact toilet with dimensions.
Related article: Dielectric boots and galoshes
Work begins by disconnecting the flexible water supply hose. Then you will need to dismantle the flush tank, because removing the toilet together with the tank will be quite problematic. To do this, drain the remaining water, unscrew the fastening nuts located on the back of the structure, and open the lid. The tank, hanging on hinges on the wall, can be removed without opening it.
Next you need to clear the base. If your bathroom has beautifully laid tiles, you will have to knock them out. The toilet is attached to the floor in two or four places at the bottom. The connection can be a nut connection, when the device is mounted into the floor using studs, or using dowels with hexagonal heads. However, in both cases, the fastener will be unscrewed with a wrench of the required size.
When connecting with studs, slightly lift the base and, with light rocking movements, loosen the seal in the sewer outlet pipe. If the socket seal was made using cement mortar, it must be chipped using a chisel before removal. It is best to use a thin chisel, breaking off the cement very carefully, with light blows - the tip of the chisel should be directed across the coating, otherwise the toilet outlet or pipe socket may be damaged. As soon as the coating cracks on one side, the same operation will need to be done on the other side of the outlet. They pick out the fragments and try to get the toilet bowl out of the pipe. If this does not work, you need to continue chipping the cement.
If you are faced with such a complex mounting option as fixing the toilet on a wooden board, then dismantling the plumbing can lead to damage. The bottom will simply have to be beaten off. The fastenings will remain in the floor along with the base, which will be removed in parts after the work is completed.
Old plumbing fixtures are usually thrown away; you shouldn’t feel sorry for them.
To avoid injury during work, carefully follow all safety precautions - use gloves and safety glasses.
Construction of houses
21 votes
+
Vote for!
—
Vote against!
Someday you will definitely face the problem of dismantling the toilet. After all, like all communications in the house, plumbing must always remain in good working order. But time is merciless with such things. Therefore, even cosmetic renovations in an apartment require replacing all elements of the bathroom and restroom. Before installing a new toilet, you need to dismantle the old plumbing fixture. This activity is not the most pleasant, but, nevertheless, quite simple, not long and completely doable with your own hands.
- Fastening the toilet with dowels
Dismantling the toilet
Removing a toilet and installing a temporary plumbing fixture is not such a difficult task, as you noticed. After familiarizing yourself with the theory presented in our article, a video about dismantling the toilet will answer the remaining questions.
Preparatory work
Dismantling and replacing a toilet that has served its useful life is necessary to provide comfortable conditions for residents of a city apartment or country house. Before work, it is recommended to stock up on all the necessary tools. You may need keys of different sizes and a crowbar during the work. It's also a good idea to have pliers on hand. To get rid of residual water, you should save a lot of rags.
All operations related to dismantling the toilet with your own hands must be performed with rubber gloves to protect the skin of your hands from microtrauma and bacteria. Before starting work, it is advisable to thoroughly wash the toilet and treat it with some kind of disinfectant, for example, chlorine solution, because it is still a breeding ground for harmful microorganisms. You can rinse the toilet with running water with an antiseptic dissolved in it - ordinary “Whiteness”, which is quite suitable for these purposes.
After this, the space in the work area should be cleared of all objects present; everything should be removed, even the rugs. It is customary to begin dismantling plumbing by turning off the cold water in the supply pipeline. The water that remains in the tank must be drained, and it is also worth ensuring that the sewer system is completely inactive - you should not use the water yourself, but you should also warn your neighbors above to refrain from water procedures for a while. After making sure that the supply channel is securely blocked, you can begin to remove the toilet.
Freeing the toilet base
You should start by disconnecting the flexible hose that supplies water from the pipe. The next step is to dismantle the tank, because it will be more difficult to physically remove the toilet along with the tank. Drain the last of the water, unscrew the nuts securing the tank, which are located on the back side of the structure, and open the lid. If the tank hangs on the wall on hinges, you can remove it without opening it.
Next you need to clear the base. If the tiles around your toilet are beautifully laid, you will have to knock them out. The toilet is attached to the floor in two or four places in the lower part of the bowl. There is either a nut connection of the toilet bowl with studs, which is built into the floor, or a bowl, which is screwed with dowels having hexagonal heads. But in any case, the fastening must be unscrewed with a wrench of a certain size.
When fastening with studs, you need to slightly lift the base and lightly rock the seal in the drainage pipe to loosen it. If the pipe socket was sealed using cement mortar, it is recommended to chip off this mortar using a chisel before removing the base.
It is better to use a thin chisel, breaking off the cement with extreme caution with light blows - the tip of the chisel is usually directed across the coating, otherwise the pipe socket or toilet outlet may burst. As soon as the coating cracks on one side, a similar operation will need to be done on the opposite side of the outlet. You should pick out the fragments and try to remove the toilet from the drain pipe. If this does not work, it is recommended to repeat the cement chipping.
However, if you got the most difficult option, which involves attaching the base to a wooden board, then in this case dismantling the toilet will be traumatic for the plumbing. You will simply have to beat off the bottom so that the fasteners remain in the floor along with the base, then it should be taken out piece by piece when the work is finished.
Removing the toilet from the sewer pipe
As a rule, old plumbing fixtures are thrown away, so there is no need to feel sorry for them. To avoid injury from pieces of tile while working, it is recommended to carefully follow safety precautions - use safety glasses and gloves. Now the toilet is connected exclusively to the cast iron sewer pipe, and it can be disconnected from it in several ways. These methods carry varying degrees of destruction. Accordingly, the price of dismantling is different if you order the service from specialists.
Before removing the toilet, it is recommended to make a special plug, which is a rag gag that is about 100 millimeters in diameter. This plug must be used to plug the hole in the drain pipe, thereby preventing sewer gases from entering the apartment.
The first method is destruction. Using this method, you should remove the outlet, remove the toilet, and then simply clean the socket of any remaining mortar and ceramics. You can break off the outlet in a situation where the toilet is no longer attached to the floor, by clearing the mortar between the outlet and the pipe as much as possible, lift it and pull it up. All that remains is to knock out the remains from the pipe without damaging the sewer pipe itself. Try not to clog the drain with fragments; it is better to plug the hole with something.
A more humane method may be chosen if attempts are made to maintain integrity. It is necessary to clean the junction of the sewer pipe and the toilet from sealant, mortar and other impurities down to the smallest residues. Lift the product and see how freely it begins to move in the pipe. Slowly turning and rocking the outlet, you need to pull it out of the pipe, simultaneously clearing the passage of the solution. If you managed to get the toilet, then you need to clean the pipe for future installation.
Dismantling a Soviet toilet
And it also happens that when the turn comes to the bathroom, the owners there are greeted by a gloomy product that was installed conscientiously decades ago, since the construction of the house. Then dismantling and installing the toilet will become quite a troublesome task, but if you do it yourself, you will certainly understand its design, and repairs will no longer cause you problems in the future.
The most difficult option is rightfully to dismantle the Soviet toilet, because the design is very unique, and the device was secured in such a way that it is almost impossible to tear it out. Therefore, you will most likely not be able to keep it intact. Inspect the floor near the toilet, assessing the method of fastening.
The next problem that occurs when dismantling a Soviet toilet, especially if your plans include reusing the toilet, for example, in the country, is how to disconnect the outlet from the sewer. During the construction and installation of communications in Soviet times, first-class tightness was ensured, with rare exceptions. The joints were covered with mortar so deeply that today it is impossible to knock it down carefully without damaging the sewer pipe or outlet.
Installation of a temporary toilet
During renovations in the bathroom, you can install a temporary toilet with your own hands. In this case, it is not at all necessary to resort to the help of specialists or strangers. In addition, you will need a minimum supply of tools. It is better to install a temporary toilet without a flush tank. It would also be superfluous to connect the temporary toilet to the water supply. In this case, it is recommended to flush the system by pouring water previously collected in a bucket.
To ensure the stability of the plumbing fixture, it is customary to install a shield underneath it or place a piece of chipboard measuring 500 by 500, securing it through the mounting holes of the toilet with self-tapping screws and washers. It is better to buy self-tapping screws with a hex head of the required length. If there is a need to prevent them from protruding from the bottom of the shield, long screws can be trimmed with a grinder.
It is convenient to connect the temporary toilet to the sewer system using corrugated pipes. This design allows you to quickly remove the plumbing fixtures to another place, literally in a minute, and also quickly put the toilet back. To ensure that the surface of the toilet gets dirty as little as possible during repairs, wrap the outside of it in cellophane and secure it with tape, which should only be glued to cellophane, because it will be difficult to remove its remains from the body. It is advisable to cover the entire assembled structure with a piece of chipboard or plywood to protect it from debris, mortar, dust or accidentally dropped tools.
Attaching a new toilet
To install a new toilet, including an ideal standard wall-hung toilet, in addition to the toilet itself, you need to have 3 more important parts on hand: a corrugated pipe approximately 15 centimeters in diameter, an eccentric and fasteners. Everything is clear with the fasteners, a corrugated pipe is used instead of the old one that goes to the collector, and an eccentric is used to connect the corrugation to the toilet.
There are three main methods of attaching a plumbing fixture to the floor:
- Fastening with dowels.
- Fastening to taffeta - a wooden board that is recessed into a recess in the floor. Taffeta should be made from well-seasoned wood, for example oak. After installing the taffeta, it is customary to fasten the toilet with ordinary self-tapping screws.
- Fixing the toilet using epoxy glue. It is necessary to apply a layer of resin to the supporting surface, the thickness of which should be approximately 5 millimeters, and then press the toilet to the floor.
Fastening the toilet with dowels
Before installing the toilet, it is strongly recommended that you understand the mounting. If the placement of the bolts of the old fastening coincides with the new one, then you can install the new toilet in the same place. The holes for the dowels should not be too large, which in turn should not fall through, but in any case they should not be smaller than the required size; there is no need to force the dowel in. If the fasteners are cracked or otherwise damaged, this will reduce the stability of the toilet.
When moving the toilet, you need to find the most suitable placement for it in the room, and it is also worth remembering that the corrugated pipe must connect to the sewer socket without any obstacles. Using corrugation, if necessary, you can independently determine the connection angle and the required distance from the pipe to the walls.
Having found the best place for installation, you need to outline the outline of the mounting plate of the plumbing fixture with a felt-tip pen or pencil, and you also need to mark the mounting holes for the dowels. Having moved the toilet, you should drill with a diamond drill the mounting holes that were marked earlier.
Drilling tiles is considered the most difficult job. You need to drill with impact drilling with a drill, but it is recommended to drill the top layer without impact, and then you can do impacts. The main thing is to drill with virtually no pressure on the drill; it will perform the impact functions itself. A hammer drill is not considered the appropriate equipment for this type of work, but once you get through the tiles, a hammer drill can be used.
Attaching the toilet to taffeta
Before starting work, it is worth preparing the holes for the toilet. If the toilet outlets fit the standard holes, this is good, but when this is not the case, it is recommended to use special nozzles included with the plumbing fixture.
Internal toilet mounting
Toilet mounting can be internal or external. However, along with this, internal fastening is considered more common. It is necessary to install the toilet and mark the markings. On the inside of the tile, you should mark the place of fastening, after which you need to mark the place of drilling for fastenings, which are secured to the floor with bolts.
The next step is to drill a hole for mounting the plumbing fixture. The principles of drilling are similar to those described above. To prevent the drill from moving to the sides during drilling, you need to make chips in the previously marked places; for this you will need a hammer and a core.
Insert dowels into the prepared holes and install the toilet in such a way that the mounting holes coincide with the dowels. Don't forget to install a gasket before fastening. If it is missing, you need to squeeze out silicone around the entire perimeter from the inside of the contour outlined on the floor. Silicone, however, will not be superfluous even when there is a gasket.
During installation, the applied silicone will fill the unevenness and gaps between the floor and the toilet, and will also block the access of dust and water under the toilet. And this, in turn, means that germs and mold will not multiply there. It also prevents rusting of the toilet fasteners, which you can easily unscrew after many years.
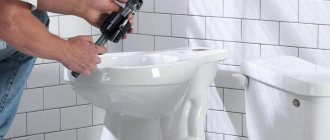
Then you need to insert screws with washers into the holes in the seating heel of the plumbing fixture, and accordingly screw them tightly into the dowels, but you should not over-tighten them to avoid damaging the toilet. It is recommended to tighten the fasteners alternately diagonally so that the toilet does not warp.
Next, you should connect the outlet of the plumbing fixture to the sewer neck. Immediately before installing the corrugated hose, you need to lubricate it on the sewer side with silicone. It is not necessary to lubricate the toilet side, but it won’t do any harm.
Tank installation
After the work has been done, you can begin installing the tank. Be sure to insert a sealing washer between the toilet and the tank, and the tank itself must be secured with 2 stainless bolts. It is also worth placing sealing gaskets under the bolts on the side of the tank.
Installation of all parts of most modern toilet models, water supply and tank connection are carried out practically without the use of tools. The only thing you need is an adjustable wrench, which is designed to tighten the mounting nuts and connect the water hose. Do not use tools such as pliers and a hammer.
Water supply
Water is supplied to the toilet using a flexible hose. It is customary to tighten the nuts by hand and only when this does not work, tighten them half a turn with a wrench. In flexible hose connections, silicone or rubber washers are used as a seal. Under no circumstances should you use a sealing wrap, because its use may cause leakage.
It is very important not to allow excessive tension on the hose; it should always be with a reserve. After connecting the water to the toilet, you need to flush it a little to clean the system from silicone residues and debris that will cause harm to the flush mechanism.
Water can be supplied using a flexible hose made of metal-plastic or a copper tube. These are the most reliable materials that can increase the service life of such eyeliner significantly. After installing the toilet, it is recommended not to use it for at least four hours to allow the silicone to completely harden.
But it’s better not to use the toilet for at least six hours so that the silicone adheres as best as possible, but in general you need to look at the circumstances. And finally, advice - when sealing corrugations with a sewer pipe, do not skimp on silicone; it is usually applied in such a way that it does not fall inside the pipe.
Now you have figured out how to remove the old plumbing fixture and install a new one. Moreover, dismantling and installing a toilet requires unquestioning compliance with hygiene and safety requirements, so be sure to wear safety glasses and gloves! And work extremely carefully if you want to use the old toilet later in your dacha or install it in its original place after renovating the bathroom. During work, it is advisable to install a temporary toilet.
Freeing the toilet from the sewer pipe
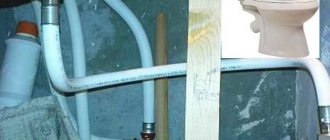
Scheme of the arrangement of drain tanks.
The toilet is now connected only to the cast iron sewer pipe, and it can be disconnected in several ways. These methods have different degrees of damage caused. Before removing the device, it is recommended to make a plug that looks like a rag gag, about 10 cm in diameter. She will need to plug the hole in the sewer pipe, thereby preventing sewer gases from escaping into the apartment.
Related article: Proper storage of workpieces on the balcony in winter
The first way is destruction. According to this method, you will need to remove the outlet, take out the toilet and simply clean the pipe of any remaining ceramics and mortar. The outlet can be broken off if the device is no longer attached to the floor; in this case, it is necessary to clean the connection between the outlet and the pipe as much as possible from the cement mortar. The toilet is lifted and pulled up. All that remains is to clean the sewer pipe of any residue, being careful not to damage it. The sewer pipe must be protected from clogging with fragments; it is better to plug the hole with something.
You can choose a less destructive method if you are trying to keep your plumbing intact. The joint between the sewer pipe and the toilet must be cleaned of mortar, sealant and other impurities, removing even the smallest residues. Lift the product and determine how freely it moves in the pipe. Slowly loosening and turning the outlet, it is necessary to pull it out of the socket, while clearing it of the solution. The pipe needs to be cleaned for upcoming installation.
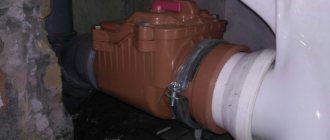
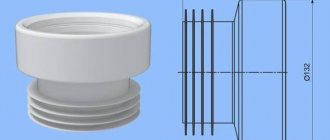
Installation of cuff and corrugation
Here's what we bought at the store for work. Firstly, 5 kg tile adhesive to fill the hole from the old toilet. Secondly, the cuff, here is a black transition to cast iron:
We will hammer this cuff into a cast iron pipe. There’s also this short corrugation and eccentric cuff:
Let's see which of them is better suited for connection. The fact is that the owners bought this long corrugation:
These are usually sold in stores. If we put it up, the owners will simply press their knees against the door. Maybe the door won't even close. Therefore, we will install either an eccentric collar or an imported short corrugation. Let's see what will be better in our case. We coated the bottom at the entrance to the sewer with sealant so that nothing would leak from there:
Use a hammer to hammer in the black transition collar. After it is up, you can install modern communications. This is what it looks like with the cuff:
Now you can insert the 110th plastic modern sewer or corrugation directly into this black cuff. Everything will be fine. Now let's measure the corrugation.
This is how we will connect the toilet to the sewer:
The eccentric collar fits here fine. We'll push it in deeper and coat it with sealant to make sure - and everything will be fine. The eccentric cuff fits here perfectly to prevent the toilet from moving forward.
Removing an old style toilet
It also happens that you buy an apartment and, when you go into the bathroom, you see an old toilet there, well installed thirty years ago during the construction of the house. Then removing the old device and installing a new one will bring you a lot of problems. However, if you do it yourself, you will definitely be able to understand its design and repairs will not cause you trouble in the future.
Dismantling a Soviet toilet can be considered the most difficult option. This design is quite unique; this device was fixed in such a way that it was almost impossible to remove. Therefore, you will not be able to keep it intact. Inspect the floor near it and evaluate the type of fastening.
The next problem that often arises when dismantling Soviet toilets (especially if you are going to reuse the toilet, for example, by installing it in the country), is disconnecting the outlet from the sewer. When building houses and laying communications in Soviet times, everything was done as hermetically as possible. The joints were covered with cement so deeply that it is currently impossible to knock it down carefully without damaging the sewer pipe or outlet.
Related article: Dependence of boiler efficiency on the heating surface
Marking and preparing the site for a new toilet
We take a marker and mark where the toilet will stand, as well as the places where we will screw the bolts.
Here are our marker marks. We measure the distance from the line to the toilet hole.
Here is the hole where the bolt will be inserted. We mark them on the floor, where we will drill holes for dowels. We marked two holes, one of them was in the pit.
We have an installation kit that the manufacturer provides for the toilet, that is, two short bolts and two 8 mm dowels.
All this will not suit us. One bolt, which is not in the hole, will still be of sufficient length, and the second, which is in the hole, will definitely be short. Therefore, we will use different bolts and different dowels. We have normal dowels from our stock.
One bolt, which is longer, will be screwed into the hole. Here are two normal dowels, 10 by 70 or 10 by 60. They hold well thanks to the protrusions, do not rotate, and what is good about them is that they have a wide entrance hole, it is easy to get into them with a screw. Now let's start the actual drilling. Since we will be drilling into tiles, and we don’t have drills or drill bits for tiles, we only have a hammer drill, we will drill gradually.
First, a five-point drill, we use it to go through the tiles, but we don’t drill into the concrete. Then a 6 mm, 8 mm drill and final drilling with a 10 mm drill. Naturally, we will drill without beating, so as not to split the tile. Then, when we drill through the tiles with a dozen, we can already drill through the concrete with beating. Let's show stasis the finished result:
The tiles are Soviet, they went through without any problems. Modern tiles can sometimes be very difficult to drill, sometimes you just can’t drill them at all if it’s porcelain stoneware. You can’t take porcelain tiles without a drill on tiles. We quickly drilled everything, installed two dowels, now we need to fill the hole left from the old toilet with tile adhesive or whatever you have: cement, cement-sand mixture. This hole is in our way; one side of the toilet fits right into this hole.
It happens that the hole does not interfere, then the new toilet is simply placed on top. In this case, the hole is very disturbing to us, so we will cover it with tile adhesive. It turned out like this:
The hole was filled with cement, leaving only the place where the screw would be screwed in and where the dowel would be.
Installing a temporary toilet
During renovations, a temporary toilet can be installed in the toilet. At the same time, it is not at all necessary to resort to the help of professionals; you can do it yourself. You will need the bare minimum set of tools and materials:
- toilet;
- chipboard;
- self-tapping screws with washers;
- spanners;
- screwdrivers.
A temporary toilet is usually installed without a cistern. It will also be superfluous to connect it to the water supply. In this case, flushing into the sewer will be carried out by pouring the water collected into a bucket. For greater stability of the plumbing fixture, place a shield or piece of chipboard measuring 50 by 50 cm under it, securing it through the holes in the base of the toilet with self-tapping screws and washers. You need to purchase self-tapping screws of the required length with hexagonal heads. If necessary, long screws are trimmed with a grinder.
The temporary toilet is connected using corrugations. This design makes it possible to quickly move the plumbing to another place, in almost a minute, and just as quickly put it in place. To make the toilet less dirty during repairs, you need to wrap it in polyethylene and secure the film with tape, which should only be glued to polyethylene, since it will be quite difficult to remove the glue from the body. The top of the structure must be covered with a piece of plywood or chipboard.
The best posts
- Stairs to the second floor. Rules for staircase construction
- How to dilute cement? What should be the ratio of cement and sand?
- Design and options for curtains for a kitchen with a balcony: answers to all questions
- Bead embroidery patterns for various flags of the world
- How to make ventilation in a metal garage
- TOP 7 things for moving that you should buy in advance
- Methods for restoring a metal entrance door
- Things in a modern interior that science fiction writers predicted
The toilet is attached with glue or cement
Dismantling the old toilet in this case is faster and easier, but leaves less chance of removing it intact. Almost always, the toilet not only stands on adhesive mastic or cement, but is also cemented with an outlet in the sewer socket.
Method 1. For the shy
- Again, we take a narrow chisel or a strong screwdriver and, bending behind the toilet, carefully try to remove the maximum amount of putty from the sewer socket. If it is desirable to remove the toilet intact, do not rush and do not put much effort.
- Then, using a wide chisel or chisel, we carefully try to pry off the toilet bowl one by one from all sides. We are looking for weakness. Using light blows, we drive the chisel under the base of the toilet, wedging its base with the floor. Sooner or later he will give up. However, there is a non-zero chance of breaking off a piece of the base.
Method 2. For experienced
If possible, free the outlet from putty or sealant. This is key: it is the release that will be the weak point during dismantling.
The main thing is to remove the putty if possible.
Then we simply kick the toilet from the front a couple of times, aiming the kick slightly from bottom to top. In this case, it is better to hold it from above: if you are too determined, the release will break off.
What is curious: such dismantling of the old toilet leaves it more likely to remain intact. The base never cracks; release - no more often than in the first case.
Method 3. For the lucky ones
If the toilet is connected to a plastic pipe in any way, you are in luck. If there is corrugation installed between the toilet and any pipe, you have hit the jackpot.
The entire operation of dismantling the old toilet will take a matter of seconds.
- Make sure there is nothing holding the toilet. There are no screws between the base and the floor, the tank has been removed, and the toilet does not rest against the wall. It is held in place only by glue or mortar.
- After asking your partner to hold the toilet so it doesn't fly off and smash against the wall, kick it in the same way as in the scenario described above. One or two kicks - and the toilet is separated from the floor and stands in front of you absolutely intact.
Here, dismantling the toilet was extremely fast
Safety precautions before starting work
When you plan to replace a toilet, doubts arise about the advisability of doing all the work yourself. In fact, you can handle removing the old and installing a new device on your own. The main thing is to do everything consistently, following the manufacturer’s recommendations and following the advice of experienced craftsmen.
There are 3 options for carrying out the work:
- invite a plumber;
- invite a coven;
- do it yourself.
The first option is suitable when scheduled repairs are underway and there is no time limit. Sometimes you have to wait for a plumber for weeks - he constantly has unforeseen circumstances.
Inviting a coven can result in even greater expenses - it’s good if you come across an experienced master whose hands grow from the right place. Otherwise, it can destroy the entire bathroom.
The last option for independent work is the most profitable - you can gain practical experience and save money. Yes, and great destruction will be avoided.
Toilet replacement tools
After selecting the product, as well as determining the location for its installation, you should prepare the necessary equipment and materials that will be needed in the process of dismantling the old and installing new devices.
These include:
- silicone based sealant;
- flat, Phillips screwdrivers;
- hammer;
- chisel;
- adjustable wrench, wrench;
- fasteners;
- perforator;
- safety glasses, gloves;
- hacksaw for metal.
After preparing these tools and materials, they begin the process of dismantling the old toilet.
How to repair a toilet
Removing and replacing a toilet is a task that should not be undertaken without a good reason, but it is certainly not beyond your capabilities. When you can't unclog your toilet using less drastic means, removing it is the answer. Maybe you want a more modern toilet, maybe the basin is cracked, or maybe the fixture is leaking around the base. All of these situations require removal and reinstallation of the old toilet or installation of a new fixture.
While there is nothing difficult about removing and replacing a toilet, your local plumbing code may prohibit anyone other than a licensed plumber from performing the job. Check your community's code to make sure you can do the task. To replace a toilet:
Step 1: Measure the approximate distance from the wall behind the bowl to the center of the toilet floor drain hole. Measure from the wall to the center of either of the two clamping bolts, one on each side of the toilet, that hold the unit to the floor. If there are two bolts on each side, measure toward the center of the back bolt.
Step 2: Select a replacement toilet using the approximate distance so that it will fit perfectly in your bathroom. You can replace your old toilet with a more modern fixture, but you must make sure that the new unit will fit into the space between the drainpipe and the wall. You can install a smaller unit, but you cannot fit a larger toilet into the space that was occupied by a smaller fixture.
Step 3: Turn off the water supply to the toilet tank, then drain all the water. both from the tank and from the bowl. Slide the flush handle to remove most of the water from the tank. Then soak up the remaining water with a sponge. Drain the water from the bowl using a small container and then use a sponge. to completely dry the bowl.
Step 4: If the tank is attached to the wall, remove the hanging bolts from inside. tank that secures the tank to the wall. Next, remove the pair of bolts on the bottom of the tank that connects the tank to the bowl. Remove the tank and get it out of the way.
Step 5: Remove the caps from the hold-down bolts at the base of the bowl, if there are any. Most of these lids are made of ceramic that matches the bowl. Some types are held in place by plumbing joints and can be removed with a putty knife; others are threaded and can be unscrewed. After removing the caps, brush to remove any dried mixture before continuing.
Step 6: Remove the lug nuts or bolts. They can be extremely stubborn, but a small amount of penetrating oil should make removal much easier. Save the washers and bolts if you are reinstalling the bowl. Once the clamping nuts or bolts are outside, nothing else holds the bowl to the floor. Caution: To prevent sewer gas from clogging the drain, cover the hole while you work. Tie a string around an old towel to prevent it from falling through. hole and insert this plug into the drain.
Step 7: Remove the bowl. Because the bowl and reservoir can crack with just one sharp blow to the porcelain, lay out an old piece of carpet on which to lay the lamps. You should also have a bucket and a sponge on hand to soak up the water that you couldn't help out before. With your work surface prepared, gently rock the bowl back and forth to loosen it, then lift straight up. He weighs about 60 or 70 pounds. Place the bowl on a piece of carpeting.
Step 8: Inspect the open drain. Clean the drain if necessary. Once the pipe is clean, you can start replacing the toilet.
Step 9: Installing the new toilet and reinstalling the old one are done in the same way. Use a putty knife to scrape off any old caulk or other sealant. material from both the bottom of the bowl and the floor flange.
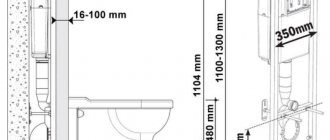
Typical installation of a two-piece floor-mounted toilet.
The approximate distance can be measured with the toilet installed by measuring from the wall to the center of the hold-down bolt, or to the center of the back of the bolt if the fixture is held in place by two pairs of bolts.
Inspect the floor where the toilet is located. If the floor is rotten, it will be on it before installing the toilet. Depending on how severe the damage is, the rebuild may include the floor, subfloor, and even beams. In this case, have a carpenter repair the damaged area before installing the toilet. Also inspect the flange and the bolts coming out of the flange. If the flange is damaged or the bolts are removed, replace the defective part. parts before moving on.
Step 10: Install the new O-ring onto the water outlet at the bottom of the new bowl. With the fixture upside down, install the O-ring into place. at the bottom of the bowl. If the floor flange is recessed, you will need a gasket with a plastic sleeve in the ring. This sleeve should be facing you. when you install it as it will go into the soil pipe.
Step 11: Apply an even coat of toilet sealing compound approximately 2 times the size. 1/8" thick around the edge of the bowl at the base. This connection is available at hardware and plumbing stores.
Step 12: Remove the plug from the drain pipe or drain pipe. Turn the bowl to the right side up and place it on the flange, guiding the bolts into place. press firmly and rotate the bowl slightly to ensure the wax ring is against the flange. Place a level across the bowl to ensure it is level. Move the bowl as necessary to level it, but do not disturb or break the seal. wax ring or the toilet will leak.
Step 13: Hand tighten the nuts to hold the bowl to the floor. Do not overtighten the nuts or the fixture may crack. Apply toilet compound to the nuts and bolts and replace the lids.
Step 14: If the tank and bowl are separate fixtures, you should now attach the tank. Unscrew the wall tank or reinstall the bolts and washers that connect the tank to the bowl support. Replace any damaged parts. If the tank and basin are connected to a pipe, apply pipe joint compound to the threads, thread the slide nuts through, and tighten them in place.
Step 15: Reconnect the water inlet pipe to the plug, make sure the ball valve assembly is properly attached, and turn the water back on.
Announcement
.