Before building a country house, its future owners must consider many issues. One of the most pressing is the choice of type of water supply. He has only two solutions. The first, more expensive one, is organizing a well or borehole. The second is joining a centralized route. Since digging a well or drilling a well implies that the work will be long, difficult and expensive, some land owners reject this “thorny” path. They prefer to use something that is guaranteed to work without the slightest problem. Therefore, before such an important operation, they need to find out how to cut into the central water supply, what needs to be done to have the right to do so.
Coordination and permission to carry out work
In order to cut into water pipes, both without welding and with its use, you must obtain all the required permits and documents.
Note! Carrying out illegal tapping into a pipe entails administrative and financial liability.
The first step is to obtain a site plan to determine if any utilities are underground. This paper, together with the title documents (for the house, plot), is submitted to the water utility department. The received technical conditions for connection include:
- connection location;
- pipeline diameter;
- other data depending on the purpose of the insertion.
Next, the necessary data is submitted to the SES and design and estimate documentation is developed and registered. Self-installation of metering devices and tapping into pipes under pressure is strictly prohibited. To perform such work, you must contact specialists.
It should also be remembered that tapping is prohibited bypassing metering devices, into a large-diameter main network that supplies the house, into a pipeline without a connection to the central sewer system, into a water supply system of any diameter, unless permission for any type of work has been obtained.
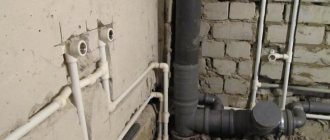
It is better to entrust the work on developing the project, preparing materials and carrying out insertions to the appropriate service
Permission to perform work
Permission to cut into a pipe is required. Without it, unauthorized connection is considered illegal and entails administrative punishment - the violator is fined. First, they submit documents for ownership of land and house to Vodokanal. Together with them, they provide a site plan, a copy of which is issued and certified by the center that registered the private property. It is necessary to check whether underground communications pass through the territory.
When permission is received, they contact the sanitary and epidemiological station. There the document is registered and checked whether the connection will violate sanitary standards. After a positive decision, you can order the project. The work will be carried out by any design organization, but it will have to be certified by Vodokanal, so it is better to contact its specialists directly.
Insertion may only be carried out by licensed workers; it is prohibited to do it yourself. Some site owners, having permission, ignore the ban and connect themselves. The fine does not scare them - the fee for Vodokanal services is much higher.
The essence of the insertion process
The choice of how to cut into a water pipe depends on its material. Modern systems are built on plastic, metal, metal-plastic and, less commonly, cast iron pipes. For insertion it is necessary to obtain a hole. It is clear that when the process is performed under pressure, water will flow out of the pipe. Therefore, special clamps are used for work, the design of which depends on the material of the pipes.
There are two most general rules that must be followed when inserting:
- Equality of the internal diameter of the embedded pipe and the diameter of the drill.
- The cut-in pipe should have a smaller diameter than the one in which the hole is made.
The process of inserting into the pipeline depends on the type of water supply. The most common technologies are welding and the use of clamps. Clamps are necessary in cases such as tapping under pressure into a water pipe or when it is not possible to cut the main line. Work on highways with polyethylene pipes excludes the use of gas and electric welding.
When welding is used, an additional coupling or thread is welded to the pipe, and a root tap is attached to these connecting elements. In this case, the water supply must be turned off and the water drained.
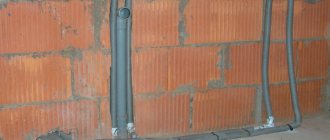
Welding work is used only when connecting to a metal pipeline
Insertion into the internal water supply in the yard
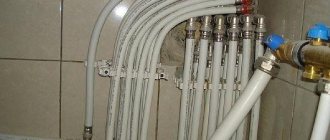
From the route that we cut into the central water supply, we can make one or more branches - for irrigation, for technical needs, for arranging a pump in the yard. You just need to comply with the legality of the tie-in, and do it only after the counter.
Technologically, there are several differences between connecting to a central pipeline and connecting to an internal route, since for an internal main, the pressure can be shut off using a central shut-off valve. Therefore, the connection is made using a conventional plumbing tee, and the working steps will be as follows:
- In the inspection well, the main valve is tightened, and water from the internal water supply is drained through the last tap;
- At the selected location, the pipe is cut with a grinder or a pipe cutter (depending on the pipe material), and from this section a branch is made along the length of the tee;
- Then you need to install the tee itself. For a polymer pipeline, this step looks the same as cutting in a standard electrical coupling - soldering with a special welding unit. In addition to this option, you can use press couplings or collet clamps. The tee is installed on the thread in an iron pipe using a conventional drive. It is not recommended to use a welding machine, since ring welding is a complex process, and for this you need to have experience;
- The last step is to cut a tap into the vertical outlet of the tee, which can be used to shut off the new water supply line. After this, you can use the water supply system by opening the valve on the central line.
The new water line can be installed while the main and yard water lines are turned back on, as the water will be shut off by the new shut-off valve at the inside tee.
Stages of tapping into a pipeline
The main tool that will be required for the job is a special mechanism for drilling water pipes under pressure. This method is quite productive and efficient if you follow safety rules and follow all technological steps.
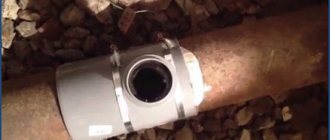
First, the insulation is removed and the surface of the pipe is cleaned. Next, a flange with an outlet to the supply pipe is installed and secured with a clamp. A drilling mechanism is mounted to the valve, which is connected to the flange.
Note! If the water supply is steel, then the drilling apparatus is installed not on a clamp, but on a welded pipe.
After the welding process, the seam is checked for defects. If necessary, it can be cooked again.
Next, a cutter of the required diameter is inserted through the open valve and a hole is cut. At the last stage, the drilling equipment is removed, cutting off the water supply from the pipe, and the insulation and anti-corrosion coating are restored. This sequence of steps is applicable for pipes made of cast iron and metal.
The hole is drilled through the welded pipe using a special drill
How to cut a pipe into a steel pipeline
Steel is considered to be as tough as cast iron, but is a more ductile alloy. The insertion method is different and more similar to the process of connecting to polymer pipes.
Insertion stages:
- The insertion site is cleaned of dirt.
- A threaded or flange type pipe is welded to the insertion point.
- The seams are welded.
- Test seams for leaks.
- A valve of any type is installed on the pipe.
- A branch of the external pipeline is installed behind it.
It is advisable to use a pipe pipe that contains structural steel. When drilling a hole, it is better to first use a hammer drill and finish the work manually.
Reference! You can visually check the quality of the seams using kerosene. The inside of the seams is lubricated with kerosene, and the outside is drawn along the contour with chalk. If greasy stains appear on the surface, it means that the joints are not airtight.
You can cut a pipe in different ways, it depends on the pressure with which the system will operate and the operating features. The insertion is performed at a right angle or 45 degrees, also directing the pipe to the side or upward.
Types of clamps
Clamps come in various designs and configurations. The most popular are:
- clamp-clip;
- saddle clamp;
- drill clamp;
- electric welded clamp saddle.
The use of a clamp-clip is possible for inserting into a water main that is not under pressure. Structurally, it consists of a pair of parts, one of which has a threaded outlet. The clamp is clamped with bolts and can be made of plastic or metal.
For cutting under pressure into a pipe made of metal, asbestos cement or plastic, a saddle clamp is used. It is attached to the pipeline using a bracket. Often, such a clamp is made of metal and has a locking plate or a special mechanism.
The drilling clamp is used for cutting into a pipe under pressure. In addition, it can come with attachments, as well as rotary connectors. To install the clamp on steel, cast iron and plastic pipes, special equipment is required.
The design of the drilling clamp includes a rotary-bolt mechanism. Subsequently, it is applicable as a shut-off or control valve.
The clamp for tapping is selected depending on the purpose of the outlet and the material of the main pipe
The saddle clamp is used for inserting into a plastic pipeline. The design includes a cutter for making a hole and a heating coil. The body of such a clamp is made of special plastic and additional equipment is required for its installation.
Where does the sidebar begin?
Any centralized water supply has a balance holder - an organization that operates and is responsible for the condition of this facility.
Any connection work should be carried out only with the consent of this organization, for which you should apply there.
Based on the application, the balance holder issues technical conditions for connection.
Before starting work, it is necessary to check the pressure in the line. If it is more than 5 atm, you will have to invite specialists to connect under pressure.
If work is to be carried out in a pedestrian area or near a highway, it is necessary to notify the local administration of the date and time of its implementation.
Insertion into the main pipeline
Discharge from the main pipeline under pressure is carried out in 3 stages:
- Excavation.
- The insertion process.
- Performing water supply drainage.
At the excavation stage, a pit with dimensions of 1.5 x 1.5 meters is dug. Its bottom drops half a meter below the pipe. You can first dig with an excavator (up to a metal or polymer tape laid above the pipe at a distance of 300-500 mm), then with shovels. If the insertion point is in the well, this step is excluded.
Using a hole in the saddle or collapsible clamp, the body of the reinforcement is punctured. This mating element is similar to a tee. A shut-off valve is screwed onto the side outlet, which, after a puncture, stops the flow of water.
For installation on plastic pipes, you can use ordinary saddle clamps or saddle clips.
Note! The best option for saddles for polymer pipes is an electric-welded collapsible clamp. Disassembled into 2 parts, it is installed above the insertion point and soldered to the pipe body using a welding machine. This results in a highly durable and airtight connection.
Diverting the water supply line from the main is the final stage of the process. The beginning of the new pipeline is at the saddle valve, and its end is at the water flow meter.
If you need to insert into underground communications, then first you need to dig a hole in the place where the pipeline is located
Do-it-yourself tapping technology
Let us consider step by step the process of connecting to a pipeline under pressure:
Excavation
It is most profitable to make a tie-in in an already existing well - then the excavation work will be limited to constructing a trench leading to the house.
If this is not possible, you will have to build the well yourself. At the site of the future tie-in, it is necessary to dig a recess with plan dimensions of 1.5 x 1.5 m and such a depth that the bottom is 50 cm below the highway.
At first, you can use earth-moving equipment, but upon reaching the warning tape, which is usually buried 30-50 cm above the pipe, excavation will need to be done manually - using a regular shovel.
The depth of the trench between the insertion point and the house should be such that the pipe laid on a 15-centimeter sand cushion is below the freezing depth of the soil. The optimal width is 50 cm. It is necessary to provide for the possibility of draining this section of the pipeline: usually a trench is dug with a slight slope towards the main line, and a tee with a drain valve is installed in the well immediately after the shut-off valve.
It is better to use polyethylene pipes - they are cheap, have a smoother wall than steel and are not afraid of corrosion.
Pipeline tapping
To connect to an existing water supply, a special collapsible clamp is used - the so-called saddle.
It consists of a pair of half-cylinders with eyes for bolts and a seal. A pipe with a thread or flange for installing a shut-off valve is welded to one of the half-cylinders.
The saddle can be installed on a polymer pipe without any preparatory operations.
The steel pipe must first be cleaned of paint and treated with sandpaper.
On a cast iron pipe at the drilling site, it is necessary to first remove the top layer using a grinder, which is strengthened by heat treatment (hardening).
Next, a seal is placed on the pipe and a saddle is installed, tightening both halves with bolts.
All that remains is to attach a ball valve to the saddle pipe, the handle of which is set to the “open” position, drill a hole in the pipe through it using a crown and quickly close this valve.
A carbide bit is used to drill a cast iron pipe, but any bit will do for a polymer pipe. One crown is not enough to pierce a cast iron wall - usually the tool has to be changed 3 or 4 times.
To prevent water splashing from the pipe from getting onto the electric drill, the latter must be covered with a rubber or cardboard screen.
Construction of a well (caisson)
In principle, the insert can simply be covered with soil. But a more correct solution would be to install a caisson around it - in the future this will simplify the operation and maintenance of the pipeline.
The construction of the caisson is carried out in the following order:
- The bottom of the excavation is lowered another 50–70 cm, after which a crushed stone or gravel cushion 20 cm thick is placed on it with a sheet of roofing material laid on top.
- A 100 mm thick concrete gravy is placed on top of the roofing material, for reinforcement of which a mesh of 4 mm reinforcing wire is used.
- After 4 days (by this time the concrete has gained 70% strength), the walls of the well are built on a concrete slab from foundation blocks, coating them on the outside with a waterproofing compound.
- The top of the well is covered with a slab with a hole wide enough to penetrate inside, after which they begin to backfill the excavation.
After the tests, the pipe leading to the house is also backfilled. First - with sand (about 100 mm), then - with a layer of soil of 20 - 40 cm and laying a warning plastic or metal tape on top of it. After this, the trench is finally backfilled.
Ready caisson
Rules for constructing a well
To simplify the operation of the outlet, a well (caisson) is placed above the insertion point. Its arrangement begins with deepening the pit by 50-70 cm. Places of selected soil are filled with a gravel cushion 20 cm thick. Roofing material is rolled out over the gravel and a concrete slab 10 cm thick is poured, which is reinforced with a grid of reinforcement.
It takes 3-4 days for concrete to reach 70% strength. After this, a shaft of blocks is built above the slab. At the same time, its neck rises to the zero level. The shape of the shaft can be square or round.
A cast plate with a round hole for a hatch is placed on the neck of the shaft. At the final stage, the vertical insulation of the outer surface of the shaft is equipped with a coating composition, and the pit is filled with selected soil.
Building a well requires a lot of time and expense. For this reason, it is better to insert into the caisson of the water pipeline than to divert it from the underground part of the pipeline.
At the point where it is inserted into the water main, a well is installed to provide access to the connection
How to crash into a central water supply under pressure?
Unauthorized connection is not a very good idea, so owners face administrative punishment - a fine. All work must be carried out by licensed organizations. Wiring and connecting the branch from the main to the house can be done without outside help. The main stages of work include:
- determining the optimal location;
- digging a trench and a well, its preparation;
- installation of a clamp on the main pipeline;
- installation of shut-off valves, drilling holes through them;
- connection to the in-house water pipe.
An additional connection to a water supply located on the site or inside the house does not require prior approval and is not punishable by law. This work can be done by yourself.
How to find a suitable place?
As a rule, the water supply is connected to the nearest inspection well. The first condition is its location on a straight section of the route. The outlet pipe must be located below the soil freezing level. In middle latitudes the depth is 1200-1500 mm. The trench is made deeper by about 500 mm, the reason is the need to arrange drainage from sand and gravel. Many craftsmen recommend making a concrete base.
Selection of materials
To connect to the main line, various pipes are used - plastic (polyethylene), steel or cast iron. These materials may have an additional protective coating. A prerequisite is a certain diameter. It should be smaller than that of the main water supply. The minimum size is 50 mm.
Plastic - polyethylene
Plastic products have built-in heating elements; they often include a calibrating cutter, which allows you to obtain an accurate connection. If the pressure in the water supply is less than 1.6 atmospheres, then saddle clamps are used. Their advantage is the uniform distribution of pressure over the entire area: it will prevent deformation of the plastic. Saddles with a check valve and a built-in cutter make it possible to weld the joint. The service life of such an insert is 50 years.
Steel and cast iron
If the first material has practically no serious flaws, then problems may arise with cast iron. Its fracture resistance requires careful handling. For this reason, it is recommended to buy products containing spherical graphite. They are more flexible. It is not recommended to use strong pressure during surgery. This type of insert requires care.
How to make a withdrawal?
How to crash into a central water supply has already been written. Since this stage is often taken on by representatives of the service organization, it is necessary to talk about what they often do on their own - how they perform a diversion from the main line. After the insertion, the branch of the water pipeline is laid in the trench, then using a crimp coupling it is attached to the shut-off valve. Upon completion of this stage of work, the pipeline is not buried, since it still needs to be tested.
The first end of the pipe is connected to the tie-in, the second to the wiring inside the house, but before this the meter is installed. Shut-off valves in the equipment area are a must. When installing the device, you need to provide another recommended element - a reverse valve. It will prevent the fluid from flowing backwards.
If the outlet is led into the house through the foundation or wall, then the hole must be larger than the diameter of the water supply: the recommended difference is about 200 mm. After installation and inspection, the remaining space is covered with oakum or an oil seal. Cement mortar is used for finishing.
Checking and adjusting system pressure
The question of how to crash into the central water supply has already been considered. However, the owners still have to make a test run, check the quality of the connections and adjust the pressure. This stage is carried out like this:
- First, the water supply is completely filled with water. To bleed air, open the taps. If the system has automatic valves, this step is simplified.
- Measure the pressure at the tapping point. For areas with low-rise buildings, 1.5-3 atmospheres is considered the norm, but a large number of plumbing fixtures increases this figure by at least 1.5 times.
- After filling the system, connect the supercharger and increase the pressure to 6 atmospheres. All connections under load are consistently and carefully checked for leaks. The minimum duration of this stage is an hour.
If no leaks are detected and the pressure is normal, this means that the insertion was carried out correctly.
Insertion into a metal water pipe
To insert into a metal pipeline, a saddle clamp with drilling is used. There are several varieties of it. Before installing the device on the pipe, it is thoroughly cleaned of rust and dirt (if any). In addition to the lower part in the form of a semicircle, in the upper part the clamp has a shut-off valve with a hole intended for drilling and the drill itself. When placed on a pipe, the parts are bolted together.
Note! To ensure a tight fit to the surface of the water supply, there are sealing rubber bands.
After securing the clamp, a hole is drilled and closed with a plug using a special screw. A similar clamp can be used as a shut-off valve. You can also take a clamp with a valve already screwed in. Once the hole is ready, the drill is pulled out and the valve is closed. Next, other necessary installation work is carried out.
A special machine can be attached to a metal clamp, consisting of a handle with a ratchet, a locking bolt, a shaft with a drill at its end and a flushing tap. All elements are enclosed in a metal housing, which is attached to the clamp using rubber seals. Thanks to the presence of a guide coupling, you can drill in a certain direction. This is how a tap into a cast iron or metal pipe is made.
Before inserting into a metal water pipe, the pipe must be cleaned of rust.
Insertion methods
Often the material of the water supply pipeline determines both the material of the branch line pipe and the insertion method. If the central or secondary pipe is steel, then it is also better to use a steel pipe. As a last resort, make a transition section in the form of a fitting made of a steel pipe with a valve, to which then connect a pipeline made of another material.
Tapping of steel pipes is done in two ways:
- using a welding machine by welding a fitting to the water supply;
- using a steel clamp without welding.
Both methods are used both when tapping into a pipeline that is under pressure and without pressure. But on high-pressure pipelines, welding is recommended to be used only in emergency, emergency cases, as well as when organizing additional safety equipment. In the normal mode of work, actions are required to completely shut off the section of the water pipeline where the tie-in is made using welding.
The algorithm for working with welding on an existing pipeline is as follows:
- a hole is dug with an excavator to a level above the laid pipeline of approximately 50 cm;
- the section of pipe into which the insertion is planned is manually cleared of soil;
- the insertion site is cleared of anti-corrosion coating and other protective layers, and the specific area of connection of the fitting or branch pipeline is cleaned to shiny metal;
- the fitting is welded to the tap;
- after the metal heated by welding has cooled, a drill is inserted into the fitting through the tap and a hole is drilled in the wall of the water supply;
- when water flows through the fitting, the drill is removed and the tap is closed (the insertion is completed, further laying of the water supply line begins from the valve on the fitting).
A mortise clamp is a simple piece consisting of two halves of semicircular shapes. These halves are put on the pipe and tightened together with bolts and nuts. They differ from ordinary clamps only in the presence of a threaded hole on one of the metal parts. A fitting is inserted into this hole, serving as part of the outlet line. The hole for the pipe can be located anywhere in the water supply system, and when screwing in the fitting, it will always be at right angles to the linear plane of the pipeline surface.
The rest of the process is similar to tapping using welding: a drill is inserted into the fitting through a tap and a hole is drilled. If the tap is of small diameter and the pressure in the water supply is within 3–4 kgf/cm², then the tap can be screwed on without any problems even after drilling (if it is threaded and not welded). Additional lines are also connected to the cast iron main using clamps.
Welding cannot be used due to the low ductility of cast iron, because it can crack in areas of overheating.
Insertion into pipes made of plastic or polyethylene occurs using plastic clamps or saddles (half-clamp with fasteners). Clamps and saddles can be simple or welded. Working with simple devices is not much different from inserting a clamp into a steel pipe. And welded saddles or clamps contain all the equipment necessary for welding. This saddle assembly is installed on the pipe in the intended location, the terminals are connected to electricity, and after a few minutes the insertion will be automatically completed.
Tapping into a cast iron pipeline
In order to drill a cast iron pipe under pressure, clamps with a special design and bimetallic crowns are used. When performing work, the following points must be taken into account:
- cast iron is fragile, so work should be carried out with light pressure;
- before drilling, the surface of the pipe is cleaned of the layer that is applied to prevent corrosion;
- Overheating of the crown is unacceptable;
- work is carried out at low speeds.
After removing the compacted layer, a dismountable saddle is mounted on the insertion point. The contact point is sealed with rubber pads. The pipe is drilled with a carbide bit, which will need to be changed at least 3-4 times during the tapping process.
The procedure for inserting a water supply into a cast iron pipe is as follows:
- dig out the pipe, clean it of rust at the cutting site;
- cut off the top layer of hot cast iron with a grinder;
- mount a dismountable saddle, put a rubber seal to seal the joint between the fittings and the clamp;
- attach the shut-off valve to the flange outlet through which the crown (cutting tool) will be inserted;
- drill a cast iron pipe, cooling the cut area;
- remove the crown from the valve and turn off the water flow.
It is also necessary to remember to ensure that the saddle pipe slopes towards the house by 2 degrees.
To tap into a cast iron pipe, you need to use drills designed for working with metal.
Rules for determining the insertion location
Typically, the connection to the water supply is made in the nearest inspection well on a straight section. The basic rule is that the outlet pipe must be laid below the freezing level of the soil.
For middle latitudes it is 1.2-1.5 meters. But the trenches should be about half a meter deeper, since a drainage layer of sand and gravel will have to be constructed.
In some cases, the pipeline is additionally insulated with foam plastic materials, and a heating cable is installed with automatic switching on at a temperature of 0-+2 degrees.
The water supply branch is equipped with a drain valve installed directly behind the tap.
Before you start digging a trench, you need to make sure that it does not intersect with other communication systems - communication cables, power supply or sewerage.
How to choose materials for insertion
Connection to the main water supply is made using pipes made of various materials - polyethylene, cast iron, steel, including those with protective coatings.
When using cast iron materials, its properties should be taken into account, especially such as increased fracture capacity. It is necessary to choose pipes made of spheroidal graphite cast iron, which is more ductile, and during the processing process do not apply significant force to the tool.
The pipe used for tapping must be smaller in diameter than the main pipe.
The connection is made with pipes measuring 50 millimeters or more.
When connecting to a plastic pipeline, products with built-in heating elements are used that can thermally make a hole, while at the same time a calibrating cutter is installed to obtain an accurate joint.
At pressures up to 1.6 MPa, saddle clamps are used in the plastic line, creating uniform pressure over the entire contact area, which prevents deformation of the plastic product.
The use of saddles with a built-in cutter and check valve allows welding in the connection, after which the service life of such an insert increases to 50 years.
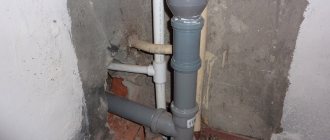
How to make a tie-in to a sewer riser yourself?
1. Mark the area on the sewer riser for the future tie-in.
2. Cut out the marked piece using a grinder.
3. Use a file to remove any burrs that have formed.
4. Apply sealant around the top of the cut.
5. Push the wide part of the compensator onto the upper pipe until it stops.
6. Treat the lower part of the cut area with sealant.
7. Install a tee on the bottom of the pipe.
8. Treat the narrow part of the expansion pipe with sealant and move it down until it stops, connecting it to the upper neck of the tee.
9. Place a plug on the tee.
With this method, the sewer riser is completely sawn and a compensation pipe is installed. And do it right. But sometimes it is impossible or not desirable to install a compensator. Then a “window” is made in the riser. There is a “clamp” type fixing plate on it.
Such an insertion is considered “emergency”. After all, sewage will cling to the cut walls of the riser and create a blockage.
Insertion on a secondary section of the water pipeline
So-called secondary pipelines branch off from any central highway, supplying water to neighboring streets. The pipes of such distributions are predominantly polyethylene; they have a smaller diameter - on average 50 mm. Typically, taps are installed at branch points of secondary pipelines, closing which simplifies the work of inserting pipes, which is available in two ways.
First:
- A 2 meter long trench is dug along the pipeline. This implementation of the problem is used mainly in relation to small diameter pipes (up to 50 mm).
- The pipe is being cut.
- A tee is mounted on the pipe, which can be welded if the pipe is metal, or simply fastened with union nuts if it is polyethylene, for example.
Second:
- An overhead clamp is installed, factory samples of which are equipped with the threads necessary for installing the taps.
- The tap is screwed on.
- A hole is drilled, which is done directly through the tap. This can be done without shutting off the water supply, since secondary pipelines are characterized by low pressure pressure.
If possible, it is necessary to install a well in the place where the insertion is made. For this, a concrete ring or a used brick as a base is suitable, followed by closing the structure with a lid with a built-in hatch.