Breakage of faucets in the bathroom is considered one of the most common annoying troubles that can happen to plumbing today. However, the market currently offers such convenient, functional and simple designs of devices that almost any home craftsman can cope with the repair. Today we will figure out how to repair the shower mixer switch in the bathroom, consider several of the most popular models and what you will have to worry about if calling a professional plumber is for some reason impossible or undesirable.
Switch Types
So, what they actually are:
Cork ones provide switching from a gander to a shower by turning a solid brass plug with slots. Tightness is ensured by its tight rubbing against the mixer body.
It is worth clarifying: the corresponding type of domestic faucets has long been discontinued, although individual examples of these exceptionally fault-tolerant products can still be found in old houses.
Push-button switches use, as the name suggests, a button with a valve on a long stem. When pressed, it turns off the water to the gander and opens the shower. Reverse motion is provided by a spring; it is only possible when the taps are closed: the flow of water keeps the valve in the down position.
Push button switch.
Devices with a brass or plastic barrel with gaskets. It is driven by an eccentric inserted into the groove of the barrel; Switching is accomplished by turning the lever approximately a quarter of a full turn. The eccentric rod is sealed by a stuffing box or, as is more common in modern mixers, by rubber ring seals. Finally, the last type of switches is ceramic cartridges with a fluoroplastic or Teflon seal. Structurally, they are closest to ceramic faucets. Mixers in the corresponding design can be easily recognized by turning the switch lever a full turn.
List of nodes
What can break in the mixer?
Crane box (screw or ceramic). It stops turning off the water. Another malfunction is observed less frequently: the tap opens, but no water flows;
- Switch for shower. It can be push-button, lever or ball-type;
- Gaskets under the spout often leak, as well as between the mixer body and the eccentrics;
- Absence or weak water pressure may mean the filter on the gander is clogged;
- The cause of a shower hose leak is a rupture of its rubber core inside the armor;
- Poor pressure of hot and cold water when supplied to the shower is a consequence of clogged nozzles of the shower head.
Types and mixers and their designs
In order to repair a bathroom faucet with a shower, it is not at all necessary to call a plumber. Any crane can be easily disassembled into parts. If a person understands its structure, then repairing a bathtub and shower mixer will be quick and effective.
To find out how to repair a faucet, you need to understand which parts of a particular design are responsible for the malfunction.
There are three main categories of bathtub and shower faucets:
Valve. This type has been known for many decades. The design consists of a gander and two valves. Older models of two-valve faucets with a worm gear are equipped with rubber gaskets, the deformation of which leads to leaks. New models are equipped with a crane-axle mechanism with ceramic discs. Holes are drilled in their centers. When you turn the valve, the holes align and this is how water flows into the spout. Valve mixer Lever. Single-lever faucets are distinguished by the presence of a cartridge where the water is mixed. At the bottom, the cartridge is fixed to the body with a nut, and at the top there is a rod on which the lever is attached. The lever controls the flow and temperature of water. Lever mixer Touch. They are controlled using a photocell responsible for turning the water on and off. As a rule, the repair of such a mixer is entrusted to professionals, since replacing sensors requires special skills. Touch faucet
Bathroom faucets differ from others by the presence of a bath-shower switch, which are also divided into several types.
If it leaks, how to prevent water leakage
The most common leak locations are:
- under the gander;
- under the lever mixer handle;
- under the valve of a two-valve mixer;
- from the shower hose connection points.
Water may leak under the fixing nut due to wear on the rubber gasket.
The problem can be corrected by replacing the worn ring with a new one - made of paronite, with a diameter of ¾ inches. In this case, the thread of the gander should be sealed with FUM tape. A leak in a lever mixer occurs due to a cartridge failure. This defect can be eliminated by replacing it with a new element.
From the author:
Hello, dear readers! When the water switch from the faucet to the shower suddenly breaks in the bathroom, this is a reason for immediate action. After all, the lack of opportunity to wash properly is definitely not something to be happy about.
What to do if calling a plumber on the same day is impossible for some reason? Fortunately, it is quite possible for you to repair your shower diverter in . This does not require a lot of experience, just some knowledge. This is what we want to offer you in our article today.
But before we find out how to repair the equipment that is so necessary for each of us, let's understand the existing types of switches. After all, it depends on the type of product how the repair will be carried out.
Types of switches
In modern mixers, spool, cartridge and exhaust switches are most often installed. Sometimes cork is also installed, but this is rather rare, since it belongs to outdated varieties. But let's talk about each in a little more detail:
The spool switch is the most popular for two-valve mixers, and has been for a long time. Externally, it looks like a handle, which is located between the valves that regulate the water supply. It is usually made of metal or plastic. Perhaps each of us is familiar with this type of equipment; the cork switch, as mentioned above, is an outdated type. Its handle is longer than that of the type described above; it is also placed between the valves. The switch got its name because the design is based on a special plug with a cutout, which, when turned, coincides with the holes for water supply. In modern stores you can see faucets with a long handle, typical of cork mechanisms. But this is just a tribute to the design; the filling of such equipment is spool-type; the cartridge version is used in single-lever mixers. It can be disk or spherical: in the first case, special ceramic plates with protrusions and holes are responsible for supplying and switching water; in the second, a carefully polished metal sphere, which also contains special holes. If the cartridge itself breaks down, it cannot be repaired. But this does not mean that you have to throw away the mixer. You can simply replace the failed element; the exhaust switch is a button. If you pull it out, water will flow from the shower head, and if you press it, it will flow from the gander. Such a system can operate automatically or be controlled entirely manually. In the first case, the advantage is that the button automatically switches to the gander when the water is turned off. That is, the next time you try to turn on the water, it will definitely not pour on your head from the shower head. With a manual system there is no such guarantee. In general, not everyone likes the push-button system precisely because of the need to pull out the handle. Doing this with wet or soapy hands is not very convenient. But, as they say, there are no comrades according to taste, so this variety is still found in many homes.
We recommend: How to make a coffee table with your own hands: description of the process and decoration options
3
We disassemble the switches - sequence of actions
The first thing that needs to be done when carrying out repair work on the mixer is to turn off the water, and then proceed according to the scheme depending on the type of switch. If you have a mixer installed with a spool or plug switch, disassemble the system as follows:
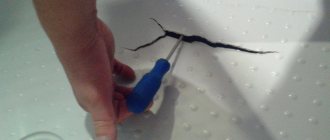
1. Remove the decorative plug from the switch by prying it off with a knife.2. Use a flat screwdriver to unscrew screw 3. After this, the switch handle can be easily removed.4. Using an adjustable wrench, unscrew the clamping nut that holds the crank.5. Next, unscrew the crank itself and the spool or plug.6. We change or clean the part.
We remove the ball switch from the mixer in the following sequence:
1. At the top of the mixer, unscrew the outlet for the watering can. This is easy to do by hand.2. After unscrewing, you will see the same locking ball, which is sandwiched between two fluoroplastic plates. You can take it out immediately, and then unscrew the handle with the rest of the switch, but you can do it easier.3. Remove the decorative plug from the switch cap.4. Unscrew the screw with a curly screwdriver.5. Remove the handle and unscrew the rod part with the gasket using a wrench.6. From below, using a gas wrench or manually, looking at the degree of density, unscrew the lower threaded fastening that holds the gander. If the thread is difficult to unscrew, lubricate it with oil.7. We take out the locking ball, clean it, change the gaskets if necessary.
Disassembling the shower ball switch
The easiest way to dismantle a push-button switch. To replace a worn spring, proceed as follows:
1. Unscrew the button, first removing the decorative plate and screw.2. We remove the rod with the spring from the hole.3. Replace the old spring with a new one. Attention, the new spring must have an anti-corrosion galvanic coating and be slightly smaller than the diameter of the previous one.4. We assemble the system in reverse order.
If water flows from under the lever with a ceramic cartridge, the handle does not turn well, or you cannot set the desired temperature, only hot or cold water flows, the shut-off valve is broken. Let's consider the sequence of replacing a ceramic cartridge, however, if you have a plastic or metal version installed, nothing will change:
1. We pry up and take out the decorative plug; usually there is a red and blue mark on it.2. Loosen the screw using a shaped screwdriver or a hexagon, depending on the model.3. Remove the lever and unscrew the decorative washer by hand.4. Using a wrench of the required diameter, unscrew the nut, not forgetting to hold the mixer.5. We take out the cartridge and inspect it. If the above problems were present, the part became unusable. We don’t throw away the cartridge, take it with us to the plumbing store and buy the same one.6. We remove blockages and lime that has formed under the cartridge, install a new shut-off valve.7. We assemble the system in reverse order. Do not tighten the nut too tightly, otherwise the cartridge body will burst.
Repair instructions for shower switch button for faucet
Push Button Switch Repair
The shower power button may stop turning off the water in extreme positions or begin to spontaneously reset from the “shower” mode to the gander when there is insufficient water pressure.
The cause of the first malfunction is the failure of the rubber seal. In this case, it needs to be replaced.
To do this you need:
- Shut off the water supply;
- Using an adjustable wrench, unscrew the gib;
- Disconnect (unscrew) the decorative cap of the button;
- Remove the rod together with the spring from the body;
- Unscrew and remove the valve;
- Remove the old o-rings from the valve;
- Install new rings of a similar shape and size (sold in the plumbing department);
- Reassemble everything in reverse order.
If the shower faucet button no longer returns to its original position when the water is turned off, then the cause of the breakdown is wear of the spring or its damage. In this case, the spring should be replaced.
Spool switch repair
If the faucet is equipped with this type of switch, water may begin to flow from under the handle over time.
The main reasons for the occurrence in this case:
- the rubber sealing rings on the crank rod are damaged/worn;
- the rubber sealing gasket on the switch box is worn out or missing;
- the crank screw is loose or the mixer box is not tightly secured.
If water oozes out at the place where the axle box is attached to the mixer body, you need to disassemble it using a wrench or gas wrench and install a new sealing gasket.
If water leaks in one of the switch positions, most likely the gaskets for sealing on the spool have become unusable. In this case, you should unscrew the spool, replace the gaskets and clean all working surfaces from limestone. Repair of the ball switch
Problems with a ball-type switch are very rare and usually arise due to excessively hard water, when lime deposits form on the surface of the working elements.
If the mixer itself is inexpensive, then the metal from which the ball mechanism is made may be covered with a layer of oxide.
In both the first and second cases, the problem can be solved by disassembling the mixer and cleaning the mechanism from plaque, as shown in the video:
Problems and solutions
So, what to do if the shower switch on the mixer breaks down in each of the cases described above? Let's move on to the common problems with each type of switch.
Suberic
Mixer tap with cork switch.
As already mentioned, these products are extremely fault-tolerant. However, they also have two diseases.
| Problem | Cause | Solution |
| Large force required to switch modes | Clamp nut overtightened | Disassemble the mixer; lubricate the plug with silicone grease; tighten the nut with moderate force |
| Leak along the plug rod | Uneven wear on the plug or body | The solution is the same as in the previous case. Viscous silicone grease will make it easier to turn the handle and fill in uneven areas of rubbing surfaces |
Button
What does repairing a switch with a gander and shower mode look like for a push-button design?
She has three typical malfunctions:
The switch does not hold water: it flows into the gander and shower at the same time. The reason is uneven wear or complete destruction of the rubber valve. It can only be treated by replacing it or, if the corresponding spare part is not on sale, by completely replacing the mixer. The button spontaneously returns to its original state after pressing with a small amount of water pressure. The reason is an excessively tight return spring. It is enough to bite off one or two turns of the spring - and the mixer starts working absolutely normally.
The return spring is clearly visible in the photo.
Finally, if the shower switch on the faucet is leaking, the cause is a worn o-ring. It again changes to a new one; rings, as a rule, are included in gasket sets for repairing domestic faucets. The price of a set rarely exceeds 20 - 30 rubles.
Hint: if the push-button switch is equipped with a gland nut, instead of a rubber seal, you can place a thread of graphite gland under it.
With a keg
Here are the diseases of this design:
The water does not shut off to the gander or shower. The reason is wear of the gaskets or, which happens much more often, destruction of the bolt securing one of them. The problem, as you might guess, is eliminated by replacing the gasket or bolt.
Useful: it’s easy to cut a gasket with your own hands from an old inner tube from a truck wheel.
The switch does not rotate to its extreme positions. The reason is the wear of the barrel or the guides in the mixer body: due to the large gap between them, the barrel stands up askew and jams.
Repairing a shower diverter for a faucet usually involves replacing the barrel; A temporary solution to the problem could be to install improvised guides made from pieces of aluminum wire into the mixer body.
If there is a leak along the rod, the rubber seal is again changed or the oil seal is filled.
A beginner may have a reasonable question: how to remove the shower switch on the mixer if the barrel does not want to leave the body?
The sequence of operations is important here.
After unscrewing the fastening screw, remove the switch lever. We unscrew the oil seal (if there is one). We take out the eccentric.
The eccentric will not allow the barrel to be removed while it is in the mixer body.
Unscrew the nut on the mixer body under the shower hose. We remove the gander. We push the barrel through the hole in the mixer body from the bottom up.
Ceramic
How do I repair a shower diverter whose handle can turn a full rotation?
Of modern mixers, these are the most fail-safe; the author cannot remember a single one of them breaking due to natural wear and tear.
We recommend: Wall-hung toilet with installation, which one to choose: we select installation kits with wall-hung toilets according to the criteria
Problems can arise only when two circumstances coincide:
Lack of filters at the entrance to the apartment or house. When repairing the water supply line, scale or coarse sand may get into it, which sooner or later will end up in the mixer. Significant physical strength of the owner with a complete lack of common sense. If you try to turn a cartridge jammed by scale by force, the result will be a little predictable: either one of the ceramic plates or the plastic retainer that holds it will break.
The repair instructions in this case are also quite predictable: the damaged cartridge is replaced with a new one. To replace, simply remove the handle and the fixing nut.
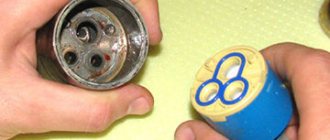
This is what the cartridge looks like.
Replacing the switching mechanism is heartbreaking
Ball switches are the most reliable, but, unfortunately, they cannot be repaired, so if you have a mixer with just such a switching mechanism, and it breaks, then you will have to buy a new one.
For cartridge, axle box and eccentric switches, the repair work will be as follows:
1. Remove the decorative plug on the shift knob. In some faucets, you need to use a wallpaper knife to remove the plug and use a screwdriver to unscrew the fixing screw that covered it. In our case, it itself is such a screw. We turn it away.
2. Remove the handle.
3. Under the handle there is either axle box mechanism or a nut securing the mechanism (cartridge or eccentric). Turn it away.
4. Take out the mechanism. The axle box or cartridge is removed entirely. With eccentric ones, only one part will be removed - the eccentric itself.
5. To completely dismantle the eccentric switch, it is necessary to remove its internal part. To do this, unscrew the spout nut by hand.
6. Remove the spout downwards.
7. Under the nut you will find a removable part of the housing. It will have to be turned away. This is very difficult to do. Wrap this part with a cloth so as not to damage the chrome plating during dismantling, and use a gas (not adjustable) wrench to unscrew this part using the body itself.
8. If you manage to do this, the inner part of the mechanism can be easily removed from the case. Overall it will look something like this:
On the right is the eccentric part, which turns away first, on the left is the inner part. If you cannot remove the inner part, you will have to change the mixer.
9. After dismantling, using the samples received, we buy the necessary spare parts in the store and assemble the mixer in the reverse order of the work described.
To replace a separate switch unit, it must be completely disconnected from the mixer.
1. Unscrew the shower hose by hand.
2. Unscrew the top nut securing the mechanism to the mixer body.
3. Remove the mechanism with the spout.
4. Unscrew the spout nut.
5. As a result, we get a switching mechanism.
6. We buy a new mechanism in the store and install it on the mixer.
How to disassemble different types of shower switch
Add to bookmarks Printable version
One of the most common problems in the operation of plumbing is the breakdown of the faucet in the bathroom. If you know how to disassemble a shower switch, you can fix the problem yourself and carry out repairs.
Types of switches
Shower switches are classified according to their design and operating principle. By design they are:
Cartridge. Most common in modern plumbing. They consist of a locking mechanism - a cartridge, which changes its position depending on the rotation of the lever; Cartridge for mixer Spool valve. Used in thin-walled or Soviet prototype mixers. They have a mechanism installed - a spool, which regulates the flow of water by rotating the rod; Types of spools Cork. They are more modern analogues of spool switches. Supplemented with a spring that holds the rod. When lifting such a switch, the spring stretches and clamps the rod in such a position that water enters the watering can. Accordingly, when you press the plug, the spring is clamped and the shower spout is closed, and water flows into the gander.
In accordance with their design features, the principle of disassembling and repairing mixers changes significantly. We suggest looking at how to disassemble the most common shower switches.
Step-by-step instructions for disassembling a plug switch
The plug switch is also in turn divided into the following subtypes:
Manual. It switches lek-gander mode only with hand pressure; Auto. After a certain time, the plug will return to the closed position; Soviet. Here the plug is adjusted by a rotating mechanism. Nowadays this design is very rare.
First you need to turn off the water in the apartment to avoid flooding or other unpleasant surprises during repairs. After this, the decorative panel is removed from the mixer, which indicates the change in temperature during the movement of the mixer handle. There is a threaded connection under the panel. Using a screwdriver, carefully unscrew the bolt and remove the upper part of the handle.
Video: step-by-step repair of a shower switch
After this, depending on the type of locking mechanism, the sequence of actions may vary:
The first thing to remove is the decorative nut from the faucet. Often it is not even screwed to the base of the mixer, so you can even remove it with your hands. Experts do not recommend using an adjustable wrench to remove it, as it can damage the outer surface of the part; Removing the decorative plate on the surface of the mixer. Under the decorative nut there is a fastening nut. She holds the locking mechanism itself. If your faucet is a cartridge type, then this lock holds the ceramic cartridge; if it is a ball valve, then the stop ball is held in place. Using an adjustable wrench, this nut is unscrewed from the tap; Then the switch is removed. Depending on the design, it can be cork (connected to the handle using a spring, when stretched, the water flow switches into the hose) and with a differtor. At the same time, the location is possible both on the side of the mixer and on the bottom of the tap; The switch is carefully unscrewed from the mixer using an adjustable wrench. When the mechanism rotates freely inside the mixer body, it must be carefully unscrewed from it without damaging the spring and gaskets; Removing the Switch Cap A spring or push-button switch consists of a stem, a spring, a locking element, and seals. To disassemble it, you need to unscrew the nut, which helps switch the water from spout to “rain”. The spring must be checked for bending and flexibility - it must be flexible enough for normal adjustment of the lock; Spring-type switch After removing the thrust nut, you need to remove the plastic washer that holds the rod. It is under it that the spring is located. It comes out carefully. Do not twist or bend the part, as this will make it unusable; After replacing or repairing the mechanism, assembly is performed in the reverse order.
When working with the Soviet type of cork switch, first the adjusting knob is unscrewed, and then the switch is removed.
Disassembly of a spool-type switch
If the shower switch is installed with a removable spool switch, then the procedure for disassembling it will have a slightly different form:
From the mixer body you need to unscrew the lower part of the structure - the switch and the hose from the shower. To do this, use an adjustable wrench or a wrench of a suitable diameter; To disconnect the hose from the switch, you need to remove the nut that holds the structure. To do this, it is convenient to use an adjustable wrench; Afterwards the switch is disconnected from the body. It must be carefully removed from the mixer.
Spool-type shower head switches are also very common, which do not need to be completely disassembled for repair or maintenance work. Simply remove the locking or decorative nut from the switch and carefully pull the mechanism out.
Shower diverter design with spool valve
Spool switches are not very popular due to the impossibility of repair. Therefore, if a leak appears on such a mixer, it is easier to immediately change it than to try to repair it.
How to disassemble a shower ball switch
Ball shut-off switches are most often installed in two-valve faucets. A special feature of such devices is that the water pressure and its temperature are regulated by a ball installed in the switch. It is connected to the stem and valves of the faucet. When the handles are rotated, the ball changes its position and sets the required jet pressure, and also switches the shower spout mode.
Completely disassembled two-valve mixer with spare parts
Step-by-step instructions on how to disassemble the shower ball switch (gander - watering can):
The first to remove is the clamping nut at the top of the mixer, which is responsible for securing the hose from the shower to the faucet body. It can be easily removed using a flat screwdriver or a utility knife; The decorative plate has been removed from the faucet. After removing the shower and nut, there will be a free hole in the faucet for the bushing, in which there is a hexagonal plate holding the locking ball. To remove the switch, you need to unscrew the fluoroplastic plate with a hexagon and pull it out. Do not press too hard so as not to break the fastening; Hole for the sleeve Only after this the handle is unscrewed, with the help of which the position of the ball is adjusted. First, the decorative plate is removed. There is a bolt under it; it needs to be screwed in with a screwdriver, preferably with a stop. If the thread is difficult to unwind, you can try applying a small amount of oil. Do not apply excessive force so as not to break the fastening; The handle can be easily removed without keys; it is not mounted on a thread (marked 1 in the photo). Please note that the handle is almost always made of silumin, which is very fragile. Therefore, if it is difficult for it to “move away” from the body, there is no need to hit or screw it hard; Switch handle that needs to be removed Under the handle there is a switch rod, it needs to be unscrewed like a standard thread. After this, it can be easily removed from the base and can be repaired or inspected.
When you assemble the mixer and switch to their original position, it is recommended to screw FUM tape onto all threaded connections, and also replace gaskets and rings. A preventive inspection should be carried out once every six months, this will prevent wear of the seals.
Source: www.kanalizaciya-stroy.ru
This is interesting: Do-it-yourself biofireplace - drawings, dimensions
Necessary tool
Before you begin the “treatment”, you will need to assemble and prepare the instrument. You will probably need a screwdriver or even several, pliers, keys, a wallpaper knife with a thin blade, as well as special hex bits. This is the minimum kit required to restore a faucet or shower switch in a bathroom.
Flat head screwdriver
Using a flat-head screwdriver, the components are disassembled (the screws are unscrewed). It can also be used to clean minor deposits of dirt and salts, and to pick up the decorative plug that covers the inside of the mixer or switch.
Pliers
Pliers are convenient for unscrewing stuck bolts and hexagons. They are also used if you need to hold a part on one side and tighten (unscrew) it on the other. The grooved notch on the jaws firmly presses against the surface, preventing it from slipping out.
Wallpaper knife
A special knife with a narrow retractable blade is suitable for cleaning threads, and it also cuts the gasket. During operation, the cutting part moves out of the body and is fixed. After finishing, he hides again. This knife is as safe as possible.
adjustable wrench
A wrench with a variable distance between the jaws (adjustable) is convenient because it works over a wide range. Control is carried out by rotating the thumb: this is much more convenient than constantly holding keys of different sizes, depending on the specific size of the switch shank being unscrewed, the bolt head.
Gas key
Additional gripping force is created by bringing the handles of the gas wrench together. The principle of operation is similar to that of an adjustable one. With a certain amount of skill, you can twist (hold) smooth, cylindrical parts with it. But there will inevitably be jagged marks on their surface. Therefore, working with soft brass with an adjustable wrench is not recommended, only as a last resort!
Hexagons
In modern faucets, in addition to standardized screws with a Phillips or flat slot, they use fasteners with a recessed hexagonal recess. Such a bolt requires a specific wrench; it cannot be unscrewed with a regular one.
Trouble-shooting
Since there are many possible causes for poor switch performance, here are a few of the most common situations to consider.
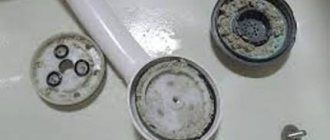
Deposits of salts and limescale can be quickly removed using ordinary sandpaper. It is better for this purpose to take material with the finest abrasive layer. A professional cleaning product will help improve the effect. But not everyone can find it in stores. Therefore, GOI paste can replace it.
If in a pull-out type of product the switch button returns to its original position without permission, you can shorten the spring slightly. Literally 2 or 3 turns of the spring will be enough to remove for the mechanism to start working correctly. But this method does not always help. After the owner removes the shower diverter on the faucet, in addition to the spring itself, it is recommended to replace the seal.
To perform the replacement correctly, it is better to watch several practical videos.
Required Tools
You can’t start renovating a shower stall without being prepared for the entire process from start to finish. The main thing is the tools. To solve a certain problem, characteristic keys and other tools are required.
There is a standard set of available tools that will help you repair the faucet in a matter of minutes:
- Flathead screwdriver.
- Pliers.
- Jack knife.
- An adjustable wrench (it is better to take a compact sample to make working with plumbing more convenient).
- Gas key.
- Hexagons.
Replacing O-rings
The push-button type of switches has become widespread, but it has several disadvantages. The main disadvantage of this type of design is considered to be the unreliability of the seal rings. They are all made of rubber. This means that untimely maintenance can lead to leaks.
Experts solve this problem in two ways:
- Fast - includes the process of stripping rubber products and softening them.
- Major - change all rings to new ones.
If the shower switch on the faucet breaks due to failure of the sealing elements, you must adhere to the following steps:
- use a wrench to unscrew the switch;
- the rod is removed;
- old rings are removed. They are replaced with new rubber products;
- the structure is assembled to its original state. In this case, it is necessary to ensure that the parts are correctly positioned in their places.
Replacing the shift spring
The derailleur spring can break at any time, which is also a common problem.
The best way out of the situation would be to replace it:
- remove the spout that leaks along with the shower hose (use a wrench);
- remove the adapter;
- remove the screw and plug;
- remove the rod. It houses a spring;
- replace the spring. Its price is generally low;
- put the structure back together.
Basically, the time to complete this operation does not exceed 40 minutes - 1 hour.
Note! When removing the spout, unscrew the nuts carefully so as not to strip the threads.
Types of faults
Bathrooms often have faucet devices that have shower switches. Of course, these types of structures are quite convenient; if necessary, you can always switch the water from the tap to the shower or vice versa. But do not forget that this part may fail. And if the main problem is not identified in a timely manner, you will have to completely replace the mixer.
If you suddenly need to repair the faucet in the bathroom and the shower switch, then this can be understood without much difficulty. Usually, when a breakdown occurs, the device begins to leak.
Possible causes of switch failure:
- the occurrence of a leak in a single-lever device;
- button closure is observed;
- simultaneous flow of water into the shower and into the main tap area;
- weakened water pressure supply;
- leakage of the water control mechanism.
If the device of the push-button switch is familiar, then usually the problem of its breakdown is quickly identified. Therefore, if you have never had to repair this type of faucet, it is better to entrust the repair to a professional. But it is worth noting an important condition when a bathroom faucet with shower is being repaired. Tools should only be used to tighten the nuts; the rest is best done by hand, so as not to overtighten important elements of the structure and completely damage it.
Main causes of failure
The recently installed, sparkling chrome faucet suddenly stopped performing its functions and malfunctioned. What is the reason - a factory defect or improper operation of the mixer? In reality, there are more than one factors influencing the failure of switches and taps. These include increased water hardness, the use of cheap materials in construction, and general pollution. Let's look at them in detail.
See also
Why does a washing machine take a long time to wash, the reasons for the breakdown and how to fix it
Poor quality material
Modern manufacturers are guilty of trying to replace steel and non-ferrous metals with cheap silumin alloys and even plastic. In this case, durability drops catastrophically. It is impossible to figure out whether it is metal or plastic coated with an anti-corrosion layer without expertise and professional knowledge. Consultation with sellers and reviews of the manufacturer can help. A reduced price should alert the buyer: there is certainly some kind of catch hidden there.
Dirt
Contamination that gets into the switch cannot have a positive effect on its operation. These include salts, dust, grease - all together this complicates the normal operation of the device. After all, this is not a tank; it will not work in extreme conditions.
Hard water
Plumbers know that hard water rich in salts is a potential source of problems. Reacting with metal, it forms stable compounds, simultaneously destroying the structures of the mixer and switch. Rubber gaskets and rings suffer from water, lose their elasticity and become hard.
In rare cases, the entire assembly will have to be replaced. Therefore, it is important to pay attention in time, perform cleaning, and preventive maintenance of the mixer.