Bulgarian – an extremely necessary tool that is widely used in any construction work. But even the highest quality tool sometimes breaks down at the most inopportune moment.
One of the most common problems is disk . It arises due to the large volume of the consumable itself and is most often found not in all types, but only in angle grinders. At the moment when cutting begins, a small impact occurs - force pressure is applied directly to the consumable itself.
With a disc size of up to 12 cm, the impact is insignificant, and with a component of 12 or more, the nut that holds the disc is tightened even more. This process occurs due to the influence of inertia. Because of this, it is not always possible to dismantle the consumable using conventional methods.
In order for a tool to last for an extremely long time, it must be used correctly. Also, timely maintenance will avoid problems with the tool in the future.
Therefore, in this article we will tell you in detail how to remove a disc from an angle grinder using standard and unusual methods.
Specifics of using an angle grinder
The tool has increased functionality. It can be used to clean surfaces. To do this, it is necessary to equip the grinder with special steel rods and sandpaper petals - such a circle will act as a cleaner.
How else can you use an angle grinder:
- for grinding - a concentric attachment with Velcro is screwed onto the tool. The abrasive is attached to the latter. Immediately before starting work, the functionality of the connection is checked;
- for grinding with abrasive wheels - the last component must be used extremely carefully. Overexposure may cause the abrasive to break.
By installing special cutting discs, the grinder can also be used for cutting concrete. Due to its versatility, the tool is in wide demand for any type of work.
How to remove the cleaning disc on an angle grinder
First of all, it is necessary to carry out preparatory measures, namely:
- disconnect the grinder from the network - otherwise you will get an electric shock or there will be a short circuit;
- press the spindle rotation button;
- While holding the stop button, you need to unscrew the flange nut.
It would also be useful to carefully inspect the body of the angle grinder. Perhaps some component has failed due to jamming. This will allow you to find out as accurately as possible what the problem with the grinder is.
General information
If you follow everything described in the instruction manual for replacing a disc on an angle grinder,
everything should be done as follows:
Unplug the power tool cord from the outlet.- Press the button to lock the rotating spindle.
- While you hold the angle grinder lock button, use an open-end wrench to unscrew the flange nut. Turn the grinder key in the direction of rotation of the attachment. If you press the button with one hand and find it difficult to operate the key with the other hand, you should ask for help.
- Remove the old disk from the shaft that is no longer needed or requires replacement.
- Install a new drive.
- Secure it manually with a nut or an allen wrench. At the same time, you should hold the stopper with your other hand, and you do not need to tighten the nut too much.
- Plug in the angle grinder for ½ minute at maximum power. If the disk rotates freely, without beating, and does not touch the protective casing, you can begin work.
The angle grinder should come with an open-end wrench.
Inexpensive grinders often come with a key that is not of the best quality, which can quickly break (although this often happens with tools even from the best manufacturing companies). In the end, it even happens that the key can simply be lost. How should you install and remove the disc on an angle grinder in this case if there are no suitable tools at hand?
Why do you need to change the disc on an angle grinder?
As practice shows, the problem rarely occurs at idle. This is also true when working with light wheels and grinders that have a soft start.
The problem immediately begins to appear at the moment of increasing speed and upon contact with an object that needs to be cut:
- material resistance provokes a sharp decrease in revolutions and rotation speed;
- by inertia, the angle grinder motor still rotates, engaging the gearbox and spindle;
- Often, the problem is aggravated by the high power of the grinder .
Due to the above-mentioned problems, it is not always possible to remove the disk using the usual methods. Therefore, we will consider all methods of dismantling the consumable.
Safety regulations
Basic safety rules when working with the tool:
- When starting to work with the tool, you should only wear thick, long-sleeved clothing and a mask;
- It is strongly not recommended to remove and change the protective casing;
- mandatory checking of the tool for malfunctions;
- It is prohibited to stand in the cutting area; you must take a side position;
- movements of the switched-on grinder should be from yourself;
- no need to put in extra effort to make the cut.
All actions to replace component materials should be carried out only by disconnecting the device from the power supply.
There are many ways to unscrew an angle grinder. But the main thing when using these methods: do not neglect basic safety precautions and carry out all actions only when the device is disconnected from the power supply. Simple techniques should be used first. And only if they do not lead to results, proceed to drastic measures.
How to unscrew a disc on an angle grinder when clamped with a nut
During intense cutting, the disc breaks and is clamped by the clamping nut. When such a situation arises, you can use the standard wrench that comes with the kit or a gas tool. But the mentioned means do not always provide the desired result.
The dismantling itself can be done much faster and easier. To do this, you need to perform the following operations:
- use pliers;
- use the above-mentioned tool to break the disk so that it completely disintegrates;
- You must first take care of personal protective equipment, namely a helmet or goggles.
Using protective equipment is a mandatory step. This will avoid injury due to fragments.
Next, using a metal plate (MP), grind off the remains that remain in the grinder. In this case, the metal plastic should be less than the disk in thickness.
How does stitching happen:
- The grinder turns on;
- the metal plate is clamped with pliers;
- then, the disc is carefully ground down using MP.
After completing the above steps, the nut on the angle grinder can be unscrewed without a special key.
What solution to the problem is offered by specialists and amateurs + (Video)
- Install a newspaper gasket under the nut;
- Place a gasket from a plastic bottle under the nut;
- Replace the nut with a nut of a different design.
What is a newspaper gasket? This is a paper washer the size of a nut. It is put on the installed disk, and a nut is screwed on top. This piece of paper was a stumbling point, because the safety inspection always spoke about the harmfulness of such a decision.
Representatives of safety authorities treat the installation of gaskets made of any other materials in the same way:
- Cardboard;
- Paronitis;
- Gaskets made of various plastics;
- Rubber gaskets of various thicknesses.
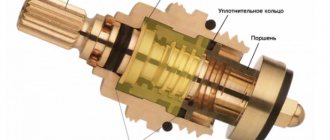
But there is a solution that does not contradict safety requirements and allows you to install and remove the disk normally. This is a special nut that consists of two elements - a nut and a pressure washer. The use of such a nut does not require any shims, because with it the disk does not jam.
If you don’t have a special key at hand, then craftsmen suggest doing without a key. This does not mean that you can do without a key at all, but use a “gas key” or other device. To do this, you need to hold the latch, tighten the nut with a gas wrench and unscrew it. This way you can replace a jammed disk, but this is a very inconvenient operation for one person.
There are also suggestions to hold the disk with your hand and unscrew it. Maybe, but it’s unlikely that you’ll be able to change broken disks this way. It is better to use wrenches that are designed for removing and installing disks.
How to avoid replacing a disc on an angle grinder
Want to avoid costly repairs? Then you must initially take care of the safe and problem-free operation of the device:
- Place a cardboard or plastic washer between the disc, flange nut and spindle head. Due to this, you will provide protection against jamming;
- correctly install the abrasive wheel - the front side of the component is mounted on the support flange. In this case, it is necessary to avoid contact of the element with the nut. This method involves using a standard metal ring as a fuse;
- Weld a nut onto the clamping flange. The latter will provide the ability to press the consumable without the use of special tools. Using a standard wrench will suffice.
In addition to the above recommendations, tightening must be carefully monitored. When installing the disc on the angle grinder, you do not need to apply too much force. Otherwise, in 100% of cases this will cause jamming of the consumables and breakdown of the expensive grinder.
The nut is stuck - how to unscrew it?
Removing a disc on an angle grinder if it is bitten is not so easy, especially without damaging the cutting element or tool. We will also consider several options for action.
Replacing a counter-rotating disc
This method has several advantages - it can be done without a key and with a broken spindle lock. Beginners in working with angle grinders mistakenly believe that if the stopper breaks, it is almost impossible to unscrew the nut. However, this is not the case. You don't even need keys.
The point is that the abrasive wheel needs to be rotated in different directions. Wearing thick gloves, you need to hit the cutting edge of the circle several times. This is what will ensure variable movement in different directions. As a rule, a couple of sharp blows are enough so that the nut can be easily unscrewed.
Open-end wrench and socket head
In this case, you will have to slightly modify the existing standard tools - a 17 mm open-end wrench and a 24 mm socket. The thickness of the key is ground down to 4 mm. 4 protrusions are machined on the head and fit into the holes of the retaining nut.
After preparation, the key is placed in the space under the disk, and the head is put on the flange of the angle grinder and rotated in the direction opposite to the rotation of the wheel. After this, you can easily remove it and install a new one.
Heat
This is one way to remove a disc from an angle grinder without a key. The fixing nut is heated with an industrial hair dryer or a gas burner. After this, the flange will unscrew much easier. However, there is a risk of damage to the plastic parts of the angle grinder or gearbox.
With a nail
For these purposes, a 100 mm nail is best suited. It should be bent into a U-shape so that the ends fit freely into the holes of the clamping flange. The tip and cap are removed. By inserting a nail into the holes, the latch is unscrewed. If the manual effort is not enough, then add a nail or screwdriver in the form of a lever.
Using a gas wrench
The use of this tool is justified by an increase in the applied moment of force due to the increased arm. Using a gas wrench will make it much easier to unscrew a jammed connection. However, when eliminating snagging, it is important to remember that if you apply excessive force, there is a risk of damaging the spindle lock or clamping nut.
Using a rotary hammer or drill in chiselling mode
You can unscrew the disc on an angle grinder without a key using a drill or hammer drill, having first switched it to jackhammer mode. A suitable drill, most often 6 millimeters, is used as a working attachment. Place the drill against the edge of the hole in the clamping nut, fix the movement of the spindle and briefly turn it on to move it from place. This method allows you to turn away even very complex snacks.
Tapping the nut
This method is similar to the previous one, only you can use a suitable metal rod or chisel. Having fixed the spindle head, tap along the edges of the clamp holes in the direction of movement of the wheel. By slightly moving the lock from its dead point, you can unscrew it by hand. However, the method is not the most harmless for the tool - the mounting holes for a standard key are damaged.
Cutting wheel destruction
You can unscrew a jammed nut by completely destroying the disk. If there is already damage, you can break it off with your hands, but most often this will not be possible. It’s better to take a hacksaw or metal blade and cut it. This will leave you with a center ring and hard-to-reach pieces. Having found a suitable plate, holding it in a vice, grind off the remaining abrasive on it to a metal ring. After this, it will be easily unscrewed with a standard key.
The most radical way to unscrew a jammed clamp nut is to cut it. It is advisable to resort to it only in extreme cases. Of course, you can find a new one, but you will have to spend your time and money. It is not uncommon for spare clamping elements to be included in the delivery set of an angle grinder.
Method 2 – How to remove a disc from an angle grinder with a key
Pretty standard way. It involves the use of a special key that comes with the grinder. Initially, you need to fix the spindle. The disk is installed on the latter, and the clamping occurs due to the flange nut (FN).
Dismantling of the FG is carried out with an open-end wrench; for this purpose, the flanges are equipped with holes. The key pins enter into the latter and removal is carried out.
How to dismantle:
- to clamp the spindle, press the button;
The latter is located on the reverse side. Then, using an open-end wrench (RK), the latch is clamped - you cannot release it, because the disk will rotate.
Does the disk rotate clockwise? Then the open-end wrench must be rotated counterclockwise and vice versa if the disc goes counterclockwise. It is important to understand here that the flange must give in and move.
If this happens, then the component can be safely unscrewed. After this, the old disk is easily removed and a new one is installed.
- use of a gas key (GK);
When using such a tool, you need to take into account the fact that the tool has increased shoulder strength. Therefore, in the process of activation, it has a powerful effect on the parts of the angle grinder.
This should be understood as a gas wrench can easily damage, tear off parts or even “kill” the gearbox. Therefore, it is necessary to use HA with extreme caution.
Important: Any manipulations with the grinder should be done only after the tool is completely disconnected from the network. If you do not take into account the high speed of the grinder, then injuries cannot be avoided.
There is also a large amount of waste to consider. Working with an angle grinder involves the presence of a significant amount of metal shavings and dust.
Therefore, as mentioned above, first of all you need to take care of personal protective equipment (PPE) - goggles or a helmet. Otherwise, emergencies cannot be avoided.
PPE provides more than just safety. With glasses or a helmet, you can pay much more attention to working with the angle grinder. This will certainly increase the quality of the result.
Also, optimized application will increase the efficiency of the grinder. This will allow you to use materials such as abrasive wheels more efficiently.
It is worth remembering that the disc in the grinder is installed in several ways. Self-assembly is notable for the fact that during the biting process the disc jumps forward. Therefore, this type of installation is safer in contrast to the “hands-on” installation method.
Tip : To work without clamps, long metal workpieces should not be cut to the end. It is enough to leave only 2 mm of metal. You can easily break it off and at the same time protect yourself from jamming of the angle grinder.
It is more efficient to process small workpieces directly if they are pressed with a vice or clamp to the workbench. The pressure density directly affects the quality of the cut and safety.
How to choose a circle for an angle grinder
When choosing the right attachment for an angle grinder, you need to pay attention to the following points:
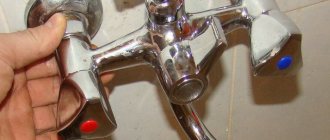
- We select the required diameter of the disk (it should not exceed the maximum permissible size of the nozzle for a particular model of angle grinder, which is limited by the size of the protective casing) and the area of its use. The area of use is indicated by the name of the disc: cutting, grinding, sharpening, etc. The type of disc can tell you what material it works with. But often manufacturers designate the type of material using noticeable stripes of a certain color: green - concrete; blue - metal and so on. Sometimes the disc is marked with a clear symbol of the type of material that the attachment is designed to work on.
- Examine the markings on the disc itself. It consists of numbers and letters of the Latin alphabet. The initial letters indicate the type of abrasive: A - corundum; AS—electrocorundum; C—silicon carbide. Next are the numbers indicating the grain size of the abrasive inclusions. This indicator affects the thickness of the material being removed. Non-ferrous metals are processed with large (rougher to the touch) grains. They work on soft surfaces with good performance. Fine-grained wheels are used to cut, peel, and grind workpieces made of various grades of steel. At the end there are letters that indicate the hardness of the binder material. Hardness increases with increasing serial number of the letter. An important rule: the softer the bonding material, the harder the material this attachment can work with. And vice versa, the harder the disk bond, the softer the workpiece material should be. The final part of the inscription consists of numbers indicating the maximum rotation speed. Its value is presented in revolutions/minute or meters/second.
Be sure to study the disc labeling: all the necessary information is indicated here
- It is extremely important to consider the capabilities of the specific model of grinder for which the disc is selected. Power, rotation speed, the presence of a manual switch to change the speed mode or automatic switching to the desired speed - these characteristics must be taken into account when choosing a disk.
Method 3 - How to change a disc on an angle grinder without using a key
A special tool may not always be at hand. Therefore, in some cases, maintenance of an angle grinder associated with replacing an old disk with a new one may become somewhat more complicated.
But other means come to the rescue, such as a gas key. We have already talked about it above, so we will analyze in more detail the specifics of its operation. To work with a tubular or gas wrench, it is necessary to open it as far as possible to fit around the flange.
When turning the key, the spindle must be held with a metal plate - this was also discussed above. In most cases, a gas wrench helps. But there are situations when even he is not able to help.
In addition to the gas key, it is worth trying the “tapping” method. To do this you need:
- take a metal rod or thin chisel;
- fix the angle grinder spindle as tightly and securely as possible;
- Gently tap the edge of the flange to displace the nut.
In this case, the blows must be performed in the right direction. The latter is equivalent to the direction of rotation of the disk in the angle grinder . Regarding safety, this technique is characterized by an increased danger associated with damage to the flange mechanism. Therefore, this method should be used only if other methods do not help.
Types of discs for grinders
Angle grinders are widely used in construction and repair technological operations. Grinder discs differ from each other:
- dimensions of outer diameter and thickness;
- material and manufacturing method;
- purpose and maximum rotation speed.
Choosing wheels for an angle grinder requires knowledge and consideration of the features of not only the workpieces being processed, but also the capabilities of the tool itself.
Cut-off
The most used wheels for angle grinders are also called abrasive wheels. They are classified according to different criteria. There are discs for working with metal, stone, and wood. There is also a diamond disc, which is used to work with the most durable and hard materials (reinforced concrete, porcelain stoneware, tiles, marble, granite and other natural and artificial stones).
Let's give a brief description of each type.
A common feature for all cutting discs is classification by outer diameter and thickness. The outer diameter is:
- 115 mm for small household grinders;
- 125 and 150 mm for average power and weight angle grinders;
- 180 and 230 mm for powerful professional tools.
The thickness of the discs varies from 1 to 3.2 mm. It depends on the size of the nozzle: discs with a large diameter have greater thickness; medium and small disks - any. The choice of disk thickness is influenced by:
- speed of rotation of the working body of the grinder;
- expected load.
Cutting (abrasive) wheels for metal
These wheels are used to work with body sheet steel (disc thickness from 1 to 1.6 mm) and long rolled steel: reinforcement, round timber, channel, angle and other types (disc thickness from 2.5 to 3.6 mm). There are special attachments for working with stainless steel, aluminum, cast iron and other metals.
Metal cutting disc for grinder
Data about this is available on the surface of the disk in the form of markings and a colored stripe. Abrasive discs consist of several layers of fiberglass mesh onto which bakelite abrasive material (silicon carbide, corundum, electrocorundum) is pressed on both sides under high pressure. The reinforced abrasive discs are then placed in a heat treatment oven to gain strength. The set heating temperature is 200 degrees. There the mass is sintered and becomes strong and resistant to fragmentation.
Abrasive discs for stone
They are absolutely identical to metal discs and differ only in the abrasives used.
Circle for stone
For wood
They are made of high-strength steel and equipped with sharp teeth along the outer diameter. These nozzles work on the circular principle and are quite dangerous to operate. It is recommended to permanently fix the angle grinder using a special device.
Wood cutting disc for grinder
Diamond
They are used for cutting high-strength materials from natural and artificial stone.
Diamond blade for stone grinder
There are different types of diamond blades for concrete, reinforced concrete, and stone. They differ from each other in the fractionation of diamond coating and the type of cutting edge - solid, with large or small slots, notches. It is important to know that the diamond blade is not used for working with metal workpieces. It is difficult to understand the purpose of diamond discs from their appearance. The best option is to consult a sales consultant before purchasing or carefully study the package supplement.
Some manufacturers of diamond blades paint the front side, depending on the material for which they are intended:
- green - for granite;
- yellow - for plaster and tiles;
- blue - for marble and concrete;
- gray - for granite ceramics and tiles;
- orange - for brick.
A diamond blade with a segmented cutting blade is used for dry cutting of stones. Wheels with a continuous cutting edge require water cooling. Turbo discs with slots in the body of the wheel operate at a higher rotation speed than discs with a segmented blade.
Grinding and roughing
Grinding wheels are divided into four types:
- Using flap (emery) attachments, remove old paint, primer or varnish, and sand wooden products.
This is what a petal disk looks like
- Special wire wheels eliminate rust and remove stubborn dirt.
- Diamond modifications in the form of a bowl are used to polish stone products.
- Metal surfaces are polished with plastic or rubber discs. You can attach replaceable discs with sandpaper, felt, sponge, or cloth to the plates.
Most grinding discs work with special pastes or liquids that include fine abrasives. These attachments are used to grind the surfaces of any materials, including car body parts in car repair shops.
Method 4 - How to unscrew a disc on an angle grinder without a key using a nail
It is worth noting that a damaged disk can be removed with a simple key made from an ordinary nail. Such a tool must have a size of 100 mm or more.
How to make a nail wrench with your own hands:
- the workpiece must be bent into a U-shape. In this case, the distance between the legs should be equal to the holes in the flange itself;
- Use a hacksaw to cut off the head of the nail and its tip.
Just two operations and the homemade key is ready for use. To unscrew a disc on an angle grinder using this tool you need:
- fix the spindle;
- gradually unscrew the fastener.
It happens that due to inertia the nut is tightened very tightly. This problem is also easily solved. You need to use a larger lever - insert another “hundredth”. And then the disc can be easily removed.
How to make a replacement
It is already inconvenient to cut with such a disc.
Discs for an angle grinder are a consumable material; when cutting, they wear out quite quickly. A worn out disk must be replaced. Let's see how to do this using our Interskol-115 angle grinder as an example.
Attention! Before work, make sure that the machine is disconnected from the electrical network!
Step-by-step instruction
The disc is mounted on the angle grinder spindle with a clamping flange with an M14 thread. To unscrew the flange, the grinder kit includes an open-end wrench. Its pins cling to the flange holes.
An open-end wrench will unscrew the flange
To unscrew the flange, the spindle must be locked. To do this, a clamp is made on the side of the case opposite to the disk. When you press the button, the cotter pin enters the hole in the driven disk of the gearbox and prevents the spindle from rotating.
The button locks the spindle
Insert the open-end wrench into the flange holes. With our right hand we press the lock button, at the same time with our left hand we turn the key counterclockwise and remove the flange from its place.
An open-end wrench is inserted into the flange holes
Our grinder rotates clockwise. If you have a different direction, remember - you need to unscrew in the direction of rotation of the disk.
If the flange gives way, unscrew it by hand, remove it and put it aside.
Top flange removed
We remove the old disk. We don't need it anymore, we can throw it away.
Old disk removed
Remove the bottom flange.
Bottom flange removed
During intensive sawing, a hardening of burnt metal and abrasive particles is formed on the inside of the casing. Let's use a steel brush to clean the casing.
The brush cleans the casing
We install the lower flange on the spindle, making sure that the flats on the flange coincide with the grooves on the spindle. Place a gasket on top.
Bottom flange and gasket installed
If your grinder does not come with gaskets, such a washer can be cut out of cardboard or tin.
We put the disk in place and cover it with the second gasket.
New disk installed
Thanks to the gaskets, if the disc gets stuck in the material and breaks, you can still easily unscrew the flange.
We tighten the upper flange by hand against the direction of rotation of the wheel (in our case, clockwise), holding the abrasive disc. With your right hand, press the lock button and twist it by hand until you feel resistance. Insert the open-end wrench and tighten it a little more, no more than a quarter turn. There is no need to tighten the flange too much; the disc will warp.
The disk has been replaced, the angle grinder is ready for work
At this point, the replacement of the disk is completed, you can continue sawing. Sometimes when changing a disk, obstacles stand in the way of the master. We will consider what to do in such situations further.
Method 5 – How to replace a disc on an angle grinder using a torch
Situations arise when none of the above methods can help. Then you need to use a gas burner.
The essence of the principle is to heat the nut. The latter will expand under the influence of high temperatures due to certain properties of the metal. And then it can be cranked out.
There is another method, but it is very crude. To remove the nut, you can cut it with a hacksaw. But this method is very sloppy and will require additional costs to purchase a new component.
You can also use penetrating lubricant. It will lubricate the nut and make it much easier to unscrew.